1. Introduction
This manual provides detailed instructions for the setup, operation, maintenance, and troubleshooting of your LINKMICRO LM208S 4K HDMI Digital Microscope and LINKMICRO LM115 LCD Digital Coin Microscope. Please read this manual thoroughly before using the devices to ensure proper function and longevity.

Image 1.1: The LM208S 4K HDMI Digital Microscope (left) and LM115 LCD Digital Coin Microscope (right).
2. Safety Information
Observe the following safety precautions to prevent damage to the devices or personal injury:
- Keep the microscopes away from water and moisture.
- Do not attempt to disassemble or modify the devices. Refer all servicing to qualified personnel.
- Use only the power adapters supplied or recommended by the manufacturer.
- Avoid direct exposure of the eyes to the LED lights for extended periods.
- Store the microscopes in a clean, dry environment when not in use.
3. Setup Instructions
3.1. LINKMICRO LM208S 4K HDMI Digital Microscope
- Unpack Components: Carefully remove all components from the packaging. Verify that all parts are present: microscope unit with 10.1-inch screen, metal stand, ring light, gooseneck lights, power adapter, HDMI cable, and 64GB memory card.
- Assemble the Stand: Attach the microscope unit to the metal stand. Ensure it is securely fastened.
- Install Ring Light: Mount the 56-LED ring light around the microscope lens. Connect its power cable if separate.
- Attach Gooseneck Lights: Secure the flexible gooseneck lights to the base of the stand. Position them as needed for illumination.
- Insert Memory Card: Locate the memory card slot on the microscope unit and insert the provided 64GB memory card.
- Power Connection: Connect the power adapter to the microscope unit and then to a power outlet.
- HDMI Connection (Optional): For external display, connect an HDMI cable from the microscope's HDMI output to a 4K compatible monitor or TV.

Image 3.1: LM208S microscope components and basic assembly.
3.2. LINKMICRO LM115 LCD Digital Coin Microscope
- Unpack Components: Remove the LM115 microscope unit and its 7.3-inch metal stand from the packaging.
- Assemble the Stand: If using the stand, attach the LM115 microscope unit to the metal stand. Ensure it is stable.
- Power Connection: Connect the power cable to the LM115 unit. It can also be powered via USB.

Image 3.2: LM115 handheld microscope and stand for setup.
4. Operating Instructions
4.1. LINKMICRO LM208S 4K HDMI Digital Microscope
- Power On/Off: Press the power button on the microscope unit or remote control to turn the device on or off.
- Focus Adjustment: Rotate the focus wheel on the microscope body to achieve a clear image on the 10.1-inch IPS screen.
- Magnification: Adjust the distance between the lens and the object using the stand's height adjustment mechanism to change magnification.
- Lighting Control:
- Ring Light: Use the dial on the ring light to adjust its brightness.
- Gooseneck Lights: Position the flexible gooseneck lights to illuminate the object from different angles.
- Bottom Lights: If using the slides holder, activate the bottom lights for transparent samples.
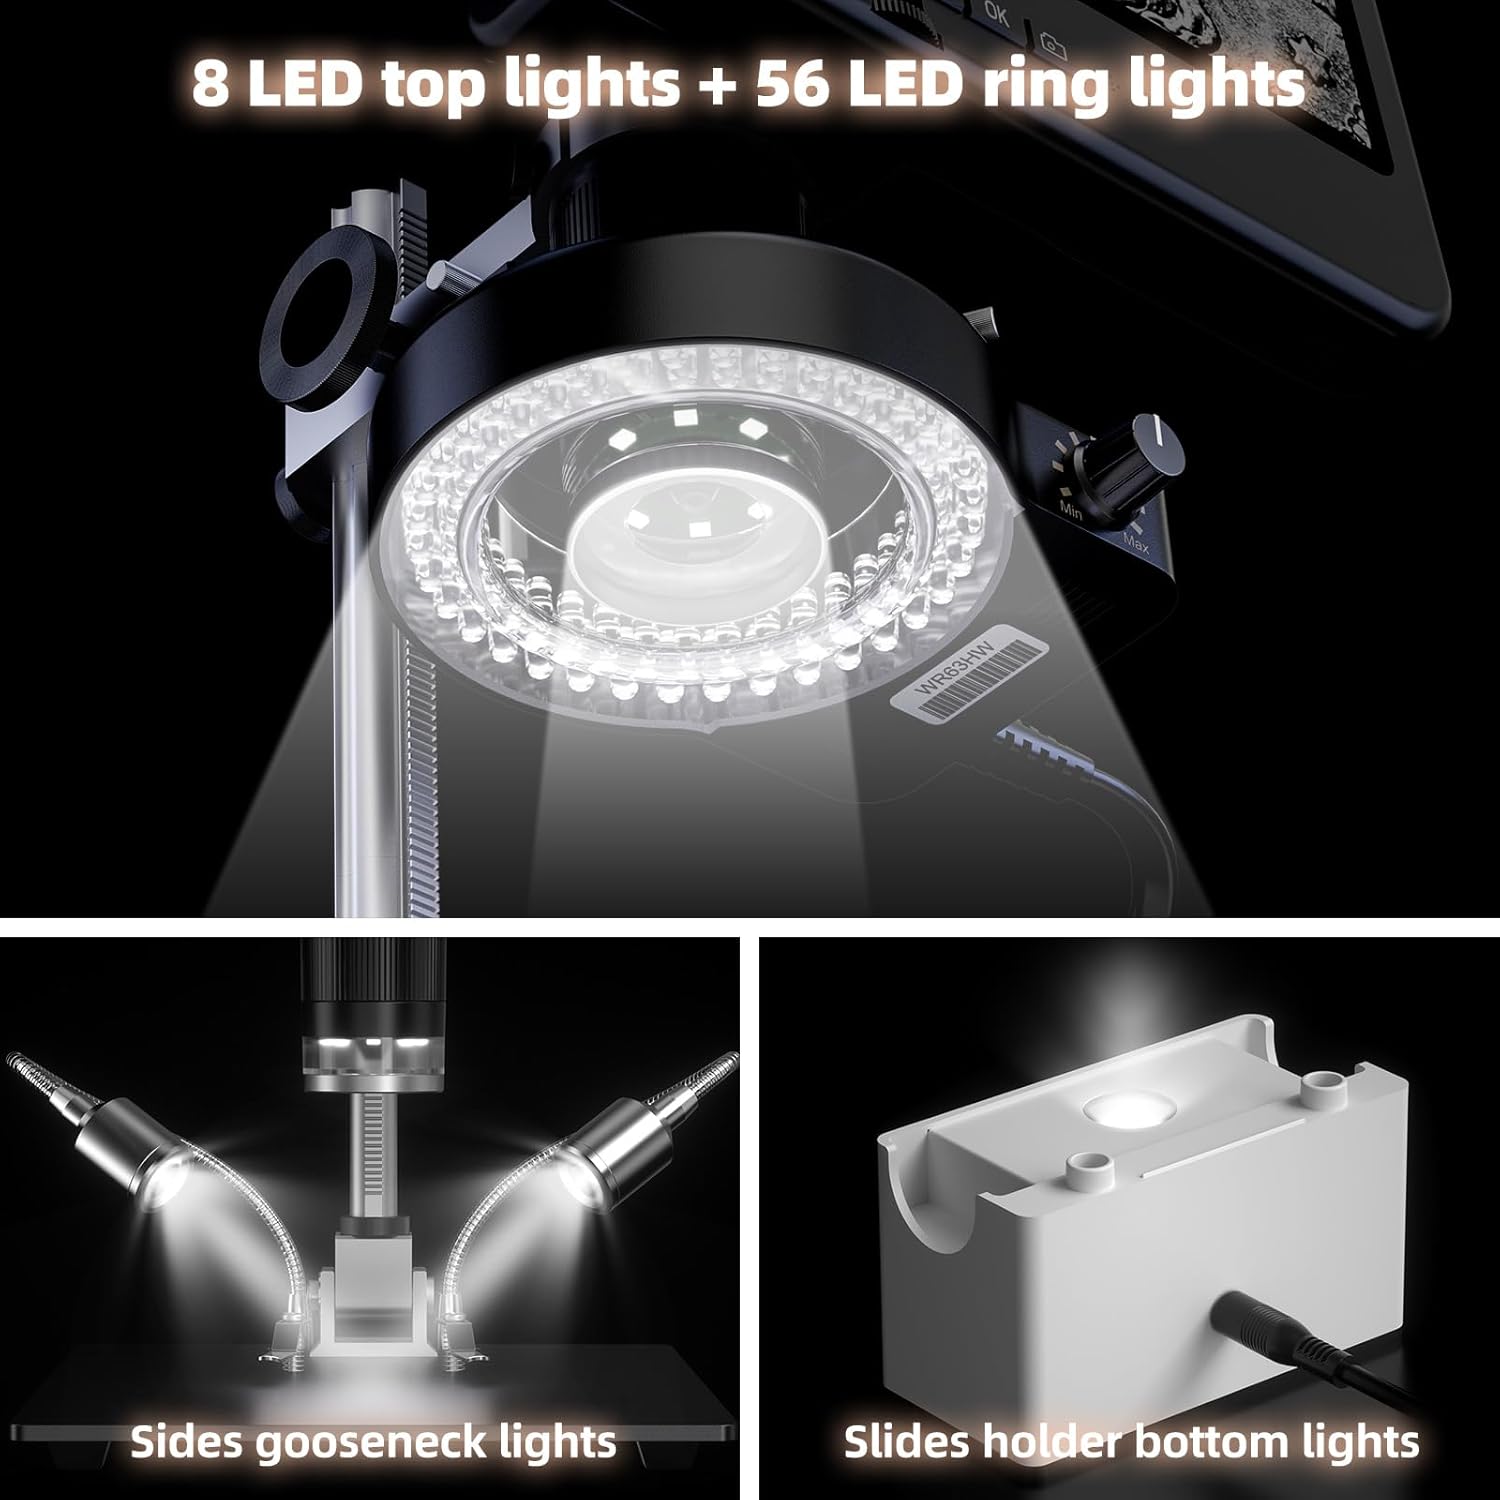
Image 4.1: LM208S lighting system, including ring light, gooseneck lights, and bottom illumination.
- Image/Video Capture: Use the dedicated buttons on the microscope or remote control to capture 10MP still images or record 4K (3840x2160) video at 30 frames per second. Files are saved to the inserted memory card.
- HDMI Output: When connected to an external 4K display, the microscope provides a real-time 4K 30FPS video feed. Note that simultaneous 4K recording and 4K output may not be supported.
- Dual-Screen Display: View images simultaneously on the built-in 10.1-inch screen and an external 4K HDMI display for enhanced viewing and collaboration.

Image 4.2: LM208S connected to an external display via HDMI for real-time viewing.
4.2. LINKMICRO LM115 LCD Digital Coin Microscope
- Power On/Off: Press the power button to activate the device.
- Focus Adjustment: Use the focus ring or buttons to achieve a clear image on the 5-inch screen.
- Magnification: Adjust the distance between the lens and the object. The metal stand allows for precise height adjustments to view full coins (e.g., silver dollars, half dollars) or detailed sections.

Image 4.3: LM115 stand adjustment for full coin views or detailed inspection.
- Handheld Use: The LM115 can be detached from its stand for portable, handheld exploration.
- Image/Video Capture: Use the control buttons to capture images or record videos.
- Computer Connectivity: Connect the LM115 to a computer via USB for live viewing or data transfer.

Image 4.4: LM115 in handheld mode, demonstrating its portability and stable image capabilities.
5. Maintenance
- Cleaning Lenses and Screen: Use a soft, lint-free cloth specifically designed for optical surfaces to clean the lenses and screen. Do not use abrasive cleaners or solvents.
- Cleaning Body: Wipe the microscope body with a soft, dry cloth. For stubborn dirt, a slightly damp cloth can be used, followed by a dry one.
- Storage: Store the microscopes in a dust-free, dry place at room temperature. If possible, use protective covers to prevent dust accumulation on lenses and screens.
- Battery Care (LM115): If the LM115 has an internal rechargeable battery, ensure it is charged periodically if stored for long durations to maintain battery health.
6. Troubleshooting
- No Power:
- Ensure the power adapter is securely connected to both the microscope and a working power outlet.
- Check if the power button has been pressed firmly.
- For LM115, ensure the battery is charged or it is connected via USB.
- Blurry Image:
- Adjust the focus wheel/ring until the image is clear.
- Ensure the object is within the microscope's working distance.
- Clean the lens if there is any dust or smudges.
- No Image on External Display (LM208S):
- Verify the HDMI cable is correctly connected to both the microscope and the external display.
- Ensure the external display is set to the correct HDMI input source.
- Check if the external display supports 4K resolution.
- Cannot Capture Images/Videos:
- Ensure a memory card is inserted and has sufficient free space.
- Check if the memory card is formatted correctly (usually FAT32).
- Insufficient Lighting:
- Adjust the brightness of the ring light and position the gooseneck lights.
- Ensure all lighting components are properly connected and powered.
7. Specifications
7.1. LINKMICRO LM208S 4K HDMI Digital Microscope
- Screen: 10.1-inch IPS display, 178° wide viewing angle
- Video Resolution: 4K (3840x2160) at 30FPS
- Image Resolution: 10 Megapixels
- Stand: Sturdy 12.6-inch metal stand with 7x8-inch base
- Lighting: 56-LED ring light, 8-LED top lights, side gooseneck lights, slides holder bottom lights
- Output: HDMI for external 4K display
- Storage: Supports memory card (64GB included)

Image 7.1: Key specifications of the LM208S, including 4K video and HDMI output.
7.2. LINKMICRO LM115 LCD Digital Coin Microscope
- Screen: 5-inch LCD display
- Design: Compact, handheld, portable
- Stand: 7.3-inch metal stand for stable viewing
- Coin View: Capable of full view for silver dollars (38.1mm) and half dollars (30.61mm)
- Connectivity: USB for computer connection

Image 7.2: LM115 demonstrating its capability to display full coin views.
8. Warranty and Support
LINKMICRO products are designed for reliability and performance. For warranty information, please refer to the warranty card included with your product or visit the official LINKMICRO website. If you encounter any issues or require technical assistance, please contact LINKMICRO customer support through the contact information provided on the product packaging or their official website. Please have your model number (LM208S, LM115) and purchase date ready when contacting support.

