Introduction
This manual provides detailed instructions for the installation, operation, and maintenance of your SakerPlus Automatic Solar Powered Chicken Coop Door. Designed for convenience and durability, this door features solar charging, multiple operating modes, and safety mechanisms to protect your poultry. Please read this manual thoroughly before use to ensure proper function and longevity of the product.
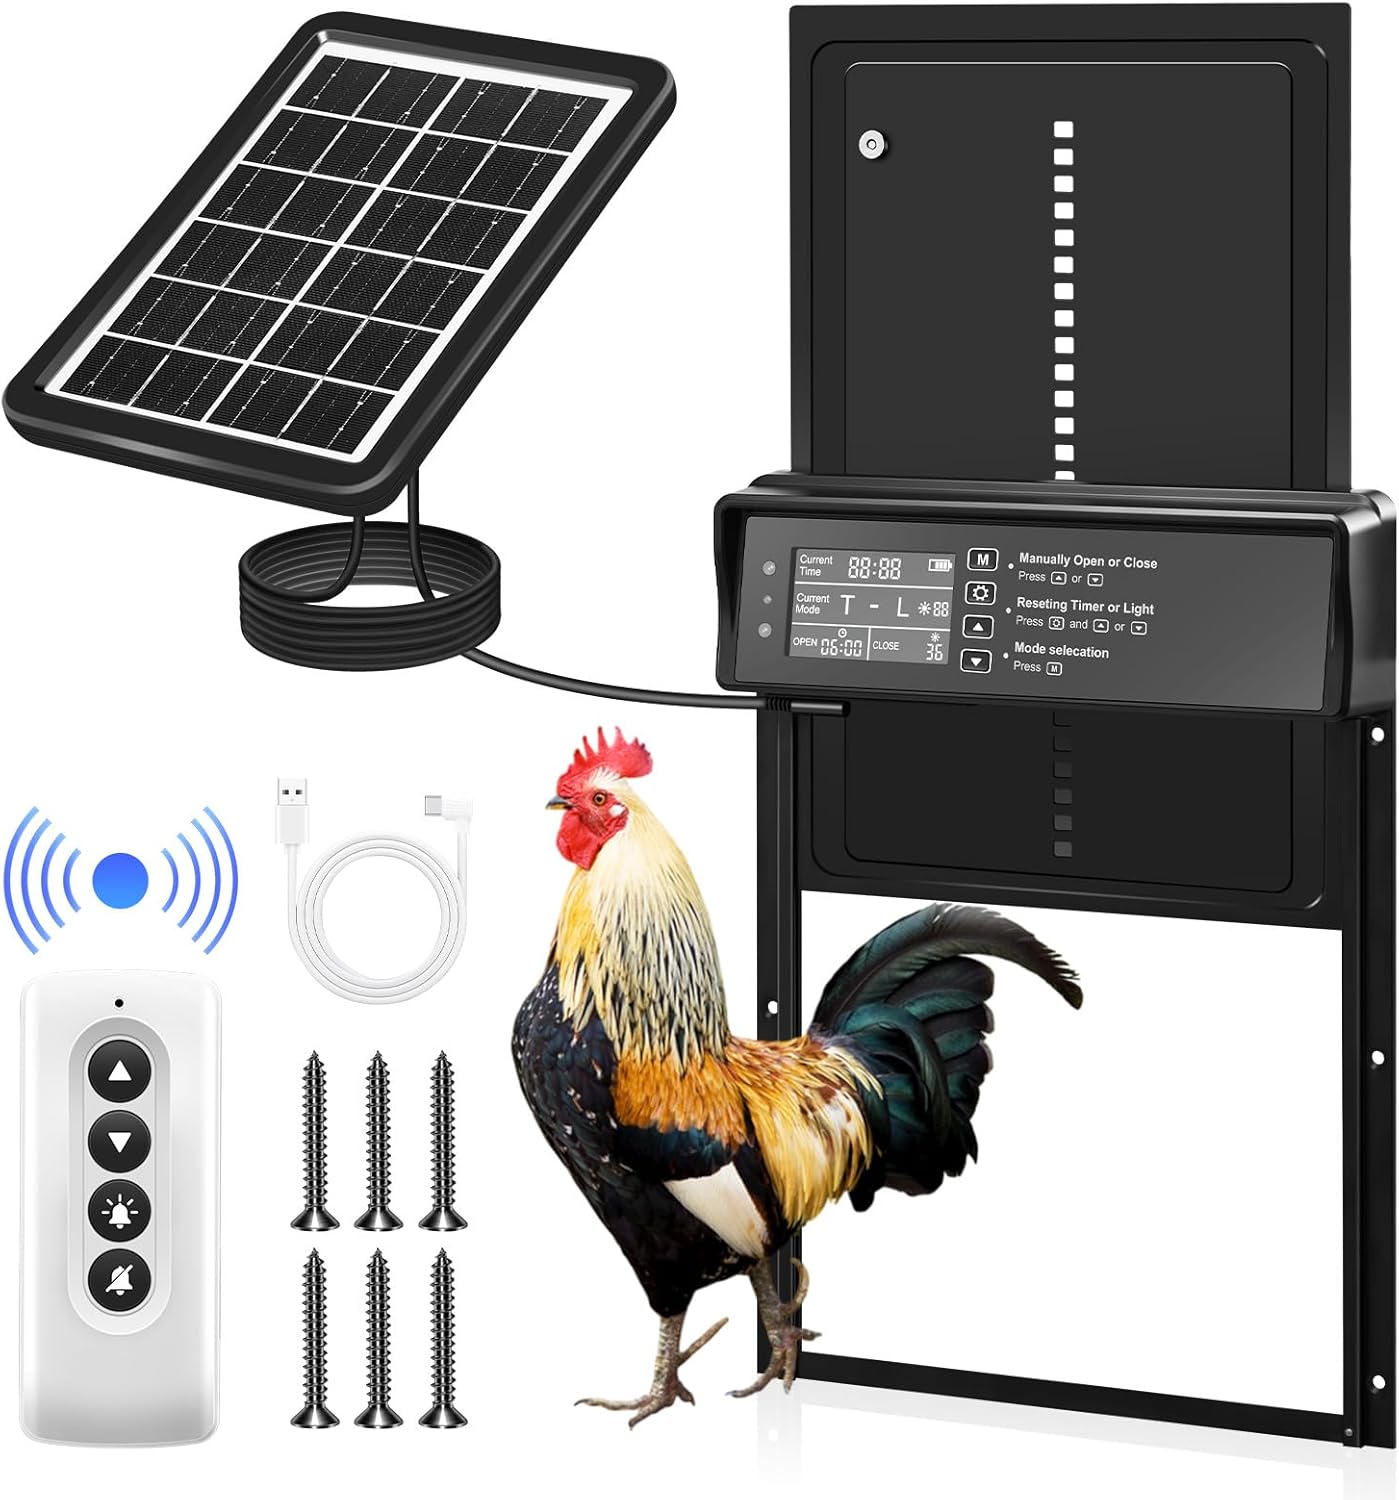
Image: Overview of the SakerPlus Automatic Solar Powered Chicken Coop Door, including the main unit, solar panel, remote control, and mounting hardware.
Package Contents
- Automatic Chicken Coop Door Unit
- Solar Panel with 5-meter cable
- Remote Control
- USB Type-C Charging Cable
- Mounting Screws
- Instruction Manual (this document)
Safety Information
- Ensure all components are securely installed before operation.
- Keep children and pets away from the moving door during operation.
- Do not attempt to force the door open or closed manually while it is in automatic mode.
- Periodically check the light sensor's sensitivity to ensure proper function.
- During initial use or seasonal changes, observe your chickens' roosting habits and fine-tune settings to prevent accidental lockouts.
Setup and Installation
1. Preparing the Installation Area
- Identify a flat, vertical surface on your chicken coop for mounting the door.
- Ensure the area is clear of obstructions that could interfere with the door's movement.
- Measure and cut an opening in the coop that accommodates the door's dimensions (approximately 10 inches high by 9.6 inches wide for the opening).

Image: Detailed dimensions of the chicken coop door unit and the solar panel, indicating the door opening size of 10 inches by 9.6 inches.
2. Mounting the Door Unit
- Position the door unit over the prepared opening.
- Mark the screw holes on the coop surface.
- Drill pilot holes if necessary.
- Secure the door unit to the coop using the provided mounting screws. Ensure it is level and firmly attached.
3. Installing the Solar Panel
- Choose a location for the solar panel that receives maximum direct sunlight throughout the day. The solar panel cable is 5 meters long, allowing flexible placement.
- Mount the solar panel using its integrated stand or by hanging it on a screw.
- Connect the solar panel cable to the solar charging interface on the door unit.

Image: Illustration of the two charging methods: solar panel connection and USB Type-C port for backup charging.
4. Initial Charging
- The door unit has a built-in 2000mAh battery. For optimal performance, allow the solar panel to charge the battery for at least 24 hours before initial use, or use the provided USB Type-C cable to charge it with a 5V/1A charger (not included).
- The LCD display will show the battery level.
Operating Instructions
LCD Display Overview
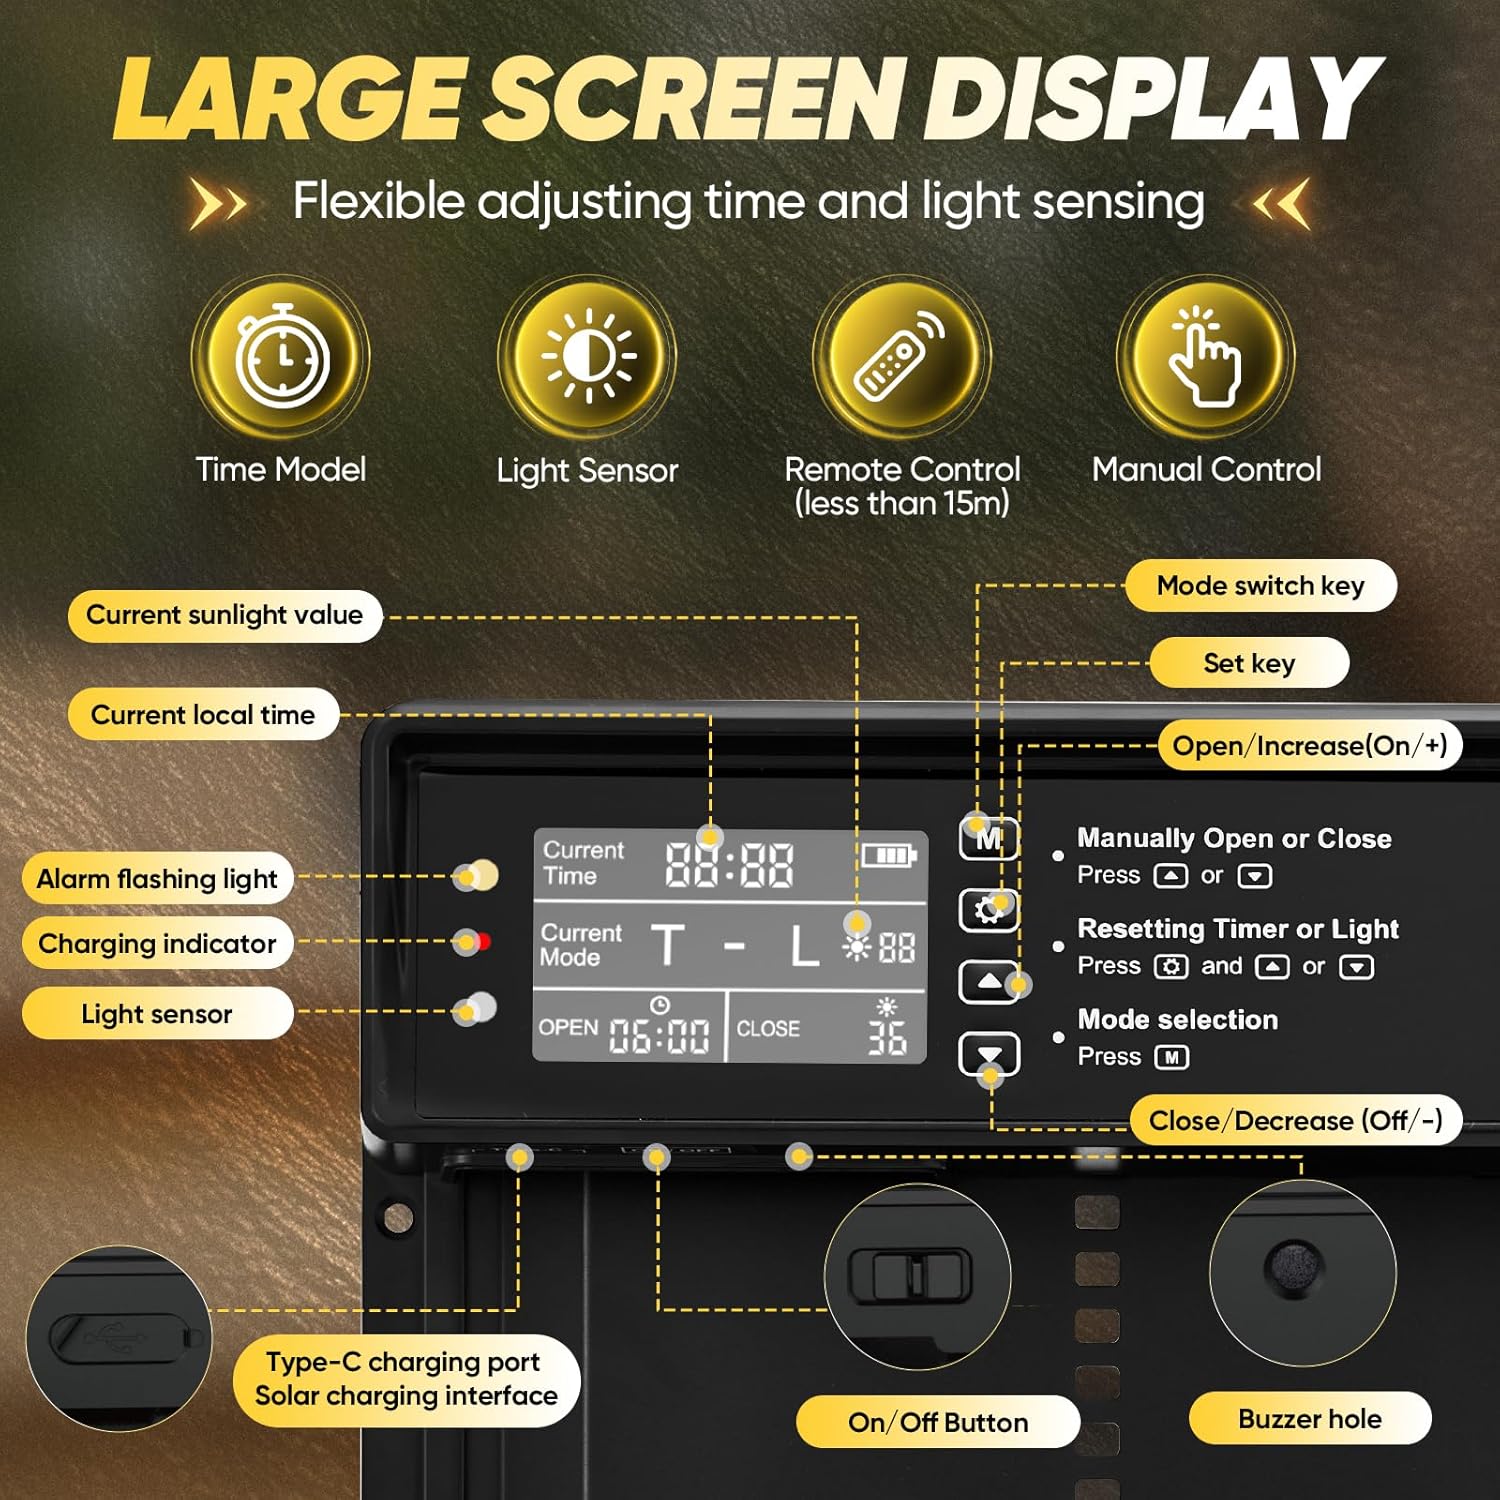
Image: Close-up of the LCD screen showing current time, current mode, open/close times, sunlight value, and battery level. Labels indicate the function of each button and indicator light.
- Current Time: Displays the current time.
- Current Mode: Indicates the active operating mode (Timer, Light Sensor, or combined).
- Open/Close Time: Shows the programmed opening and closing times.
- Sunlight Value: Displays the current light intensity detected by the sensor.
- Battery Level: Indicates the remaining battery charge.
- Charging Indicator: Lights up when charging.
- Alarm Flashing Light: Indicates an alert or error.
Control Buttons
- Mode Switch Key (M): Press to cycle through operating modes.
- Set Key: Press to enter setting mode for the selected parameter.
- Open/Increase (+): Manually opens the door or increases a setting value.
- Close/Decrease (-): Manually closes the door or decreases a setting value.
- On/Off Button: Powers the unit on or off.
Operating Modes
The SakerPlus chicken coop door offers four automatic modes and manual control:
- Timer Mode (T-T): The door opens and closes at specific times set by the user.
- Light Sensor Mode (L-L): The door opens and closes based on detected light levels (sunrise/sunset).
- Timed & Light Mode (T-L): The door opens at a set time and closes based on light levels.
- Light & Timed Mode (L-T): The door opens based on light levels and closes at a set time.
- Manual Control: Use the '+' and '-' buttons on the unit or the remote control to open/close the door instantly.

Image: Diagram illustrating the automatic operation based on light and timer settings, showing the door opening at sunrise and closing at sunset.

Image: The chicken coop door is shown in an open position, with a blue arrow indicating its upward movement, signifying automatic opening.

Image: The chicken coop door is shown in a closed position, with a red arrow indicating its downward movement, signifying automatic closing.
Setting Operating Modes and Times
- Press the 'M' button to select the desired operating mode.
- Once the mode is selected, press the 'Set' button to enter the setting adjustment.
- Use the '+' and '-' buttons to adjust times or light sensitivity levels.
- Press 'Set' again to confirm and save your changes.
Important Note on Default Settings: The factory default settings are 6:00 AM for opening and 6:00 PM for closing in light-sensing mode.

Image: A visual reminder to adjust the door's closing time during summer months when daylight lasts longer, to prevent chickens from being locked out.
Summer Adjustment: During summer months, daylight lasts longer. Manually adjust the closing time based on your local sunset to prevent chickens from being locked out. Always observe your chickens' roosting habits.
Anti-Pinch Protection
The SakerPlus door features a sensitive obstruction detection system. If the door encounters a chicken or other obstruction while closing, it will instantly reverse, pause, and then safely retry closing after 10 seconds. This mechanism prevents injuries and ensures the safety of your poultry.

Image: A three-panel sequence demonstrating the anti-pinch feature: the door detects an obstruction (chicken), reverses, pauses, and then attempts to close again.
Maintenance
- Cleaning: Periodically clean the door tracks and the light sensor with a soft, damp cloth to ensure smooth operation and accurate light detection. Avoid abrasive cleaners.
- Light Sensor Check: Regularly check the light sensor's sensitivity, especially during seasonal changes, to ensure it responds correctly to ambient light.
- Battery Health: Ensure the solar panel is clean and positioned to receive adequate sunlight for continuous charging. If prolonged cloudy weather occurs, use the USB Type-C cable for backup charging to maintain battery health.
- Inspection: Routinely inspect the door for any signs of wear, damage, or loose components. Tighten screws if necessary.
Troubleshooting
| Problem | Possible Cause | Solution |
|---|---|---|
| Door does not open/close automatically. | Incorrect time settings; insufficient light for sensor mode; low battery. | Verify programmed open/close times. Check light sensor sensitivity. Ensure solar panel is clean and receiving sunlight, or charge via USB. |
| Door reverses during closing. | Obstruction detected (e.g., chicken, debris). | This is the anti-pinch safety feature. Ensure the path is clear. The door will retry closing after 10 seconds. |
| LCD display is dim or off. | Low battery. | Charge the unit using the solar panel or USB Type-C cable. |
| Remote control not working. | Remote battery depleted; out of range. | Replace remote battery. Ensure you are within the 15-meter operating range. |
| Door movement is sluggish or noisy. | Debris in tracks; mechanical issue. | Clean the door tracks thoroughly. If the issue persists, contact customer support. |
Specifications
| Feature | Detail |
|---|---|
| Model Name | EC91417-X62201 |
| Brand | SakerPlus |
| Material | Aluminum Alloy |
| Door Dimensions (L x W x H) | 10" x 9.6" x 22.3" (25.4cm x 24.38cm x 56.64cm) |
| Item Weight | 2.86 pounds (1.3 kg) |
| Power Source | Solar Powered (2000mAh Lithium Ion battery included) / USB Type-C (5V/1A) |
| Solar Panel Cable Length | 5 meters (9.84 ft) |
| Waterproof Rating | IPX45 |
| Operating Temperature | -15°C to 60°C (5°F to 140°F) |
| Special Features | Timer, Light Sensor, Remote Control, Anti-Pinch Protection, LCD Display, Weather Resistant |

Image: Visual representation of the door's weather resistance, highlighting aluminum alloy construction, IPX45 waterproof rating, and temperature tolerance from -15°C to 60°C.
Warranty and Support
SakerPlus products are designed for reliability and durability. For specific warranty information, please refer to the warranty card included with your product or visit the official SakerPlus website.
If you encounter any issues or have questions regarding your Automatic Solar Powered Chicken Coop Door, please contact SakerPlus customer support through the retailer where you purchased the product or via the contact information provided on the SakerPlus official website.
Online Resources: For additional support and product information, you may visit the SakerPlus Store on Amazon.