1. Introduction
This manual provides comprehensive instructions for the installation, operation, and maintenance of your NINETOM 12.3" Ultra-Narrow Touchscreen Wireless CarPlay Android Auto Receiver.
Compatibility Note: This touchscreen is specifically designed for BMW X5 X6 Series E70/E71 (2009–2013) vehicles equipped with the CIC system. It is not compatible with other versions or systems (e.g., CCC, NBT, EVO). The unit operates on a Linux system, ensuring stable performance.
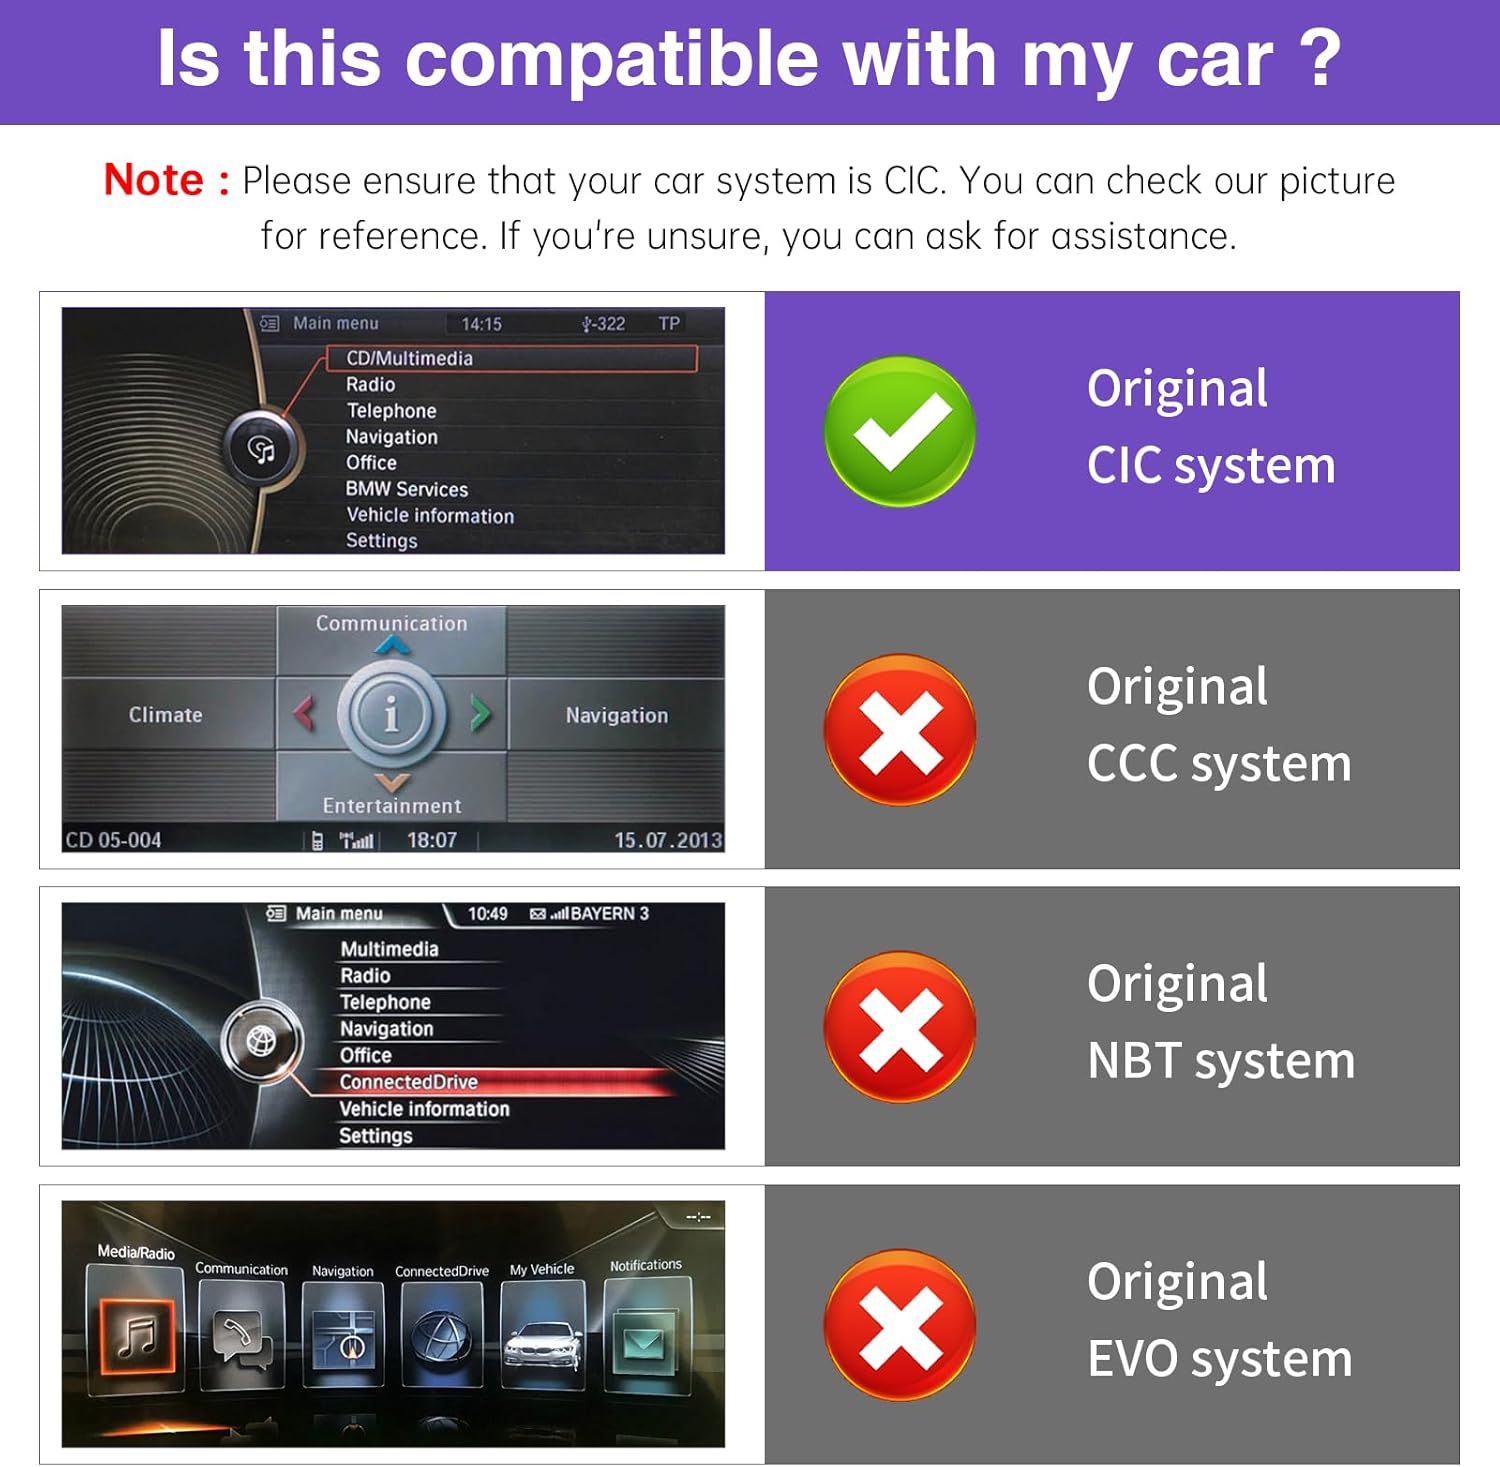
Image: Compatibility chart for BMW systems. Ensure your vehicle has a CIC system for proper functionality.
2. Package Contents
Verify that all items listed below are included in your package:
- NINETOM 12.3" Ultra-Narrow Touchscreen Display
- Power cable
- USB cable
- AUX cable
- Mounting Bracket
- Basic installation accessories

Image: Product size and accessories list.
3. Setup and Installation
3.1 Pre-Installation Notes
- This unit is compatible with BMW X5 X6 Series E70/E71 (2009–2013) CIC systems only.
- The unit runs on a Linux system, designed for stable performance.
- Professional installation is recommended if you are unsure about the process.
- Test all functions before reassembling the dashboard.

Image: Before and after installation comparison.
3.2 Optical Fiber Cable Installation
If your original vehicle has an optical fiber cable, it must be moved from the original connector to the new power cable harness to ensure proper audio functionality.
Video: Instructions on how to relocate optic cables to the Linux harness for BMW. This step is crucial for sound transmission.
3.3 Resolution Settings
Before using the OEM system, ensure the correct screen resolution is set. Incorrect resolution can cause display issues.
- Navigate to Setup -> Car Settings -> Original Car's Screen Resolution.
- Select a resolution compatible with your original vehicle screen. If unsure, manually test resolutions to find the correct one.
Video: Guide on setting the original resolution for BMW displays.
3.4 Sound Setup
Proper sound transmission is essential. Follow these steps based on your vehicle's system.
3.4.1 AUX Cable Transmission
- Connect the EXT-AUX cable to the AUX port in your vehicle.
- If your mobile phone's Bluetooth is connected to the original vehicle's Bluetooth, please disconnect it.
- Return to the Main menu page, select Multimedia -> External devices -> AUX front.
- Adjust the volume of AUX. It cannot be set to 0.
- Touch the screen to switch to the new system and turn on CarPlay/Android Auto.
3.4.2 Bluetooth Transmission (for vehicles with OEM vehicle Bluetooth supporting phone calls and music)
- Return to the main page of the new system and select Setup -> System. Turn on "Use Car's BT Channel".
- Switch to the original vehicle system. Turn on the original vehicle's Bluetooth page. Turn on your mobile phone's Bluetooth and connect to the original vehicle's Bluetooth.
- Return to the Main menu page, select Multimedia -> External devices. Select the Bluetooth name of your mobile phone.
- Touch the screen to switch to the new system and turn on CarPlay/Android Auto.
Video: Audio settings for Linux Screen for BMW CIC and NBT, covering AUX and Bluetooth sound transmission.
4. Operating Instructions
4.1 Wireless CarPlay / Android Auto Connection
Access GPS, calls, messages, and music via Siri or touch controls for a safer driving experience.
- Ensure the "CarPlay" option is turned on in Setup -> Smart Phone -> Smart Phone Setting.
- Turn on your mobile phone's Wi-Fi and Bluetooth.
- Search for the screen's Wi-Fi name ("CAR-XXXX") and connect to it. If a password is required, enter "66668888".
- Search for the screen's Bluetooth name ("CAR-BT-XXXX") and pair with it.
- Allow contact and favorites sync if prompted.
- On your iPhone, select "AirPlay" in the Screen Mirroring menu.
- Click "Use CarPlay" to activate the CarPlay function.
Video: Detailed steps on how to set up Wireless CarPlay on BMW.
Video: Instructions for setting up AirPlay on BMW.

Image: Support for Wireless/Wired CarPlay & Android Auto.
4.2 Original Car Functions Retention
The upgraded touchscreen retains all original car functions, including the radio, amplifier, joystick controls, and reversing camera, without altering the vehicle’s software. It supports both original and aftermarket features while adding Linux system enhancements for an improved experience.

Image: Support for original car settings and features.
4.3 Dual System Switching
Easily switch between the Linux system and your original car interface.
- To return to the new system from the original car interface, click "Car Home" on the new system's interface.
- To return to the original system from the new system, click "Original car interface" on the new system's interface.
- Alternatively, hold the Menu Button on your iDrive controller for 3 seconds to switch between systems.
Video: Demonstrates system switching between the new Linux screen and the original BMW CIC/NBT interface.

Image: Quick System Switch feature.
4.4 Day and Night Mode
The screen features automatic light sensitivity, adjusting between day and night modes based on your car's original headlights for optimal visibility.

Image: Day and Night Mode automatic adjustment.
4.5 Boot Logo Customization
You can customize the boot logo of your system.
- Create a PNG image with a resolution of 1920x720 pixels.
- Rename the file to
updatelogo.png. - Place the file in the root directory of a USB drive.
- Insert the USB drive into the system. A prompt will appear asking you to confirm the logo change.
- Restart the system for the new logo to take effect.
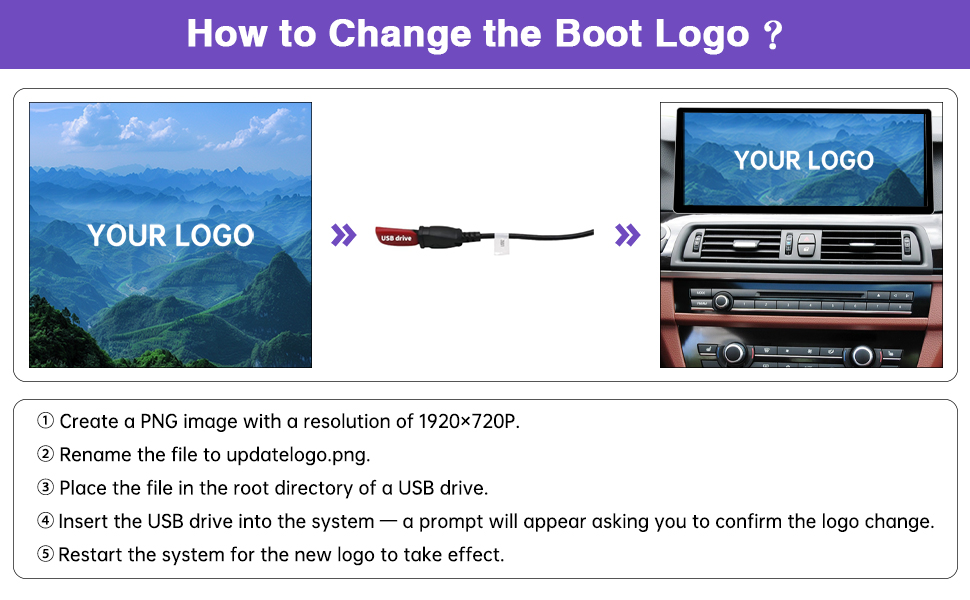
Image: How to Change the Boot Logo.
5. Maintenance
To ensure the longevity and optimal performance of your NINETOM display, follow these maintenance guidelines:
- Cleaning: Use a soft, lint-free cloth slightly dampened with water or a screen cleaner specifically designed for electronic displays. Avoid harsh chemicals, abrasive cleaners, or solvents.
- Temperature: Avoid exposing the unit to extreme temperatures, both hot and cold, for extended periods.
- Physical Damage: Protect the screen from direct impact or sharp objects. While the screen features IN-CELL full lamination and an anti-reflection layer, excessive force can still cause damage.
- Software Updates: Periodically check for firmware updates from NINETOM to ensure you have the latest features and bug fixes.
6. Troubleshooting
6.1 AUX Input Issues
If you experience issues with AUX audio input, consider the following:
- Has the optical fiber cable been transferred to the new power harness?
- Has the "Use Car's BT Channel" option been turned off?
- Has the phone's Bluetooth connection to the vehicle been disconnected?
- Has the AUX cable been connected, and its input volume turned up (not 0)?
- If there is noise, try connecting or disconnecting the GND cable.
6.2 Vehicle Bluetooth Audio Issues
If you encounter problems with Bluetooth audio, check these points:
- Has the optical fiber cable been transferred to the new power harness?
- Has the "Use Car's BT Channel" option been turned on?
- Has the phone's Bluetooth been connected to the vehicle's Bluetooth instead of the screen's Bluetooth?
- Has Bluetooth been selected as the audio output in the original vehicle system?
- Has the phone's sound output mode been set to the vehicle's Bluetooth rather than its speaker?
Warm Reminder: The vehicle's Bluetooth sound mode only supports CarPlay and Android Auto. If you are using screen mirroring or USB to play music/videos, please use AUX sound mode.
7. Specifications
| Feature | Detail |
|---|---|
| Brand | NINETOM |
| Model Name | NINETOM 2025 |
| Display Size | 12.3 Inches |
| Resolution | 1920x720 IPS |
| Operating System | Linux |
| Special Feature | Wireless CarPlay/Android Auto Integration |
| Connectivity Technology | Bluetooth, USB |
| Vehicle Service Type | Car (BMW X5 X6 Series E70/E71, 2009-2013, CIC System) |
| Item Weight | 4.11 pounds (1.87 Kilograms) |
| Package Dimensions | 13.3 x 7.91 x 6.22 inches |

Image: NINETOM 12.3" Ultra-Narrow Touchscreen Display.

Image: Ultra 1920x720 Resolution display quality.

Image: Narrow Bezel New-Generation Design.

Image: Full Lamination Screen benefits.
8. Warranty and Support
Your NINETOM touchscreen comes with a 1-Year Warranty. Installation will not affect your factory warranty or damage existing wiring.
Our experienced support team is available to assist with any questions regarding wiring, settings, or general operation. Please contact us if you require assistance.
For support, visit the NINETOM Store or use the "Ask a question" feature on the product page.


