1. Introduction and Safety Information
This manual provides detailed instructions for the assembly, operation, and maintenance of your Greenvelly 10-14 Gun Safe. Please read all instructions carefully before assembly and use to ensure proper function and safety.
Important Safety Warnings:
- Always keep the safe locked when not in use.
- Store keys and digital codes in a secure location, away from the safe and out of reach of children.
- Do not store the emergency keys inside the safe.
- Ensure the safe is securely mounted to a wall or floor to prevent tipping and unauthorized removal.
- Keep children and unauthorized individuals away from the safe.
2. Parts List
Before beginning assembly, verify that all parts listed below are present and undamaged. Refer to the assembly video for visual identification of each component.
Video 1: Assembly Instructions Overview. This video provides a visual guide to the assembly process, including a detailed parts list at the 0:02 mark.
The main components include the door frame, side panels, back plate, top plate, bottom plate, storage board, gun stock shelves, cross head, adjustable feet, clapboard buckles, rivets, expansion bolts, and emergency keys. A screwdriver is also included for assembly.

Image 1: Exploded view of the gun safe, illustrating the adjustable shelf, flashlight, removable gun rack, and removable storage bag components.
3. Assembly Instructions
Assembly of the Greenvelly gun safe is designed to be straightforward. For a visual guide, please refer to Video 1 above, which demonstrates each step.
- Step 1: Assemble Side Panels and Back Plate. Connect the side panels to the back plate using the provided hardware. Ensure all connections are secure.
- Step 2: Attach Top and Bottom Plates. Securely fasten the top and bottom plates to the assembled side and back panels.
- Step 3: Install Door Frame. Carefully attach the door frame to the main body of the safe.
- Step 4: Secure the Safe. Once the main structure is assembled, ensure all screws and bolts are tightened.
- Step 5: Insert Adjustable Shelf. Place the adjustable shelf into the desired position within the safe.
- Step 6: Install Gun Racks. Secure the removable gun racks inside the safe.
- Step 7: Attach Storage Accessories. Affix the handgun pockets and other storage bags to the inside of the door as desired.
- Step 8: Final Check. Verify all components are correctly installed and secure.
- Step 9: Mounting the Safe. Use the pre-drilled holes in the bottom and back of the safe to securely fasten it to a wall or floor using the expansion bolts. This is crucial for security and stability.

Image 2: Security hardening instructions, illustrating the process of drilling holes and fixing the safe to a wall or floor for enhanced stability and theft prevention.
4. Operating Instructions
Digital Keypad Operation:
Your Greenvelly gun safe features a digital keypad for secure access. The initial password is typically 123456#. You can set a custom password of 3-8 digits.
- To Open: Enter your 3-8 digit password followed by the '#' key. Turn the knob to open the door.
- To Change Password: With the door open, press the reset button (usually located on the inside of the door). Enter your new 3-8 digit password followed by the '#' key. Confirm the new password by entering it again followed by '#'.
- Low Battery Indicator: The digital lock has indicator lights to show the battery status. Replace batteries promptly when indicated.
Emergency Key Operation:
In case of digital keypad malfunction or dead batteries, the safe can be opened using the emergency key.
- Locate the emergency keyhole, usually concealed behind the digital keypad or a small cover.
- Insert the emergency key and turn it while simultaneously turning the knob to open the safe.
External Battery Pack:
If the internal batteries die and you do not have the emergency key readily available, an external battery pack can be used to power the digital lock temporarily.
Video 2: Safe Operation and External Battery Pack. This video demonstrates how to use the digital keypad and the external battery pack for emergency power.

Image 3: Multiple unlocking methods for the safe, showing the digital password + knob and override key + knob options.
5. Maintenance
To ensure the longevity and optimal performance of your Greenvelly gun safe, follow these maintenance guidelines:
- Cleaning: Wipe the exterior and interior surfaces with a soft, damp cloth. Avoid abrasive cleaners or solvents that could damage the finish.
- Lock Mechanism: Periodically check the digital keypad and emergency key mechanism for smooth operation. Do not lubricate the digital lock.
- Batteries: Replace the digital lock batteries annually or when the low battery indicator appears. Use high-quality alkaline batteries.
- Hinges and Bolts: Inspect hinges and locking bolts for any signs of wear or damage. Ensure they move freely.
- Moisture Control: If storing in a humid environment, consider using a desiccant or dehumidifier inside the safe to prevent rust and moisture damage to contents.
6. Troubleshooting
If you encounter issues with your Greenvelly gun safe, refer to the following common problems and solutions:
| Problem | Possible Cause | Solution |
|---|---|---|
| Digital keypad not responding | Dead batteries; incorrect code entered too many times. | Replace batteries. Use the external battery pack. Use the emergency key. Wait 5 minutes if locked out due to incorrect entries. |
| Door will not open after entering code | Knob not turned quickly enough; locking bolts jammed. | Enter code and turn knob immediately. Check for obstructions around the door or bolts. |
| Safe feels unstable or wobbly | Not properly mounted; uneven floor. | Ensure the safe is securely bolted to a wall or floor using expansion bolts. Adjust the adjustable feet for stability. |
| Difficulty during assembly | Misalignment of parts; unclear instructions. | Refer to Video 1 for visual assembly steps. Ensure parts are oriented correctly before tightening. |
7. Specifications
The Greenvelly 10-14 Gun Safe is constructed with durability and security in mind. Key specifications are as follows:
- Material: 100% High-density cold-rolled steel plate
- Dimensions (D x W x H): 15.22" x 21.1" x 55.2"
- Lock Type: Electronic Digital Keypad with Emergency Key Override
- Capacity: Designed to hold 10-14 rifles/pistols (actual capacity may vary based on firearm size and accessories)
- Special Features: Dual Alarm System, Digital Password Lock, Removable Shelf, Adjustable Gun Racks, Door-mounted Handgun Pockets and Storage Bags
- Mounting Type: Floor Mount (pre-drilled holes for secure fastening)
- Locking Bolts: 4 x 20mm diameter locking bolts
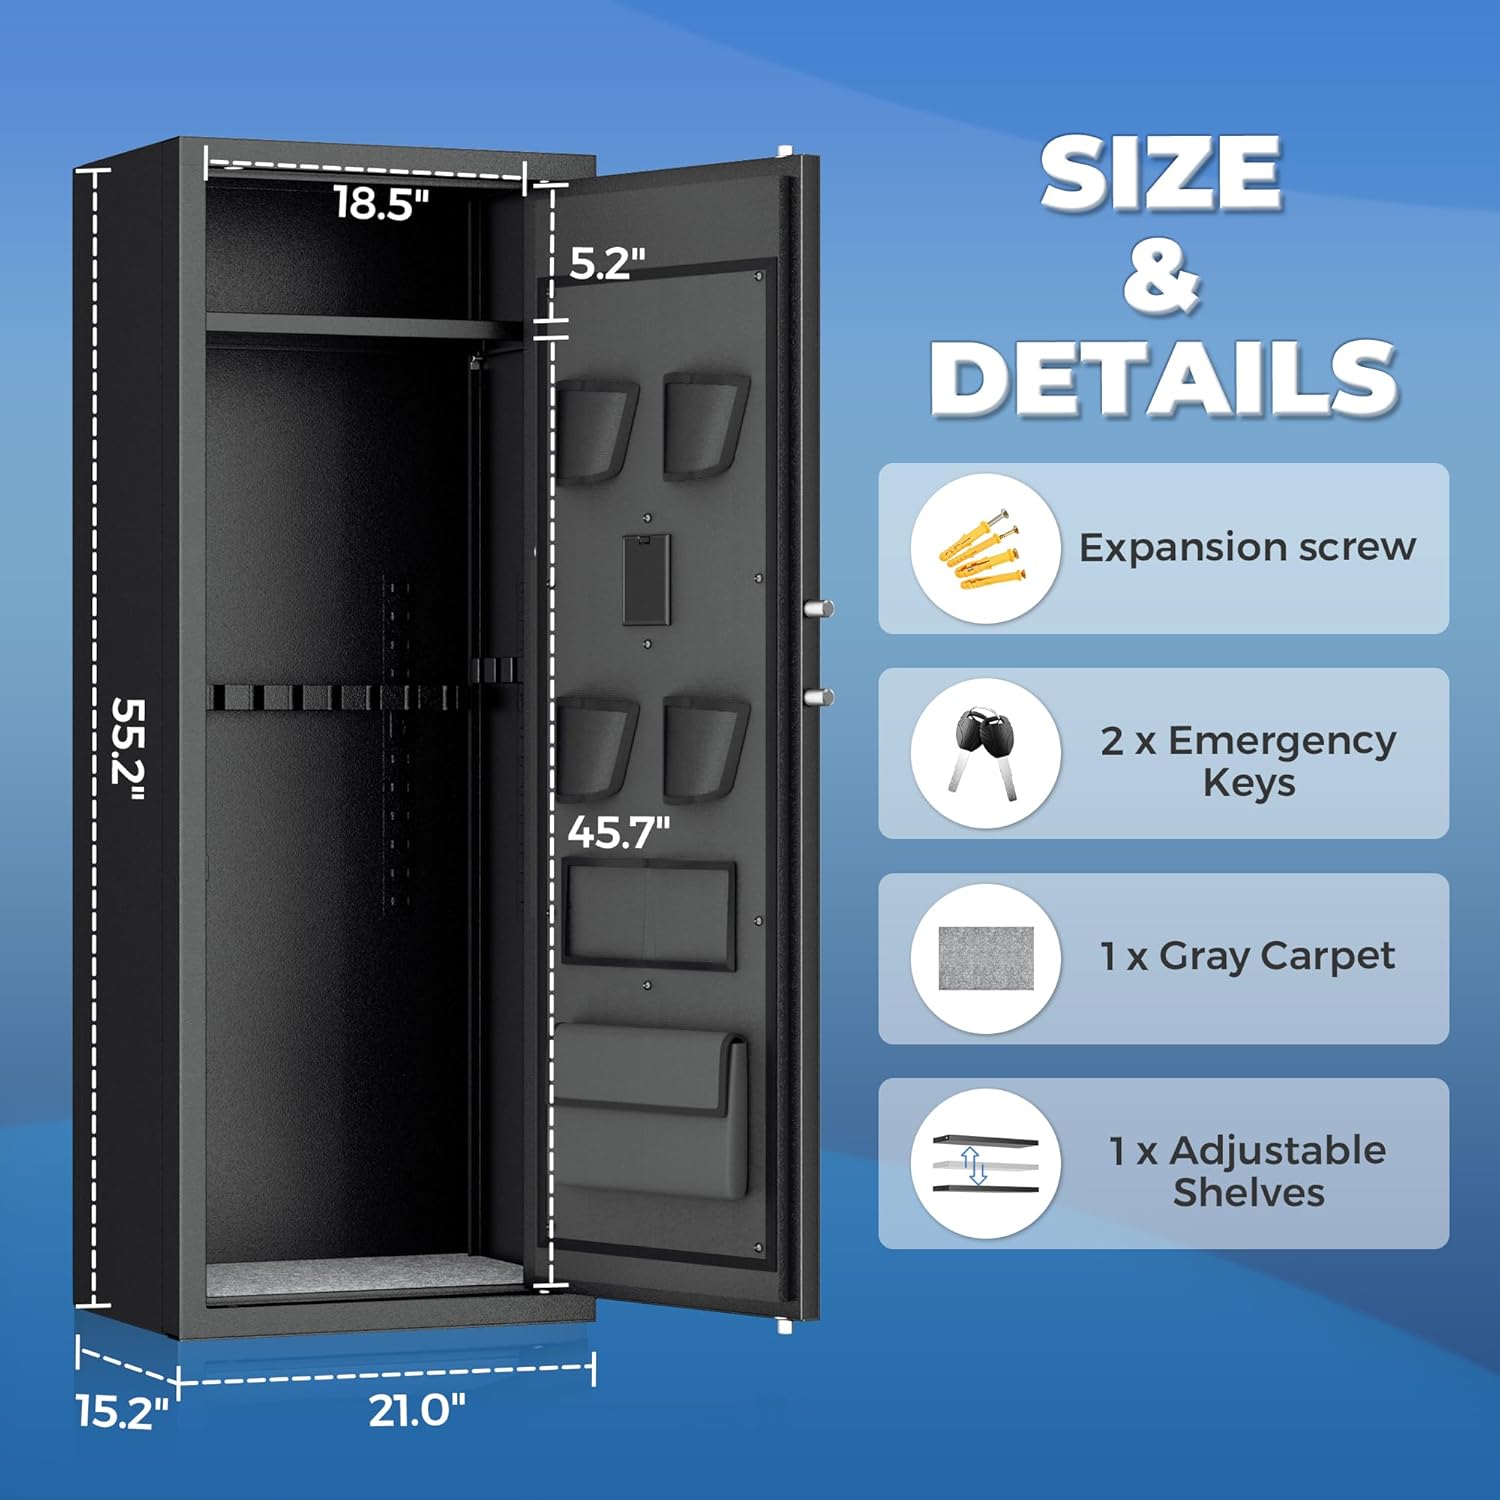
Image 4: Size and details of the safe, including dimensions and a list of included accessories such as expansion screws, emergency keys, gray carpet, and adjustable shelves.

Image 5: Detail of the safe's robust construction, highlighting the 20mm locking bolts and the thick steel door designed for security.
8. Warranty and Support
Greenvelly is committed to providing quality products and customer satisfaction. While specific warranty details are not provided in this manual, please retain your proof of purchase for any warranty claims.
For any questions regarding your Greenvelly 10-14 Gun Safe, including assembly assistance, operational issues, or missing parts, please contact Greenvelly customer support. They are available to answer your product-related inquiries.
You can typically find contact information on the product packaging or the official Greenvelly website.