1. Product Overview
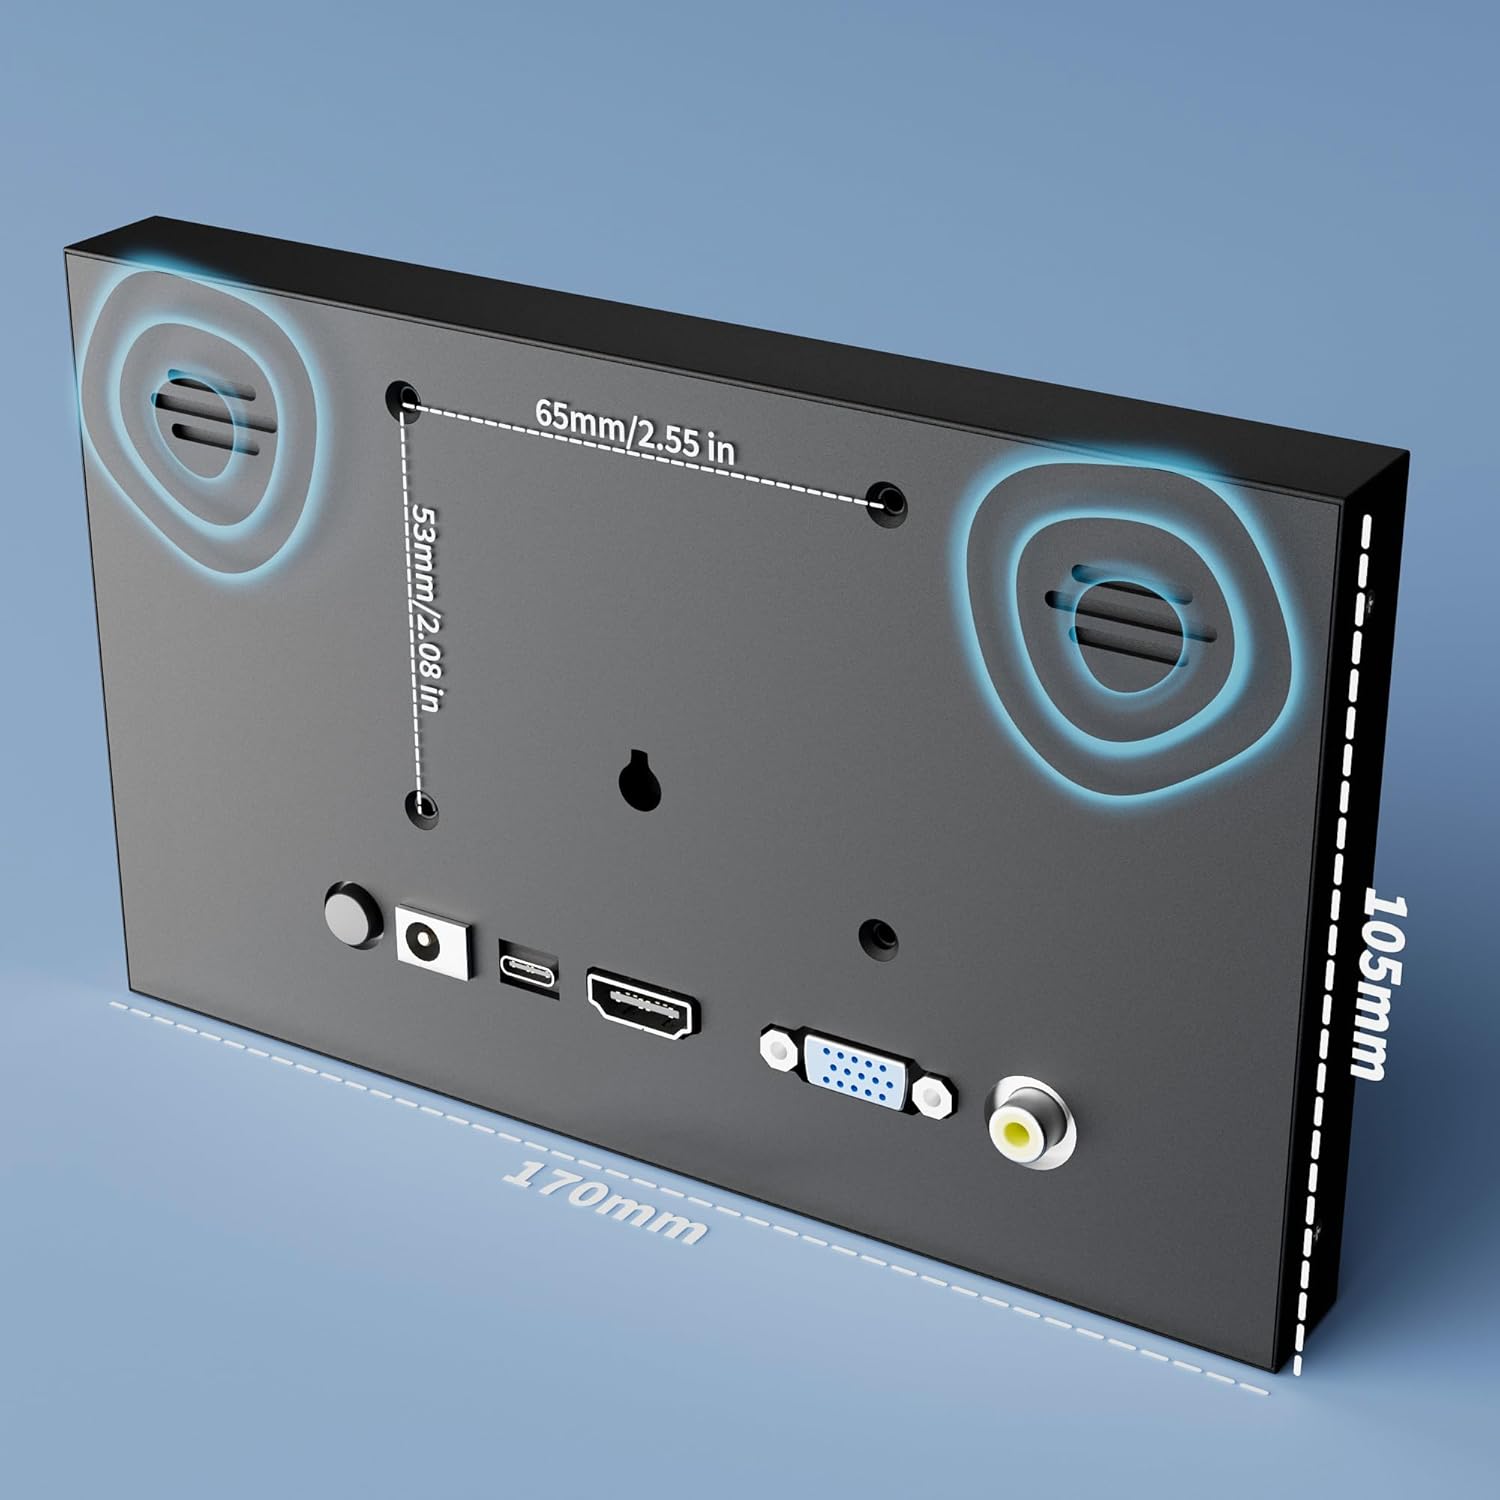
The JUN-ELECTRON 7-inch Mini Monitor is a versatile display solution designed for various applications, including PC, TV, DVD, and CCTV systems. It features a 1024x600 resolution IPS screen with a 178° wide viewing angle, ensuring clear and vivid images from multiple perspectives. The monitor includes built-in speakers for audio output and offers multiple input interfaces for broad compatibility.
- Display: 7-inch IPS screen with 1024x600 resolution.
- Viewing Angle: 178° wide viewing angle.
- Audio: Integrated built-in speakers.
- Connectivity: HDMI, VGA, AV, and BNC input interfaces.
- Power Options: DC (12V/1A) or Micro-USB (5V/2A) for enhanced portability.
- Construction: Durable aluminum alloy shell, lightweight and compact.


2. Setup Instructions
2.1 Unpacking and Inspection
Carefully remove the monitor and all accessories from the packaging. Inspect for any signs of damage. Retain the packaging for future transport or storage.
2.2 Power Connection
The monitor can be powered using two methods:
- DC Power: Connect the provided 12V/1A DC power adapter to the 'DC' port on the monitor and then to a power outlet.
- Micro-USB Power: For portable use, connect a 5V/2A Micro-USB power source (e.g., a power bank) to the 'Micro-USB' port on the monitor.

2.3 Video Input Connections
The monitor supports multiple video input types. Choose the appropriate cable and port for your device:
- HDMI: Connect devices such as Raspberry Pi, cameras, laptops, or PCs using an HDMI cable to the 'HDMI' port.
- VGA: Connect desktop computers or older laptops using a VGA cable to the 'VGA' port.
- AV (RCA): Connect devices like DVD players, TV boxes, or older video equipment using an AV (RCA) cable to the 'AV' port.
- BNC: Connect CCTV cameras or security systems using a BNC cable to the 'BNC' port.
The monitor is designed for plug-and-play functionality, generally not requiring additional drivers for basic display operation.

2.4 Monitor Placement
The monitor can be used in various orientations:
- Horizontal Use: Place the monitor on a flat surface using its integrated stand or an external stand.
- Wall-mounted Use: The monitor may support VESA mounting (check specific model for details) for wall installation.
- Vertical Use: Position the monitor vertically with an appropriate stand or mount.

3. Operating Instructions
3.1 Power On/Off
To power on the monitor, ensure it is connected to a power source. Use the inline switch on the power cord or the 'KEY' button on the back of the monitor to turn it on. To power off, use the same method.
3.2 Input Source Selection
To switch between different video input sources (HDMI, VGA, AV, BNC), press the 'KEY' button on the back of the monitor. Repeated presses will cycle through the available inputs.
3.3 Brightness Adjustment
The monitor's brightness can be adjusted to suit your viewing environment. Specific controls for brightness adjustment are typically integrated with the 'KEY' button or an on-screen display (OSD) menu accessible via the 'KEY' button. Refer to the on-screen menu for detailed brightness settings.
4. Maintenance
4.1 Cleaning the Monitor
- Screen: Gently wipe the screen with a soft, lint-free cloth. For stubborn marks, slightly dampen the cloth with water or a screen-cleaning solution. Avoid harsh chemicals or abrasive materials.
- Exterior: Clean the monitor's casing with a soft, dry cloth.
Caution: Always disconnect the monitor from the power source before cleaning.
4.2 Storage
When not in use for extended periods, store the monitor in a cool, dry place, away from direct sunlight and extreme temperatures. If possible, use the original packaging for protection.
5. Troubleshooting
If you encounter issues with your JUN-ELECTRON Mini Monitor, refer to the following common solutions:
- No Display:
- Ensure the power adapter is securely connected and the monitor is powered on.
- Verify that the video cable (HDMI, VGA, AV, BNC) is correctly connected to both the monitor and the source device.
- Confirm the correct input source is selected on the monitor using the 'KEY' button.
- Test with a different video cable or source device if possible.
- No Sound:
- Check the volume settings on both the monitor and the connected source device.
- Ensure the audio is being transmitted through the selected video input (e.g., HDMI carries audio, VGA typically does not without a separate audio cable).
- Poor Image Quality:
- Ensure the source device's resolution output matches the monitor's native resolution (1024x600).
- Check for any damage to the video cable.
- Adjust brightness and contrast settings via the monitor's controls.
- Monitor Not Turning On:
- Verify the power adapter is functional and the power outlet is active.
- If using Micro-USB, ensure the power bank or adapter provides sufficient 5V/2A output.
6. Specifications
| Feature | Specification |
|---|---|
| Product Dimensions | 8 x 1.5 x 5 inches |
| Item Weight | 1.37 pounds |
| ASIN | B0F7W1P47L |
| Item Model Number | 7 inch - Non Touch |
| Standing Screen Display Size | 7 Inches |
| Aspect Ratio | 16:9 |
| Resolution | 1024 x 600 Pixels |
| Screen Surface Description | Matte |
| Brand | JUN-ELECTRON |
| Manufacturer | JUN-ELECTRON |
| Date First Available | May 8, 2025 |
7. Warranty and Support
For warranty information and technical support, please refer to the documentation included with your purchase or contact JUN-ELECTRON customer service directly. Contact details can typically be found on the manufacturer's official website or on the product packaging.