
1. Introduction
Thank you for purchasing the HYPER GO H14BM V3 1/14 Brushless RC Truck. This high-performance 4WD off-road truggy is designed for extreme speed bashing, offering an exhilarating remote control experience. This manual provides essential information for setting up, operating, maintaining, and troubleshooting your RC truck to ensure long-lasting enjoyment and optimal performance.
Please read this manual thoroughly before operating your vehicle. Keep it for future reference.
2. Package Contents
Before proceeding, please verify that all items listed below are included in your package:
- 1 x HYPER GO H14BM V3 RC Truck
- 1 x 2.4GHz Remote Controller
- 1 x 3S 2000mAh LiPo Battery
- 1 x USB Charger
- Extra Paddle Tires (4 pcs)
- Additional Accessories (e.g., F/R Lower Swing Arm Fixed Shaft, High Rebound Shock Spring, Clips, F/R Swing Set, F/R Shock Tower, F/R Body Pillars, Spoiler)

Image: The HYPER GO H14BM V3 RC Truck, its remote controller, and the included batteries.

Image: A detailed view of the HYPER GO H14BM V3 RC Truck with its various components and the included extra accessories, such as spare body shells, paddle tires, and suspension parts.
3. Setup
3.1 Charging the Battery
The included 3S LiPo battery must be fully charged before first use. Use only the provided USB charger or a compatible LiPo balance charger.
- Connect the USB charger to a suitable USB power source (e.g., computer USB port, USB wall adapter).
- Connect the battery's balance plug (white connector) to the charger's corresponding port.
- The charger's indicator light will show the charging status (e.g., red for charging, green for fully charged).
- Once fully charged, disconnect the battery from the charger.
Caution: Never leave charging batteries unattended. Do not overcharge or discharge LiPo batteries. Store batteries in a cool, dry place away from direct sunlight and heat.
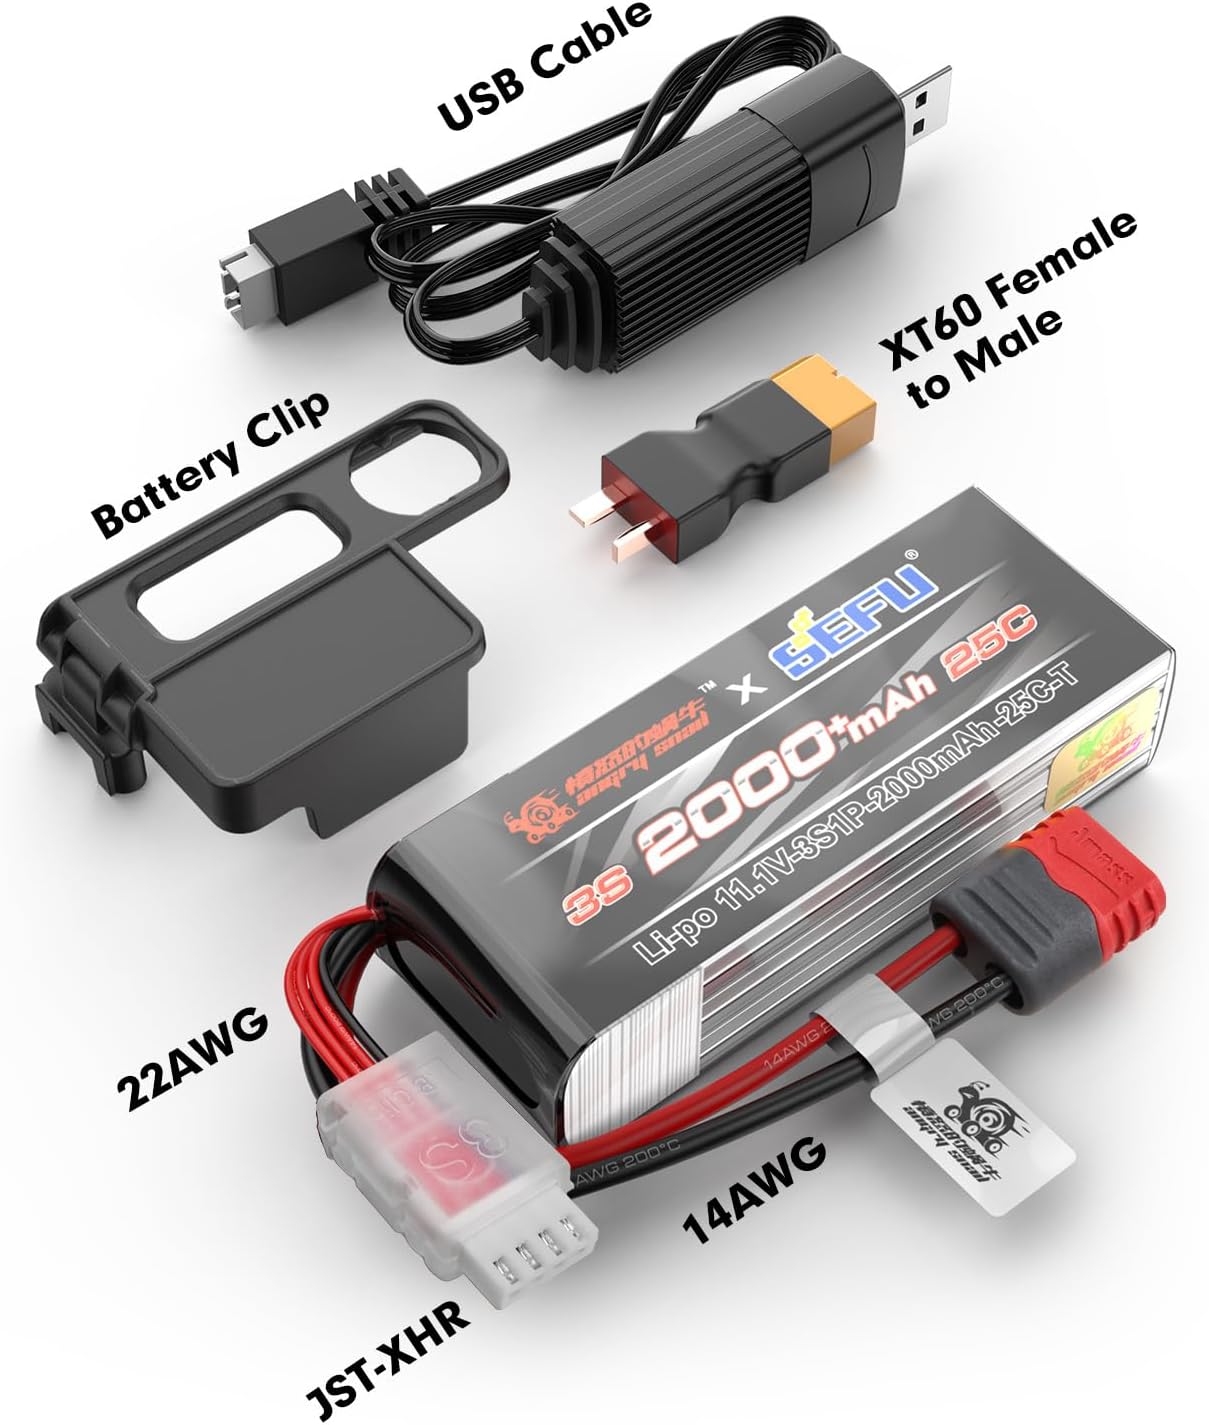
Image: The USB charging cable, an XT60 female to male adapter, and the 3S 2000mAh LiPo battery, illustrating the components involved in battery charging and connection.
3.2 Installing the Battery in the Truck
- Remove the body shell of the RC truck.
- Carefully place the charged battery into the battery compartment.
- Connect the battery's main power connector (red/black wires) to the ESC's power input connector. Ensure correct polarity.
- Secure the battery using the provided battery strap or clip.
- Reattach the body shell.
3.3 Remote Controller Setup
The remote controller requires 4 AA batteries (not included).
- Open the battery compartment on the back of the remote controller.
- Insert 4 AA batteries, observing the correct polarity (+/-).
- Close the battery compartment.
- Turn on the remote controller. The indicator light should illuminate.
4. Operating Instructions
4.1 Powering On and Binding
- Ensure the remote controller is turned on first.
- Turn on the RC truck by pressing the power button on the ESC.
- The truck and remote controller should automatically bind. If not, refer to the binding procedure in the troubleshooting section.
4.2 Driving Controls
- Steering Wheel: Turn left or right to control the direction of the truck.
- Throttle Trigger: Pull to accelerate forward, push to brake or reverse.
- ST Trim: Adjusts the steering neutral position. If the truck pulls to one side, adjust this trim until it drives straight.
- TH Trim: Adjusts the throttle neutral position. If the truck moves without throttle input, adjust this trim.
- Speed Limit Switch: The transmitter allows setting throttle limits at 70% for new users.
4.3 Unlocking Full Speed (50 mph)
The factory speed limit is approximately 33 mph. To unlock the full speed potential of 45+ mph (73 km/h) with the included 3S battery, or up to 50 mph (80 km/h) with an Angry Snail 3S2000 battery (not included), follow these steps:
- With the truck and remote controller powered on and bound, press the speed limit switch on the remote controller 5 times in quick succession.
- The truck's speed limit will be removed, allowing access to its maximum speed capabilities.

Image: The HYPER GO H14BM V3 Bash Speed Truggy in action, highlighting its brushless 2852 4400KV motor and independent E45K2 ESC, capable of reaching 73 km/h with a 3S battery.
4.4 Terrain Considerations
The HYPER GO H14BM V3 is designed for off-road use and can conquer various terrains thanks to its 4WD system, durable components, and optional paddle tires.
- Rough Terrain: The aluminum chassis, heavy-duty drivetrain, and oil-filled shocks provide excellent durability and handling over bumps and uneven surfaces.
- Snow/Sand/Mud: Utilize the included paddle tires for enhanced traction and performance in loose or slippery conditions.
- Water: The truck features a waterproof receiver box, offering protection against splashes and light moisture. Avoid submerging the vehicle.

Image: A close-up view of the adjustable, oil-filled shocks on the HYPER GO H14BM V3 RC Truck, showing their design and adjustability for different terrains.
Image: The included paddle tires for enhanced traction in snow and sand, alongside the waterproof receiver box, demonstrating features for all-terrain capability.
5. Maintenance
Regular maintenance is crucial for the longevity and performance of your RC truck.
5.1 Cleaning
- After each use, especially in dirty or wet conditions, clean the truck thoroughly.
- Use a soft brush or compressed air to remove dirt, dust, and debris from the chassis, suspension, and drivetrain.
- Wipe down the body shell with a damp cloth.
- Avoid using harsh chemicals or solvents that could damage plastic or painted surfaces.
5.2 Battery Care and Storage
- Always disconnect the battery from the truck when not in use.
- Store LiPo batteries at a storage voltage (around 3.8V per cell) if not used for extended periods.
- Store batteries in a fire-safe bag or container in a cool, dry place.
- Inspect batteries regularly for any signs of damage or swelling. Discontinue use immediately if damaged.
5.3 Component Inspection
Periodically inspect the following components for wear, damage, or looseness:
- Gears: Check the metal gears in the servo and differential for wear. The V3 model features durable metal gears for improved longevity.
- Shocks: Ensure oil-filled shocks are not leaking and operate smoothly.
- Driveshafts: Inspect steel driveshafts for bends or damage.
- Screws and Fasteners: Tighten any loose screws.
- Tires: Check for wear and tear. Replace if necessary.

Image: A comparison illustrating the difference between V2 and V3 components, specifically highlighting the upgrade to metal gears for enhanced durability and agility, and an improved ESC design for smoother low-speed performance.
6. Troubleshooting
If you encounter issues with your HYPER GO H14BM V3, refer to the following common problems and solutions:
| Problem | Possible Cause | Solution |
|---|---|---|
| Truck does not power on. | Battery not charged; Battery not connected; ESC not turned on. | Charge battery; Connect battery securely; Turn on ESC. |
| No response from remote controller. | Remote controller batteries low/dead; Not bound to truck. | Replace remote controller batteries; Perform binding procedure. |
| Truck drives erratically or pulls to one side. | Steering trim needs adjustment; Damaged steering components. | Adjust ST Trim on remote controller; Inspect steering servo and linkages. |
| Reduced speed or power. | Battery low; Speed limit engaged; Motor/ESC overheating. | Recharge battery; Unlock speed limit (press switch 5 times); Allow components to cool down. |
| Truck makes unusual noises. | Debris in gears; Damaged gears; Loose components. | Clean gears; Inspect and replace damaged gears; Tighten loose screws. |
Binding Procedure (if needed)
- Ensure both the remote controller and the truck are turned off.
- Turn on the remote controller.
- Press and hold the bind button (if available, refer to remote manual) or follow specific power-on sequence for binding.
- Turn on the truck. The indicator lights on both devices should confirm successful binding.
7. Specifications
- Model: H14BM V3
- Scale: 1/14
- Drive System: 4WD
- Motor: Brushless 2852 4400KV (4-pole, high-torque with metal heatsink and cooling fans)
- ESC: 45A (compatible with 2S/3S LiPo batteries)
- Maximum Speed: Up to 50 mph (80 km/h) with Angry Snail 3S2000 battery (not included); 45+ mph (73 km/h) with included 3S battery.
- Chassis Material: 6061 Aluminum alloy with metal center body support
- Drivetrain Components: Steel differential outdrives, metal gearbox internals, durable steel universal telescopic drive shafts.
- Suspension: Adjustable, oil-filled shocks.
- Receiver: Independent, waterproof receiver box.
- Transmitter: 2.4GHz 3-Channel Radio with light control, ST/TH Trim function.
- Control Range: 300+ FT
- Included Battery: 1 x 3S 2000mAh LiPo Battery
- Dimensions (Car): Approximately 32.3 cm x 22 cm x 11.8 cm (L x W x H)
8. Support
For further assistance, technical support, or inquiries regarding spare parts, please contact HYPER GO customer service through the official HYPER GO store or website. Please have your product model number (H14BM V3) and purchase details ready when contacting support.
Visit the HYPER GO Store for more information and products.


