1. Introduction
This manual provides essential instructions for the safe and effective use of your SunSare X12 Cordless Vacuum Cleaner Replacement Battery (Model CPA5261). Please read this manual thoroughly before installation and operation to ensure optimal performance and longevity of your battery and vacuum cleaner. Keep this manual for future reference.
2. Safety Information
Always observe the following safety precautions to prevent injury or damage to the battery and vacuum cleaner:
- Charging: Use only the original charger or a compatible charger specified for the SunSare X12 Cordless Vacuum Cleaner. Do not attempt to charge the battery with unauthorized chargers.
- Temperature: Do not expose the battery to extreme temperatures (above 60°C / 140°F or below 0°C / 32°F). Avoid direct sunlight and heat sources.
- Damage: Do not use the battery if it shows any signs of damage, swelling, leakage, or overheating. Contact customer support immediately.
- Disassembly: Do not attempt to disassemble, modify, or repair the battery. This can lead to electric shock, fire, or explosion.
- Water Exposure: Keep the battery away from water and moisture.
- Disposal: Dispose of used batteries according to local regulations. Do not dispose of batteries in household waste or by incineration.
- Children: Keep the battery out of reach of children and pets.
3. Setup and Installation
Follow these steps to safely replace the battery in your SunSare X12 Cordless Vacuum Cleaner.
- Power Off: Ensure the vacuum cleaner is completely turned off and disconnected from any power source before beginning the battery replacement process.
- Locate Battery Compartment: Identify the battery compartment on your SunSare X12 Cordless Vacuum Cleaner. This is typically located on the main body of the vacuum.
- Remove Old Battery: Depending on your vacuum model, you may need to press a release button or unlatch a cover to access the battery. Carefully slide out or unclip the old battery.
- Insert New Battery: Align the new SunSare replacement battery (Model CPA5261) with the battery slot. Ensure the connectors are properly aligned. Gently slide or clip the new battery into place until it clicks securely.
- Secure Compartment: Close and secure the battery compartment cover, if applicable.
- Initial Charge: For optimal performance, fully charge the new battery before its first use. Refer to the "Operating Instructions" section for charging details.
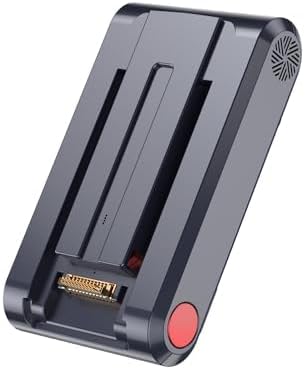
Image 1: The SunSare X12 Cordless Vacuum Cleaner Replacement Battery (Model CPA5261). This image shows the battery unit with its connection terminals and release button, ready for installation into the vacuum cleaner.
4. Operating Instructions
4.1. Charging the Battery
To charge your SunSare X12 replacement battery:
- Connect the vacuum cleaner (with the new battery installed) to its original charging adapter.
- Plug the charging adapter into a standard wall outlet.
- The charging indicator light on your vacuum cleaner will typically illuminate to show that charging is in progress. Refer to your vacuum cleaner's main manual for specific indicator light behavior.
- Allow the battery to charge fully. A full charge usually takes several hours. Disconnect the charger once the battery is fully charged to prolong its lifespan.
4.2. Battery Usage
Once fully charged, the battery is ready for use with your SunSare X12 Cordless Vacuum Cleaner. Operate the vacuum cleaner as per its original instruction manual. The replacement battery is designed to provide comparable performance to the original battery.
5. Maintenance
5.1. Cleaning
Periodically inspect the battery and its contacts for dust or debris. Use a dry, soft cloth to gently wipe the battery surface and connection terminals. Do not use liquids or abrasive cleaners.
5.2. Storage
If the vacuum cleaner will not be used for an extended period, it is recommended to store the battery partially charged (around 50-60%) in a cool, dry place, away from direct sunlight and extreme temperatures. Fully discharging or fully charging the battery for long-term storage can reduce its lifespan.
6. Troubleshooting
- Vacuum not powering on after battery replacement:
- Ensure the battery is correctly installed and securely clicked into place.
- Verify that the battery compartment cover (if any) is properly closed.
- Check if the battery has sufficient charge. Connect the vacuum to the charger and observe the charging indicator.
- Battery not charging:
- Confirm that the charging adapter is properly connected to both the vacuum and the wall outlet.
- Check the wall outlet by plugging in another device.
- Inspect the charging cable and adapter for any visible damage.
- Ensure the battery contacts on both the battery and the vacuum are clean and free of debris.
- Reduced run time:
- Battery performance can be affected by extreme temperatures. Use the vacuum in recommended temperature ranges.
- Over time, all rechargeable batteries experience a natural decline in capacity.
- Ensure the vacuum cleaner's filters are clean, as clogged filters can increase motor strain and battery drain.
If troubleshooting steps do not resolve the issue, please contact SunSare customer support.
7. Specifications
| Brand | SunSare |
| Model Number | CPA5261 |
| ASIN | B0F7RH26Z1 |
| Product Dimensions | 4 x 2 x 10 inches |
| Item Weight | 1.2 pounds |
| Battery Type | Nonstandard Battery (1 required) |
| Manufacturer | SunSare |
| Date First Available | May 7, 2025 |
8. Warranty and Support
For warranty information, please refer to the documentation included with your purchase or visit the official SunSare website. If you encounter any issues or have questions regarding your SunSare X12 replacement battery, please contact SunSare customer support for assistance.
You can typically find support contact details on the manufacturer's website or through your purchase platform.