1. Product Overview
The LENUTO W13 Magnetic Power Bank is a versatile portable charger designed for convenience and efficiency. It features a 10000mAh battery, 22.5W fast charging capabilities, a foldable stand, and dual USB output for charging multiple devices simultaneously. This manual provides essential information for safe and effective use of your power bank.

Figure 1: Product Components and Ports
- 1. Power Button: Activates/deactivates the power bank and LED display.
- 2. Magnetic Wireless Charging Surface: For MagSafe compatible wireless charging.
- 3. USB-C Input/Output Port: For charging the power bank or charging devices.
- 4. USB-A Output Port: For wired charging of devices.
- 5. LED Display: Shows battery percentage and charging status.
- 6. Foldable Stand: Integrated stand for hands-free device viewing.
2. What's in the Box
Please check the package contents upon unboxing:
- 1 x LENUTO W13 10000mAh Portable Power Bank
- 1 x USB-A to USB-C Charging Cable
- 1 x User Manual
3. Specifications
| Model | W13 |
| Battery Capacity | 10000mAh |
| USB-C Input/Output | Input: 18W (Max), Output: 20W (Max) |
| USB-A Output | 22.5W (Max) |
| Wireless Charging Output | 15W (Max) |
| Product Dimensions | 4.3 x 2.89 x 0.69 inches |
| Item Weight | 8.1 ounces |
| Special Features | Fast Charging, LED Display, Wireless Charging, Foldable Stand |
4. Setup and Initial Use
4.1 Activating the LED Display
For the first time use or if the product has not been used for a long period, please follow these steps to activate the LED display for accurate battery percentage readings:
- Use the product until the battery display reaches 0%.
- Charge the product to 100% without disconnecting the power or unplugging the charging cable.
Note: Failure to follow these steps may result in an inaccurate battery display.

Figure 2: LED Display Activation Process
4.2 Charging the Power Bank
To charge your LENUTO W13 Power Bank:
- Connect the provided USB-A to USB-C charging cable to the USB-C Input/Output Port (3) on the power bank.
- Connect the other end of the cable to a compatible USB power adapter (not included) or a computer's USB port.
- The LED Display (5) will show the increasing battery percentage. When fully charged, it will display "100".

Figure 3: Charging the Power Bank
5. Operating Instructions
5.1 Power Button Operation and LED Display
- Press once: Turns on the power bank and displays the remaining battery percentage on the LED display.
- Press twice in succession: Turns off the power bank. The LED display will go out.
5.2 Wireless Charging (MagSafe Compatible)
The power bank supports magnetic wireless charging for MagSafe compatible devices (iPhone 12 series and newer, or other wireless-charging-capable phones with a magnetic ring).
- Ensure the power bank is turned on (press the Power Button once).
- Align your MagSafe compatible device with the Magnetic Wireless Charging Surface (2) on the power bank. The magnets will snap into place, and charging will begin automatically.
- The LED display will show a charging indicator.

Figure 4: Wireless Charging in Progress
Note: For optimal magnetic connection and charging efficiency, use with MagSafe compatible cases or without a case. Non-magnetic cases may hinder the magnetic attachment and wireless charging performance.
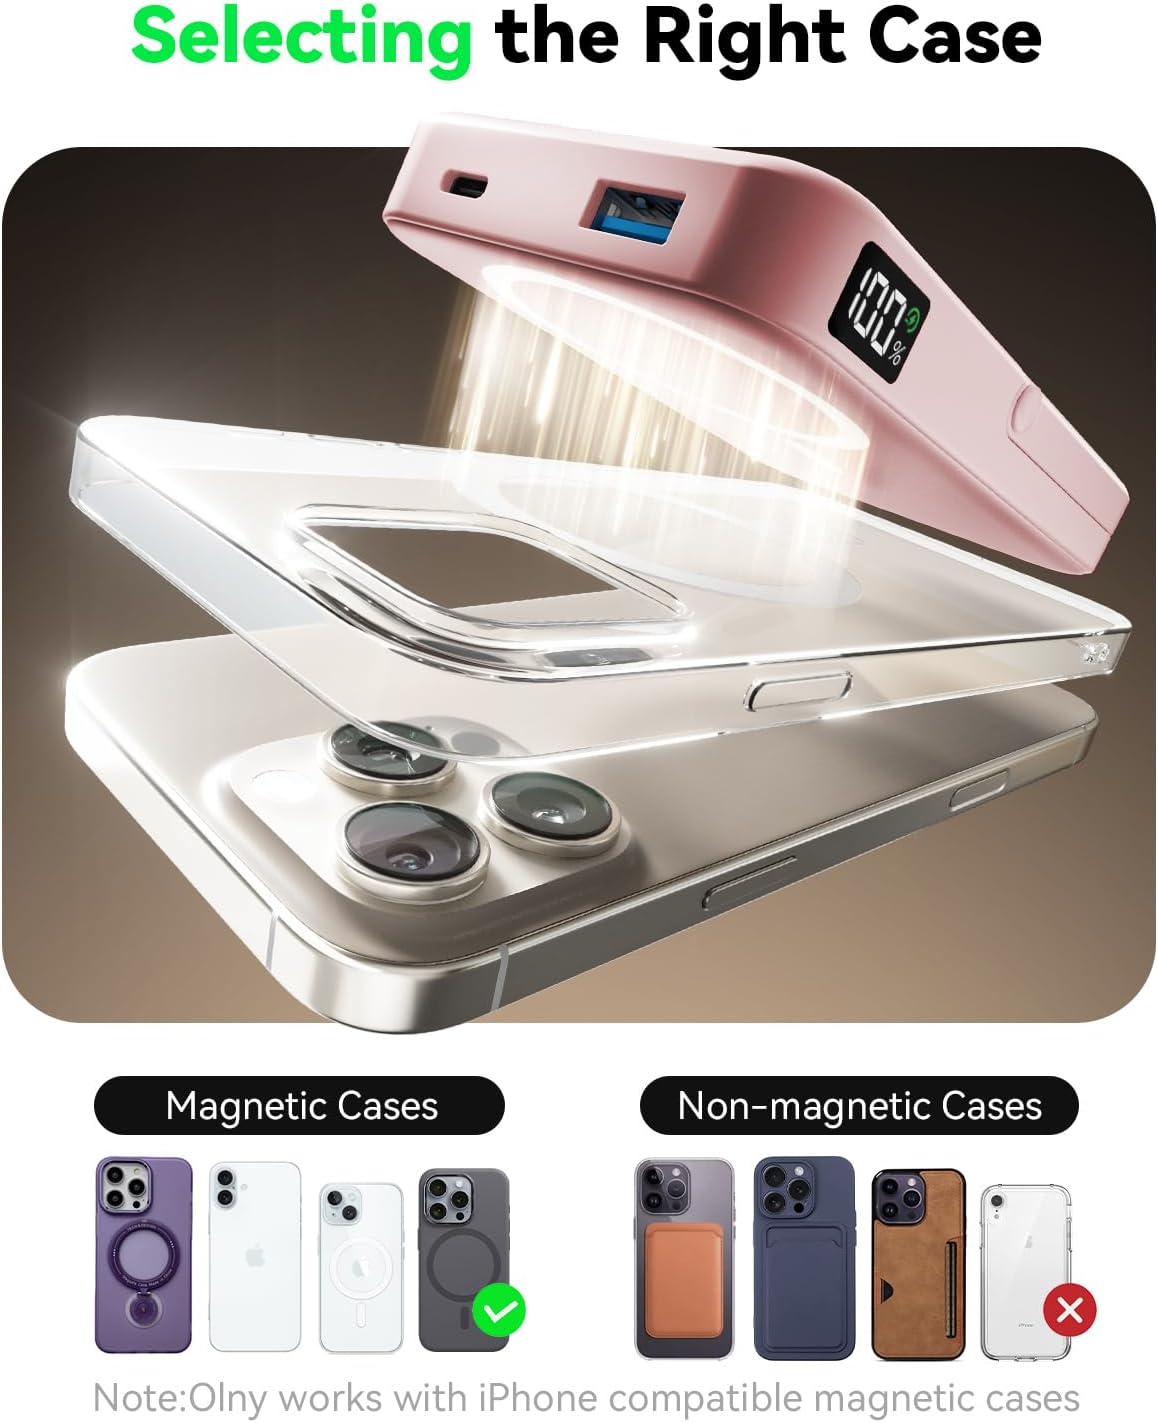
Figure 5: Selecting the Right Case for Magnetic Charging
5.3 Wired Charging (USB-C and USB-A)
The power bank offers wired charging via its USB-C and USB-A ports.
- Connect your device's charging cable to either the USB-C Input/Output Port (3) or the USB-A Output Port (4) on the power bank.
- Connect the other end of the cable to your device.
- Ensure the power bank is turned on. Charging will begin automatically.
The power bank supports charging up to three devices simultaneously (one wirelessly, two wired). However, charging multiple devices may reduce the charging speed for each device and cause the power bank to heat up, which is normal.

Figure 6: Charging Multiple Devices
5.4 Using the Foldable Stand
The integrated foldable stand allows for hands-free viewing of your device while charging.
- Gently pull out the Foldable Stand (6) from the back of the power bank.
- Adjust the stand to your desired viewing angle (up to 60 degrees).
- Place your device on the magnetic charging surface or connect it via cable.
The stand supports both portrait and landscape orientations for your device.

Figure 7: Multiple Usage Modes with Foldable Stand
6. Important Safety Precautions
To ensure safe operation and prolong the lifespan of your power bank, please adhere to the following safety guidelines:
- Do not expose the power bank to extreme temperatures (above 60°C/140°F) or direct sunlight.
- Avoid dropping, hitting, or disassembling the device.
- Keep away from water, moisture, and flammable materials.
- Do not use if the power bank is damaged, swollen, or leaking.
- Use only approved charging cables and adapters.
- Keep out of reach of children.
- This product contains a lithium polymer battery. Dispose of it responsibly according to local regulations.
- The power bank is certified with FCC/CE/ROHS, ensuring safe and reliable charging.
Video 1: Overview of the LENUTO W13 Magnetic Power Bank, highlighting its features and safety aspects.
7. Troubleshooting
- Device not charging wirelessly:
- Ensure your device is MagSafe compatible or has a magnetic ring.
- Check if the power bank is turned on.
- Remove any thick or non-magnetic phone cases.
- Ensure proper alignment of the device on the charging surface.
- Slow charging speed:
- Verify that your device and cable support fast charging.
- Charging multiple devices simultaneously may reduce individual charging speeds.
- Ensure the power bank itself is sufficiently charged.
- Power bank not charging:
- Check the charging cable and adapter for damage.
- Ensure the cable is securely connected to both the power bank and the power source.
- Try a different cable or adapter.
- LED display inaccurate or not working:
- Perform the LED display activation steps outlined in Section 4.1.
8. Maintenance
- Clean the power bank with a soft, dry cloth. Do not use harsh chemicals or abrasive materials.
- Store the power bank in a cool, dry place away from direct sunlight and extreme temperatures.
- If not used for extended periods, charge the power bank to approximately 50-70% every three months to maintain battery health.
9. Warranty and Support
LENUTO products come with a standard manufacturer's warranty. For warranty claims, technical support, or any product-related inquiries, please contact your retailer or visit the official LENUTO website. Please have your purchase receipt and product model number (W13) ready when contacting support.
For further assistance, you may also refer to the contact information provided on the product packaging or the official LENUTO brand store on Amazon: LENUTO Store.