BOSUDA MG100
BOSUDA MG100 5-inch Motorcycle Smart Monitor User Manual
Model: MG100
1. Introduction
Thank you for choosing the BOSUDA MG100 5-inch Motorcycle Smart Monitor. This device is designed to enhance your riding experience by providing seamless smartphone integration, navigation, communication, and entertainment features in a durable, weather-resistant package. Please read this manual thoroughly before use to ensure proper installation and operation.
2. Safety Information
Always prioritize safety while riding. Do not operate the device in a way that distracts you from the road. Ensure all connections are secure and the device is firmly mounted before riding. Adhere to all local traffic laws and regulations.
- Do not attempt to disassemble or modify the device.
- Keep the device away from extreme heat sources or open flames.
- Ensure proper wiring to avoid electrical shorts or damage to your motorcycle's electrical system.
- Use only approved accessories and power cables.
3. Package Contents
Verify that all items are present in your package:
- Main Unit (BOSUDA MG100 Smart Monitor)
- Holder
- Battery Connection Cable
- USB Power Cable
- Tool Set
- Japanese Instruction Manual
4. Setup
4.1 Mounting the Device
The BOSUDA MG100 offers flexible mounting options to suit various motorcycle handlebars and mirror mounts. Choose the method that best fits your motorcycle and ensures clear visibility without obstructing controls.
Handlebar Mounting (20mm-25mm diameter)
- Attach the anti-slip mats to the upper and lower parts of the U-clamp.
- Insert flat washers onto the long screws.
- Attach the nuts to the bottom of the U-clamp, corresponding to the long screws.
- Secure the bracket to the motorcycle handlebar and tighten the screws.
- Attach the stand anti-slip pad to the screw holes on the rectangular plate of the ball joint using a screwdriver.
- Using the special hex wrench, loosen the screw in the center of the long arm. Insert the ball part onto the long arm and tighten the screw in the center of the long arm.
- Align the screw holes on the rectangular plate of the bracket with the screw holes on the back of the product body and tighten the screws.
Mirror Mount Installation (up to 10mm hole diameter)
- Remove the motorcycle mirror using a spanner (wrench). (Spanner is not included, separate preparation is required. Mirror removal method may vary by model.)
- Combine the mirror mount with the motorcycle mirror.
- Attach the assembled product body to the mirror mount.
- After inserting the ball head of the rearview mirror into the rod, adjust it to a position that is easy to see, and firmly tighten the center of the long arm to complete the installation.
Brake Reservoir Mounting
- Remove the original screw from the brake reservoir.
- Tighten the brake reservoir with the original screw. Note: The length of the original screw and the ball-type part may not be compatible. In such cases, please use other mounting methods.
- Attach the assembled product body to the brake reservoir mount.
Video: Installation and Wiring Guide for the BOSUDA MG100 Smart Monitor.
4.2 Power Connection
The device can be powered directly from your motorcycle's battery or via a USB cable. For USB power, ensure the adapter provides DC5V/2A or higher.

Image: Diagram illustrating power connection options for the BOSUDA MG100 Smart Monitor, including direct battery and USB.
4.3 Initial Power On
After connecting the power cord, the device will start within 10 seconds. The home screen will display various functions and information.
5. Operating Instructions
5.1 Connecting to Apple CarPlay
- Ensure Bluetooth is enabled on your monitor.
- From the monitor's home screen, tap 'Apple CarPlay'.
- On your iPhone, go to 'Settings' > 'Bluetooth' and select the device named 'MT05-*****'.
- Wait approximately 20-30 seconds. A 'Bluetooth Pairing Request' will appear on your iPhone. Select 'Pair' to complete the pairing.
- A message 'Use CarPlay via SmartScreen?' will appear. Select 'Use CarPlay'.
- After a short wait, the system will switch to CarPlay mode.

Image: The monitor seamlessly integrates with Apple CarPlay, showing familiar apps like Phone, Music, and Maps.
5.2 Connecting to Android Auto
- Ensure Bluetooth is enabled on your monitor.
- From the monitor's home screen, tap 'Android Auto'.
- On your Android smartphone, access 'Bluetooth' settings and start searching for devices.
- Select the device named 'MT05-*****' from the list.
- Wait approximately 20-30 seconds. A 'Bluetooth Pairing Request' will appear on your smartphone. Select 'Pair' to complete the pairing.
- A message 'Connect to device?' will appear. Tap 'Connect'.
- Once Android Auto is successfully connected, the system will automatically switch to Android Auto mode.

Image: The monitor supports Android Auto, providing access to navigation, media, and communication apps.
5.3 Brightness Adjustment
The monitor features a high-sensitivity light sensor for automatic brightness adjustment, ensuring optimal visibility in varying light conditions. You can also manually adjust the brightness as needed.
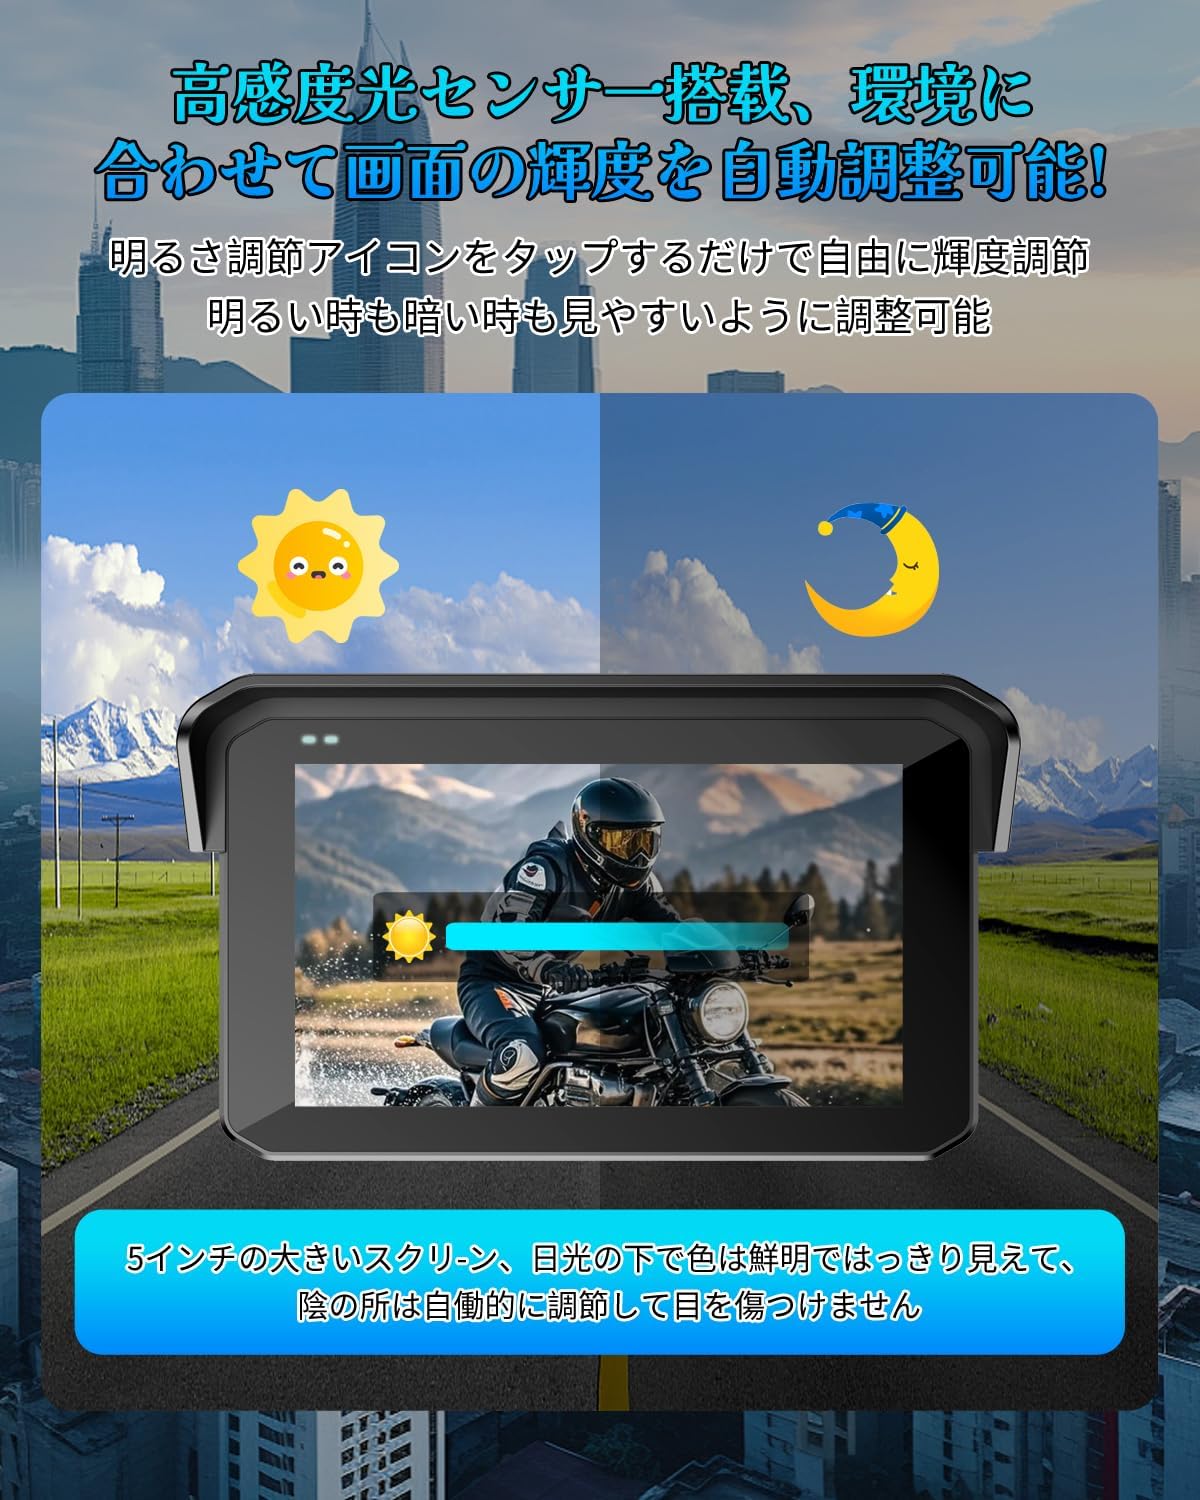
Image: The monitor automatically adjusts brightness based on ambient light, or can be adjusted manually.
5.4 Voice Control
Utilize voice commands through Siri or Google Assistant for hands-free operation of navigation, music playback, and calls. This allows you to focus on driving while staying connected.

Image: Voice commands enable hands-free control for navigation, music, and calls.
Video: Demonstrates wireless CarPlay and Android Auto features, including voice control for navigation, music, and calls.
5.5 Music Playback and Calls
Connect your smartphone via Bluetooth to play music and make/receive calls directly from the monitor. Audio can be routed through connected earphones or intercoms.
Video: Overview of the motorcycle navigation features, including music playback and call handling.
5.6 Navigation
Utilize your smartphone's navigation applications (e.g., Google Maps, Apple Maps) displayed directly on the monitor. This ensures you always have access to the latest road and facility information without update fees.

Image: The 5-inch IPS LCD touch screen shows the main interface with applications like Phone, Music, Maps, and Messages.
6. Maintenance
6.1 Cleaning
To clean the monitor, gently wipe the screen and body with a soft, damp cloth. Avoid using harsh chemicals or abrasive materials that could damage the screen or casing.
6.2 Storage
When not in use for extended periods, store the device in a cool, dry place away from direct sunlight and extreme temperatures. Ensure all cables are neatly coiled to prevent damage.
7. Troubleshooting
- Device not powering on: Check all power connections. Ensure the battery connection is secure or the USB power adapter meets the DC5V/2A requirement.
- CarPlay/Android Auto not connecting: Ensure Bluetooth is enabled on both the monitor and your smartphone. Verify that the correct device is selected for pairing. Restart both the monitor and your smartphone if issues persist.
- Screen not responding to touch: Ensure the screen is clean and dry. If wearing gloves, ensure they are compatible with capacitive touchscreens.
- Poor audio quality: Check Bluetooth connection to your earphones/intercom. Ensure volume levels are appropriately set on both the monitor and your audio device.
8. Specifications
| Feature | Specification |
|---|---|
| Screen Size | 5 inches |
| Display Type | IPS LCD |
| Map Type | Terrain (via smartphone apps) |
| Package Dimensions | 20.4 x 14.4 x 10.9 cm; 780 g |
| Product Model Number | MG100 |
| Brand | BOSUDA |
| Compatible Vehicle Type | Motorcycle |
| Features | Touchscreen, Automatic Brightness Adjustment, IP65 Waterproof/Dustproof, Heat Resistant, Shock Resistant, Voice Assistant, Music Playback, Call, Navigation, Intercom Compatible |
| Connectivity Technology | Bluetooth 5.0 |
| Mounting Type | Handlebar Mount, Mirror Mount, Brake Reservoir Mount |
| Touchscreen Type | Capacitive |
9. Warranty and Support
This product comes with a 2-year quality guarantee. For any inquiries or support, please contact our Japanese customer support team. The device has obtained Japan's technical compliance (Technical Compliance Number: 219-249118).
Related Documents - MG100
 |
Motorcycle 5-inch Wireless Touchscreen Dash Cam with Cell Phone Connectivity Comprehensive guide to the 5-inch wireless touchscreen dash cam for motorcycles, featuring cell phone connectivity, Carplay, Android Auto, tire pressure monitoring, and dual-camera recording. Includes installation, setup, and troubleshooting instructions. |
 |
FJDynamics AG1 Guidance System Software User Manual Comprehensive guide for the FJDynamics AG1 Guidance System software, covering installation, configuration, operation, safety, and troubleshooting for precision agriculture. |
 |
Dr.Rock Mini 2s Massage Gun User Manual User manual for the Dr.Rock Mini 2s Massage Gun, detailing product introduction, specifications, usage instructions, and after-sales service. Learn how to use the massage gun for muscle relaxation and recovery. |
 |
CHIQ MG80-14586BW, MG100-14586BX User Manual Comprehensive user manual for CHIQ washing machines, models MG80-14586BW and MG100-14586BX. Includes safety instructions, installation guides, operation details, maintenance tips, and technical specifications. |
 |
Montpellier MDAWD10614W 10kg Washer Dryer: Installation & Operating Instructions This guide provides essential installation, operation, maintenance, and troubleshooting information for the Montpellier MDAWD10614W 10kg Washer Dryer. Ensure safe and efficient use of your domestic appliance. |
 |
ATMOCE MC100-T M-Combiner Quick Installation Guide for Solar Energy Systems Step-by-step instructions for installing the ATMOCE MC100-T M-Combiner, an integrated management and power equipment for connecting microinverters, batteries, and loads to the grid. Includes pre-installation checks, mounting, wiring, power-up, and activation procedures. |
Ask a question about this manual
Ask about setup, troubleshooting, compatibility, parts, safety, or missing instructions. Manuals+ will review the question and use this page’s manual context to help answer it.