1. Safety Information
Read all safety warnings and instructions before operating this pressure washer. Failure to follow the warnings and instructions may result in electric shock, fire, and/or serious injury.
1.1 General Safety
- Always wear appropriate personal protective equipment (PPE) such as safety glasses, hearing protection, and protective footwear.
- Never point the spray gun at people, pets, or electrical devices. The high-pressure spray can cause severe injury.
- Ensure the pressure washer is connected to a properly grounded outlet. Do not use with ungrounded outlets or adapters.
- Keep children and bystanders away from the operating area.
- Do not operate the pressure washer if you are tired or under the influence of drugs, alcohol, or medication.
1.2 Electrical Safety
- Inspect the power cord for damage before each use. Do not use if the cord is damaged.
- Do not immerse the pressure washer in water.
- Always unplug the unit from the power source before performing any maintenance or cleaning.
1.3 Water Supply Safety
- Ensure the water supply hose is securely connected and free of leaks.
- Do not use hot water with the pressure washer. Use cold water only.
- Ensure the water inlet filter is clean and properly installed to prevent debris from entering the pump.
2. Product Overview and Components
Familiarize yourself with the components of your Le Hao Tool Pressure Washer Model 101 before assembly and operation.
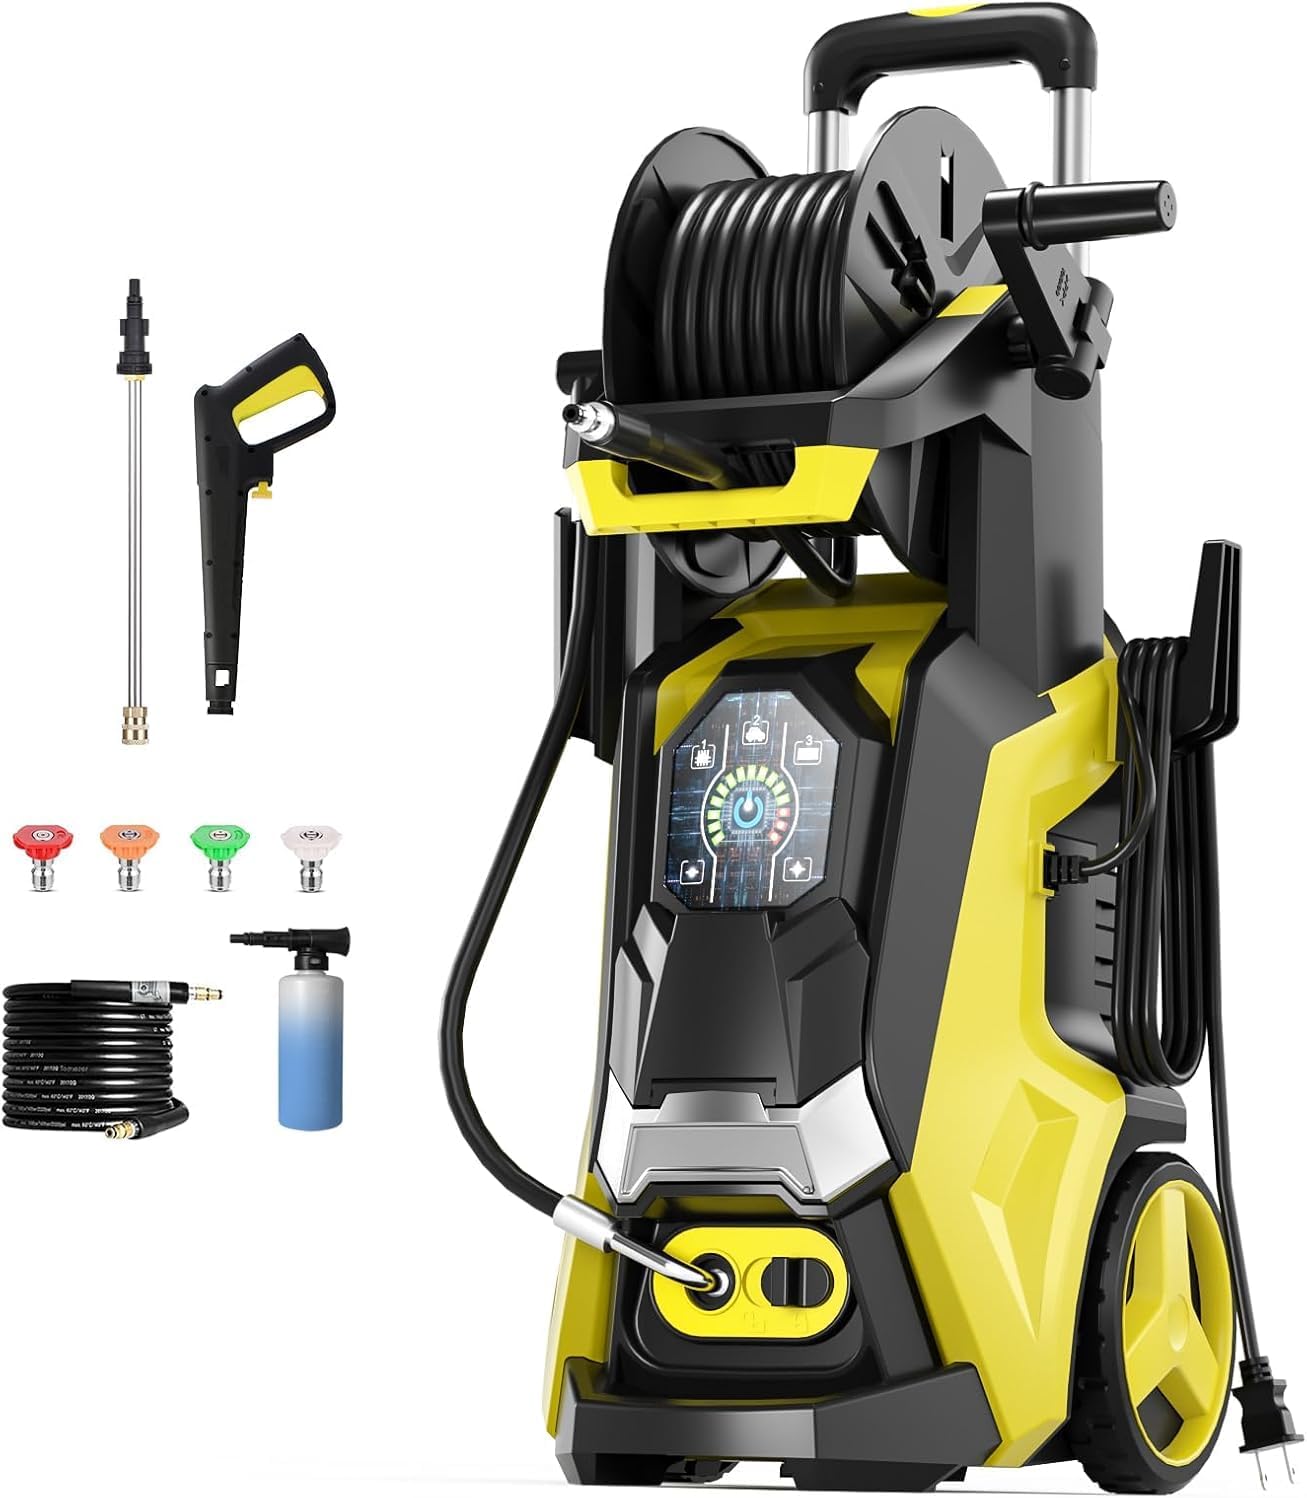
Figure 2.1: Le Hao Tool Pressure Washer Model 101 with included accessories. This image displays the main unit, high-pressure hose, spray gun, extension wand, various quick-connect nozzles (0°, 15°, 25°, 40°), and the foam cannon.
Key Components:
- Main Unit: Contains the motor, pump, and control panel.
- High-Pressure Hose: Connects the main unit to the spray gun.
- Spray Gun: Handheld device for directing the high-pressure water. Features a safety lock.
- Extension Wand: Attaches to the spray gun for extended reach.
- Quick-Connect Nozzles: Interchangeable nozzles for different spray patterns and intensities.
- Foam Cannon: For applying detergent or soap.
- Water Inlet: Connection point for the garden hose.
- Power Cord: For electrical connection.
- Hose Reel: Integrated storage for the high-pressure hose.
- Telescopic Handle: Adjustable handle for easy transport.
- Wheels: For mobility.
3. Setup and Assembly
Follow these steps to assemble and prepare your pressure washer for first use.
3.1 Unpacking
- Carefully remove all components from the packaging.
- Check for any damage during transit. Contact customer support if any parts are damaged or missing.
- Retain packaging for future storage or transport.
3.2 Assembly
- Attach the Handle: Extend the telescopic handle until it locks into place.
- Connect High-Pressure Hose: Connect one end of the high-pressure hose to the outlet on the main unit and the other end to the spray gun. Ensure connections are tight.
- Attach Extension Wand and Nozzle: Connect the extension wand to the spray gun. Select the desired quick-connect nozzle and insert it into the end of the extension wand until it clicks securely.
- Connect Water Supply: Attach a standard garden hose (not included) to the water inlet on the pressure washer. Ensure the water inlet filter is in place. Connect the other end of the garden hose to a water faucet.
3.3 Initial Water Flow
- Turn on the water faucet completely.
- Squeeze the trigger on the spray gun to purge air from the system. Hold the trigger until a steady stream of water flows out, free of air bubbles. This primes the pump.
4. Operating Instructions
This section details how to operate your pressure washer safely and effectively.
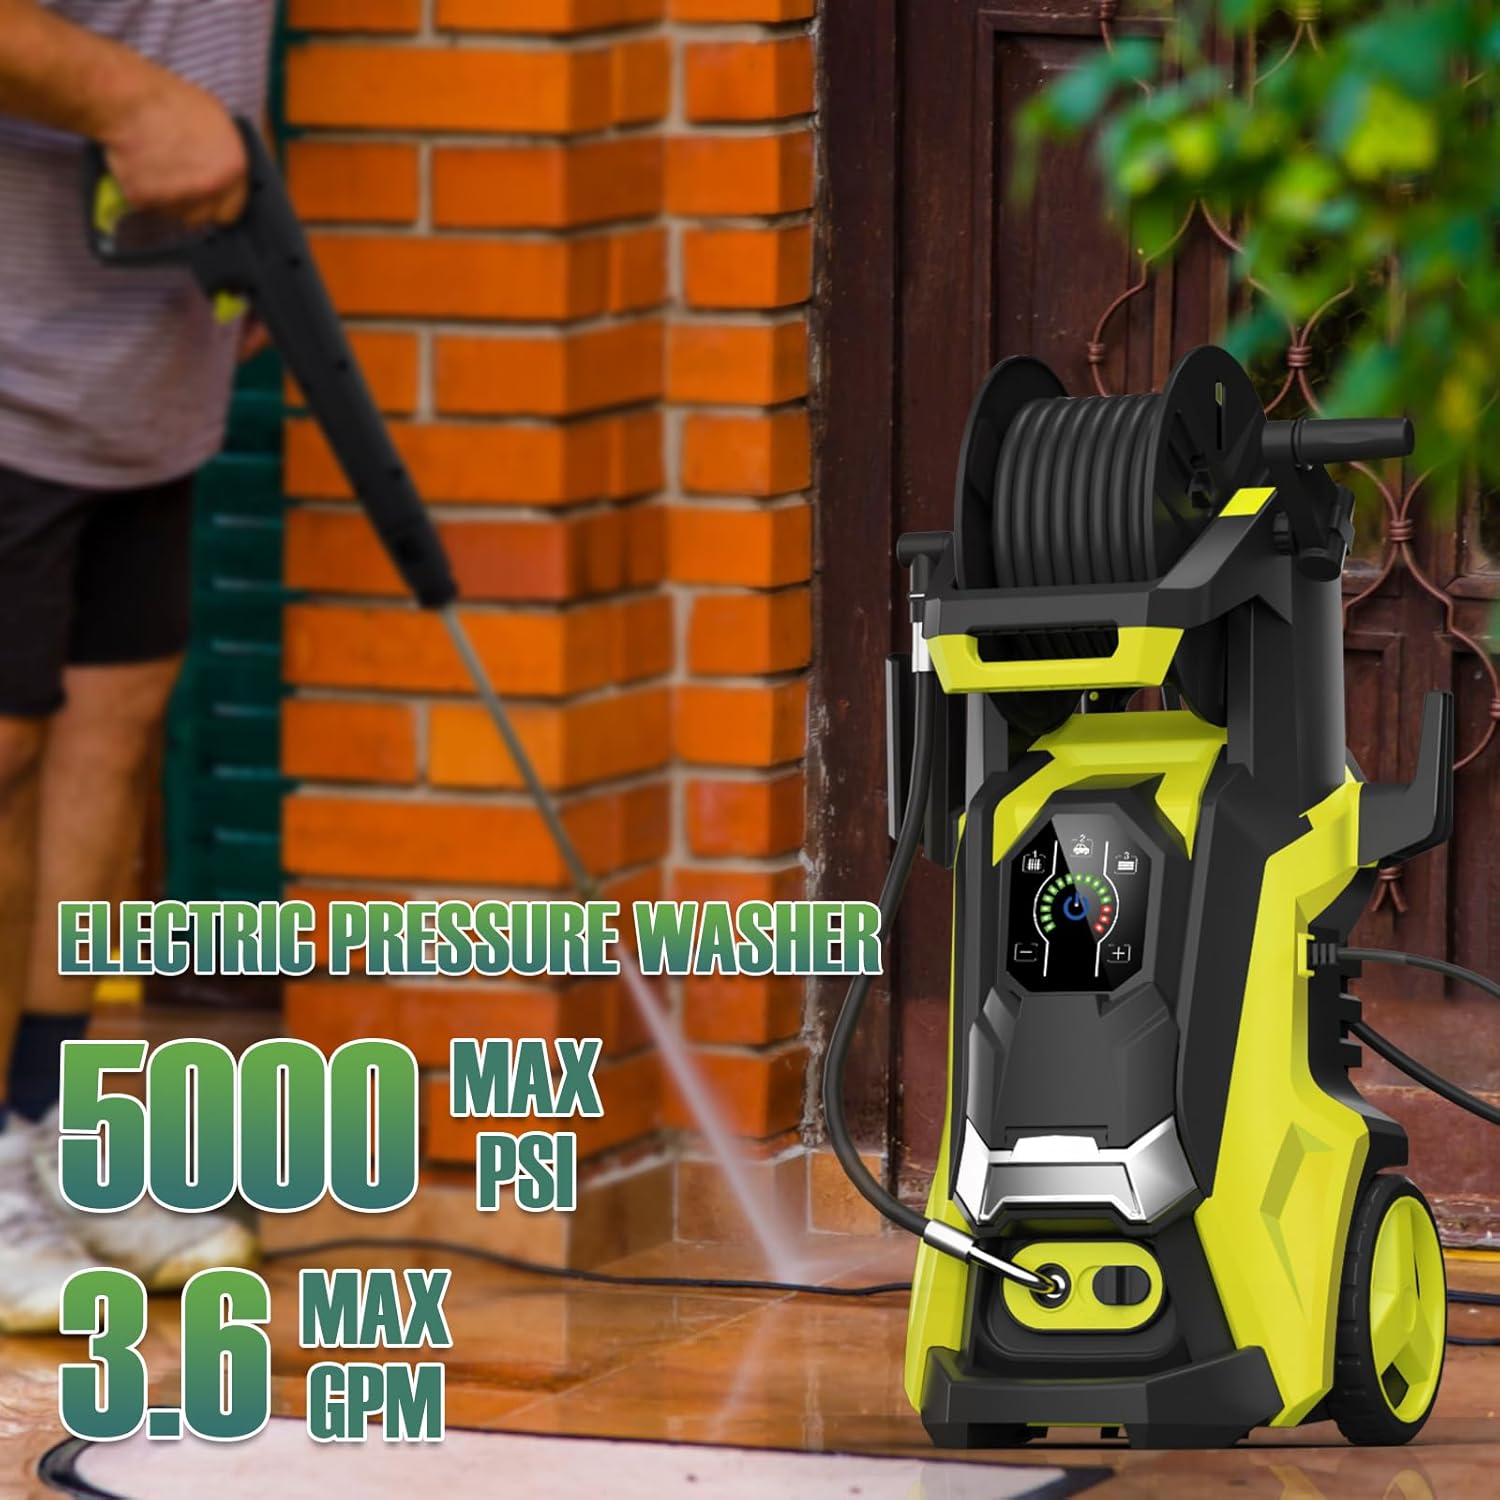
Figure 4.1: The Le Hao Tool Pressure Washer in operation, demonstrating its cleaning capability with a maximum pressure of 5000 PSI and a maximum flow rate of 3.6 GPM.
4.1 Starting the Pressure Washer
- Ensure the water supply is fully open and air has been purged from the system (as per Section 3.3).
- Plug the power cord into a grounded electrical outlet.
- Press the power button on the unit's control panel to turn on the pressure washer. The motor will start.
4.2 Using the LED Touchscreen and Pressure Modes

Figure 4.2: Detailed view of the LED touchscreen control panel, illustrating the three selectable pressure modes: Soft (1), Medium (2), and Strong (3). Each mode's gear can be further adjusted using the '+' and '-' buttons.
The pressure washer features an LED touchscreen for easy control of water pressure.
- Soft Mode (1): Ideal for delicate surfaces like painted wood or vehicles.
- Medium Mode (2): Suitable for general cleaning tasks such as patio furniture or light dirt on concrete.
- Strong Mode (3): For tough stains and durable surfaces like heavily soiled concrete or brick.
Use the '+' and '-' buttons on the touchscreen to fine-tune the pressure within each selected mode.
4.3 Nozzle Selection and Application

Figure 4.3: The four quick-connect nozzles (0°, 15°, 25°, 40°) and the 500 ml foam spray bottle. Each nozzle is designed for specific cleaning tasks.
The pressure washer comes with four quick-connect nozzles and a foam cannon for various cleaning needs:
- 0° Red Nozzle: Produces a concentrated, high-impact stream for stubborn stains and hard-to-reach areas. Use with extreme caution on durable surfaces only.
- 15° Yellow Nozzle: Provides a powerful, narrow spray for removing mud and sand stains from hard surfaces.
- 25° Green Nozzle: A versatile, medium-angle spray suitable for general cleaning of decks, patios, and vehicles.
- 40° White Nozzle: Delivers a wide, gentle spray for sensitive materials like windows, siding, or delicate painted surfaces.
- Foam Cannon: Fill with appropriate pressure washer detergent. Attach to the spray gun to apply a thick layer of foam for cleaning vehicles, siding, or other surfaces.
4.4 Using the Safety Lock
The spray gun is equipped with a safety lock to prevent accidental operation. Always engage the safety lock when the pressure washer is not in use or when changing nozzles.

Figure 4.4: Features such as the telescopic handle for easy movement, the safety lock on the spray gun for preventing accidental discharge, and large wheels for enhanced mobility.
4.5 Shutting Down
- Turn off the pressure washer by pressing the power button.
- Turn off the water supply at the faucet.
- Squeeze the trigger on the spray gun to release any remaining pressure in the system.
- Engage the safety lock on the spray gun.
- Unplug the power cord from the electrical outlet.
- Disconnect the garden hose and high-pressure hose.
5. Maintenance
Regular maintenance ensures optimal performance and extends the lifespan of your pressure washer.
5.1 Cleaning Nozzles
If a nozzle becomes clogged or the spray pattern is irregular, clean it using the included nozzle cleaning tool or a thin wire. Remove the nozzle from the wand, clear any debris, and rinse with water.
5.2 Water Inlet Filter
Periodically check and clean the water inlet filter to prevent debris from entering the pump. Remove the filter, rinse it under running water, and reinsert it.
5.3 Storage and Winterization
Before storing the pressure washer, especially in freezing temperatures, ensure all water is drained from the pump and hoses to prevent damage.
- Disconnect all hoses.
- Run the pressure washer for a few seconds with no water supply to expel any remaining water from the pump. Do not run dry for more than 5 seconds.
- Store the unit in a dry, frost-free location.
6. Troubleshooting
Refer to this section for common issues and their solutions.
| Problem | Possible Cause | Solution |
|---|---|---|
| Motor does not start | No power supply Thermal overload activated | Check power cord and outlet Allow unit to cool down for 30 minutes |
| No water pressure or low pressure | Water supply off or restricted Air in pump Clogged nozzle Water inlet filter dirty | Ensure water supply is fully open Purge air from system (Section 3.3) Clean nozzle (Section 5.1) Clean water inlet filter (Section 5.2) |
| Water leaks | Loose connections Damaged O-rings | Tighten all hose connections Inspect and replace O-rings if damaged |
| Motor stops during operation | Thermal overload activated Low voltage | Allow unit to cool down Ensure proper voltage supply |
7. Specifications
Technical details for the Le Hao Tool Pressure Washer Model 101.
- Model: 101
- Product Dimensions: 18 x 12 x 11 inches
- Item Weight: 21.9 pounds
- Maximum Pressure: Up to 5000 PSI (Pounds per Square Inch)
- Maximum Flow Rate: Up to 3.6 GPM (Gallons per Minute)
- Hose Length: 25 FT
- Water Protection Level: IPX5 (from A+ content image)

Figure 7.1: Illustration of the high-performance motor, highlighting its IPX5 waterproof rating, high power, and turbocharger technology for strong pressure output.
8. Warranty and Support
This Le Hao Tool product is designed for reliability and performance. For warranty information or technical support, please refer to the contact details provided with your purchase documentation or visit the official Le Hao Tool website.


