1. Introduction
This manual provides detailed instructions for the installation, configuration, and maintenance of your YYTDNGW Classic B450M Motherboard. Please read this manual thoroughly before proceeding with installation to ensure proper setup and operation. This motherboard is designed to support AMD AM4 socket processors and DDR4 memory, offering a robust foundation for various computing needs.
2. Product Overview
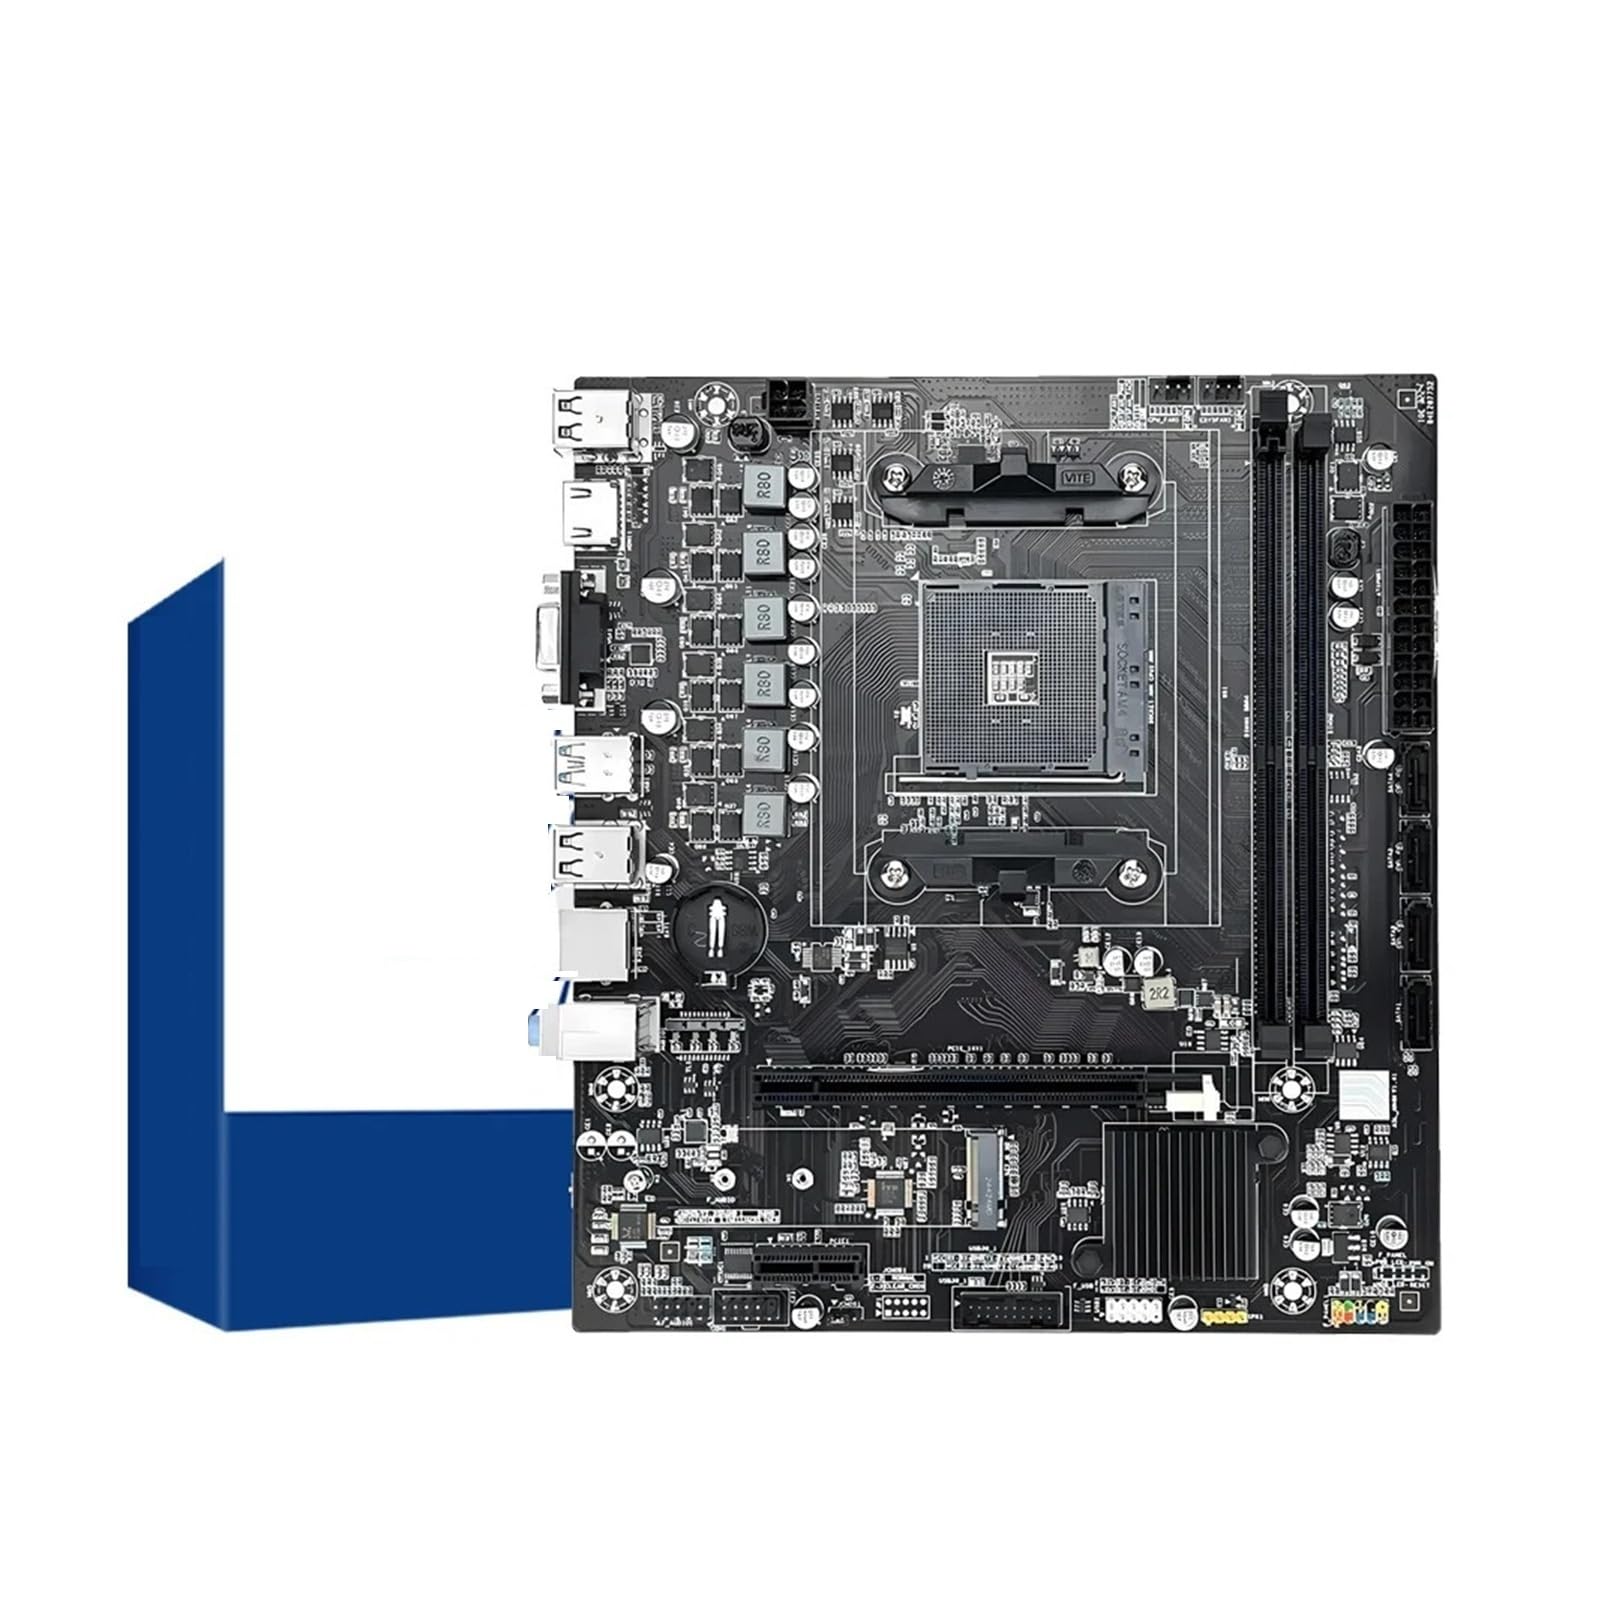
Figure 1: Top-down view of the YYTDNGW Classic B450M Motherboard, showcasing the AM4 CPU socket, DDR4 memory slots, PCIe slots, and various connectors.
The YYTDNGW Classic B450M Motherboard is built for performance and expandability. Key features include:
- Processor Compatibility: Supports AMD Ryzen 3000, 4000, and 5000 series processors with an AM4 socket, including Ryzen 5600 and 5600G CPUs.
- Memory Support: Features two DDR4 memory slots, supporting dual-channel configuration up to 64GB total capacity.
- Storage Options: Equipped with four SATA 3 ports and one M.2 slot for NVMe SSDs, providing flexible and high-speed storage solutions.
- Expansion Slots: Includes one PCI-E 3.0 x16 slot for graphics cards and one PCI-Express X1 slot for additional expansion cards.
- Connectivity: Offers a range of back I/O ports including USB 2.0, USB 3.0, RJ45 for Gigabit LAN, and COM port.
3. Setup Guide
Follow these steps carefully to install your motherboard and its components.
3.1 CPU Installation
- Locate the AM4 CPU socket on the motherboard.
- Lift the load lever on the side of the socket.
- Align the triangular mark on your AMD AM4 CPU with the corresponding mark on the socket.
- Gently place the CPU into the socket. Do not force it. If it does not sit correctly, re-check alignment.
- Lower the load lever back into its locked position to secure the CPU.
- Apply thermal paste (if not pre-applied to your cooler) and install the CPU cooler according to its manufacturer's instructions.
3.2 Memory (RAM) Installation
- Locate the two DDR4 DIMM slots.
- Open the clips at both ends of the DIMM slot.
- Align the notch on the DDR4 memory module with the key in the DIMM slot.
- Insert the memory module firmly into the slot until the clips snap into place. Ensure both clips are fully closed.
- For dual-channel performance, install memory modules in both slots.
3.3 Storage Device Installation
3.3.1 M.2 NVMe SSD Installation
- Locate the M.2 slot on the motherboard.
- Remove the M.2 standoff screw.
- Insert the M.2 SSD into the slot at a 30-degree angle.
- Gently push the SSD down and secure it with the standoff screw.
3.3.2 SATA Drive Installation
- Connect one end of a SATA data cable to a SATA 3 port on the motherboard.
- Connect the other end of the SATA data cable to your SATA hard drive or SSD.
- Connect a SATA power cable from your power supply unit (PSU) to the SATA drive.
3.4 Graphics Card Installation
- Locate the PCI-E 3.0 x16 slot.
- Remove the corresponding expansion slot cover from your PC case.
- Align your graphics card with the PCI-E slot and press down firmly until it is fully seated and the retention clip locks.
- Secure the graphics card to the case with a screw.
- Connect any necessary PCIe power cables from your PSU to the graphics card.
3.5 Power Connections
- 24-pin Main Power Connector: Connect the main 24-pin ATX power cable from your PSU to the corresponding connector on the motherboard.
- 4-pin +12V Power Connector: Connect the 4-pin CPU power cable from your PSU to the connector near the CPU socket.
3.6 Front Panel Connections
Connect the cables from your PC case's front panel (power button, reset button, USB ports, audio jacks, power LED, HDD LED) to the corresponding headers on the motherboard. Refer to the motherboard's silkscreen labels for correct pin assignments.
4. Operating Instructions
4.1 Initial Boot and BIOS Setup
- After assembling all components, connect your monitor, keyboard, and mouse.
- Power on your system. During the initial boot sequence, press the designated key (usually DEL or F2) to enter the BIOS/UEFI setup utility.
- In the BIOS, configure boot order, set system time, and adjust any necessary settings for your components. Save changes and exit.
4.2 Driver Installation
After installing your operating system, install the necessary drivers for the motherboard chipset, LAN, audio, and any other integrated components. These drivers are typically available on the manufacturer's website or included on a driver CD/USB drive.
5. Maintenance
- Dust Removal: Regularly clean dust from the motherboard and components using compressed air. Ensure the system is powered off and unplugged before cleaning.
- BIOS Updates: Periodically check the manufacturer's website for BIOS updates. BIOS updates can improve stability, compatibility, and performance. Follow update instructions carefully.
- Cable Management: Ensure cables are neatly routed to improve airflow and prevent interference.
6. Troubleshooting
If you encounter issues, consider the following common troubleshooting steps:
- No Power: Check all power connections (24-pin, 4-pin CPU, GPU, SATA drives). Ensure the PSU switch is on.
- No Display: Verify monitor connection, graphics card seating, and power. Try reseating RAM modules.
- System Instability: Check CPU and RAM seating. Ensure adequate cooling. Update drivers and BIOS.
- Component Not Detected: Reseat the component. Check BIOS settings to ensure it's enabled.
For persistent issues, consult the manufacturer's support resources or a qualified technician.
7. Specifications
| Feature | Specification |
|---|---|
| Brand | YYTDNGW |
| Model Name | YYTDNGW B450M |
| Chipset | B450 |
| Socket Type | AM4 |
| Processor Compatibility | Ryzen 3000 Series (R3, R5, R7), Ryzen 4000 Series (R3, R5, R7), Ryzen 5000 Series (R3, R5) (e.g., Ryzen 5600, 5600G) |
| Memory Type | DDR4 |
| Number of Memory Slots | 2 |
| Memory Channel | Double |
| Maximum Memory Capacity | 64 GB |
| Storage Interface Type | SATA 3, M.2 (NVMe) |
| Number of SATA Ports | 4 |
| Number of M.2 Slots | 1 (Supports 2260) |
| PCI-E Standards | PCI-E 3.0 |
| Number of PCIe x16 Slots | 1 |
| Number of PCI-Express X1 Slots | 1 |
| Onboard LAN | 1x RJ45 (1000Mbps Max LAN Speed) |
| Audio Channels | 5.1 |
| Back I/O Ports | 1x RJ45, COM, 4 x USB 2.0 (Support USB Type: USB 2.0, USB 3.0) |
| Onboard Connectors & Header | 24-pin Main Power Connector, CPU Fan Connector(s), 4-pin +12V Power Connector |
| Form Factor | Micro-ATX |
| Origin | China |
| Certification | CE |
8. Warranty and Support
For warranty information, technical support, or further assistance, please refer to the official YYTDNGW website or contact your retailer. Keep your proof of purchase for warranty claims.