1. Introduction
This manual provides detailed instructions for the installation, configuration, and maintenance of your Suapouen X99M-A Motherboard. The X99M-A is a Micro-ATX motherboard designed for Xeon E5 V3/V4 CPUs, featuring 4 DDR4 memory slots, M.2 NVMe/NGFF support, and a Gigabit network interface. Please read this manual thoroughly before proceeding with installation.
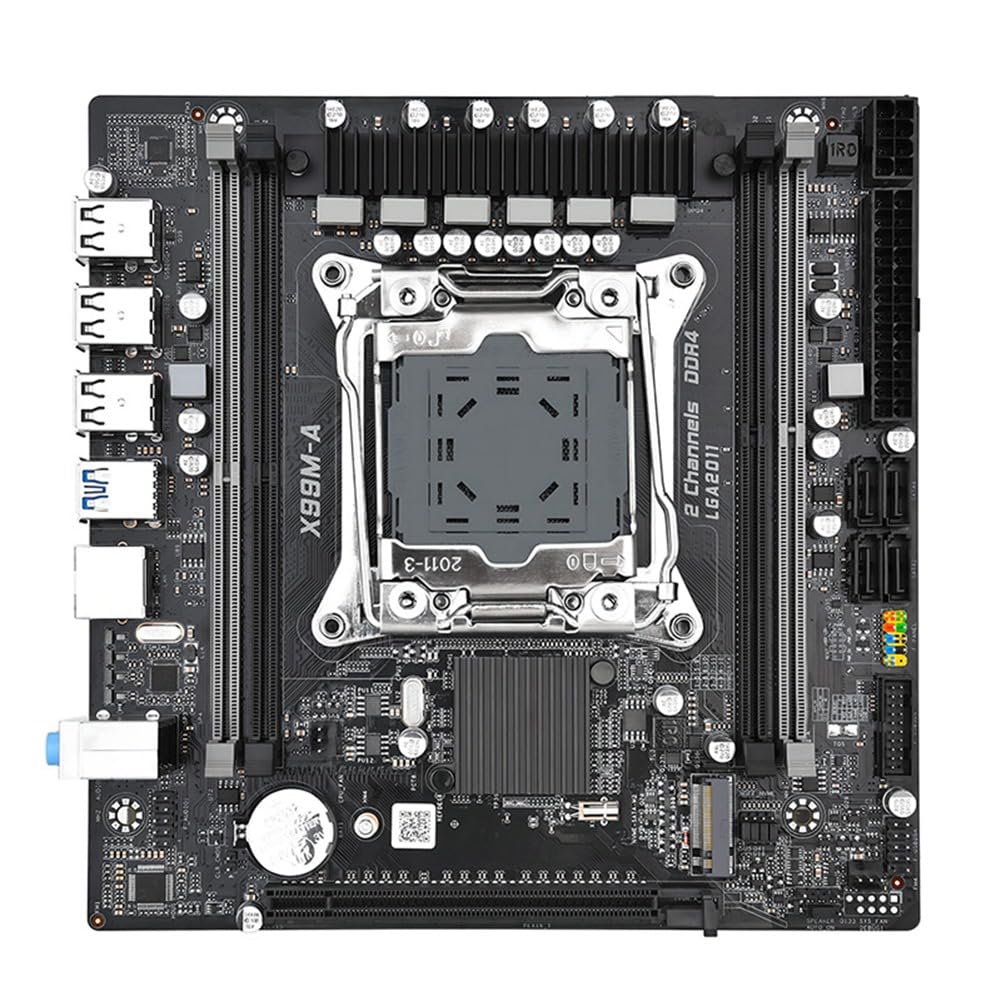
Image 1.1: Overview of the Suapouen X99M-A Motherboard, showcasing its layout with CPU socket, RAM slots, and various ports.
2. Product Features
The Suapouen X99M-A Motherboard incorporates several key features designed for performance and stability:
- All-Solid Capacitors: Utilizes all-solid capacitors with a 6-phase power supply for stable performance and extended motherboard lifespan.
- High-Speed M.2 Slot: Features one M.2 2280 NVMe x4 3.0 Port + NGFF slot, providing high performance for demanding applications like gaming, graphics, and data analysis.
- Gigabit Network Interface: Equipped with a Gigabit Fast Ethernet port and a high-performance network control chip for fast data transmission speeds.
- Optimized Computing Power: Supports Xeon E5 V3/V4 CPU processors, delivering powerful performance for multitasking and intensive applications.
- SATA3.0 Ports: Includes four SATA3.0 interfaces to improve computer performance and accelerate program loading.
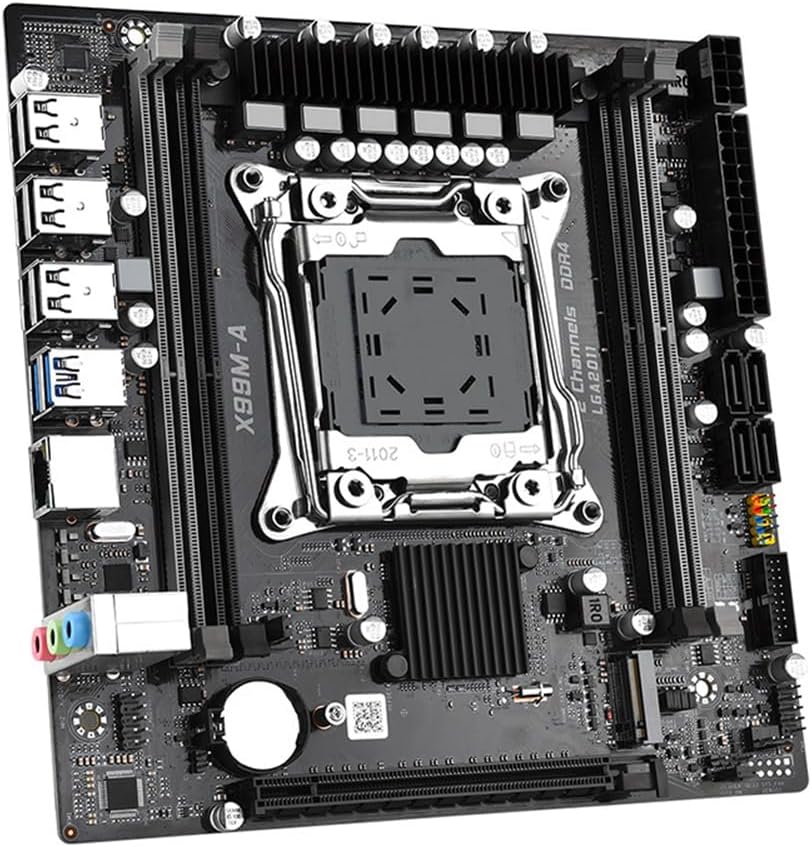
Image 2.1: Diagram illustrating the four core technologies: Full solid capacitor, Gigabit NIC, High-speed M.2, and SATA3.0.

Image 2.2: Close-up view of the motherboard's CPU power delivery area, highlighting the full solid capacitors and 6-phase power supply.
3. Specifications
| Feature | Detail |
|---|---|
| Model | X99M-A (Part Number: 500801980) |
| Motherboard Version | Micro-ATX |
| CPU Slot | LGA2011-3 (Supports Xeon E5 V3/V4 CPU) |
| Memory Slots | 4 x DDR4 (Supports 1600/1866/2133/2400 MHz, up to 128GB) |
| SATA Interfaces | 4 x SATA3.0 |
| M.2 Slot | 1 x M.2 2280 NVMe x4 3.0 Port + NGFF |
| Graphics Card Slot | 1 x PCI-E3.0x16 |
| Sound Card | 5.1 channel high-definition audio chip |
| Network Card | 1 x Gigabit network port |
| USB Interfaces | 8 x USB2.0 (6 rear, 1 F_USB2.0 pin for 2 ports), 4 x USB3.0 (2 rear, 1 F_USB3.0 pin for 2 ports) |
| Other Interfaces | F_AUDIO, 3PIN CPU_FAN, 3PIN SYS_FAN, 1*AUTO_ON, 1*24pin ATX power, 1*8pin 12V power, 1*CLR_COMS, 4*3 NGFF_NVME Transfer pin |
| Product Dimensions | 25 x 10 x 21 cm |
| Weight | 637.5 g |

Image 3.1: Rear I/O panel showing USB ports, Gigabit Ethernet, and audio jacks.
4. Setup and Installation
Before installing the motherboard, ensure your power supply is disconnected from the wall outlet. Handle the motherboard by its edges to avoid static discharge.
4.1. CPU Installation
- Locate the LGA2011-3 CPU socket on the motherboard.
- Open the CPU socket retention mechanism.
- Carefully align the CPU (Xeon E5 V3/V4) with the socket, ensuring the gold triangle on the CPU matches the indicator on the socket.
- Gently place the CPU into the socket without forcing it.
- Close the retention mechanism to secure the CPU.
- Apply thermal paste and install the CPU cooler according to its manufacturer's instructions.
4.2. Memory (RAM) Installation
- Identify the four DDR4 memory slots.
- Open the clips at both ends of the memory slot.
- Align the notch on the DDR4 memory module with the key in the memory slot.
- Press down firmly on both ends of the memory module until the clips snap into place.
4.3. M.2 NVMe/NGFF SSD Installation
- Locate the M.2 slot on the motherboard.
- Insert the M.2 SSD into the slot at an angle.
- Gently push the SSD down and secure it with the provided screw.
4.4. SATA Device Installation
- Connect one end of a SATA data cable to a SATA3.0 port on the motherboard.
- Connect the other end of the SATA data cable to your storage device (HDD/SSD).
- Connect a SATA power cable from your power supply to the storage device.
4.5. Power Connections
- Connect the 24-pin ATX power connector from your power supply to the main power socket on the motherboard.
- Connect the 8-pin 12V CPU power connector from your power supply to the CPU power socket.

Image 4.1: Top-down view of the motherboard, highlighting key components like the CPU socket, DDR4 slots, M.2 slot, and SATA ports.
5. Operating Instructions
Once all components are installed and connected, you can power on your system.
5.1. First Boot
- Ensure all power cables are securely connected.
- Connect your monitor, keyboard, and mouse.
- Press the power button on your computer case.
- The system should boot and display the BIOS/UEFI splash screen.
5.2. BIOS/UEFI Configuration
To enter the BIOS/UEFI setup, press the designated key (usually DEL or F2) during the initial boot sequence. Within the BIOS/UEFI, you can configure boot order, system time, fan speeds, and other advanced settings. Refer to the on-screen instructions or the motherboard manufacturer's website for detailed BIOS/UEFI navigation.
6. Maintenance
Proper maintenance ensures the longevity and stable operation of your motherboard.
- Dust Removal: Regularly clean dust from the motherboard and components using compressed air. Ensure the system is powered off and unplugged before cleaning.
- BIOS/UEFI Updates: Periodically check the manufacturer's website for BIOS/UEFI updates. Updates can improve compatibility, stability, and performance. Follow the update instructions carefully to avoid system damage.
- Driver Updates: Keep your operating system and device drivers (chipset, network, audio) updated for optimal performance and security.
7. Troubleshooting
If you encounter issues, consider the following troubleshooting steps:
- No Power:
- Ensure the power supply is connected to the motherboard (24-pin ATX and 8-pin 12V CPU power).
- Check if the power supply switch is ON.
- Verify the front panel power button connection to the motherboard.
- No Display:
- Confirm the monitor is connected to the graphics card (if dedicated) or the motherboard (if integrated graphics are used and supported by the CPU).
- Reseat the graphics card and memory modules.
- Try booting with only one RAM stick.
- System Instability/Crashes:
- Check CPU and GPU temperatures.
- Ensure all components are properly seated.
- Run memory diagnostic tools.
- Update drivers and BIOS/UEFI.
- Peripheral Not Detected:
- Verify the device is correctly connected to the appropriate port (USB, SATA, M.2).
- Check device manager for driver issues.
- Test the device on another port or system if possible.
For further assistance, consult the manufacturer's support website or contact your retailer.
8. Warranty and Support
For information regarding the warranty period, terms, and conditions for your Suapouen X99M-A Motherboard, please refer to the warranty card included with your product or visit the official Suapouen website. Support resources, including updated drivers and BIOS versions, may also be available on the manufacturer's website.
When contacting support, please have your motherboard model (X99M-A) and serial number ready.