1. Important Safety Information
Please read this manual thoroughly before installation and use. Keep this manual for future reference.
- Weight Capacity: Do not exceed the maximum weight capacity of 33 lbs (15 kg) per arm. Exceeding this limit may result in serious injury or product damage.
- Monitor Size: This mount is designed for monitors between 13 and 39 inches.
- VESA Compatibility: Ensure your monitor has VESA mounting patterns of 75x75 mm or 100x100 mm. If your monitor does not have these patterns, a VESA adapter (sold separately) may be required.
- Desk Thickness: The C-clamp is suitable for desks 0.39"-1.77" thick. The grommet mount is suitable for desks 0.39"-1.77" thick with a hole diameter of 0.39"-2.36".
- Desk Material: Do not install this product on tempered glass desks or other fragile table tops. Ensure your desk is structurally sound to support the combined weight of the mount and monitors.
- Assembly: Assemble the product according to the instructions. Incorrect assembly can lead to product failure or injury.
- Moving Parts: Keep hands and fingers clear of moving parts during adjustment to prevent pinching.
2. Product Overview
The MOUNT PRO Dual Monitor Desk Mount provides an ergonomic solution for mounting two monitors, offering extensive adjustability and integrated features for an organized workspace.
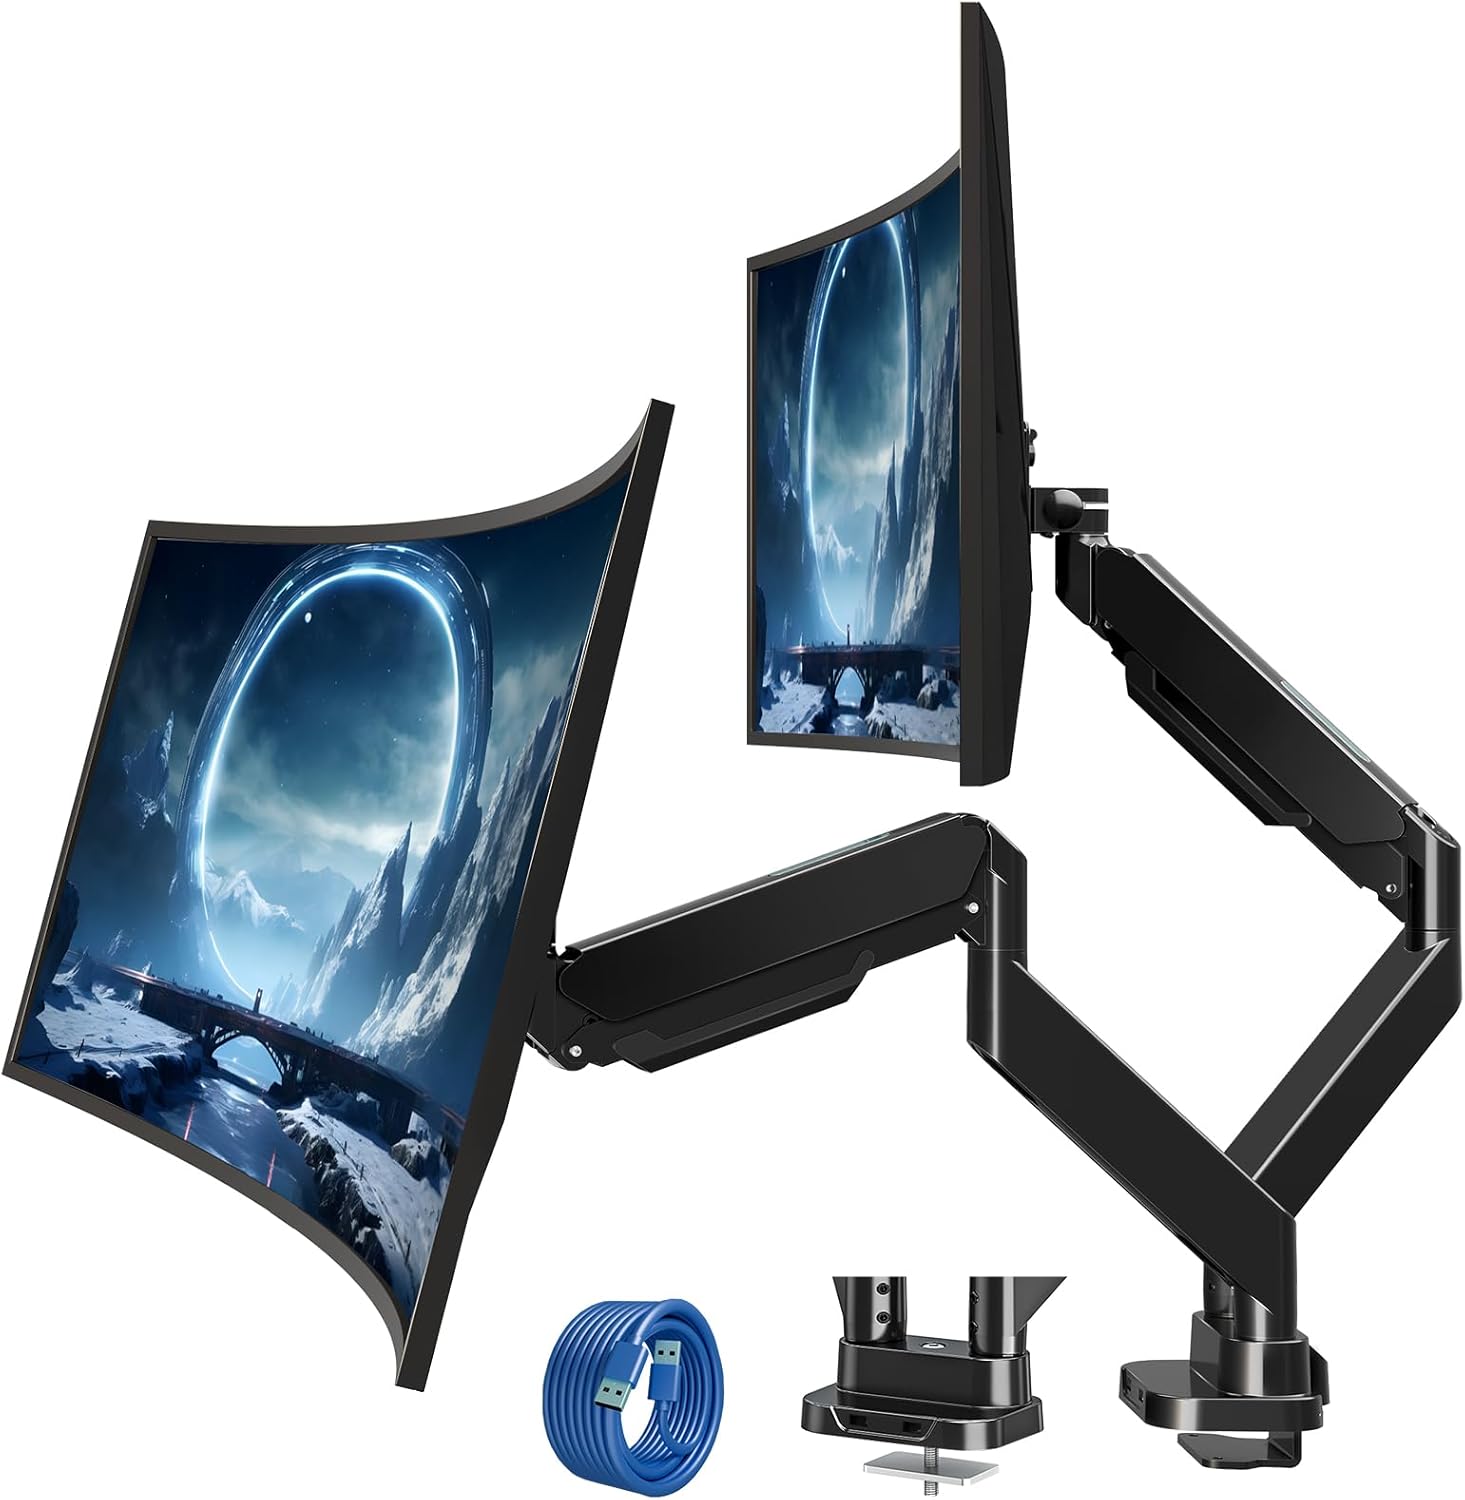
Figure 2.1: MOUNT PRO Dual Monitor Desk Mount with two monitors.
2.1 Key Features
- Supports two flat or curved monitors from 13" to 39" in size.
- Each arm supports monitors weighing between 4.4 lbs (2 kg) and 33 lbs (15 kg).
- Compatible with VESA patterns 75x75 mm and 100x100 mm.
- Full range of motion: tilt +90°/-45°, swivel 180°, rotation 360°.
- Adjustable height and extension for optimal viewing angles.
- Integrated cable management system.
- Two USB ports at the base for convenient charging and data transfer.

Figure 2.2: Compatibility details for monitor size, weight, and VESA standards.

Figure 2.3: The mount's capability to support large and heavy monitors, up to 33 lbs per arm.
3. Package Contents
Verify that all components are present and undamaged. If any parts are missing or damaged, please contact customer support.
- Monitor Arms (x2)
- Desk Clamp Base
- Grommet Mount Hardware
- VESA Plates (x2)
- USB Extension Cable
- Hardware Kit (screws, washers, spacers)
- Allen Keys (various sizes)
- Instruction Manual
4. Installation Guide
4.1 Pre-Installation Check
Before beginning installation, confirm your monitor and desk meet the following requirements:
- Monitor Size: 13"-39"
- Monitor Weight: 4.4-33 lbs (per arm)
- VESA Pattern: 75x75 mm or 100x100 mm
- Desk Thickness (C-clamp/Grommet): 0.39"-1.77"
- Grommet Hole Diameter (Grommet mount only): 0.39"-2.36"

Figure 4.1: Compatibility requirements for monitors and desk.
4.2 Desk Compatibility
Ensure your desk edge or grommet hole is suitable for installation. Avoid installing on desks with fragile materials like tempered glass.

Figure 4.2: Desk edge requirements for secure clamp installation.
4.3 Mounting Options
The mount offers two installation methods: C-clamp or grommet mount.
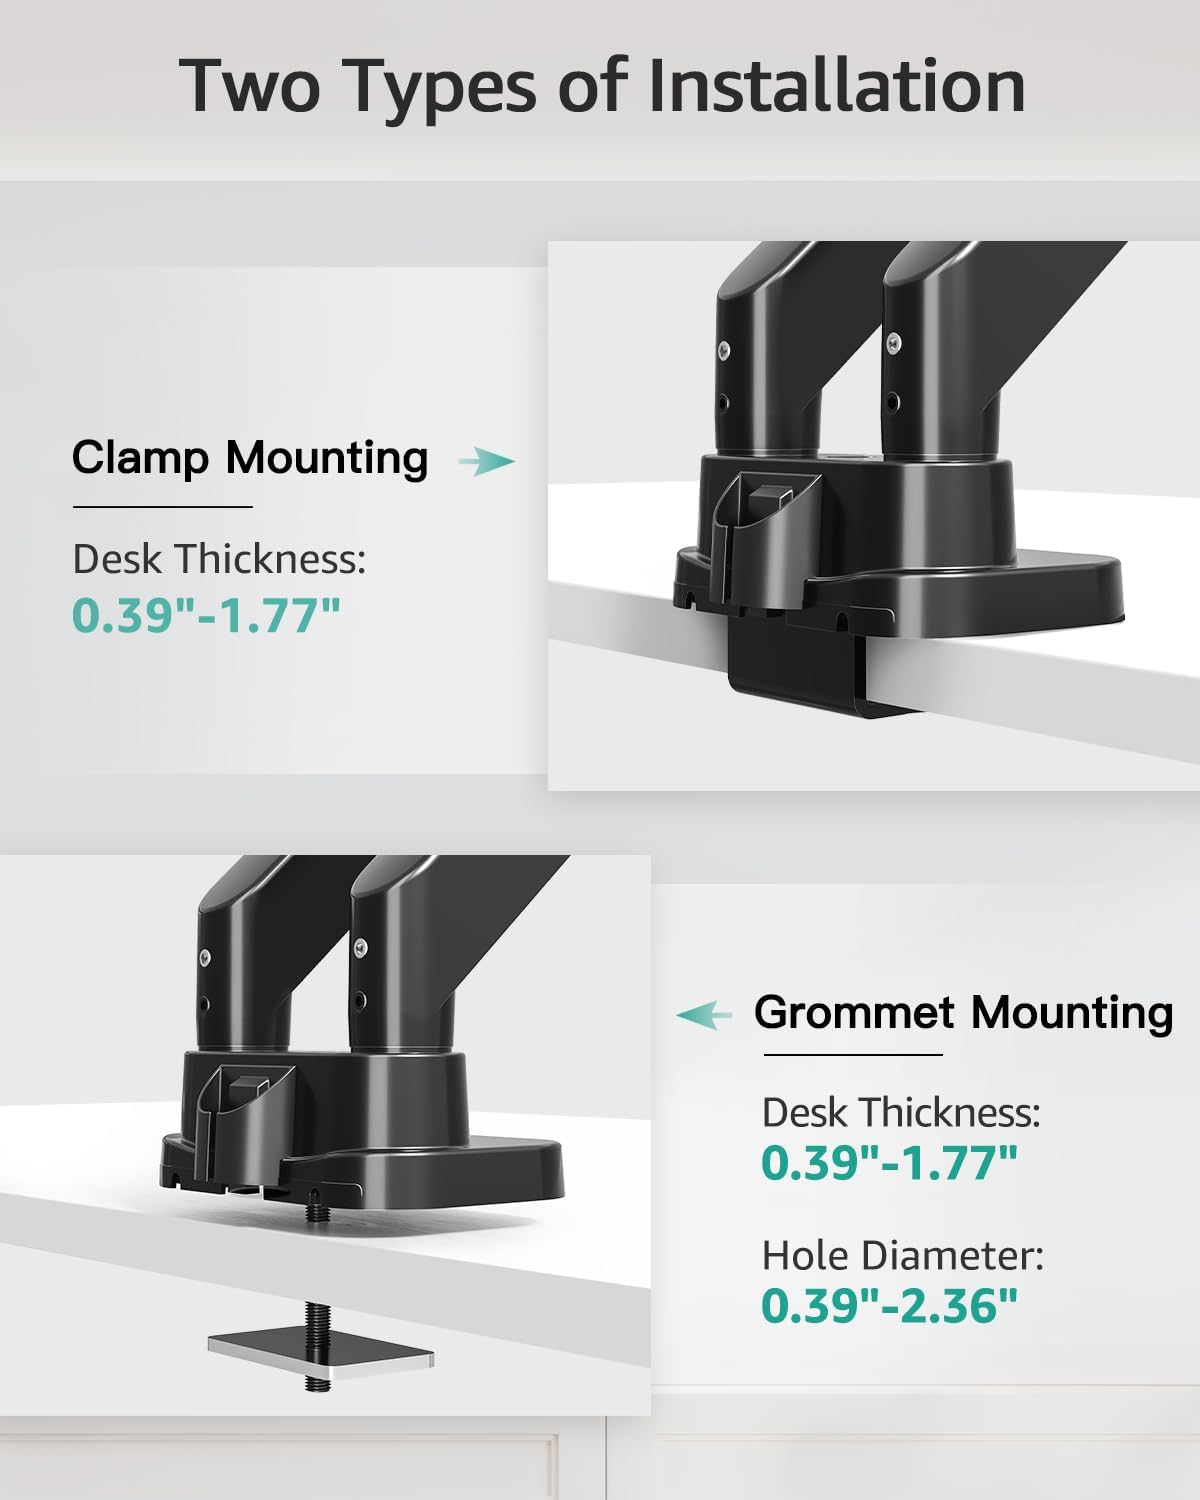
Figure 4.3: Visual representation of C-clamp and grommet mounting methods.
4.3.1 C-Clamp Installation
- Attach the C-clamp to the desk base.
- Position the base on the desired location on your desk.
- Tighten the C-clamp screw until the mount is securely fastened to the desk.
4.3.2 Grommet Installation
- Disassemble the C-clamp from the base and attach the grommet plate.
- Insert the grommet bolt through the desk hole.
- Secure the mount from underneath the desk using the provided washer and nut.

Figure 4.4: Steps for easy base installation using either C-clamp or grommet method.
4.4 Attaching Monitors
- Attach the VESA plate to the back of your monitor using the appropriate screws and spacers from the hardware kit. Ensure the screws are tightened securely.
- Slide the monitor with the attached VESA plate onto the monitor arm's VESA head. The quick-release design allows for easy attachment.
- Ensure the monitor is securely locked in place.

Figure 4.5: Detail of VESA quick release boards and monitor locking mechanism.
5. Operation and Adjustments
The MOUNT PRO Dual Monitor Desk Mount offers a wide range of adjustments to customize your viewing experience.
5.1 Monitor Positioning (Tilt, Swivel, Rotation)
Each monitor arm allows for flexible positioning:
- Tilt: Adjust the monitor angle up to 90° upwards and 45° downwards.
- Swivel: Rotate the monitor horizontally up to 180° left or right.
- Rotation: Rotate the monitor 360° to switch between landscape and portrait orientations.

Figure 5.1: Illustrates the full range of motion including swivel, tilt, and 360° rotation.
5.2 Height and Extension Adjustment
The gas spring arms allow for smooth vertical and horizontal adjustments.
- Max Height: Monitors can be raised up to 21.5 inches from the desk surface.
- Max Extension: Arms can extend up to 20.9 inches.

Figure 5.2: Maximum height and extension capabilities of the monitor arm.
5.3 Gas Spring Tension Adjustment
The gas spring tension must be adjusted to match the weight of your monitor for optimal stability and ease of movement. Hold the arm in a horizontal position during adjustment.
- For lighter monitors (monitor raises up): Turn the adjustment screw clockwise towards the "-" symbol to reduce tension.
- For heavier monitors (monitor drops down): Turn the adjustment screw counter-clockwise towards the "+" symbol to increase tension.
A scale line on the arm indicates the approximate gas spring force value, with each division representing about 2 lbs. Adjust until the arm holds the monitor's position stably.

Figure 5.3: Gas spring tension adjustment mechanism with a visual scale.
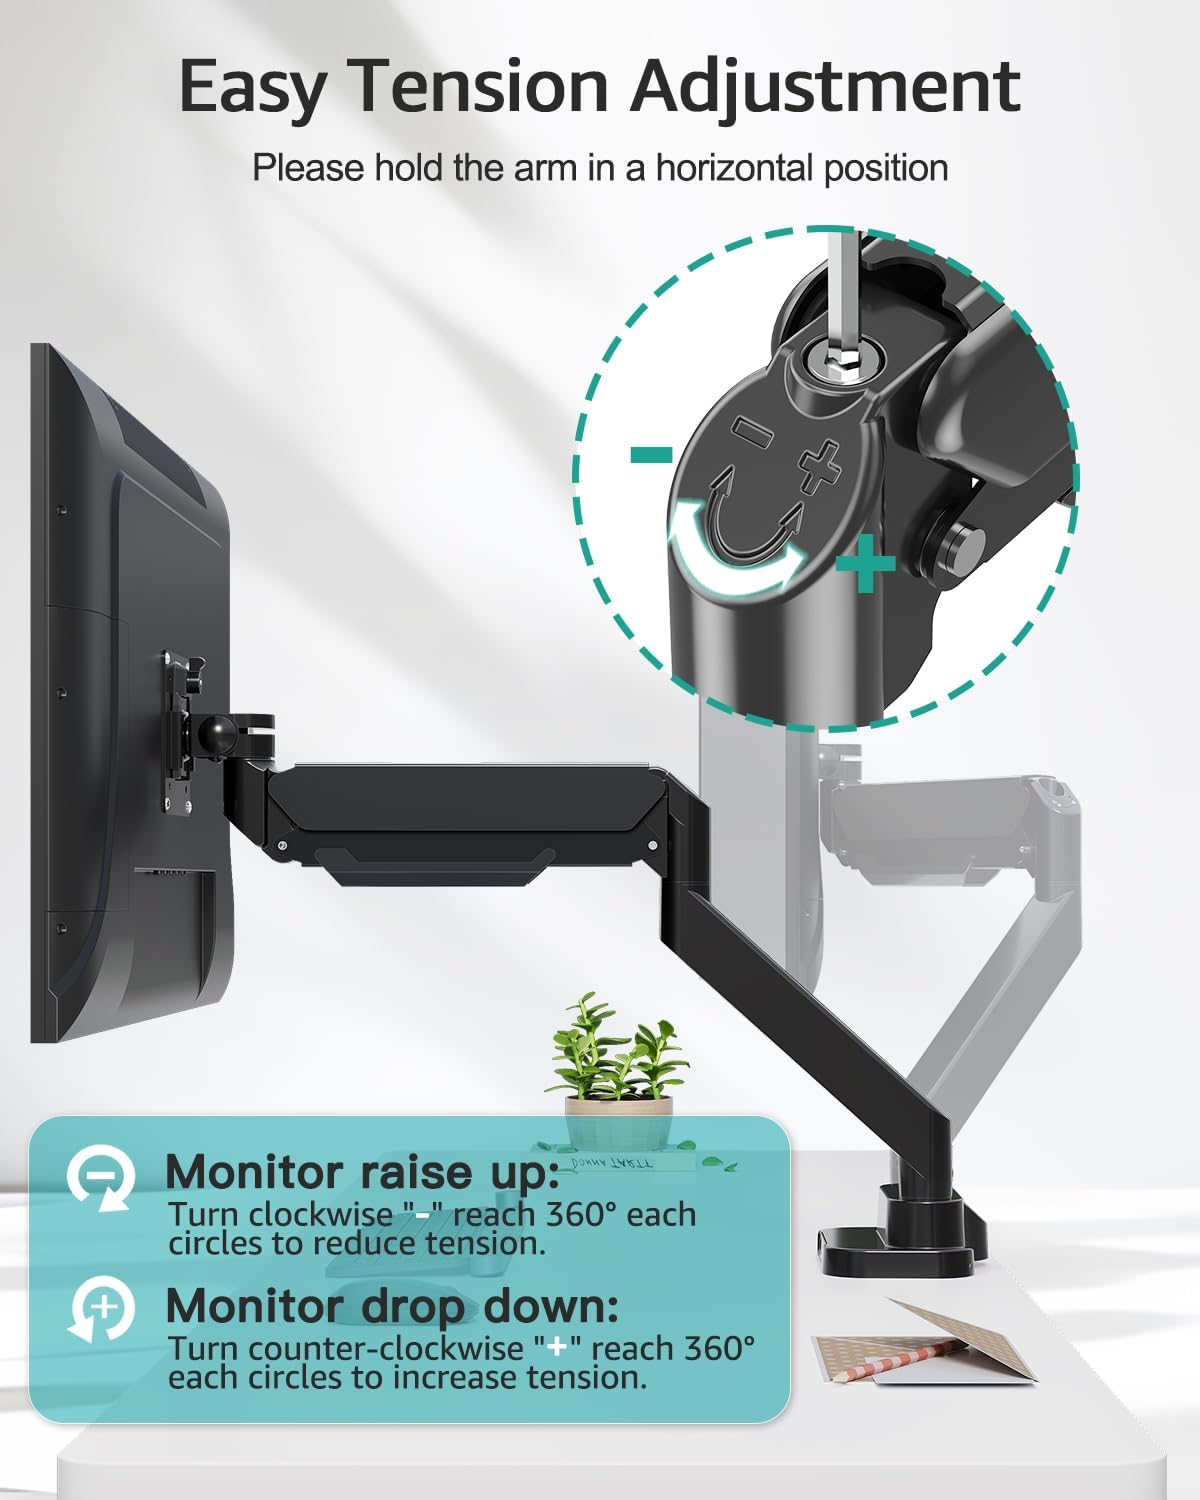
Figure 5.4: Detailed instructions for adjusting tension to suit monitor weight.
5.4 Cable Management
Route your monitor cables through the integrated cable management channels along the arms to maintain a tidy workspace.
5.5 USB Ports
The base of the mount includes two USB ports. Connect the provided USB extension cable from the mount's base to your computer to enable these ports for charging devices or data transfer.

Figure 5.5: Cable management system and integrated USB ports for desktop organization.
6. Maintenance
- Regularly check all screws and connections to ensure they remain tight and secure.
- Clean the mount with a soft, damp cloth. Avoid abrasive cleaners or solvents.
- Periodically verify that the gas spring tension is still appropriate for your monitor's weight.
7. Troubleshooting
7.1 Monitor Sags or Does Not Stay in Position
- Solution: The gas spring tension is too low for the monitor's weight. Increase the tension by turning the adjustment screw counter-clockwise towards the "+" symbol (refer to Section 5.3).
7.2 Monitor Arm is Too Stiff or Hard to Move
- Solution: The gas spring tension is too high for the monitor's weight. Decrease the tension by turning the adjustment screw clockwise towards the "-" symbol (refer to Section 5.3).
7.3 Mount Feels Unstable on Desk
- Solution: Re-tighten the C-clamp or grommet bolt. Ensure the desk thickness is within the specified range (0.39"-1.77") and the desk material is sturdy.
7.4 Monitor Does Not Fit VESA Plate
- Solution: Verify your monitor's VESA pattern is 75x75 mm or 100x100 mm. If not, a VESA adapter may be required. Some monitors may require removing a cover or original stand before attaching the VESA plate.
8. Specifications
| Feature | Specification |
|---|---|
| Brand | MOUNT PRO |
| Model | B0F7LRZF4F |
| Monitor Size Compatibility | 13" - 39" (flat or curved) |
| Weight Capacity (per arm) | 4.4 - 33 lbs (2 - 15 kg) |
| VESA Compatibility | 75x75 mm, 100x100 mm |
| Tilt Angle | +90° / -45° |
| Swivel Angle | 180° |
| Rotation | 360° |
| Max Height | 21.5 inches |
| Max Extension | 20.9 inches |
| Desk Thickness (Clamp/Grommet) | 0.39" - 1.77" |
| Grommet Hole Diameter | 0.39" - 2.36" |
| Material | Metal |
| Color | Black |
| Item Weight | 14.63 pounds |
9. Warranty and Support
MOUNT PRO products are designed and manufactured to high-quality standards. This product is covered by a limited warranty from the date of purchase. For warranty details, technical support, or to report missing/damaged parts, please contact MOUNT PRO customer service through the retailer where the product was purchased or visit the official MOUNT PRO website.
Please have your model number (B0F7LRZF4F) and purchase information ready when contacting support.


