ATTACHXPRO ATTACHXPRO-MOWER500Pro
ATTACHXPRO Remote Control Lawn Mower ATTACHXPRO-MOWER500Pro User Manual
Model: ATTACHXPRO-MOWER500Pro
1. Introduction
This manual provides essential instructions for the safe and efficient operation, maintenance, and troubleshooting of your ATTACHXPRO Remote Control Lawn Mower ATTACHXPRO-MOWER500Pro. Please read this manual thoroughly before operating the machine to ensure proper usage and to prevent injury or damage.
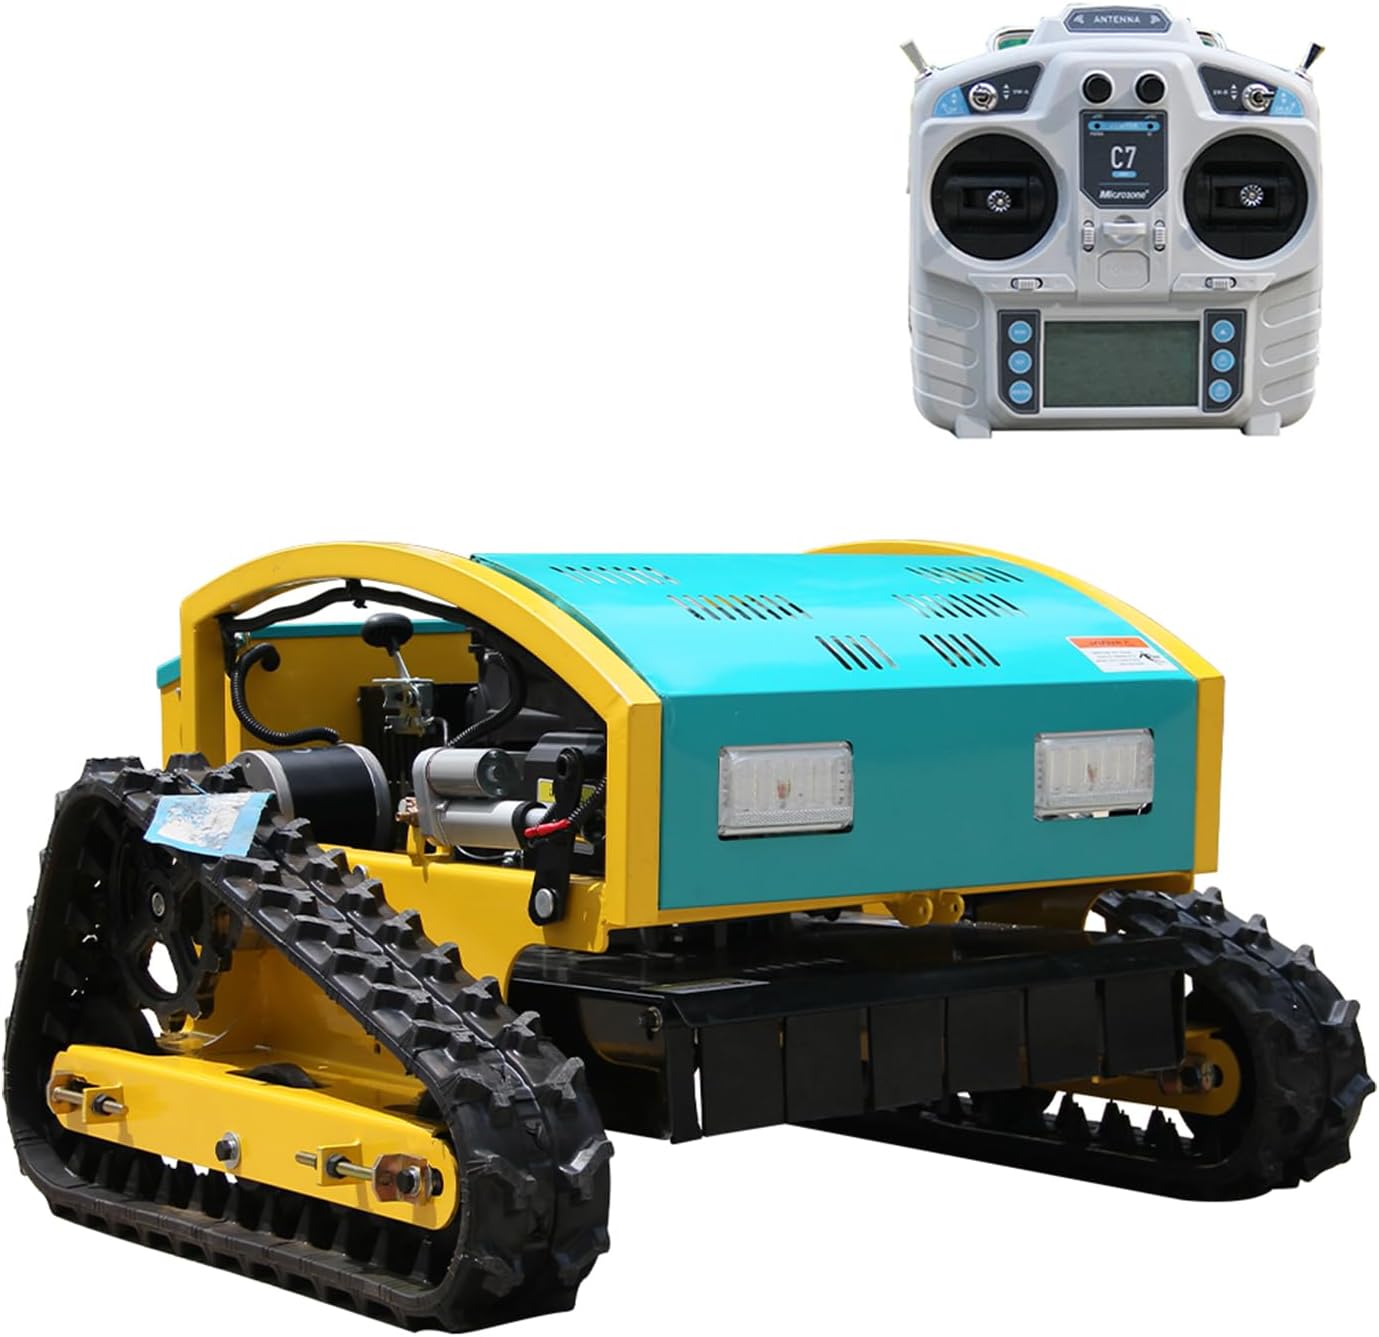
Figure 1: ATTACHXPRO Remote Control Lawn Mower with its remote control unit.
The ATTACHXPRO Remote Control Lawn Mower is designed for efficient lawn care, featuring a crawler drive system suitable for various terrains, including slopes up to 80% (39 degrees). It offers precise control and adjustable cutting height for diverse grass types and conditions.
2. Safety Information
WARNING: Failure to follow these safety instructions may result in serious injury or death.
- Always operate the mower from a safe distance using the remote control.
- Ensure all safety guards and protective curtains are in place before operation. The thickened protective curtain minimizes debris splashing.
- Keep bystanders, especially children and pets, away from the operating area.
- Wear appropriate personal protective equipment (PPE), including eye protection, hearing protection, and sturdy footwear.
- Inspect the mowing area for objects that could be thrown by the blades before starting.
- Do not operate the mower in wet conditions or on excessively steep slopes beyond its rated capacity (80% / 39 degrees).
- Turn off the engine and disconnect the spark plug wire before performing any maintenance or clearing blockages.
- Store fuel in approved containers in a well-ventilated area, away from ignition sources.
- The mower is equipped with LED front lights for enhanced visibility during low-light conditions or night work. Use them responsibly.
3. Setup and Initial Preparation
3.1 Unpacking and Assembly
Carefully remove all components from the packaging. Inspect for any shipping damage. Refer to the included assembly guide for specific steps. Ensure all connections are secure before proceeding.
3.2 Fuel and Oil
- Fill the 1.2L fuel tank with unleaded gasoline. Do not overfill.
- Check the engine oil level and fill with the recommended engine oil up to the proper mark. The engine oil capacity is 0.6L.
3.3 Remote Control Preparation
Install the required batteries into the remote control unit. Power on the remote control and ensure it pairs correctly with the mower. Refer to the remote control's specific manual for pairing instructions if necessary.
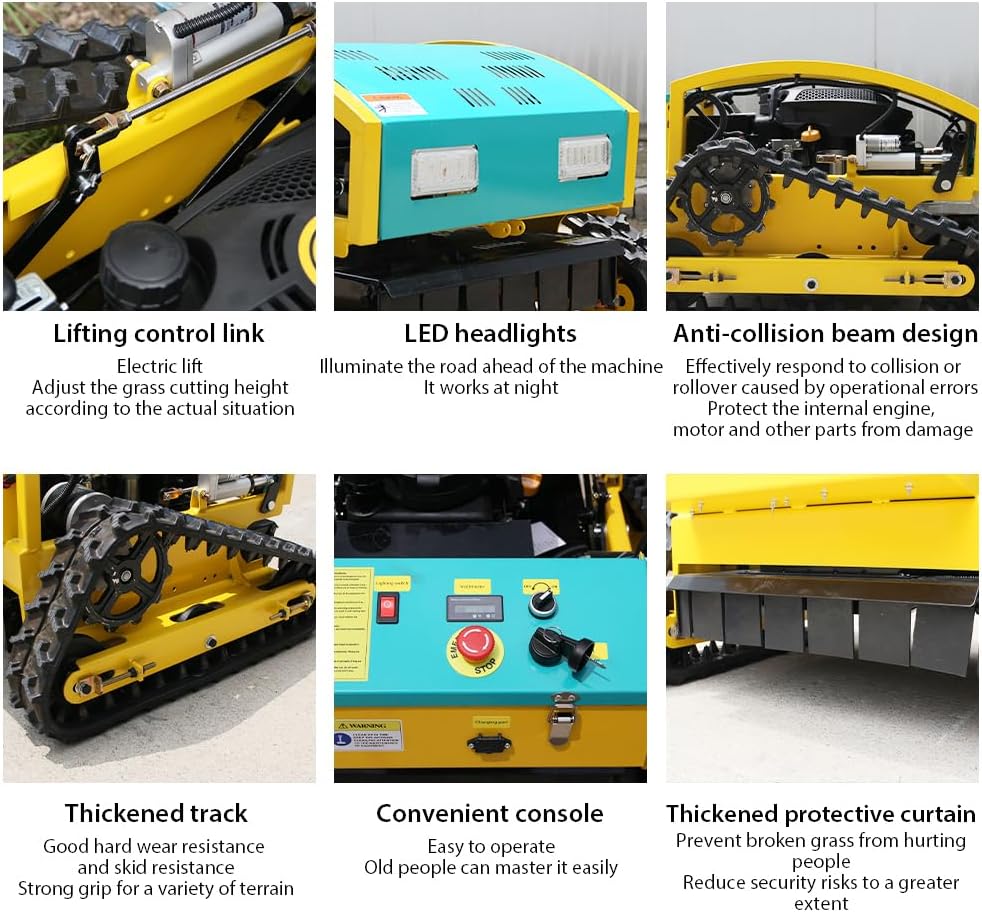
Figure 2: The mower's convenient console with power switch and emergency stop button.
4. Operating Instructions
4.1 Starting the Mower
- Ensure the mower is on a level surface and clear of obstructions.
- Turn on the main power switch on the mower's console.
- Use the electric start feature to ignite the RATO225 engine.
- Confirm the remote control is powered on and connected.
4.2 Remote Control Functions

Figure 3: Remote control unit with key functions labeled for easy operation.
- High and Low Speed: Adjust the travel speed (up to 3 KM/H) for different mowing conditions.
- Cutting Table Lifting: Electronically adjust the cutting height from 20mm to 150mm.
- Constant Cruising: Engage cruise control for consistent speed during long passes.
- Power Indicator Light: Shows the remote control's battery status.
- Advance/Recoil: Control forward and backward movement.
- Around Swerve: Control turning and steering.
- Remote Control Switch: Power on/off the remote.
- Information Display: Provides operational data.
4.3 Adjusting Cutting Height
The cutting height can be adjusted electrically from 20mm to 150mm using the remote control. Select the appropriate height based on grass type and desired lawn finish.

Figure 4: The electric lift mechanism allows for precise cutting height adjustment.
4.4 Mowing Operation
Guide the mower using the remote control, maintaining a safe distance. The 500mm cutting width allows for efficient coverage. Utilize the LED headlights for operation in low-light conditions.

Figure 5: The mower's 500mm cutting width ensures efficient large-area pruning.
5. Maintenance
Regular maintenance ensures the longevity and optimal performance of your ATTACHXPRO Remote Control Lawn Mower. The modular structure simplifies maintenance tasks.
- Cleaning: After each use, clean the mower deck and blades to prevent grass buildup. The convenient structure facilitates cleaning.
- Blade Inspection: Regularly inspect blades for sharpness and damage. Replace or sharpen as needed.
- Engine Oil: Check engine oil levels before each use and change according to the engine manufacturer's recommendations.
- Fuel System: Ensure the fuel tank is clean and free of debris.
- Tracks: Inspect the thickened tracks for wear and tear. Ensure they are free of debris that could impede movement.
- Anti-Collision Beam: Verify the anti-collision beam design is intact to protect internal components.

Figure 6: Key components requiring regular inspection and maintenance.
6. Troubleshooting
This section provides solutions to common issues you might encounter. For problems not listed here, please contact ATTACHXPRO customer support.
| Problem | Possible Cause | Solution |
|---|---|---|
| Mower does not start | No fuel; low engine oil; spark plug issue; remote not connected. | Check fuel level; check oil level; inspect spark plug; ensure remote is paired and powered. |
| Poor cutting performance | Dull or damaged blades; incorrect cutting height; excessive grass height. | Sharpen or replace blades; adjust cutting height; mow in smaller passes. |
| Mower loses power during operation | Low fuel; engine overheating; air filter clogged. | Refuel; allow engine to cool; clean or replace air filter. |
| Remote control not responding | Remote batteries low/dead; remote not paired; interference. | Replace batteries; re-pair remote; move away from sources of interference. |
7. Specifications
| Feature | Detail |
|---|---|
| Brand | ATTACHXPRO |
| Model Number | ATTACHXPRO-MOWER500Pro-1 |
| Power Source | Fuel Powered (RATO225 Electric Starting Engine) |
| Item Weight | 331 pounds (approx. 150 kg) |
| Product Dimensions (L x W x H) | 31.89"D x 39.98"W x 38.98"H (approx. 81cm D x 101.5cm W x 99cm H) |
| Cutting Width | 500 mm (approx. 19.7 inches) |
| Adjustable Cutting Height | 20 mm to 150 mm |
| Operation Mode | Automatic (Remote Control) |
| Max Slope Capability | 80% (39 degrees) |
| Fuel Tank Capacity | 1.2 L |
| Engine Oil Capacity | 0.6 L |
| Travel Speed | Adjustable, up to 3 KM/H |
| Features | LED Headlights, Thickened Protective Curtain, Thickened Tracks, Anti-Collision Beam Design |
8. Warranty and Support
ATTACHXPRO is committed to providing high-quality products and excellent customer service. Your product is backed by certifications and support.
8.1 Warranty Information
Specific warranty details are typically provided with your purchase documentation. Please refer to those documents for terms and conditions. ATTACHXPRO products are backed by ISO 9001, CE, and EPA certifications.
8.2 Technical Support
For technical assistance, troubleshooting, or parts inquiries, please contact ATTACHXPRO customer support. Lifetime technical advisory is included with your purchase.
You can visit the official ATTACHXPRO store for more information and support: ATTACHXPRO Store
8.3 Frequently Asked Questions (FAQs)
- How was ATTACHXPRO established?
In 2006, industry veterans united with the mission of "making compact machinery universal" and established ATTACHXPRO. The brand is committed to continuous innovation for efficiency and sustainable development. - Why choose ATTACHXPRO?
ATTACHXPRO delivers cost-effective products backed by multiple performance certifications. They offer rapid regional shipping from self-operated local warehouses and maintain a strong after-sales support system, including lifetime technical advisory.
Ask a question about this manual
Ask about setup, troubleshooting, compatibility, parts, safety, or missing instructions. Manuals+ will review the question and use this page’s manual context to help answer it.