Introduction
This manual provides comprehensive instructions for the safe installation, operation, and maintenance of your SOSTOO Water Cooler Dispenser. This appliance is designed to provide convenient access to both hot and cold water from 3 or 5-gallon top-loading water bottles. Please read this manual thoroughly before initial use and retain it for future reference.
Safety Instructions
- Electrical Safety: Ensure the power outlet matches the dispenser's voltage (110V/60Hz). Do not use extension cords. Always unplug the dispenser before cleaning or maintenance.
- Water Level: Always ensure the water bottle is properly installed and the machine is filled with water before plugging it in and turning on the heating function. Operating the heating element without water can cause damage to the appliance and poses a fire risk.
- Child Safety Lock: The hot water tap is equipped with a child safety lock. To dispense hot water, simultaneously press the safety lock and the hot water button. This prevents accidental burns.
- Placement: Place the dispenser on a firm, level surface. Avoid direct sunlight, heat sources, or areas with high humidity. Ensure adequate ventilation around the unit.
- Cleaning: Use only mild detergents and a soft cloth for cleaning. Do not immerse the appliance in water.
- Damage: Do not operate the dispenser if the power cord or plug is damaged, or if the appliance has been dropped or damaged in any way. Contact customer support for assistance.
Package Contents
Verify that all items are present in the package:
- 1 x SOSTOO Water Cooler Dispenser (Model 06VWD000)
- 1 x Instruction Manual
Setup
- Unpack: Carefully remove the water dispenser from its packaging. Remove all protective materials and plastic films.
- Placement: Position the dispenser on a flat, stable, and level surface. Ensure there is at least 4 inches of clearance from walls to allow for proper ventilation.
- Install Water Bottle: Remove the cap from a 3 or 5-gallon water bottle. Carefully lift the bottle and place it inverted onto the top loading receptacle of the dispenser. Ensure it is seated firmly.
- Initial Flush (Recommended): Before plugging in, dispense several cups of water from both the hot and cold faucets to ensure water flows freely and to flush out any manufacturing residue.
- Plug In: Connect the power cord to a grounded 110V/60Hz electrical outlet.

Operating Instructions
Powering On
- After plugging in the unit, locate the power switches on the back of the dispenser.
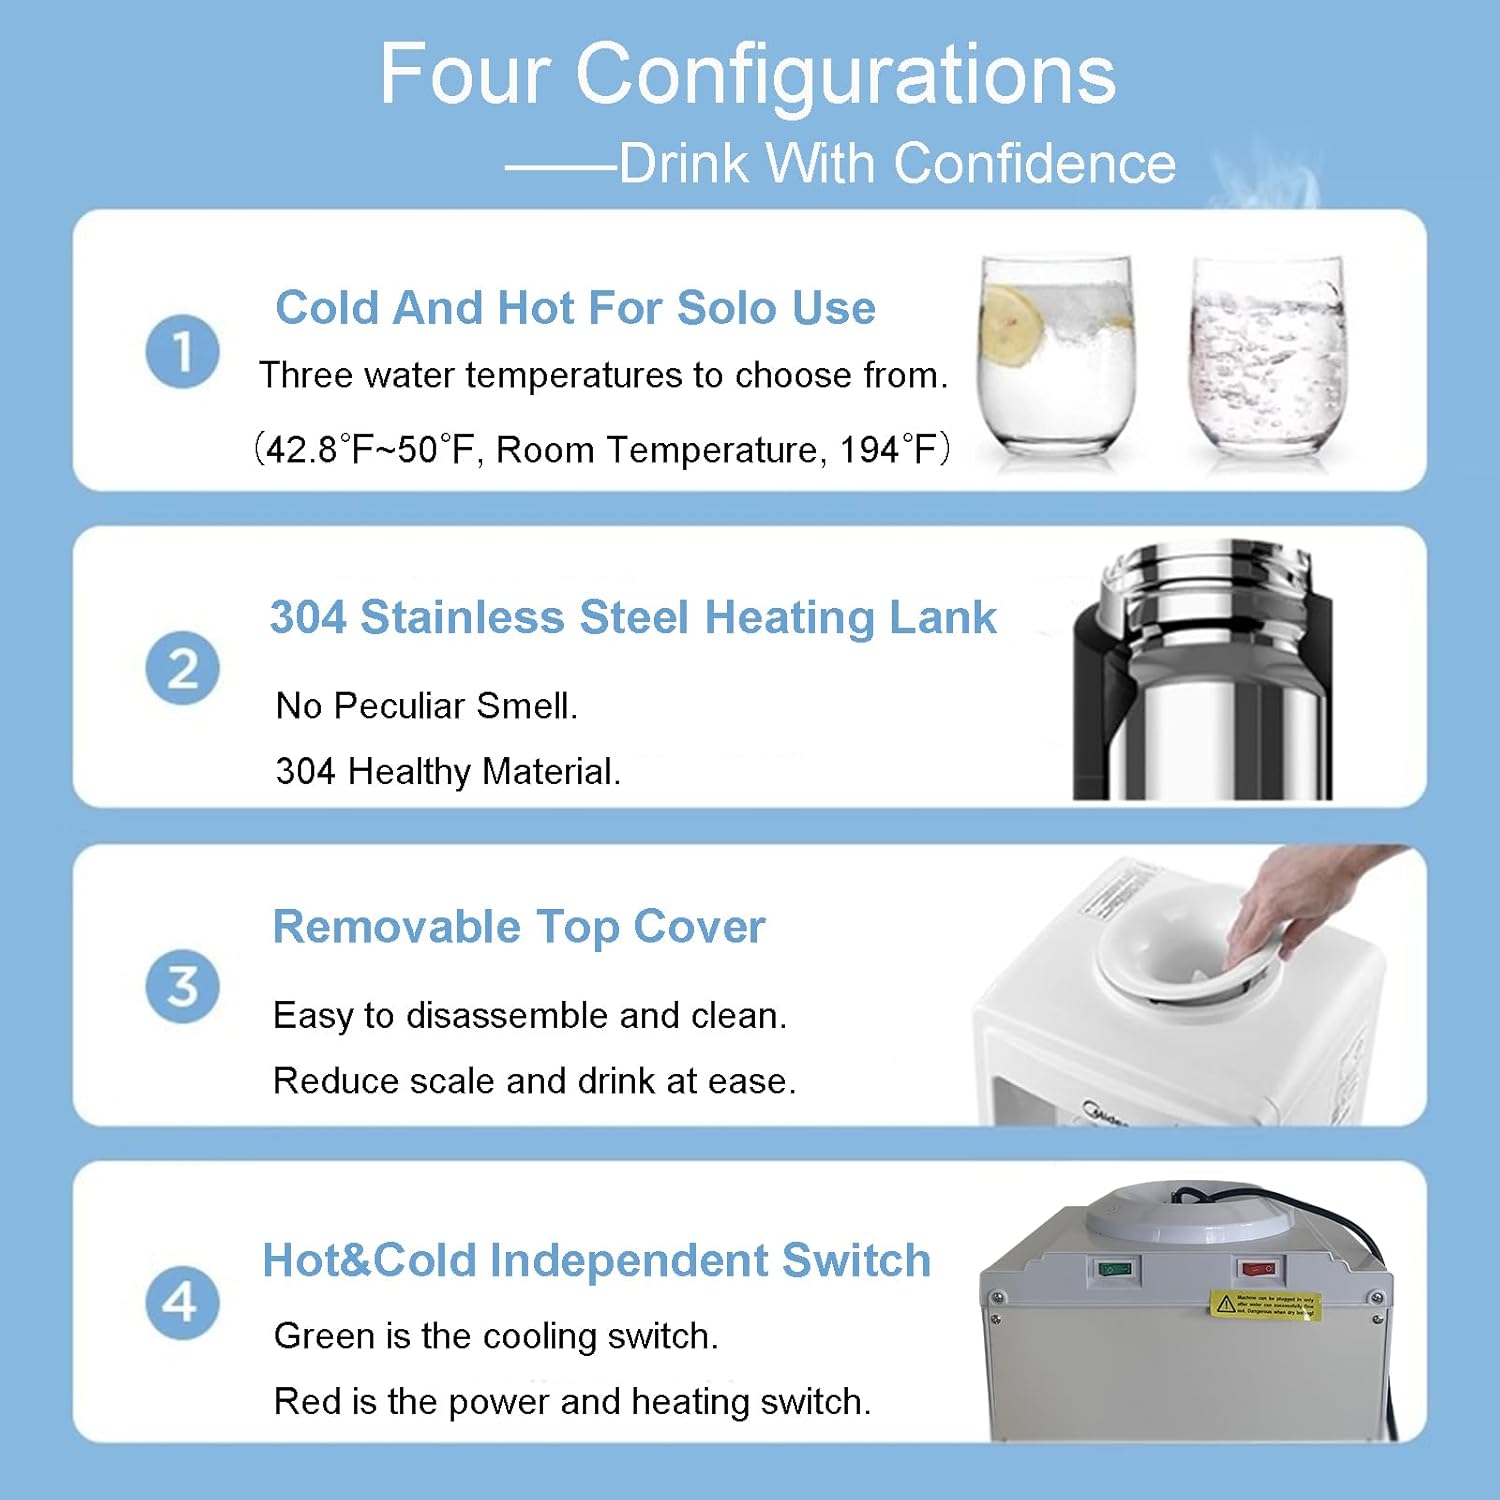
- The red switch controls the heating function. Flip it to the 'ON' position for hot water. The heating process typically takes 3 to 5 minutes.
- The green switch controls the cooling function. Flip it to the 'ON' position for cold water. Chilled water will be ready in approximately 40 to 60 minutes.
Dispensing Water
- Hot Water: To dispense hot water (90°C to 95°C / 194°F to 203°F), simultaneously press the child safety lock button located above the red faucet and push the red faucet lever down. Release both to stop the flow.
- Cold Water: To dispense cold water (6°C to 10°C / 42.8°F to 50°F), simply push the blue faucet lever down. Release to stop the flow.

Indicator Lights
The dispenser features indicator lights to show operational status:
- A red light indicates the hot water heating element is active. It will turn off when the desired hot temperature is reached.
- A green light indicates the cold water cooling element is active. It will turn off when the desired cold temperature is reached.

Maintenance
Cleaning the Drip Tray
The removable drip tray catches spills and overflows. Regularly empty and clean the drip tray to prevent water accumulation and maintain hygiene.
- Gently pull the drip tray forward to remove it from the dispenser.
- Empty any collected water and wash the tray with mild soap and warm water.
- Rinse thoroughly and dry before reinserting.
Cleaning the Water Reservoir
The detachable top cover allows for easy access to the internal water reservoir for cleaning, which helps minimize limescale buildup and ensures clean drinking water.
- Unplug the dispenser from the power outlet and remove the water bottle.
- Carefully remove the top cover of the dispenser.
- Clean the internal reservoir with a soft brush and a solution of water and white vinegar (1:1 ratio) or a food-grade cleaning solution designed for water dispensers.
- Rinse the reservoir thoroughly with clean water multiple times to remove all cleaning solution residue.
- Replace the top cover securely.
Troubleshooting
| Problem | Possible Cause | Solution |
|---|---|---|
| No water dispensing | Empty water bottle; Bottle not seated correctly; Airlock in system. | Replace water bottle; Re-seat bottle firmly; Dispense water from both faucets to release air. |
| No hot water | Hot water switch off; No power; Heating element malfunction. | Turn on red switch; Check power connection; Contact customer support. |
| No cold water | Cold water switch off; No power; Cooling element malfunction. | Turn on green switch; Check power connection; Contact customer support. |
| Water leakage | Water bottle cracked or improperly seated; Drip tray full; Internal leak. | Inspect/replace bottle, ensure proper seating; Empty drip tray; Unplug and contact customer support. |
Specifications
| Feature | Detail |
|---|---|
| Model Number | 06VWD000 |
| Voltage | 110 V / 60 Hz |
| Refrigeration Power | 80 W |
| Heating Power | 500 W |
| Heating Water Temperature | 90°C to 95°C (194°F - 203°F) |
| Cold Water Temperature | 6°C to 10°C (42.8°F - 50°F) |
| Product Dimensions (D x W x H) | 11.8" x 10.2" x 35.4" |
| Item Weight | 13.23 pounds |
| Material | Plastic |
| Installation Type | Floor Mounted |

Warranty and Support
For warranty information or technical support, please refer to the warranty card included with your purchase or contact SOSTOO customer service. Keep your purchase receipt as proof of purchase for any warranty claims.
Customer Service Contact: Please refer to the contact information provided on the product packaging or the official SOSTOO website for the most up-to-date support details.