1. Introduction
The HEXEUM Z9 Night Vision Goggles are advanced optical devices designed to provide clear visibility in low-light conditions and complete darkness. Equipped with 5K HD resolution, a 3.99-inch display, and a high-capacity 10000mAh rechargeable battery, these binoculars are ideal for activities such as wildlife observation, security monitoring, and outdoor exploration. This manual provides detailed instructions for the proper setup, operation, and maintenance of your device.

Image 1.1: HEXEUM Z9 Night Vision Goggles and accessories.
2. Package Contents
Please verify that all items listed below are included in your package:
- 1 x HEXEUM Z9 Night Vision Goggles
- 1 x Carrying Case
- 1 x 64GB TF Card (pre-installed)
- 1 x Type-C Data Cable
- 1 x Neck Strap
- 1 x User Manual
3. Product Overview
Familiarize yourself with the various components, buttons, and ports of your HEXEUM Z9 Night Vision Goggles.

Image 3.1: Labeled components of the Night Vision Goggles.
- MODE Button: Switches between Photo, Video, and Playback modes.
- MENU Button: Accesses device settings and options.
- OK/Shoot Button: Confirms selections, captures photos, or starts/stops video recording.
- KEY Light Switch: Activates or deactivates the button backlight.
- Power On/Off Button: Turns the device on or off.
- IR Up/Zoom In/Up Button: Increases Infrared level, zooms in, or navigates up in menus.
- IR Down/Zoom Out/Down Button: Decreases Infrared level, zooms out, or navigates down in menus.
- Flashlight Switch: Activates the built-in flashlight.
- Type-C Port: For charging the internal battery and transferring data.
- TF Card Slot: For inserting the memory card.
- Universal 1/4" Tripod Screw Hole: For mounting the device on a compatible tripod.
4. Setup
4.1 Charging the Battery
The HEXEUM Z9 Night Vision Goggles are equipped with a built-in 10000mAh rechargeable battery. Before first use, fully charge the device.
- Connect the included Type-C data cable to the Type-C port on the device.
- Connect the other end of the cable to a USB power adapter (not included) or a computer's USB port.
- The charging indicator will show the charging status. A full charge provides 8-20 hours of continuous runtime depending on IR usage.

Image 4.1: Type-C charging port and TF card slot.
4.2 Inserting the Memory Card
A 64GB TF card is typically pre-installed. If you need to insert or replace the card:
- Locate the TF card slot on the side of the device.
- Gently push the TF card into the slot until it clicks into place. Ensure the card is oriented correctly.
- To remove, push the card in again until it springs out.
The device supports TF cards up to 128GB.
4.3 Attaching the Neck Strap
Attach the included neck strap to the designated attachment points on the device. This provides a secure way to carry the goggles and helps prevent accidental drops.
4.4 Powering On/Off
Press and hold the Power On/Off Button for a few seconds to turn the device on or off.
5. Operating Instructions
5.1 Focus Adjustment
Rotate the objective lens focus wheel (located at the front of the device) until the image on the 3.99" HD screen appears clear and sharp.
5.2 Mode Selection
Press the MODE Button to cycle through the available modes: Photo, Video, and Playback.
5.3 Infrared (IR) Adjustment
In low-light or completely dark environments, the infrared illuminator enhances visibility. The device offers 9 levels of IR intensity.
- Press the IR Up Button to increase the IR intensity.
- Press the IR Down Button to decrease the IR intensity.
Higher IR levels provide a brighter image in total darkness but will consume more battery power. Adjust the IR level to suit your viewing conditions.
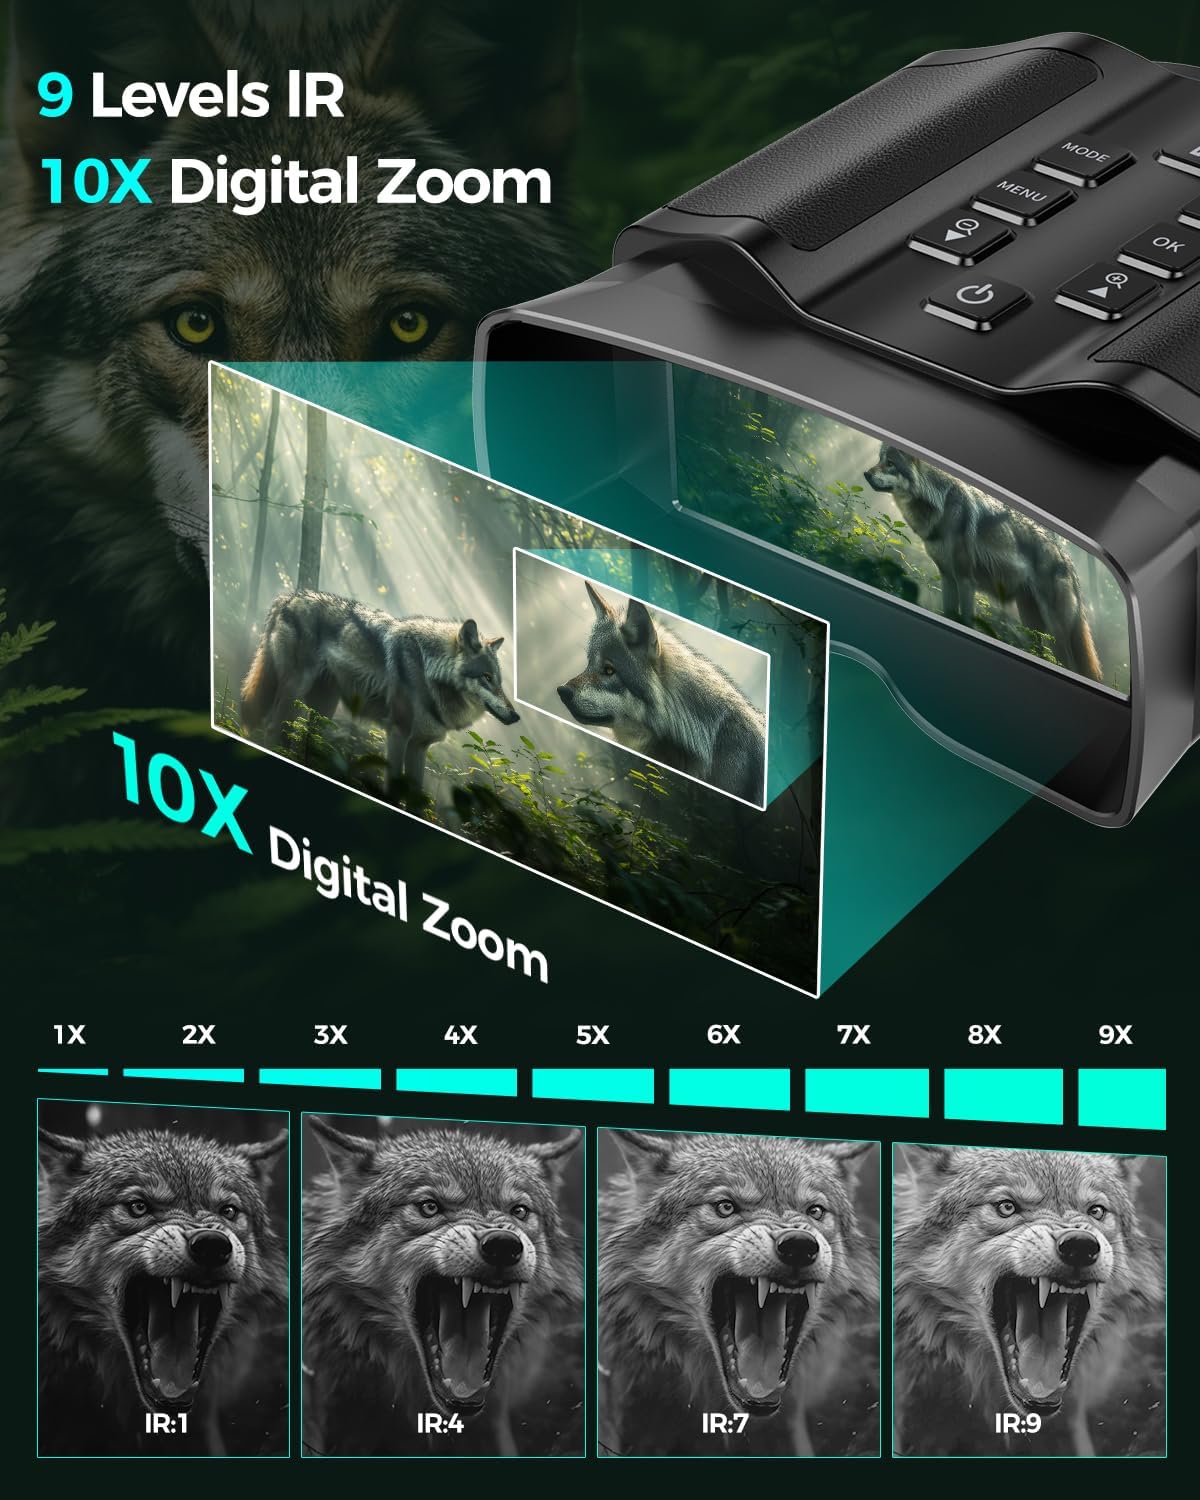
Image 5.1: Infrared (IR) levels and digital zoom demonstration.
5.4 Digital Zoom
The device features up to 10x digital zoom.
- Press the IR Up Button to zoom in.
- Press the IR Down Button to zoom out.
5.5 Capturing Photos and Recording Videos
- Photo Mode: Select Photo mode using the MODE Button. Press the OK/Shoot Button to take a 60MP photograph.
- Video Mode: Select Video mode using the MODE Button. Press the OK/Shoot Button once to start recording 5K HD video, and press it again to stop recording.
5.6 Playback and Deletion
To review your captured media:
- Switch to Playback mode using the MODE Button.
- Use the IR Up and IR Down Buttons to navigate through your photos and videos.
- Press the OK/Shoot Button to view a selected item.
- To delete an item, access the Menu while in Playback mode and select the delete option.
5.7 Screen Brightness
To adjust the brightness of the internal display:
- Press the MENU Button to enter the settings menu.
- Navigate to the 'Screen Brightness' option using the IR Up/Down Buttons.
- Use the IR Up/Down Buttons to adjust the brightness level.
- Press the OK/Shoot Button to confirm your selection and exit the menu.
5.8 Backlit Buttons and Flashlight
- Backlit Buttons: Press the KEY Light Switch to illuminate the control buttons for easier operation in dark conditions. Press again to turn off.
- Flashlight Function: The device includes a built-in flashlight. A short press of the Flashlight Switch activates a steady light, while a long press activates a brighter flashlight beam.
6. Connecting to a Computer
To transfer your captured photos and videos to a computer:
- Ensure the HEXEUM Z9 Night Vision Goggles are powered on.
- Connect the device to your computer using the provided Type-C data cable.
- The device will be recognized as a removable storage device (e.g., a USB drive).
- You can now access the stored files and transfer them to your computer for viewing, editing, or sharing.

Image 6.1: Connecting the device to a computer for data transfer.
7. Maintenance
Proper care and maintenance will ensure the longevity and optimal performance of your night vision goggles:
- Cleaning Lenses: Use a soft, lint-free cloth specifically designed for optical lenses to clean the objective and eyepiece lenses. Avoid using abrasive materials or harsh chemicals.
- Storage: When not in use, store the device in its protective carrying case to shield it from dust, dirt, and physical impact.
- Environmental Conditions: Avoid exposing the device to extreme temperatures, high humidity, or direct sunlight for extended periods.
- Port Protection: Ensure the covers for the Type-C port and TF card slot are properly closed to prevent moisture and debris from entering.
8. Troubleshooting
If you encounter issues with your HEXEUM Z9 Night Vision Goggles, refer to the following common problems and solutions:
| Problem | Possible Cause | Solution |
|---|---|---|
| No image or very dark image in night vision mode. | IR illuminator off or set too low; low battery; out of focus; viewing through glass. | Activate IR and increase intensity. Charge the battery. Adjust the focus wheel. Avoid viewing through windows or screens. |
| Buttons are difficult to see in the dark. | Button backlight is off. | Press the KEY Light Switch to turn on the button backlight. |
| Screen is too bright. | Screen brightness setting is too high. | Access the Menu and adjust the 'Screen Brightness' setting. |
| Battery drains quickly. | High IR levels or screen brightness; frequent use of flashlight. | Reduce IR intensity and screen brightness. Limit flashlight use. Ensure battery is fully charged before use. |
| Cannot transfer files to computer. | Incorrect cable connection; device not powered on; driver issue. | Ensure Type-C cable is securely connected. Power on the device. Try a different USB port or computer. |
9. Specifications
- Model Number: Z9
- Brand: HEXEUM
- Display: 3.99" HD Screen
- Video Resolution: 5K HD
- Image Resolution: 60MP
- Infrared Levels: 9 levels
- Digital Magnification: 10x
- Battery: 10000mAh Rechargeable (integrated)
- Memory Card: 64GB TF Card (included), supports up to 128GB
- Connectivity: Type-C
- Mounting: Universal 1/4" Tripod Screw Hole
- Special Features: Backlit Buttons, Built-in Flashlight, Lightweight, Portable
- Item Weight: 2.27 pounds
- Package Dimensions: 9.88 x 7.4 x 4.09 inches
- Manufacturer: Shenzhen Hunting Tech Co., Ltd
- Date First Available: March 25, 2024
10. Warranty and Support
For detailed warranty information, technical assistance, or customer support, please refer to the documentation included with your purchase or visit the official HEXEUM website. Keep your proof of purchase for warranty claims.