1. Introduction
This manual provides detailed instructions for the installation, operation, and maintenance of your new Driauto 8 Inch Double Din Car Stereo. This unit is designed to enhance your in-car entertainment and navigation experience with advanced features such as wireless CarPlay, Android Auto, GPS, WiFi, Bluetooth, FM/RDS radio, and Digital Sound Processing (DSP).
Please read this manual thoroughly before installation and use to ensure proper functionality and to prevent damage to the unit or your vehicle. Keep this manual for future reference.
2. Product Overview
The Driauto AVR-8DD car stereo features an 8-inch touch screen display with a 1024*600 resolution, powered by a 4GB RAM and 64GB ROM configuration for smooth performance. It integrates seamlessly with various vehicle systems and offers a wide range of connectivity options.

Image 2.1: Front view of the Driauto 8 Inch Double Din Car Stereo, showing the main interface with app icons for navigation, music, and communication.
Key Features:
- High Performance: 4GB RAM + 64GB ROM, 8-inch 1024*600 touch screen.
- Wireless Connectivity: CarPlay and Android Auto for seamless smartphone integration.
- Navigation: Built-in GPS module with support for online and offline maps via WiFi.
- Audio Quality: Bluetooth for music streaming and hands-free calls, FM/RDS radio, 32-band DSP adjustment, 4*45W amplifier with subwoofer output.
- Vehicle Integration: CANBUS support, steering wheel control compatibility, AHD reversing camera input.
- User Interface: Split screen function, customizable homepage applications, multiple UI options.
3. Compatibility
This car stereo is designed for specific Volkswagen, Seat, and Skoda models. Please verify your vehicle's compatibility before installation. Refer to the image below for a detailed list of suitable models.
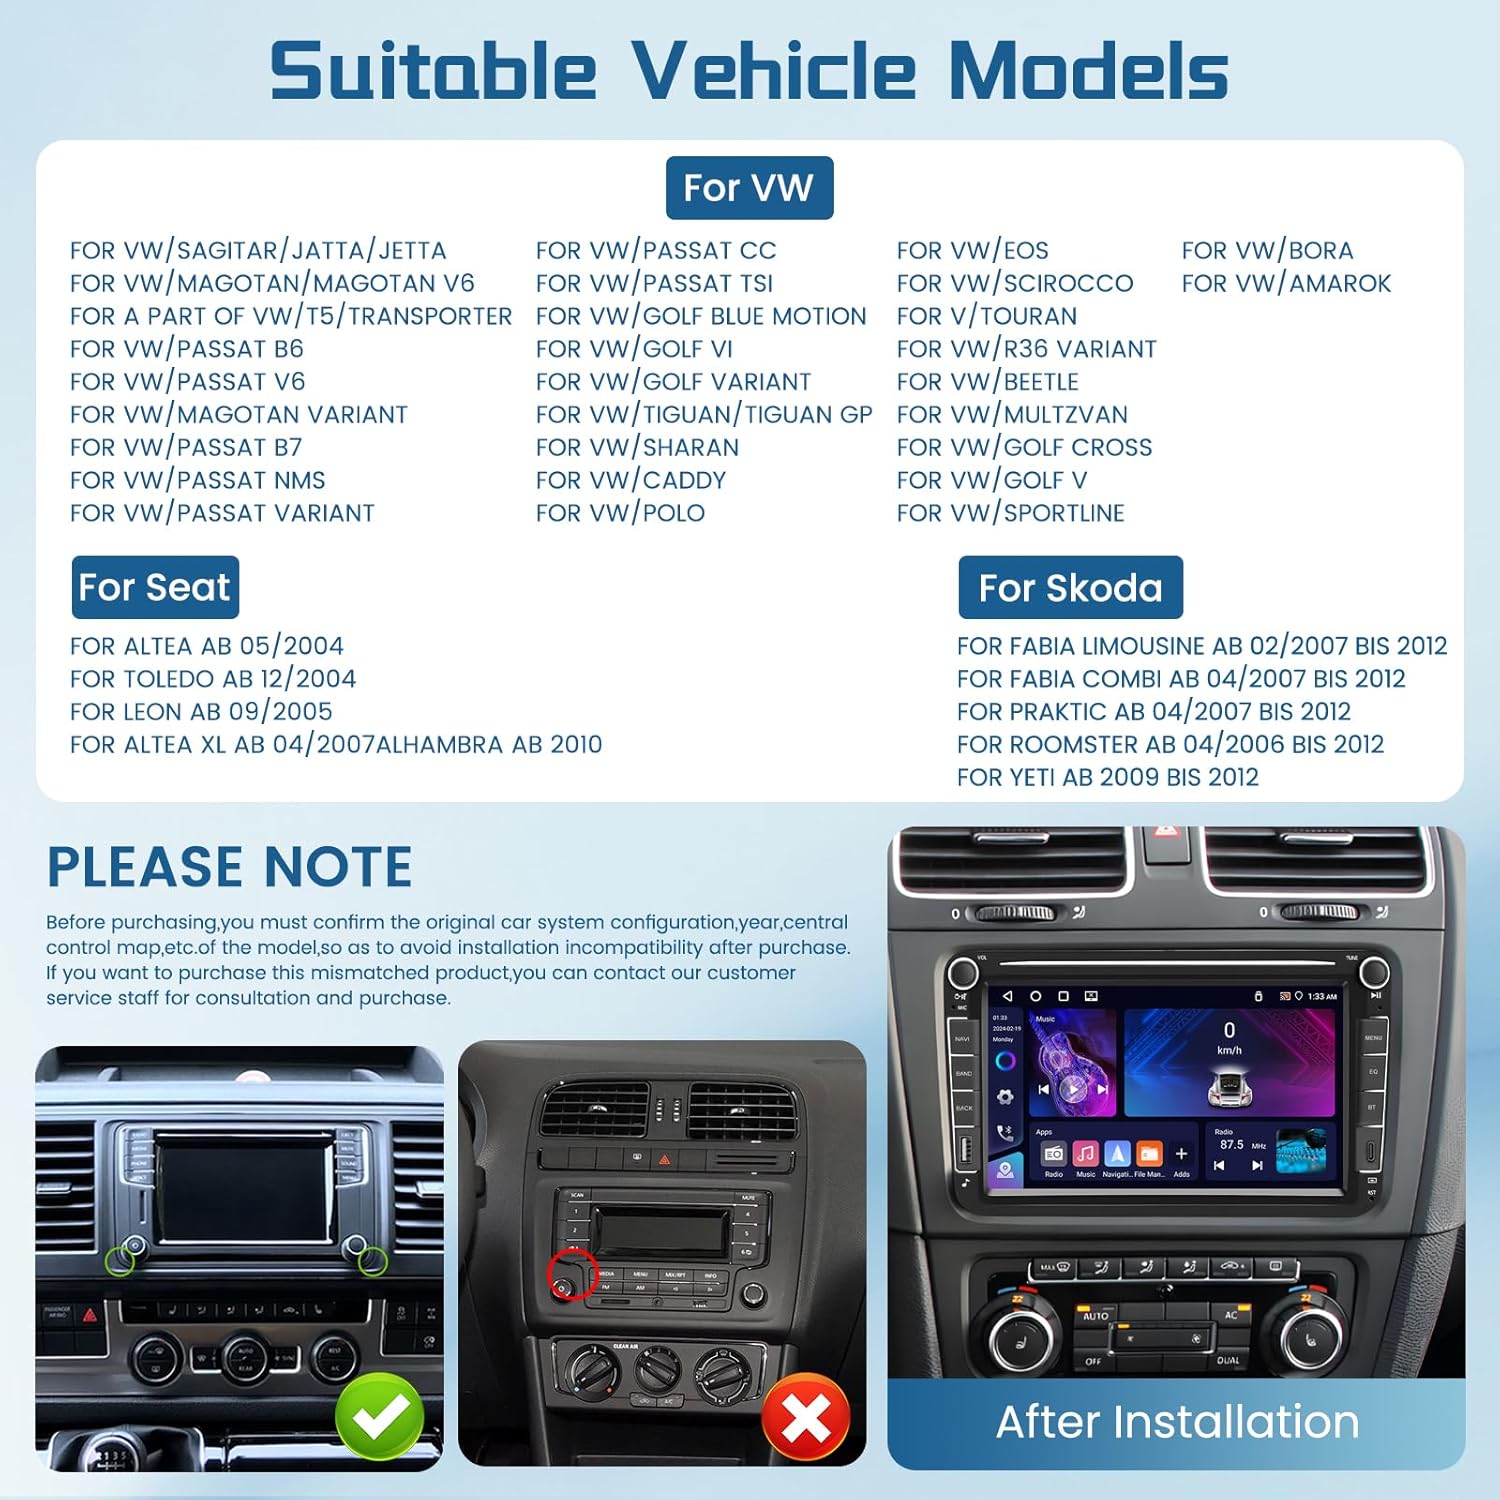
Image 3.1: Detailed list of compatible VW, Seat, and Skoda vehicle models. Examples include VW Passat, Golf, Jetta, Polo, Touran, Seat Altea, Leon, Toledo, and Skoda Fabia, Roomster, Yeti.
Important Note: For vehicles produced in 2014, 2015, 2016, or 2017, please contact customer support to confirm compatibility and ensure the correct wiring harness is used. Incorrect installation due to mismatched vehicle configurations may lead to functional issues.

Image 3.2: Visual guide indicating compatible and incompatible dashboard configurations for installation. Ensure your vehicle's original central control map and year match the requirements.
4. Package Contents
Verify that all items listed below are included in your package:
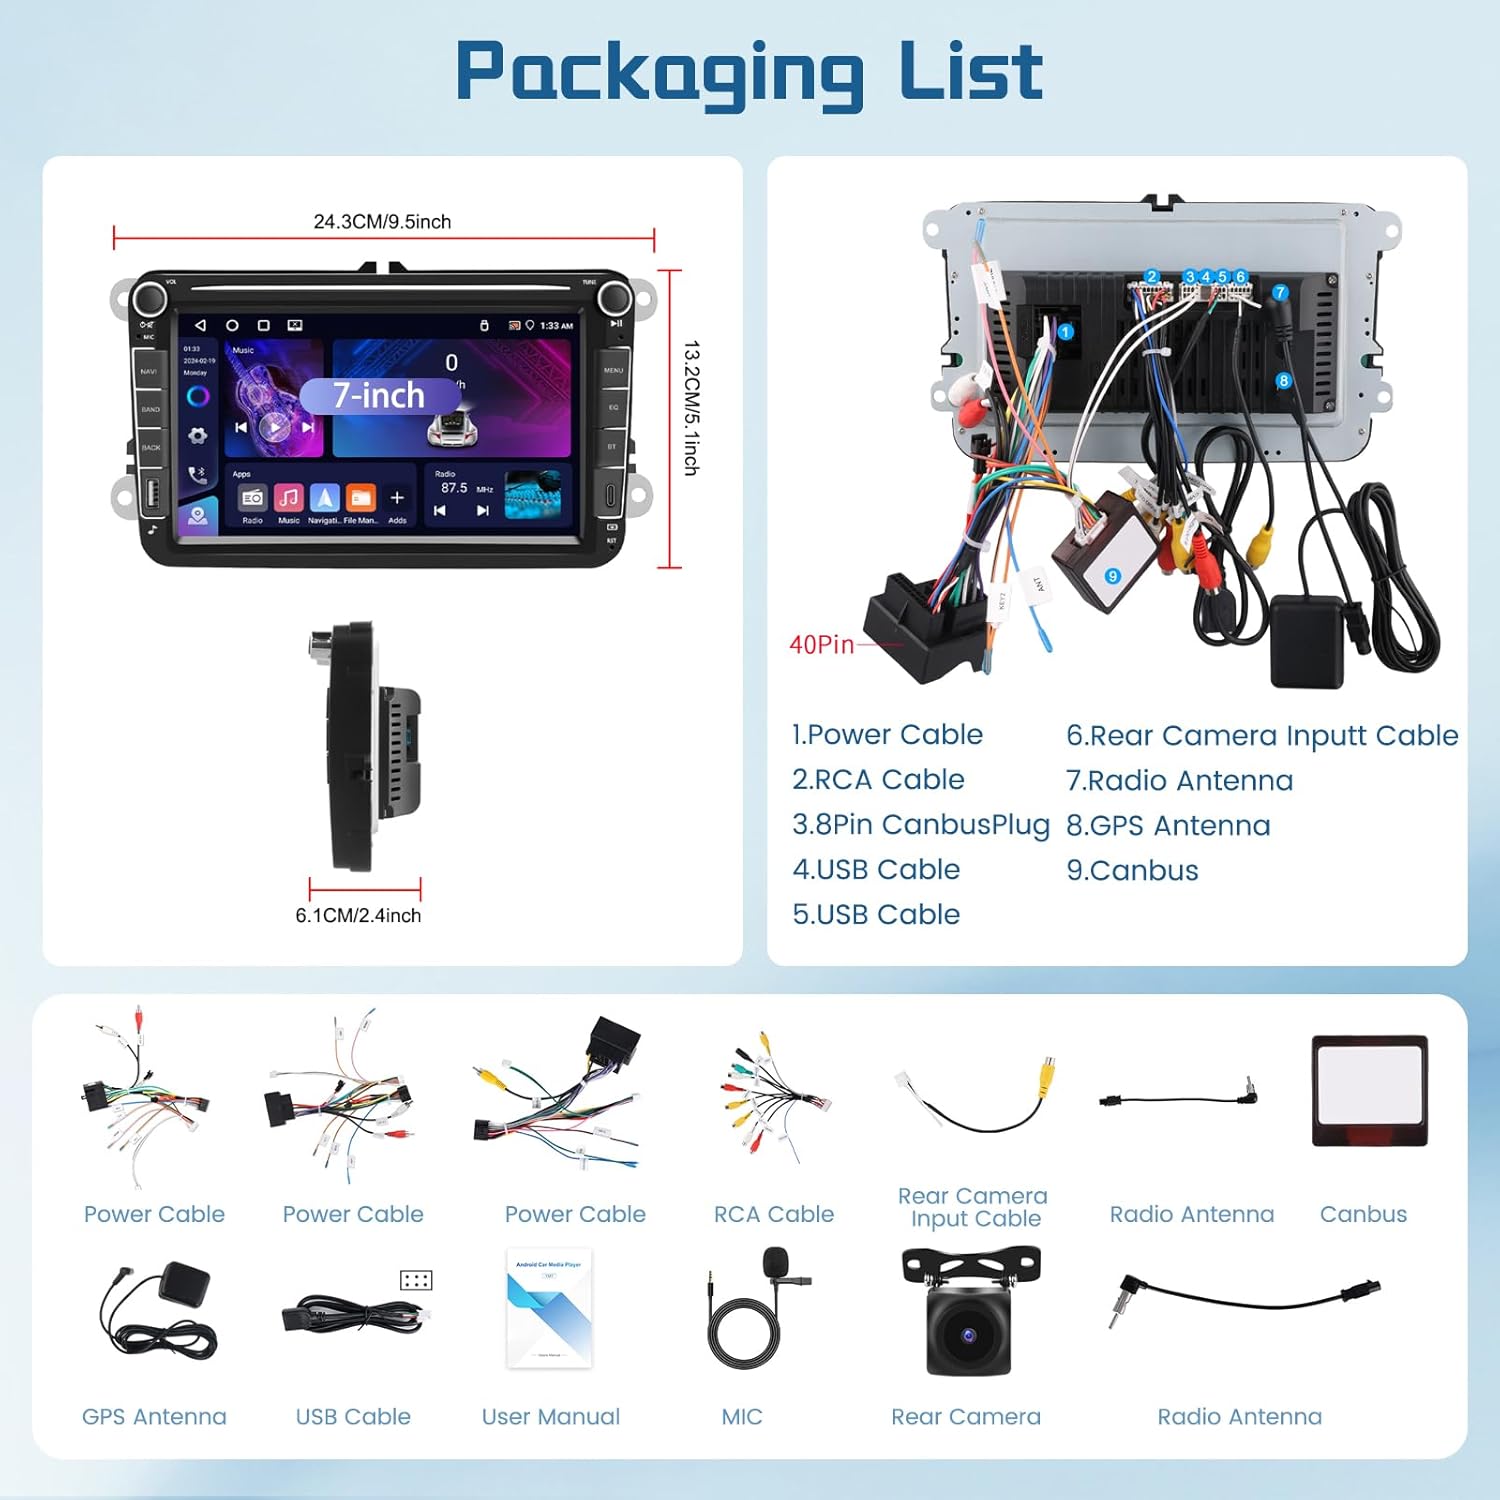
Image 4.1: Visual representation of the package contents, including the head unit, various power cables, RCA cable, rear camera input cable, radio antenna, GPS antenna, USB cables, user manual, microphone, and Canbus decoder.
- Driauto 8 Inch Car Stereo Head Unit
- Power Cables (various types: 52-pin, 40-pin, 36-pin)
- RCA Cable
- Rear Camera Input Cable
- Radio Antenna
- GPS Antenna
- USB Cables (Dual)
- User Manual
- External Microphone
- AHD Reversing Camera
- CANBUS Decoder (if applicable for your vehicle)
5. Setup and Installation
Professional installation is recommended. If you choose to perform the installation yourself, proceed with caution and ensure the vehicle's battery is disconnected before starting.
5.1 Wiring Harness Connection
Identify the correct power harness (36-pin, 40-pin, or 52-pin) for your vehicle. Connect the corresponding cables to the stereo unit and your vehicle's wiring system.

Image 5.1: Power cable definitions for 36-pin, 40-pin, and 52-pin connectors. Points A and B are for ACC wire, C for Canbus, and D for Canbus power cable connection to the head unit.
5.2 Reverse Camera Installation
The included AHD reversing camera requires specific wiring for proper function. Connect the camera's red cable (1 and 3) to the positive of the car's reverse light power supply. Connect the camera's black cable (2) to the negative of the car's reverse light power supply. Connect the black cable (4) to the reverse trigger wire on the power harness.

Image 5.2: Detailed wiring instructions for the AHD backup camera and an overview of steering wheel control button functions.
5.3 Steering Wheel Control
If your vehicle has steering wheel controls, connect the appropriate wires from the stereo harness to your vehicle's steering wheel control wires. The system supports learning functions for various buttons (Volume+, Next, Answer, HangUp, Last, Volume-, Mute, Mode, Power, Band, GPS).
5.4 General Installation Precautions
- Disconnect the vehicle's battery before starting any electrical work.
- For vehicles with highly equipped features (e.g., steering wheel controls, original car information display, navigation trajectory), a CANBUS decoder is typically required. Ensure the CANBUS is correctly installed and connected.
- For general car players without these highly equipped features, a CANBUS may not be necessary, and the unit can run normally without it.
- Select the correct size of power plug for the navigator according to your original vehicle interface.

Image 5.3: Installation precautions for VW car power cords, detailing steps for disconnecting ACC line ports and selecting the correct power plug size. Also lists features of highly equipped vehicles that may require a Canbus.
6. Operating Instructions
6.1 Wireless CarPlay & Android Auto
Connect your iOS or Android smartphone wirelessly via Bluetooth to access CarPlay or Android Auto. This allows you to use navigation, music, messaging, and voice control features directly on the stereo screen.

Image 6.1: The car stereo displaying the Wireless CarPlay interface, with a smartphone showing the CarPlay and Android Auto logos.
6.2 Mirror Link
The dual system mirrored connectivity feature allows you to cast your mobile phone screen to the car stereo display. This function supports both Android and iOS devices.

Image 6.2: Illustration of Wireless Mirror Link displaying phone content on the stereo, alongside Wireless CarPlay and Android Auto connectivity via Bluetooth.
6.3 GPS Navigation & WiFi
The unit has a built-in GPS module. Connect to a WiFi hotspot to browse the web, download apps, and receive real-time traffic updates for online navigation. Offline navigation is also supported by downloading map resources in advance.

Image 6.3: The car stereo displaying a GPS navigation map, and a graphic highlighting the Android 15 operating system with 4GB RAM and 64GB ROM for enhanced performance.
6.4 Bluetooth
Utilize Bluetooth for stable connections to your devices, enabling easy music playback and hands-free calling. The system supports phone dialer, contacts, and call logs.

Image 6.4: Screenshots showing the Bluetooth dialer, FM/RDS radio interface, and the EQ/DSP sound adjustment panel.
6.5 FM/RDS Radio
Access your favorite radio programs and real-time traffic information using the FM/RDS function. The radio interface allows for easy station tuning and preset management.
6.6 DSP (Digital Sound Processing)
Customize your audio experience with the 32-band DSP adjustment. This feature provides high-fidelity audio output and allows you to fine-tune sound effects to your preference.
6.7 Split Screen Function and Customization
The unit supports split-screen functionality, allowing you to run two applications simultaneously. You can also customize the applications displayed on the homepage and set shortcuts for frequently used functions.

Image 6.5: The car stereo displaying a reverse camera feed with parking guidelines, the interface for programming steering wheel controls, and a screen for setting application shortcuts.
7. Maintenance
- Cleaning the Screen: Use a soft, lint-free cloth to gently wipe the touch screen. Avoid abrasive cleaners or solvents that could damage the display.
- Software Updates: Periodically check for software updates to ensure optimal performance and access to new features. Updates can typically be downloaded via WiFi.
- Environmental Conditions: Avoid exposing the unit to extreme temperatures, direct sunlight for prolonged periods, or excessive moisture.
- Cable Connections: Ensure all cables are securely connected. Loose connections can lead to intermittent functionality.
8. Troubleshooting
8.1 Power Consumption Issues
If your car media player experiences power consumption issues (e.g., battery drain), consider the following:
- Confirm that the CANBUS and the A&B ports of the power line are connected at the same time. Do not connect them simultaneously.
- If the CANBUS is connected, try unplugging it to see if the same issue persists. This can help determine whether the problem is related to the CANBUS.
- After turning off the engine, test whether the ACC red wire of the power supply still has electricity. If the ACC red wire still has electricity after turning off the engine, it is necessary to reconnect it separately to ensure it powers off with the ignition.
- If your CANBUS is not from 'Simple soft', consider replacing it with a 'Simple soft' compatible unit.

Image 8.1: Visual guide for troubleshooting power consumption, showing different wiring configurations for 36-pin and 40-pin connectors and the CANBUS module.
8.2 Reverse Camera Not Displaying
- Ensure the camera's power and ground wires are correctly connected to the reverse light circuit.
- Verify that the reverse trigger wire on the stereo's power harness is correctly connected to the vehicle's reverse signal wire.
- Check the camera settings in the stereo's factory settings menu. Ensure the correct video format (e.g., AHD) is selected.
- Inspect the video input cable for any damage or loose connections.
8.3 No Sound or Distorted Audio
- Check all speaker wire connections for proper polarity and secure fit.
- Verify the volume levels on both the stereo and any connected devices (e.g., smartphone).
- Ensure the DSP/EQ settings are not configured to extreme levels that could cause distortion. Reset to default if necessary.
- If using an external amplifier, check its power and signal connections.
8.4 Touch Screen Unresponsive
- Perform a soft reset of the unit (refer to the main unit for a reset button, usually a small pinhole).
- Ensure the screen is clean and free of debris or moisture.
- If the issue persists, contact customer support.
9. Specifications
| Feature | Specification |
|---|---|
| Model Number | Driauto AVR-8DD |
| Display Size | 8 Inches |
| Operating System | Android |
| RAM | 4GB |
| ROM | 64GB |
| Screen Resolution | 1024x600 |
| Connectivity Technology | Bluetooth, HDMI, USB, Wi-Fi |
| Special Features | Android Auto, Apple CarPlay, Bluetooth, Built-In Wi-Fi, GPS Navigation |
| Audio Output Mode | Stereo, Surround |
| Included Components | Backup Camera |
| Item Weight | 2.97 pounds |
| Package Dimensions | 12.95 x 10.16 x 4.45 inches |
10. Warranty and Support
10.1 Warranty Information
The Driauto AVR-8DD car stereo comes with a 2-year replacement warranty. Please retain your proof of purchase for warranty claims.
10.2 Customer Support
Driauto offers lifetime support for its products. For technical assistance, troubleshooting, or warranty inquiries, please contact Driauto customer service. Response times are typically within 18 hours.
- Returns: 60-day return policy.
- Replacement: 2-year replacement warranty.
- Support: Lifetime technical support.

Image 10.1: Summary of Driauto's customer service commitments, including response time, return policy, replacement warranty, and lifetime support.