1. Important Safety Information
Read all instructions before using the appliance. Failure to follow these instructions may result in electric shock, fire, or serious injury.
- Always place the appliance on a stable, heat-resistant surface.
- Do not immerse the cord, plug, or appliance in water or other liquid.
- Close supervision is necessary when any appliance is used by or near children.
- Unplug from outlet when not in use and before cleaning. Allow to cool before putting on or taking off parts.
- Do not operate any appliance with a damaged cord or plug, or after the appliance malfunctions or has been damaged in any manner.
- Do not use outdoors.
- Do not let cord hang over edge of table or counter, or touch hot surfaces.
- Do not place on or near a hot gas or electric burner, or in a heated oven.
- Extreme caution must be used when moving an appliance containing hot oil or other hot liquids.
- Do not use the appliance for other than intended use.
- Use extreme caution when removing tray or disposing of hot grease.
- Oversized foods or metal utensils must not be inserted in a toaster oven as they may create a fire or risk of electric shock.
- A fire may occur if the oven is covered or touching flammable material, including curtains, drapes, walls, and the like, when in operation.
- Do not store any materials, other than manufacturer's recommended accessories, in this oven when not in use.
- Do not place any of the following materials in the oven: paper, cardboard, plastic, or any materials not specifically designed for oven use.
- Do not cover crumb tray or any part of the oven with metal foil. This will cause overheating of the oven.
2. Product Overview
The Curtis Stone 32-Quart Digital Airfryer Oven is a versatile kitchen appliance designed for a wide range of cooking tasks. It combines the functionality of an air fryer with a conventional oven, offering 13 distinct cooking functions.
2.1 Key Features
- 13-in-1 Functionality: Air Fry, Toast, Bagel, Pizza, Bake, Broil, Roast, Reheat, Warm, Cookie, Rotisserie, Dehydrate, and Slow Cook.
- 32-Quart Capacity: Provides ample cooking space for various meal sizes.
- Digital Controls: Easy-to-use digital interface for precise temperature and time settings.
- Adjustable Temperature: Temperature range from 100°F to 450°F.
- Included Accessories: Air fryer basket, Dura-Pan bake tray, crumb tray, wire rack, rotisserie set, and pizza stone.
2.2 Components and Accessories
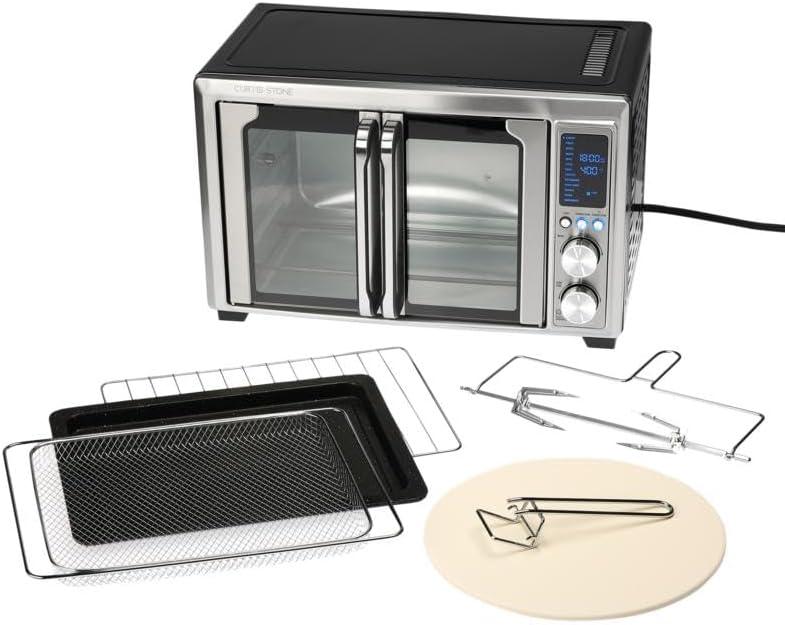
Figure 2.2.1: The Curtis Stone 32-Quart Digital Airfryer Oven shown with its various accessories, including the air fryer basket, bake tray, wire rack, rotisserie spit, and pizza stone.

Figure 2.2.2: Front view of the black model of the Curtis Stone 32-Quart Digital Airfryer Oven, highlighting its double doors and control panel.

Figure 2.2.3: Detailed view of the digital control panel, showing the various cooking functions, time, and temperature display, along with the control knobs and buttons.

Figure 2.2.4: Interior view of the oven with both doors fully open, revealing the spacious cooking cavity and the placement of the air fryer basket.

Figure 2.2.5: Side perspective of the red model of the Curtis Stone 32-Quart Digital Airfryer Oven, showcasing its compact design.

Figure 2.2.6: A complete set of accessories: wire rack, air fryer basket, Dura-Pan bake tray, pizza stone with handle, and rotisserie spit with forks.
3. Setup and First Use
- Unpacking: Carefully remove the air fryer oven and all accessories from the packaging. Retain packaging for future storage or transport.
- Cleaning: Before first use, wipe the exterior of the oven with a damp cloth. Wash all removable accessories (air fryer basket, bake tray, wire rack, rotisserie set, pizza stone) in warm, soapy water. Rinse thoroughly and dry completely.
- Placement: Place the oven on a flat, stable, heat-resistant surface, ensuring at least 6 inches of clearance on all sides and above for proper ventilation. Do not place near flammable materials.
- Power Connection: Plug the power cord into a grounded electrical outlet. Ensure the outlet voltage matches the appliance's requirements (typically 120V AC).
- Initial Burn-Off: It is recommended to run the oven empty for approximately 15 minutes at 400°F (200°C) before first use. This helps to burn off any manufacturing residues and odors. Ensure the area is well-ventilated during this process.
4. Operating Instructions
The Curtis Stone Digital Airfryer Oven features a user-friendly digital control panel. Refer to Figure 2.2.3 for control panel layout.
4.1 Control Panel Overview
- Digital Display: Shows selected function, time, and temperature.
- Menu Button: Cycles through the 13 pre-set cooking functions.
- Temp/Time Knobs: Adjust temperature and cooking time.
- Start/Stop Button: Initiates or pauses/stops the cooking cycle.
- Light Button: Turns the interior oven light on/off.
- Convection Button: Activates or deactivates the convection fan for certain functions.
4.2 General Operation Steps
- Prepare Food: Place food on the appropriate accessory (e.g., air fryer basket for air frying, bake tray for baking).
- Load Oven: Carefully slide the accessory with food into the desired rack position inside the oven. Close the oven doors securely.
- Select Function: Press the Menu button repeatedly until the desired cooking function (e.g., Air Fry, Bake, Toast) is highlighted on the digital display.
- Adjust Settings: Use the Temp/Time knobs to set the desired temperature and cooking time. The display will show the current settings.
- Start Cooking: Press the Start/Stop button to begin the cooking process. The oven will preheat if necessary, and a timer will count down.
- Monitor Progress: Use the Light button to check on food without opening the doors.
- End of Cooking: The oven will beep when the cooking cycle is complete. Carefully remove food using oven mitts. Press Start/Stop to turn off the oven.
4.3 Specific Cooking Functions
Below is a brief guide for each of the 13 functions. Refer to the included recipe book for detailed cooking charts and specific instructions.
- Air Fry: Ideal for crispy foods with little to no oil. Use the air fryer basket.
- Toast: For bread, bagels, and frozen waffles. Adjust darkness level.
- Bagel: Toasts the cut side of bagels while gently warming the crust.
- Pizza: Optimized for cooking fresh or frozen pizzas. Use the pizza stone.
- Bake: For cakes, cookies, casseroles, and other baked goods. Use the bake tray or a suitable baking dish.
- Broil: For browning, melting, or quick cooking of thin cuts of meat. Use the wire rack with the bake tray underneath to catch drips.
- Roast: For larger cuts of meat, poultry, or vegetables.
- Reheat: Gently warms leftovers without drying them out.
- Warm: Keeps cooked food warm until ready to serve.
- Cookie: Specific setting for baking cookies.
- Rotisserie: For roasting whole chickens or roasts using the rotisserie spit. Ensure food is securely balanced.
- Dehydrate: For drying fruits, vegetables, and making jerky at low temperatures over extended periods.
- Slow Cook: For slow cooking stews, soups, and tenderizing meats.
5. Maintenance and Cleaning
Regular cleaning and maintenance will ensure the longevity and optimal performance of your air fryer oven.
- Always Unplug: Before cleaning, always unplug the oven from the power outlet and allow it to cool completely.
- Exterior Cleaning: Wipe the exterior surfaces with a soft, damp cloth. Do not use abrasive cleaners or scouring pads, as they may damage the finish.
- Interior Cleaning: For the interior, wipe down with a damp cloth and mild detergent. For stubborn stains, a non-abrasive sponge can be used. Ensure the interior is dry before next use.
- Crumb Tray: The crumb tray should be emptied and cleaned regularly to prevent grease buildup and potential fire hazards. Slide it out from the bottom, discard crumbs, and wash with warm, soapy water.
- Accessories: All removable accessories (air fryer basket, bake tray, wire rack, rotisserie set, pizza stone) are dishwasher safe or can be washed by hand in warm, soapy water.
- Do Not Immerse: Never immerse the main unit of the oven, its cord, or plug in water or any other liquid.
6. Troubleshooting Guide
If you encounter issues with your air fryer oven, consult the following table before contacting customer support.
| Problem | Possible Cause | Solution |
|---|---|---|
| Oven does not turn on. | Not plugged in; power outlet malfunction; circuit breaker tripped. | Ensure plug is securely inserted. Test outlet with another appliance. Reset circuit breaker if tripped. |
| Food is not cooking evenly. | Overcrowding the basket/tray; incorrect temperature/time; food not flipped/shaken. | Do not overcrowd. Adjust temperature/time as per recipe. Flip or shake food halfway through cooking. |
| White smoke coming from oven. | Excess oil/grease on heating elements or crumb tray; fatty food. | Unplug and let cool. Clean heating elements and crumb tray. For fatty foods, use a bake tray underneath to catch drips. |
| Oven smells like burning plastic. | New appliance odor (initial burn-off); plastic material inside oven. | Ensure initial burn-off was performed in a well-ventilated area. Remove any non-oven-safe plastic items. If odor persists, contact support. |
| Digital display not working. | Power issue; internal malfunction. | Unplug for 5 minutes, then plug back in. If issue persists, contact customer support. |
7. Product Specifications
- Model: 32-Quart Digital Airfryer Oven
- ASIN: B0F75YNFJW
- Capacity: 32 Quarts (approx. 1024 Ounces)
- Functions: 13-in-1 (Air Fry, Toast, Bagel, Pizza, Bake, Broil, Roast, Reheat, Warm, Cookie, Rotisserie, Dehydrate, Slow Cook)
- Temperature Range: 100°F - 450°F
- Weight: Approximately 20 pounds
- Color: Black (as per current product variant)
- Manufacturer: Curtis Stone
- UPC: 606582504136
8. Warranty and Support
This product is a renewed item and comes with a 1-Year Refurbished Warranty. For warranty claims or technical support, please contact the Amazon Renewed customer service or the manufacturer, Curtis Stone, directly.
For further assistance, please refer to the contact information provided with your purchase or visit the Amazon Renewed support page.
Online Resources:
- Amazon Renewed Support: https://www.amazon.com/Amazon-Renewed/b?node=12653393011
- Product Page (for reference): https://www.amazon.com/dp/B0F75YNFJW