1. Introduction
Thank you for choosing the Proster PST252-US Digital Rechargeable Pinless Moisture Meter. This device is designed for non-destructive measurement of moisture content in various materials such as wood, walls, plaster, and masonry. It features a clear LCD display, a 3-color LED bar graph, and an audible alarm for easy interpretation of moisture levels. Please read this manual thoroughly before use to ensure proper operation and to maximize the lifespan of your device.

Image: The Proster PST252-US Digital Rechargeable Pinless Moisture Meter, showing its orange and black design with an LCD screen.
2. Safety Information
- Keep the device away from water and high humidity environments to prevent damage.
- Do not attempt to disassemble or modify the device. Repairs should only be performed by qualified personnel.
- Avoid exposing the device to extreme temperatures or direct sunlight for prolonged periods.
- Ensure the device is fully charged before critical measurements to avoid inaccurate readings due to low battery.
- Be aware that the presence of metals or pipes within the material being measured can affect the reading accuracy.
3. Product Overview
3.1 Components
- Digital Moisture Meter
- USB Type-C Charging Cable
- Storage Pouch
- User Manual

Image: The Proster PST252-US moisture meter, storage pouch, USB-C charging cable, and user manual.
3.2 Device Layout and Display
The device features an intuitive layout with a large LCD screen and clearly labeled buttons for various functions and measurement modes.

Image: Detailed view of the Proster PST252-US display showing moisture percentage, battery indicator, 3-color LED bar graph (Dry, Risk, Wet), HOLD function, and mode selection icons for Wall, Masonry, Soft Wood, and Hard Wood.
- LCD Display: Shows moisture percentage, battery status, and selected material mode.
- 3-Color LED Bar Graph: Visually indicates moisture levels (Green for Dry, Yellow for Risk, Red for Wet).
- Power Button: Turns the device ON/OFF.
- HOLD Button: Short press to freeze the current reading; long press for calibration.
- Mode Buttons: Separate buttons for selecting Wall, Masonry, Soft Wood, and Hard Wood measurement modes.
4. Setup
4.1 Charging the Device
The Proster PST252-US features a rechargeable lithium-ion battery. When the battery icon on the display shows low power or the device does not turn on, it needs to be charged.
- Connect the provided USB Type-C cable to the charging port on the device.
- Plug the other end of the USB cable into a standard USB power adapter (not included) or a computer USB port.
- The battery indicator on the display will show charging status. Charge until the battery icon indicates full charge.

Image: The Proster PST252-US moisture meter connected to a wall charger via its USB-C cable for recharging.
4.2 Initial Power On
Press the power button to turn on the device. The LCD display will illuminate, and the device will be ready for use.
5. Operating Instructions
5.1 Selecting a Measurement Mode
The device offers four specific measurement modes for different materials. Select the appropriate mode before taking a reading for optimal accuracy.
- Press the WALL button for plaster and drywall.
- Press the MASONRY button for brick and concrete.
- Press the SOFT WOOD button for softwoods.
- Press the HARD WOOD button for hardwoods.

Image: The Proster PST252-US displaying measurement ranges for different materials like walls, masonry, soft wood, and hard wood.
5.2 Taking a Measurement
The Proster PST252-US uses a non-destructive sensor to detect moisture up to 19mm (0.75 inches) below the surface.
- Ensure the device is charged and powered on.
- Select the appropriate material mode using the dedicated buttons.
- Place the sensor panel (located on the back of the device) flat against the surface of the material you wish to measure. Ensure full contact.
- Read the moisture percentage displayed on the LCD screen. The 3-color LED bar graph will also provide a visual indication of the moisture level (Green: Dry, Yellow: Risk, Red: Wet).
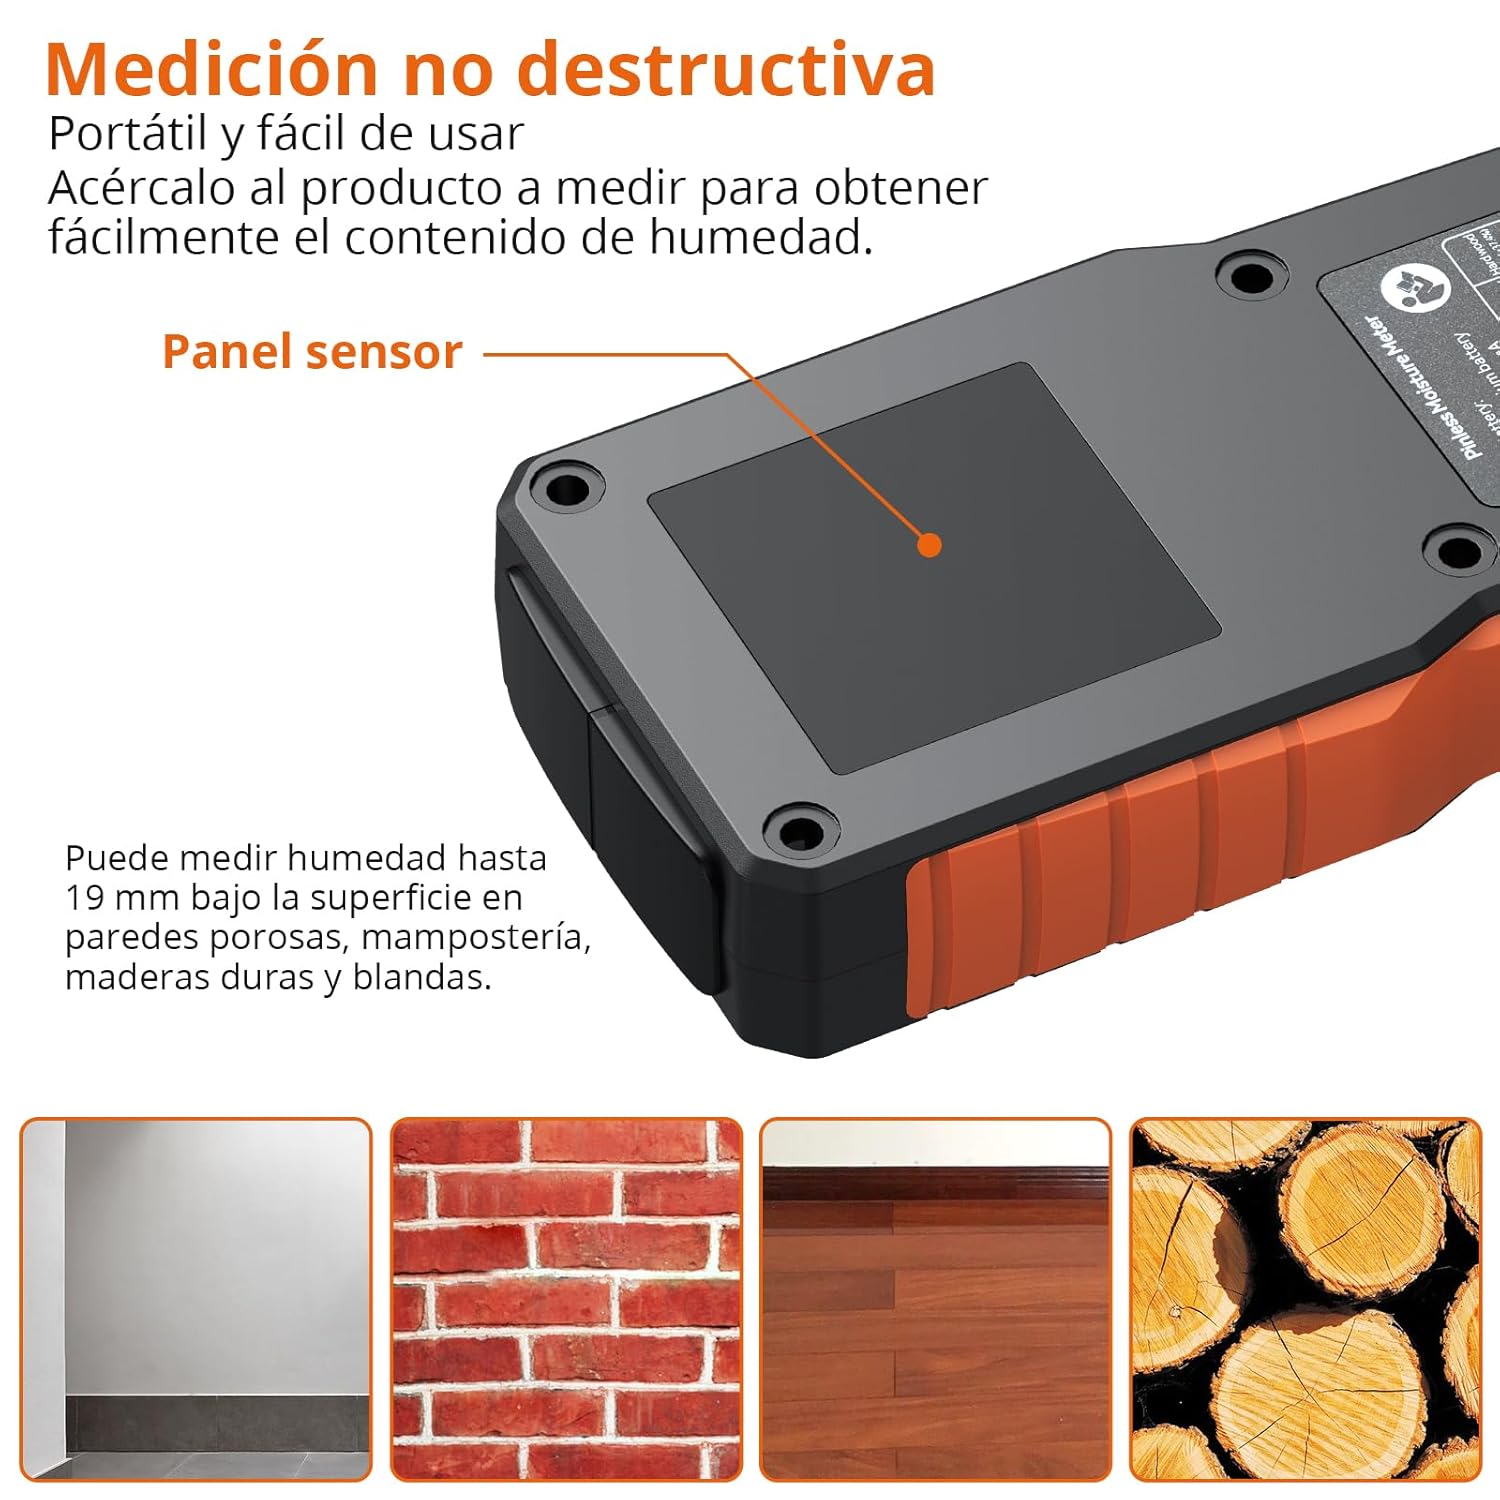
Image: The Proster PST252-US moisture meter being used to measure a wall, highlighting the sensor panel and showing examples of materials it can measure: porous walls, brick masonry, hardwood flooring, and wood logs.
Important Considerations:
- The material being measured should have a thickness greater than 19mm for accurate readings.
- The presence of metals, screws, nails, or pipes within the material can interfere with the sensor and affect measurement accuracy. Avoid these areas if possible.
- For precise measurements, place your finger on the rubber grip area of the device.

Image: Illustration showing correct measurement on a brick wall (left) and incorrect measurement on a damaged wall with exposed metal rebar (right), indicating that metals can affect accuracy.
5.3 Data Hold Function
To freeze the current reading on the display, short press the HOLD button. Press it again to release the hold and resume live measurement.
5.4 Audible Alarm
The device features an audible alarm that activates when moisture levels exceed predefined thresholds for the selected material. The alarm will sound faster as the moisture content increases.
| Material | Alarm Threshold |
|---|---|
| Wood | >10% |
| Plaster/Drywall | >20% |
| Masonry | >8% |

Image: The Proster PST252-US displaying a high moisture reading (27.3% on Wall mode) with a visual representation of the audible alarm.
5.5 Automatic Shut-off
The device will automatically shut off after 5 minutes of inactivity to conserve battery life.
6. Maintenance
6.1 Cleaning
Wipe the device with a soft, dry cloth. Do not use abrasive cleaners or solvents, as these may damage the casing or display.
6.2 Storage
When not in use, store the moisture meter in its protective pouch in a cool, dry place, away from direct sunlight and extreme temperatures.
6.3 Calibration
The device can be calibrated by long-pressing the HOLD button. Refer to the on-screen instructions or contact support if you suspect calibration issues.
7. Troubleshooting
- Device does not turn on: Ensure the battery is charged. Connect the USB-C cable and charge for at least 30 minutes.
- Inaccurate readings:
- Verify that the correct material mode is selected.
- Ensure the sensor panel is in full contact with the surface.
- Check for any metal objects (nails, pipes, rebar) within the measurement area that might interfere with the sensor.
- Ensure the material thickness is greater than 19mm.
- Perform a calibration if necessary (long press HOLD button).
- Display is dim or flickering: The battery may be low. Recharge the device.
- Audible alarm not working: Check if the device is in a high moisture area. If not, contact customer support.
8. Specifications
| Feature | Specification |
|---|---|
| Model Number | PST252-US |
| Measurement Type | Pinless (Non-destructive) |
| Detection Depth | Up to 19 mm |
| Measurement Modes | Wall, Masonry, Soft Wood, Hard Wood |
| Measurement Accuracy | ±4% |
| Display | LCD with 3-color LED bar graph |
| Battery Type | 1 Lithium-metal (rechargeable, included) |
| Charging Port | USB Type-C |
| Automatic Shut-off | Yes (after 5 minutes of inactivity) |
| Product Dimensions | 19 x 8 x 4.3 cm |
| Product Weight | 140 Grams |
| Operating Voltage | 3.7 Volts |
| Max Operating Temperature | 40 Degrees Celsius |
9. Warranty and Support
Proster products are designed for reliability and performance. For warranty information or technical support, please refer to the contact details provided with your purchase documentation or visit the official Proster website. Keep your purchase receipt as proof of purchase for any warranty claims.