1. Introduction
The NEEWER Basics RGB Photography Flashlight FL10 is a portable LED video spotlight designed for various photographic and videographic applications. It features multiple light colors, GOBO filters, adjustable beam zoom, and a built-in rechargeable battery, offering versatile lighting control for creative effects.

Image 1.1: The NEEWER Basics RGB Photography Flashlight FL10, shown with its included silicone snoot, USB-C charging cable, and velvet storage bag. Various GOBO filter effects are displayed on the right.
2. Package Contents
Verify that all items are present in the package:
- 1 x FL10 Photography Flashlight
- 1 x Silicone Snoot
- 20 x Gobo Filters
- 1 x Velvet Storage Bag
- 1 x USB Type C Charging Cable
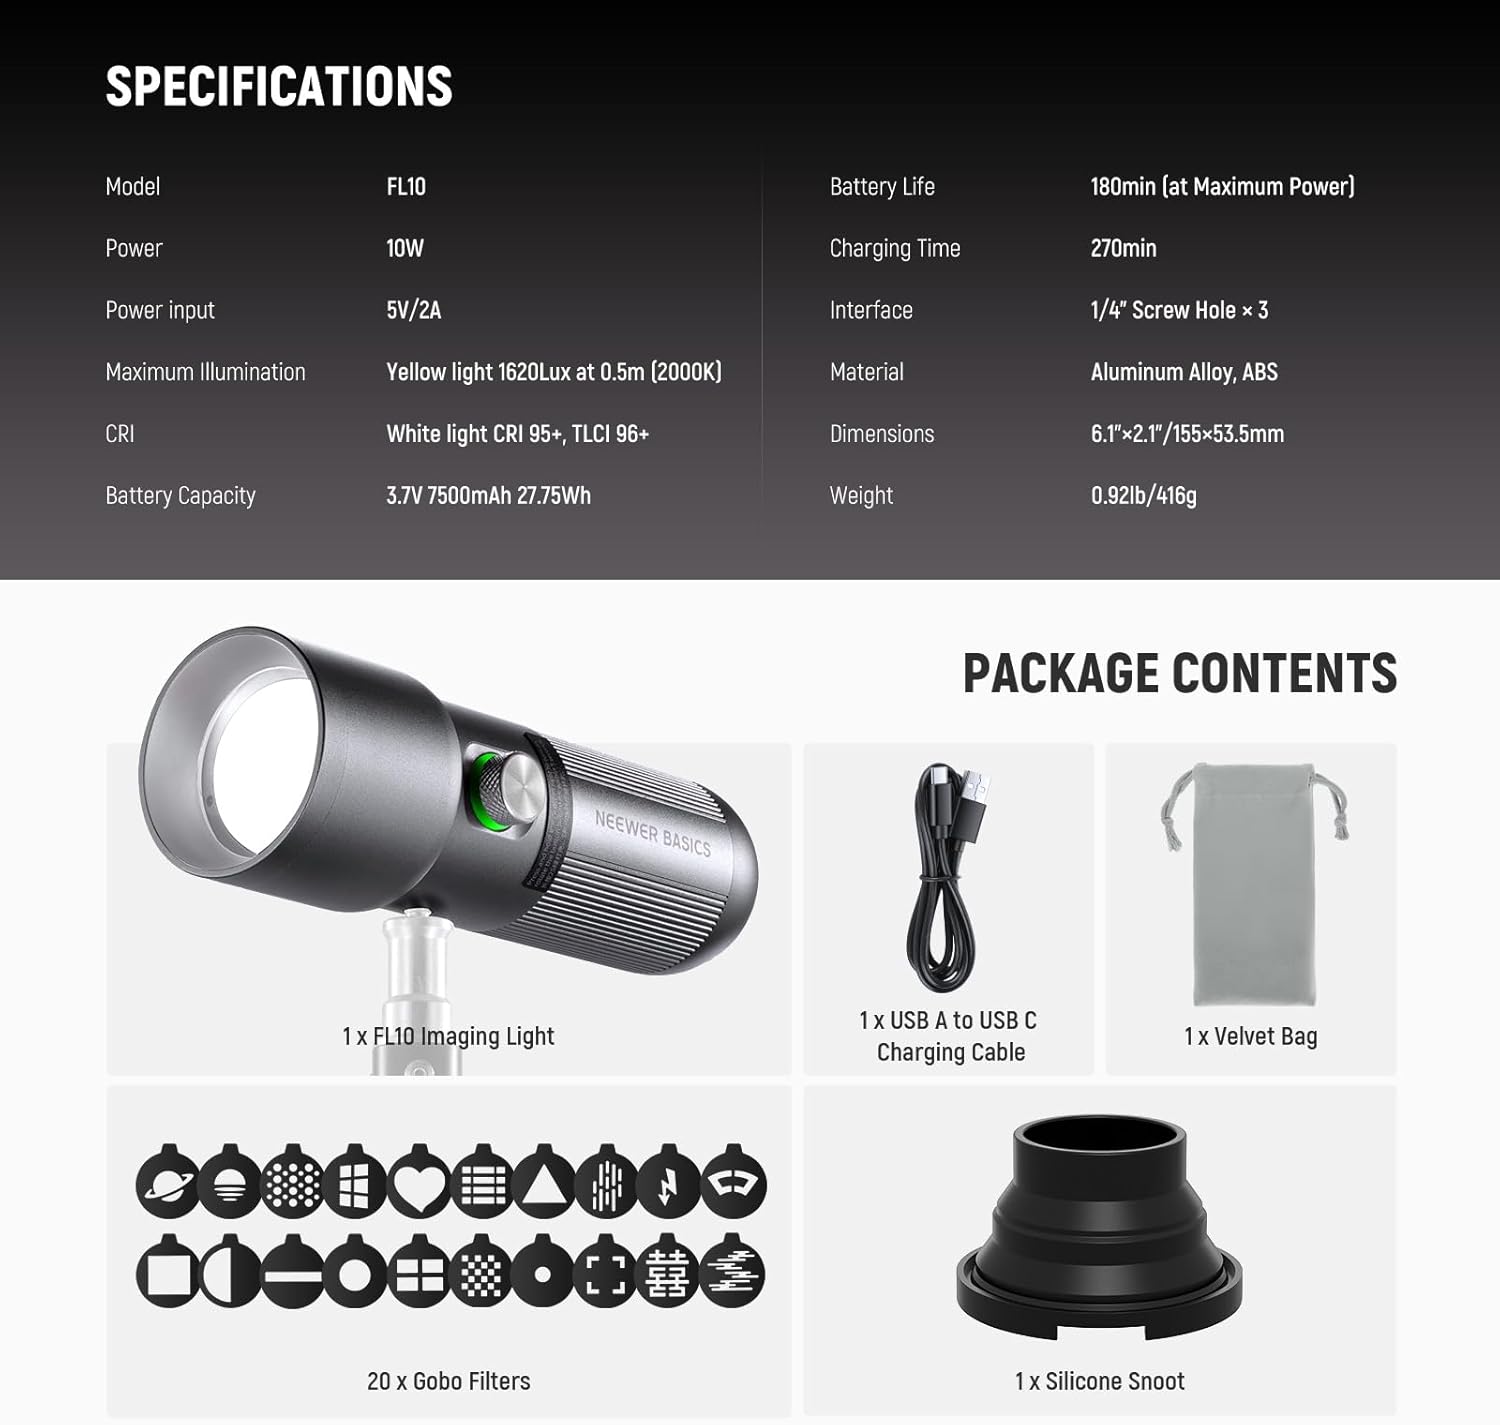
Image 2.1: Visual representation of the NEEWER FL10 package contents, including the flashlight, silicone snoot, 20 GOBO filters, velvet bag, and USB-C cable.
3. Product Features
- Compact and Durable Design: Constructed from aluminum alloy, measuring 6.1"x2.1" (155x53.5mm) and weighing 0.92lb (416g), designed for comfortable handheld use.
- Multiple Light Colors: Features 4 LED colors: warm white, orange yellow, ice blue, and red light.
- 20 GOBO Filters: Includes 20 unique GOBO filters for creating various patterned lighting effects.
- Adjustable Beam Zoom: A push-pull convex mirror barrel allows smooth adjustment of the light beam size and reach (zoom angle approximately 10°-60°).
- High Color Accuracy: Warm white light offers CRI95+ and TLCI96+ for accurate color rendering.
- Dimmable Output: Brightness is adjustable from 1% to 100%.
- Long Battery Life: Built-in 7500mAh lithium battery provides up to 180 minutes of continuous output at full power. Supports charging while in use via USB-C.
- Simple One-Button Control: Intuitive control for power, color switching, and brightness adjustment.
- Battery Indicator: Integrated light signals battery status: solid green (30%-100%), solid red (10%-30%), flashing red (below 10%).
- Mounting Options: Equipped with three standard 1/4" screw holes for attachment to tripods, DSLR cameras, or other compatible devices.

Image 3.1: The NEEWER FL10 flashlight held in a hand, illustrating its compact and portable design. Dimensions are indicated as 6.1"x2.1" (155x53.5mm).

Image 3.2: Examples of the four available light colors (warm white, orange yellow, ice blue, and red) projected onto models, demonstrating the lighting effects.

Image 3.3: A display of the 20 creative GOBO filters included with the NEEWER FL10, offering various patterns for artistic lighting.

Image 3.4: An illustration demonstrating the adjustable beam zoom function of the NEEWER FL10, showing how extending or retracting the lens barrel changes the light spot size from sharp to soft.

Image 3.5: A graphic highlighting the large capacity 7500mAh lithium battery, providing up to 180 minutes of runtime at maximum power.
4. Setup
4.1 Initial Charging
Before first use, fully charge the device to ensure optimal battery longevity and performance.
- Connect the included USB Type C charging cable to the flashlight's USB-C port.
- Connect the other end of the cable to a compatible USB power adapter (5V/2A recommended, not included).
- The battery indicator light will show charging status. Ensure it reaches solid green, indicating a full charge.
4.2 Attaching Accessories
The FL10 can be used handheld or mounted on various photographic equipment.
- Silicone Snoot: Attach the silicone snoot to the front of the flashlight to further control the light beam and prevent spill.
- GOBO Filters: Insert the desired GOBO filter into the designated slot on the flashlight's head.
- Mounting: Utilize the three 1/4" screw holes to attach the flashlight to tripods, light stands, DSLR cameras, or camera cages.

Image 4.1: The NEEWER FL10 flashlight demonstrated with different mounting options, including a DSLR camera, selfie stick, tripod, and camera cage, utilizing its 1/4" screw threads.
5. Operating Instructions
5.1 Power On/Off
- Power On: Press and hold the power button for 2 seconds until the light illuminates.
- Power Off: Press and hold the power button for 2 seconds to turn off the device.
5.2 Adjusting Brightness
After powering on:
- Rotate the control knob to adjust the brightness from 1% to 100%.
5.3 Changing Light Colors
After powering on:
- Short press the power button to cycle through the available light colors: warm white, orange yellow, ice blue, and red.
5.4 Adjusting Beam Zoom
- Gently push or pull the convex mirror barrel at the front of the flashlight to adjust the size and focus of the light beam.
5.5 Battery Indicator
The indicator light provides real-time battery status:
- Solid Green: 30% - 100% battery remaining.
- Solid Red: 10% - 30% battery remaining.
- Flashing Red: Below 10% battery remaining. Recharge immediately.

Image 5.1: A detailed view of the single control button and knob on the NEEWER FL10, illustrating its functions for power, color switching, and dimming, along with the battery status indicators.
6. Maintenance
- Cleaning: Use a soft, dry cloth to clean the exterior of the flashlight. Do not use abrasive cleaners or solvents.
- Lens Care: Keep the lens and GOBO filters free from dust and fingerprints for optimal light projection. Use a lens cleaning cloth if necessary.
- Storage: When not in use for extended periods, store the flashlight in the provided velvet storage bag in a cool, dry place.
- Battery Care: To maintain battery health, avoid fully discharging the battery frequently. Recharge the device regularly, even if not in active use.
7. Troubleshooting
- Light does not turn on:
- Ensure the battery is charged. Check the battery indicator.
- Press and hold the power button for 2 seconds to power on.
- Light output is dim:
- Adjust the brightness by rotating the control knob.
- Check battery level; low battery can reduce maximum brightness.
- Projected pattern is blurry:
- Adjust the beam zoom by pushing or pulling the lens barrel.
- Ensure the GOBO filter and lens are clean.
- Optimal projection distance for clear patterns is within 3.28ft/1m.
- Device not charging:
- Verify the USB-C cable is securely connected to both the flashlight and the power source.
- Try a different USB-C cable or power adapter.
8. Specifications
| Feature | Specification |
|---|---|
| Model | FL10 |
| Power | 10W |
| Power Input | 5V/2A |
| Maximum Illumination (Yellow Light) | 1620Lx/0.5m (2000K) |
| CRI (White Light) | 95+ |
| TLCI (White Light) | 96+ |
| Battery Capacity | 3.7V 7500mAh 27.75Wh |
| Battery Life (at Maximum Power) | 180 minutes |
| Charging Time | 270 minutes |
| Interface | 1/4" Screw Hole × 3, USB Type C |
| Material | Aluminum Alloy, ABS |
| Dimensions | 6.1" × 2.1" (155 × 53.5mm) |
| Weight | 0.92lb (416g) |
| UPC | 191073108806 |
9. Warranty and Support
For warranty information, technical support, or service inquiries, please refer to the official NEEWER website or contact their customer service directly. Details regarding product protection plans may also be available from your retailer.


