
1. Introduction
This manual provides detailed instructions for the installation, operation, and maintenance of your Jerqry 9-inch Car Radio, designed specifically for Hyundai Elantra models from 2014 to 2016. Please read this manual thoroughly before using the product to ensure proper function and safety.
2. Safety Information
- Do not attempt to operate the device while driving. Always ensure your vehicle is safely parked before making adjustments or interacting with the touchscreen.
- Professional installation is recommended to avoid damage to the unit or your vehicle's electrical system.
- Keep the device away from water and excessive moisture.
- Use only approved accessories and wiring provided with the unit.
- Ensure all connections are secure to prevent short circuits or malfunctions.
3. Package Contents
Verify that all items listed below are included in your package:
- Jerqry 9-inch Car Radio Unit
- USB Cable
- Reversing Cable
- Backup Camera
- Microphone
- Power Cable
- Original USB Adapter
- CAN BUS Decoder
- Crowbar (for trim removal)
- RCA Cable
- GPS Antenna

Figure 3.1: Included Accessories and Main Unit
4. Product Overview
The Jerqry 9-inch Car Radio is an advanced multimedia system designed to enhance your driving experience. It features a high-resolution IPS touchscreen and integrates various functionalities for navigation, entertainment, and communication.

Figure 4.1: Jerqry 9-inch Car Radio Main Unit
Key Features:
- 9-inch 1280*800P IPS Touchscreen: Delivers high-definition visuals with responsive touch and wide-angle viewing.
- Wireless CarPlay & Android Auto: Seamless smartphone integration for navigation, music, calls, and messages.
- Bluetooth 4.0: Hands-free calling, music streaming, and automatic phonebook loading.
- GPS Navigation: Supports both offline and online maps for real-time navigation.
- 5G WiFi & Hotspot: Connect to the internet for app downloads and online services.
- Backup Camera Support: Enhances safety with rear view image input and a 170° wide-angle, IP68 waterproof, night vision camera.
- Steering Wheel Control (SWC): Control essential functions directly from your steering wheel.
- FM RDS Radio & EQ: Enjoy radio broadcasts and customize audio settings with the built-in equalizer.
- Mirror Link: Project your iOS or Android phone screen onto the car stereo display.
5. Installation Guide
This section outlines the general installation process. Specific steps may vary based on your vehicle's trim and existing wiring. Professional installation is highly recommended.
5.1 Compatibility Check
This unit is designed for Hyundai Elantra models from 2014 to 2016. Please verify your vehicle's dashboard configuration matches the compatible designs shown below.
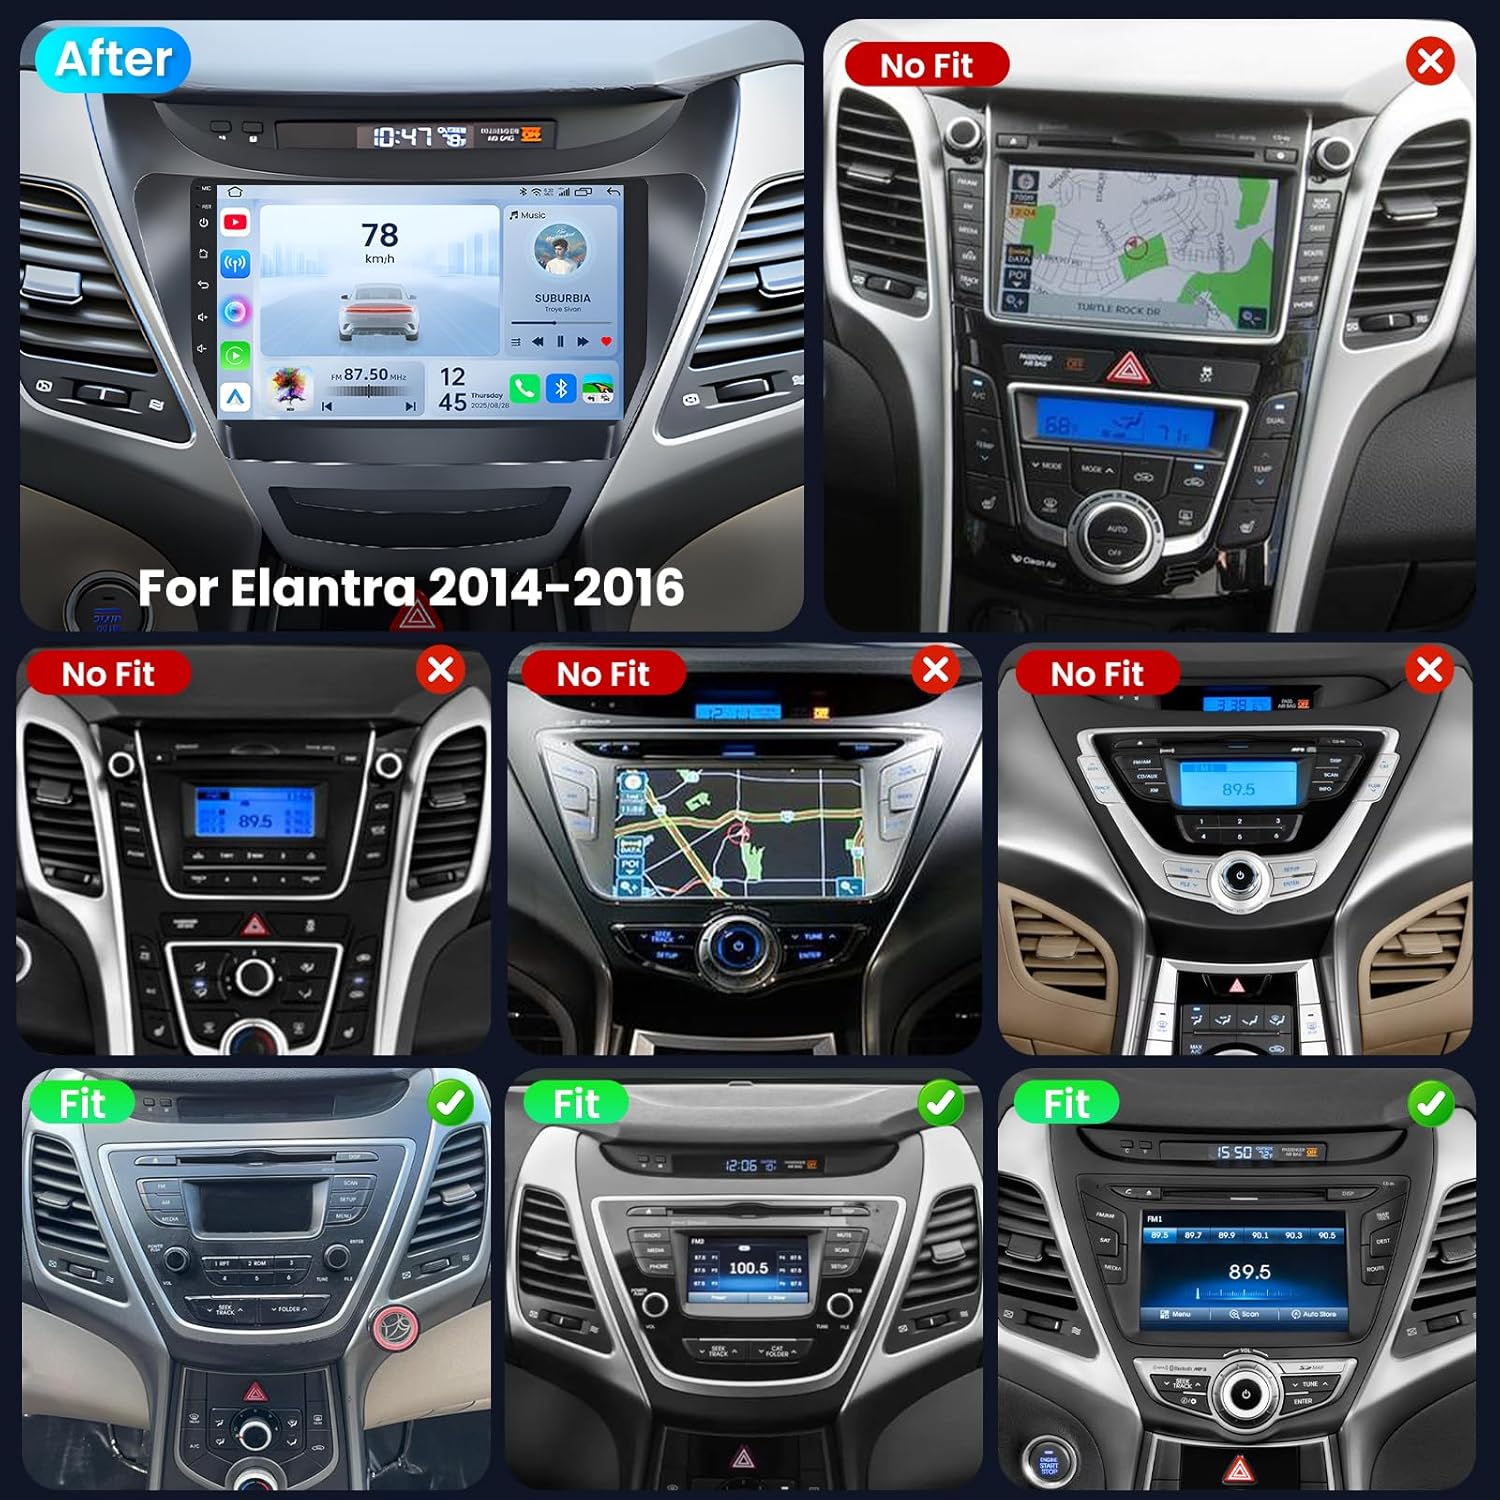
Figure 5.1: Dashboard Compatibility for Hyundai Elantra (2014-2016)
5.2 Basic Installation Steps
- Disconnect Battery: Before starting, disconnect the negative terminal of your car battery to prevent electrical shorts.
- Remove Old Unit: Carefully remove the existing car radio and dashboard trim using the provided crowbar or appropriate tools. Refer to your vehicle's service manual for specific trim removal instructions.
- Connect Wiring Harness: Connect the provided power cable, RCA cable, and other necessary wiring harnesses to the car radio and your vehicle's existing connectors. Ensure all connections are secure.
- Install GPS Antenna: Mount the GPS antenna in a location with a clear view of the sky, typically on the dashboard or under the windshield.
- Install Backup Camera (Optional): If installing the backup camera, route the reversing cable from the camera to the main unit. Connect the camera's power to the reverse light circuit.
- Test Connections: Before fully reassembling the dashboard, reconnect the car battery and power on the unit to test all functions (radio, Bluetooth, GPS, camera, steering wheel controls).
- Secure Unit and Reassemble: Once all functions are verified, securely mount the new car radio and reassemble the dashboard trim.
6. Operating Instructions
This section details how to use the various features of your Jerqry Car Radio.
6.1 Power On/Off
Press and hold the power button (usually located on the front panel or as a soft button on the screen) to turn the unit on or off. A short press typically mutes/unmutes the audio.
6.2 Touchscreen Interface
The 9-inch IPS touchscreen provides a clear and responsive interface. Navigate through menus and applications by tapping, swiping, and pinching. The display offers 1280*800P resolution for crisp visuals.

Figure 6.1: 1280*800P IPS Touch Screen Display
6.3 Wireless CarPlay / Android Auto
Connect your smartphone wirelessly to access navigation, music, calls, and messages directly on the car radio screen.
- Ensure Bluetooth and Wi-Fi are enabled on your smartphone.
- On the car radio, open the CarPlay or Android Auto application.
- Follow the on-screen prompts to pair your phone via Bluetooth and establish the wireless connection.
- Once connected, your phone's compatible apps will appear on the car radio display.

Figure 6.2: Wireless CarPlay & Android Auto Interface
6.4 Bluetooth Connectivity
Pair your phone via Bluetooth for hands-free calls and audio streaming.
- Go to the Bluetooth settings on the car radio.
- Enable Bluetooth on your smartphone and search for available devices.
- Select the car radio's Bluetooth name (e.g., "SYU-Android") from your phone's list and enter the pairing code (default is usually 0000).
- Once paired, you can make/receive calls and play music through the car's speakers.

Figure 6.3: Bluetooth 4.0 Functionality
6.5 GPS Navigation
The unit comes with a built-in GPS navigation system supporting both offline and online maps.
- Tap the 'Navigation' or 'Maps' icon on the home screen.
- Enter your destination using the on-screen keyboard.
- Select your preferred route and start navigation.
- For online maps and real-time traffic updates, ensure the unit is connected to Wi-Fi or a mobile hotspot.

Figure 6.4: GPS Navigation Interface
6.6 Wi-Fi Connectivity
Connect to a Wi-Fi network or mobile hotspot to access online features and download apps.
- Go to 'Settings' and select 'Wi-Fi'.
- Turn on Wi-Fi and select your desired network from the list.
- Enter the password if prompted.

Figure 6.5: 5G WiFi & Hotspot Functionality
6.7 FM RDS Radio
Tune into your favorite radio stations.
- Tap the 'Radio' icon on the home screen.
- Use the on-screen controls to scan for stations, manually tune, or select from presets.
- RDS (Radio Data System) provides additional information like station name and song title where available.
6.8 DSP Sound & EQ Adjustment
Customize your audio experience with the Digital Sound Processor (DSP) and Equalizer (EQ).
- Access the 'Equalizer' or 'DSP' app from the main menu.
- Adjust frequency bands, sound field, surround sound, bass enhancement, and sound filter settings to match your preferences.
- Pre-set modes like Rock, Pop, Jazz, etc., are available for quick selection.
6.9 Mirror Link
Project your smartphone screen onto the car radio display.
- Open the 'Mirror Link' application on the car radio.
- Follow the instructions to connect your iOS or Android device via USB or Wi-Fi.
- Once connected, your phone's screen will be mirrored on the car radio.
6.10 Steering Wheel Control (SWC)
Program your steering wheel buttons to control the car radio.
- Go to 'Settings' and find the 'Steering Wheel Control' option.
- Follow the on-screen instructions to assign functions (e.g., volume up/down, track skip, answer call) to your vehicle's steering wheel buttons.
6.11 Video Overview of Features
Video 6.1: Overview of Jerqry Car Radio features, including Bluetooth, Wireless CarPlay, DSP Sound, FM Radio, GPS Navigation, and UI customization.
7. Maintenance
Proper care ensures the longevity and optimal performance of your car radio.
- Cleaning the Screen: Use a soft, lint-free cloth to gently wipe the touchscreen. For stubborn smudges, slightly dampen the cloth with water or a screen-safe cleaner. Avoid harsh chemicals or abrasive materials.
- General Cleaning: Keep the unit and surrounding dashboard area free from dust and debris. Use a soft brush or compressed air for hard-to-reach areas.
- Software Updates: Periodically check for software updates through the unit's settings menu or the manufacturer's website to ensure you have the latest features and bug fixes.
- Temperature: Avoid exposing the unit to extreme temperatures for extended periods.
8. Troubleshooting
Refer to this section for common issues and their solutions.
| Problem | Possible Cause | Solution |
|---|---|---|
| Unit does not power on. | Loose power connection, blown fuse, vehicle battery issue. | Check power cable connections. Inspect vehicle fuses. Ensure car battery is charged. |
| No sound. | Volume muted, incorrect audio source, loose speaker wires. | Check volume level and mute status. Select correct audio source. Verify speaker wire connections. |
| Bluetooth not connecting. | Bluetooth off on phone/unit, incorrect pairing process, interference. | Ensure Bluetooth is enabled on both devices. Re-attempt pairing. Clear previous pairings. |
| GPS not acquiring signal. | GPS antenna obstructed or improperly installed. | Ensure GPS antenna has a clear view of the sky. Check antenna connection. |
| Backup camera not displaying. | Loose camera connection, incorrect wiring to reverse light. | Check camera cable connections. Verify camera power is correctly wired to the reverse light. |
| Touchscreen unresponsive. | Temporary software glitch. | Restart the unit. If issue persists, perform a factory reset (refer to settings). |
9. Specifications
| Feature | Specification |
|---|---|
| Brand | Jerqry |
| Model | 4Core 64G ROM Car Radio |
| Screen Size | 9 Inches |
| Display Type | LCD IPS Capacitive Touchscreen |
| Resolution | 1280*800P |
| Operating System | Android 12 |
| Processor | 4-Core |
| RAM | 2GB |
| Internal Storage (ROM) | 64GB |
| Connectivity | Bluetooth 4.0, Wi-Fi (5G supported) |
| Navigation | Built-in GPS (Offline/Online Maps) |
| Smartphone Integration | Wireless CarPlay, Android Auto, Mirror Link |
| Audio Output Mode | Stereo |
| Included Components | Car radio, wiring harnesses, backup camera, GPS antenna, USB cables, microphone, crowbar |
| Item Weight | 1.93 Kilograms |
10. Warranty and Support
Your Jerqry Car Radio comes with a 2-year warranty from the date of purchase, covering manufacturing defects. Please retain your proof of purchase for warranty claims.
Customer Support:
For technical assistance, troubleshooting beyond this manual, or warranty inquiries, please contact Jerqry customer support through the retailer where you purchased the product or visit the official Jerqry website for contact information.