KOORUI 27E3QK
KOORUI 27 Inch Gaming Monitor User Manual
Model: 27E3QK
1. Introduction
Thank you for choosing the KOORUI 27 Inch QHD 240Hz Gaming Monitor. This manual provides essential information for setting up, operating, maintaining, and troubleshooting your new monitor. Please read this manual thoroughly before using the product to ensure proper operation and to prevent damage.
This monitor is designed to deliver an immersive gaming and viewing experience with its high resolution, fast refresh rate, and quick response time.
2. Safety Information
Please observe the following safety precautions to ensure safe and optimal performance of your monitor:
- Do not expose the monitor to rain, moisture, or extreme temperatures.
- Ensure proper ventilation around the monitor. Do not block ventilation openings.
- Use only the power adapter and cables provided by the manufacturer.
- Avoid placing heavy objects on the power cord.
- Clean the monitor screen and casing with a soft, dry cloth. Do not use liquid cleaners or aerosol sprays directly on the screen.
- If the monitor emits smoke, unusual odors, or strange noises, immediately unplug it from the power outlet and contact customer support.
- Do not attempt to disassemble or repair the monitor yourself. Refer all servicing to qualified service personnel.
3. Package Contents
Please check the box for the following items:
- KOORUI 27 Inch Gaming Monitor
- Monitor Stand (Base and Neck)
- Power Adapter and Power Cable
- DisplayPort Cable
- HDMI Cable
- User Manual (this document)
- Screws for Stand Assembly
4. Setup
4.1 Assembling the Stand
- Carefully remove the monitor from its packaging, keeping it protected on a soft surface.
- Attach the stand neck to the monitor panel by aligning the tabs and pushing until it clicks into place. Secure with screws if provided.
- Attach the stand base to the stand neck and tighten the captive screw at the bottom of the base.
- Place the assembled monitor on a stable, flat surface.
4.2 VESA Mount Installation (Optional)
This monitor supports VESA mounting (75mm x 75mm) for wall mounts or monitor arms. To install, remove the stand and attach your VESA-compatible mount using appropriate screws.
Rear view of the monitor, highlighting the VESA 75mm x 75mm mounting points and various input ports.
4.3 Connecting Cables
Connect the necessary cables to the corresponding ports on the back of the monitor and your computer:
- Power: Connect the power adapter to the monitor's power input and then to a power outlet.
- Video Input:
- For 2560x1440 resolution at 240Hz, use the DisplayPort (DP) cable.
- For 2560x1440 resolution at 144Hz, use HDMI 2.0.
- For 1920x1080 resolution at 240Hz, use HDMI 1.4.
- Audio Output: Connect external speakers or headphones to the 3.5mm audio out jack if desired.

Detailed view of the monitor's input and output ports, including DisplayPort, HDMI, and Audio Out.
5. Operating the Monitor
5.1 Power On/Off
Press the power button (usually located on the back or bottom right of the monitor) to turn the monitor on or off. The power indicator light will illuminate when the monitor is on.
5.2 On-Screen Display (OSD) Menu
The monitor features a joystick control for navigating the On-Screen Display (OSD) menu. This menu allows you to adjust various settings such as brightness, contrast, color temperature, input source, and gaming features.
- Press the joystick: To open the OSD menu.
- Move the joystick (Up/Down): To navigate through menu options.
- Move the joystick (Left/Right): To adjust values or enter sub-menus.
- Press the joystick again: To confirm a selection or exit a sub-menu.
5.3 Key Features and Adjustments
Your KOORUI monitor offers several features to enhance your viewing and gaming experience:
- QHD Resolution (2560x1440): Provides sharp and detailed images.
- 240Hz Refresh Rate: Delivers incredibly smooth motion, crucial for fast-paced gaming.

Visual comparison demonstrating the enhanced smoothness of 240Hz refresh rate over 165Hz.
- 1ms Response Time: Minimizes motion blur and ghosting for clear, crisp visuals during rapid movements.

Illustration of 1ms response time reducing motion blur compared to a typical monitor.
- Adaptive Sync (FreeSync/G-Sync Compatible): Synchronizes the monitor's refresh rate with your graphics card's frame rate to eliminate screen tearing and stuttering.

Demonstration of Adaptive Sync eliminating screen tearing for a smoother visual experience.
- HDR400 Support: Enhances contrast and color for a more dynamic and lifelike image.
- 90% DCI-P3 / 100% sRGB Color Gamut: Provides accurate and vibrant color reproduction for both gaming and content creation.

The monitor's wide color gamut and HDR support deliver rich and accurate colors.
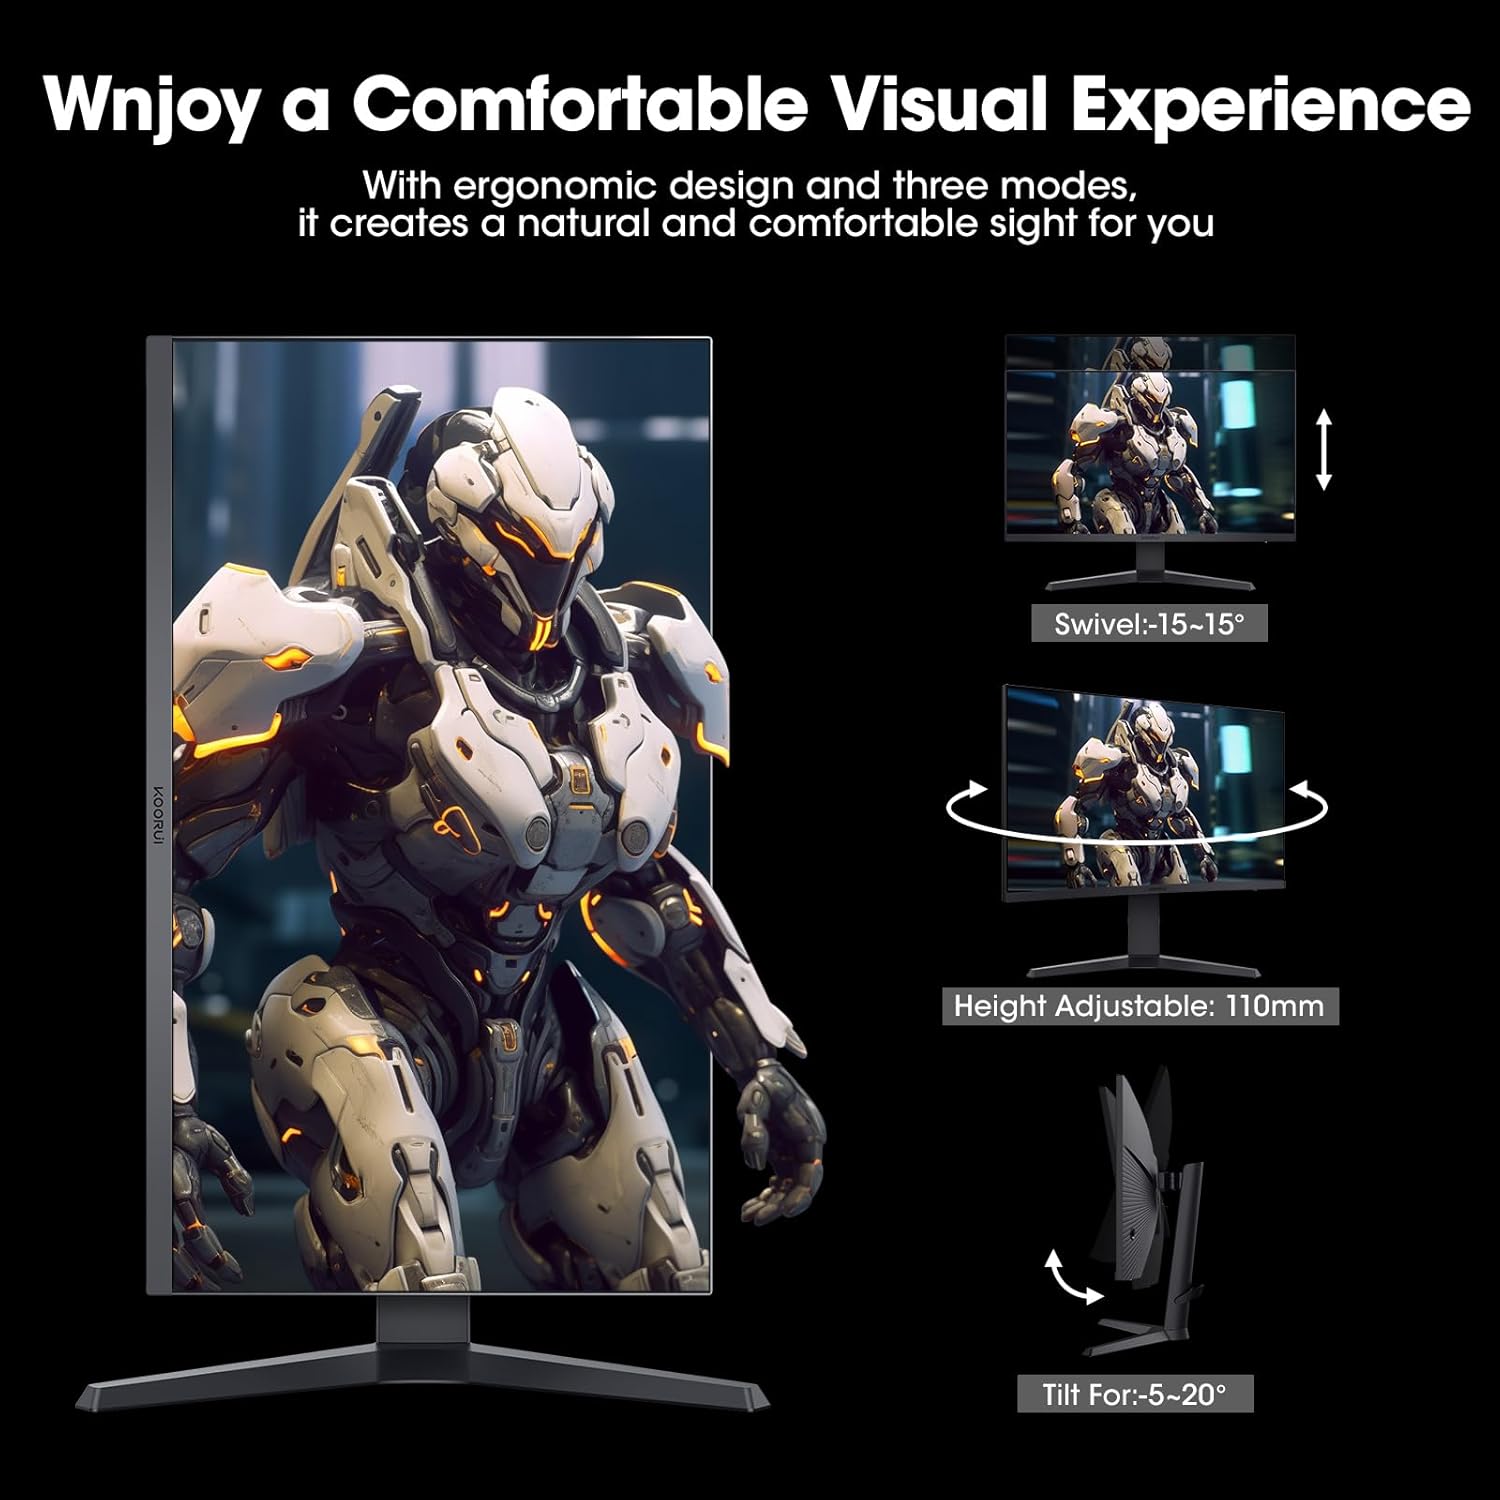
- Ergonomic Adjustments: The monitor stand allows for various adjustments to optimize your viewing comfort.

The monitor offers tilt, swivel, height adjustment, and pivot functionality for ergonomic comfort.
6. Maintenance
6.1 Cleaning the Monitor
To maintain the clarity and longevity of your monitor, follow these cleaning guidelines:
- Always unplug the monitor from the power outlet before cleaning.
- Use a soft, lint-free cloth to gently wipe the screen. For stubborn smudges, slightly dampen the cloth with water or a specialized screen cleaner (ensure it's alcohol-free and ammonia-free).
- Do not spray liquid directly onto the screen.
- Clean the monitor casing with a soft, dry cloth.
6.2 Storage
If storing the monitor for an extended period, ensure it is clean, dry, and stored in a cool, well-ventilated area, preferably in its original packaging to protect it from dust and physical damage.
7. Troubleshooting
If you encounter issues with your monitor, please refer to the following common problems and solutions:
| Problem | Possible Cause | Solution |
|---|---|---|
| No Power | Power cable not connected; Power outlet faulty; Monitor off. | Ensure power cable is securely connected to monitor and outlet. Test outlet with another device. Press power button on monitor. |
| No Signal | Video cable not connected; Incorrect input source selected; Computer not outputting signal. | Check video cable (DP/HDMI) connections. Select correct input source via OSD menu. Ensure computer is on and outputting video. Try another video cable. |
| Flickering Screen | Loose video cable; Incorrect refresh rate; Graphics driver issue. | Reseat video cable. Check display settings on your computer for correct refresh rate (240Hz for QHD). Update graphics drivers. |
| Ghosting/Blurry Image | Response time setting; Adaptive Sync issue. | Adjust Overdrive/Response Time settings in the OSD menu. Ensure Adaptive Sync is enabled in both monitor OSD and graphics card control panel. |
| Colors are Washed Out | Color settings; HDR setting. | Adjust brightness, contrast, and color temperature in the OSD menu. Check HDR settings in both monitor OSD and Windows Display Settings. |
If the problem persists after trying these solutions, please contact KOORUI customer support for further assistance.
8. Specifications
The following table lists the key specifications for the KOORUI 27 Inch Gaming Monitor (Model: 27E3QK):
| Feature | Specification |
|---|---|
| Model Number | 27E3QK |
| Screen Size | 27 Inches |
| Resolution | 2560x1440 (QHD) |
| Refresh Rate | 240Hz |
| Response Time | 1ms |
| Panel Type | IPS |
| HDR Support | HDR400 |
| Color Gamut | 90% DCI-P3, 100% sRGB |
| Adaptive Sync | Yes (FreeSync/G-Sync Compatible) |
| Connectivity | 1x DisplayPort, 2x HDMI, 1x Audio Out |
| VESA Compatibility | 75mm x 75mm |
| Product Dimensions (with stand) | 9.53 x 24.15 x 20.19 inches |
| Item Weight | 15.97 pounds |
9. Warranty and Support
KOORUI products are manufactured to the highest quality standards. This product is covered by a limited warranty from the date of purchase. Please refer to the warranty card included in your package or visit the official KOORUI website for detailed warranty terms and conditions.
For technical support, troubleshooting assistance, or warranty claims, please contact KOORUI customer service through their official support channels. Have your product model number (27E3QK) and purchase information ready when contacting support.