
DINGETU V092
DINGETU 4K Video Camera Camcorder User Manual
Model: V092
Introduction
Thank you for choosing the DINGETU 4K Video Camera Camcorder. This manual provides essential information for the proper use, maintenance, and troubleshooting of your new device. Please read this user manual carefully before operating the camera to ensure optimal performance and longevity.
Important Tips:
- Always format the SD card directly on the camcorder before its first use and periodically thereafter. A 32GB SD card is included.
- Ensure the camcorder is fully charged before its initial use.
- This video camera camcorder is designed for amateurs and general use, not for professional-grade videography.
Safety Information
- Do not expose the camera to water or moisture.
- Avoid extreme temperatures, direct sunlight, or dusty environments.
- Use only the specified batteries and charger.
- Keep out of reach of children.
- Do not attempt to disassemble or modify the camera.
- Clean the camera with a soft, dry cloth. Avoid harsh chemicals.
Package Contents
Please check the package contents upon opening to ensure all items are present:
- 1 x DINGETU 4K Video Camera Camcorder
- 2 x AAA Batteries (for remote controller, if applicable)
- 1 x 32GB SD Card
- 1 x USB Cable
- 1 x User Manual
Product Overview
Familiarize yourself with the main components of your DINGETU 4K Video Camera Camcorder:
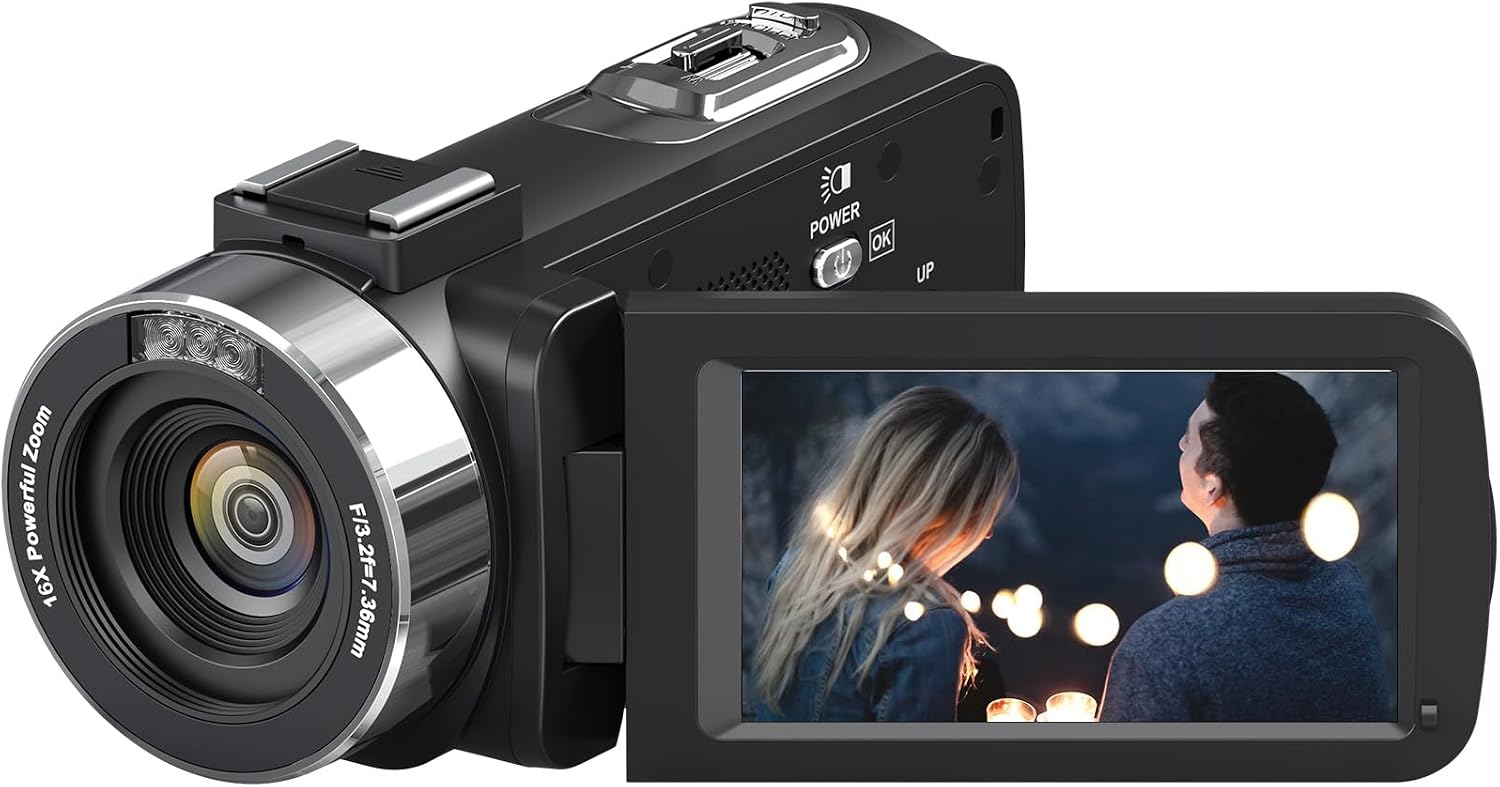
This image displays the DINGETU 4K Video Camera Camcorder from a slightly elevated angle, with its 3.0-inch IPS screen rotated open to the side. The screen shows a vibrant image of two individuals. The camera's main lens, featuring '16X Powerful Zoom' and 'F/3.2f=7.36mm' markings, is prominent on the left. The top of the camera body shows control buttons including 'POWER' and 'OK', along with a hot shoe mount. The overall color of the camera is black with silver accents around the lens.
Key Components:
- Lens: Captures video and still images. Features 18X digital zoom.
- IR Night Vision Lights: For recording in low-light conditions.
- 3.0" IPS Rotatable Screen: For viewing, playback, and menu navigation.
- Power Button: Turns the camera on/off.
- OK Button: Confirms selections in the menu and starts/stops recording.
- Zoom Lever: Controls the digital zoom.
- SD Card Slot: Insert your memory card here.
- Battery Compartment: Houses the rechargeable battery.
- USB Port: For charging and connecting to a computer.
Setup
1. Battery Installation
- Open the battery compartment cover on the bottom of the camera.
- Insert the rechargeable battery, ensuring the correct polarity (+/-) alignment.
- Close the battery compartment cover securely.
2. SD Card Installation
- Locate the SD card slot on the side of the camera.
- Insert the 32GB SD card (or another compatible SD card, Class 10 or higher recommended) with the metal contacts facing down until it clicks into place.
- To remove, gently push the card in until it springs out.
- Important: After inserting a new SD card, power on the camera and navigate to the settings menu to format the card. This ensures compatibility and optimal performance.
3. Initial Charging
- Connect the camera to a power source (e.g., USB wall adapter or computer) using the provided USB cable.
- The charging indicator light will illuminate.
- Charge the camera fully before first use. Charging time may vary.
Operating Instructions
1. Powering On/Off
- To Power On: Open the LCD screen or press and hold the Power button.
- To Power Off: Close the LCD screen or press and hold the Power button until the camera shuts down.
2. Basic Video Recording
- Ensure the camera is in video mode (usually indicated by a video camera icon on the screen). If not, use the Mode button to switch.
- Frame your shot using the rotatable IPS screen.
- Press the OK button to start recording. A red indicator light or recording icon will appear on the screen.
- Press the OK button again to stop recording. The recording will be saved to the SD card.
3. Taking Photos
- Switch the camera to photo mode (usually indicated by a camera icon).
- Frame your shot.
- Press the OK button to take a photo. The image will be saved to the SD card.
4. Playback Mode
- Enter playback mode (usually via a dedicated button or menu option).
- Use the navigation buttons (Up/Down/Left/Right) to browse through your recorded videos and photos.
- Press OK to play a video or view a photo in full screen.
5. Menu Navigation
- Press the Menu button to access camera settings.
- Use the navigation buttons to scroll through options (e.g., resolution, white balance, exposure, format SD card).
- Press OK to select an option or confirm a setting.
- Press the Menu button again to exit the menu.
6. IR Night Vision
- To activate IR Night Vision, locate the IR button (or menu option) and press it. The IR lights will turn on, allowing for recording in very low light or complete darkness.
- Note that recordings in IR Night Vision will be in black and white.
7. Digital Zoom
- While in recording or photo mode, use the zoom lever (often labeled T/W or Tele/Wide) to zoom in (T) or zoom out (W).
- The camera features 18X digital zoom.
8. Connecting to a Computer
- Connect the camera to your computer using the provided USB cable.
- The camera screen may display options like "Mass Storage" or "PC Camera". Select "Mass Storage" to access your files.
- Your computer will recognize the camera as a removable disk. You can then transfer videos and photos.
Maintenance
1. Cleaning the Camera
- Use a soft, lint-free cloth to clean the camera body.
- For the lens, use a specialized lens cleaning cloth and solution. Avoid touching the lens surface with your fingers.
- Do not use abrasive cleaners or solvents.
2. Battery Care
- Charge the battery regularly, even if the camera is not in use, to maintain battery health.
- Store batteries in a cool, dry place.
- If the camera will not be used for an extended period, remove the battery.
3. Storage
- Store the camera in a dry, dust-free environment, away from direct sunlight and extreme temperatures.
- Consider using a camera bag for protection during transport.
Troubleshooting
If you encounter issues with your camera, please refer to the following common problems and solutions:
| Problem | Possible Cause | Solution |
|---|---|---|
| Camera does not turn on. | Battery is low or not inserted correctly. | Charge the battery fully. Reinsert the battery, ensuring correct polarity. |
| Cannot record video/take photos. | SD card is full, not formatted, or faulty. | Delete unnecessary files. Format the SD card in the camera. Try a different SD card. |
| Poor image/video quality. | Lens is dirty, insufficient lighting, or incorrect settings. | Clean the lens. Ensure adequate lighting. Adjust resolution settings in the menu. |
| Camera freezes or becomes unresponsive. | Software glitch or temporary error. | Remove the battery for a few seconds, then reinsert it and restart the camera. |
Specifications
Detailed technical specifications for the DINGETU 4K Video Camera Camcorder V092:
| Brand Name | DINGETU |
| Item Model Number | V092 |
| Item Weight | 1.32 pounds |
| Package Dimensions | 5.6 x 4 x 3 inches |
| Batteries | 2 AAA batteries required (included) |
| Color | Black092 |
| Photo Sensor Technology | CMOS |
| Video Capture Resolution | 4K |
| Maximum Focal Length | 7.36mm |
| Flash Memory Type | SD |
| Video Capture Format | MP4 |
| Screen Size | 3 inches |
| Camcorder Type | Video Camera |
| Included Components | 4K Video Camera |
Warranty and Support
This DINGETU product is covered by a standard manufacturer's warranty. Please refer to the warranty card included in your package for specific terms and conditions, including warranty period and coverage details.
For technical support, troubleshooting assistance, or warranty claims, please contact DINGETU customer service through the retailer's platform where you purchased the product. Provide your model number (V092) and purchase details for faster service.
Ask a question about this manual
Ask about setup, troubleshooting, compatibility, parts, safety, or missing instructions. Manuals+ will review the question and use this page’s manual context to help answer it.