1. Introduction
This manual provides detailed instructions for the safe and effective use of your WEP 982-V Micro Soldering Kit. Please read this manual thoroughly before operating the device and retain it for future reference.
1.1. Package Contents
The WEP 982-V Micro Soldering Kit includes the following components:
- WEP 982-V Precision Soldering Station
- 5 replacement soldering iron tips (2*C210/I, C210/K, 2*C210/SI)
- 1*lead-free solder wire (0.8mm, 10g)

Figure 1.1: WEP 982-V Micro Soldering Kit components.
2. Safety Instructions
Always observe the following safety precautions to prevent injury or damage to the equipment:
- Ensure the soldering station is placed on a stable, heat-resistant surface.
- Work in a well-ventilated area to avoid inhaling solder fumes.
- Wear appropriate personal protective equipment, including safety glasses.
- Do not touch the soldering iron tip or heating element when hot.
- Always return the soldering iron to its holder when not in use.
- Unplug the unit from the power outlet when not in use or before cleaning/maintenance.
- Keep the unit away from flammable materials.
- Do not operate the unit if the power cord or any part of the station is damaged.
3. Setup
3.1. Connecting the Soldering Iron
Connect the soldering iron handpiece cable to the designated port on the soldering station. Ensure a secure connection.
3.2. Installing Soldering Tips
The WEP 982-V uses cartridge-type soldering tips. To install a tip:
- Ensure the soldering iron is cool or use the metallic tip change slot for hot swapping.
- Insert the desired C210 tip into the handpiece.
- Push the tip fully to the bottom until the marking line on the heating element reaches the rim of the handpiece's receptacle. Incorrect installation can lead to poor performance or damage.

Figure 3.1: Correct soldering tip installation.
3.3. Power Connection
Connect the power cord to the soldering station and then to a suitable 110V AC power outlet. The power switch is located on the bottom rear of the unit.
4. Operation
4.1. Powering On and Initial Heating
Flip the power switch to the 'ON' position. The LCD display will illuminate, showing the set temperature and real-time temperature. The soldering iron will rapidly heat up to the last set temperature.

Figure 4.1: WEP 982-V Micro Soldering Station features.
4.2. Temperature Adjustment
Use the shortcut buttons on the soldering iron handpiece or the control panel on the station to adjust the desired temperature. The temperature range is 194°F to 842°F (90°C to 450°C). The built-in PID program maintains a stable temperature.
4.3. Sleep Mode and Automatic Shutdown
The WEP 982-V features intelligent power management:
- Sleep Mode: When the soldering iron is placed in its holder, it will automatically enter a low-temperature sleep mode (e.g., 392°F / 200°C) to reduce tip oxidation and wear.
- Automatic Shutdown: If the soldering iron remains in sleep mode and is not reactivated within approximately 4 minutes, the station will automatically cut off power to the heating element, entering standby mode for enhanced safety and extended component lifespan.

Figure 4.2: Sleep Mode and Automatic Shutdown.
4.4. Tip Changing (Hot Swapping)
The station includes a metallic tip change slot designed for safe hot swapping of tips. This allows for quick changes without waiting for the iron to cool down completely.
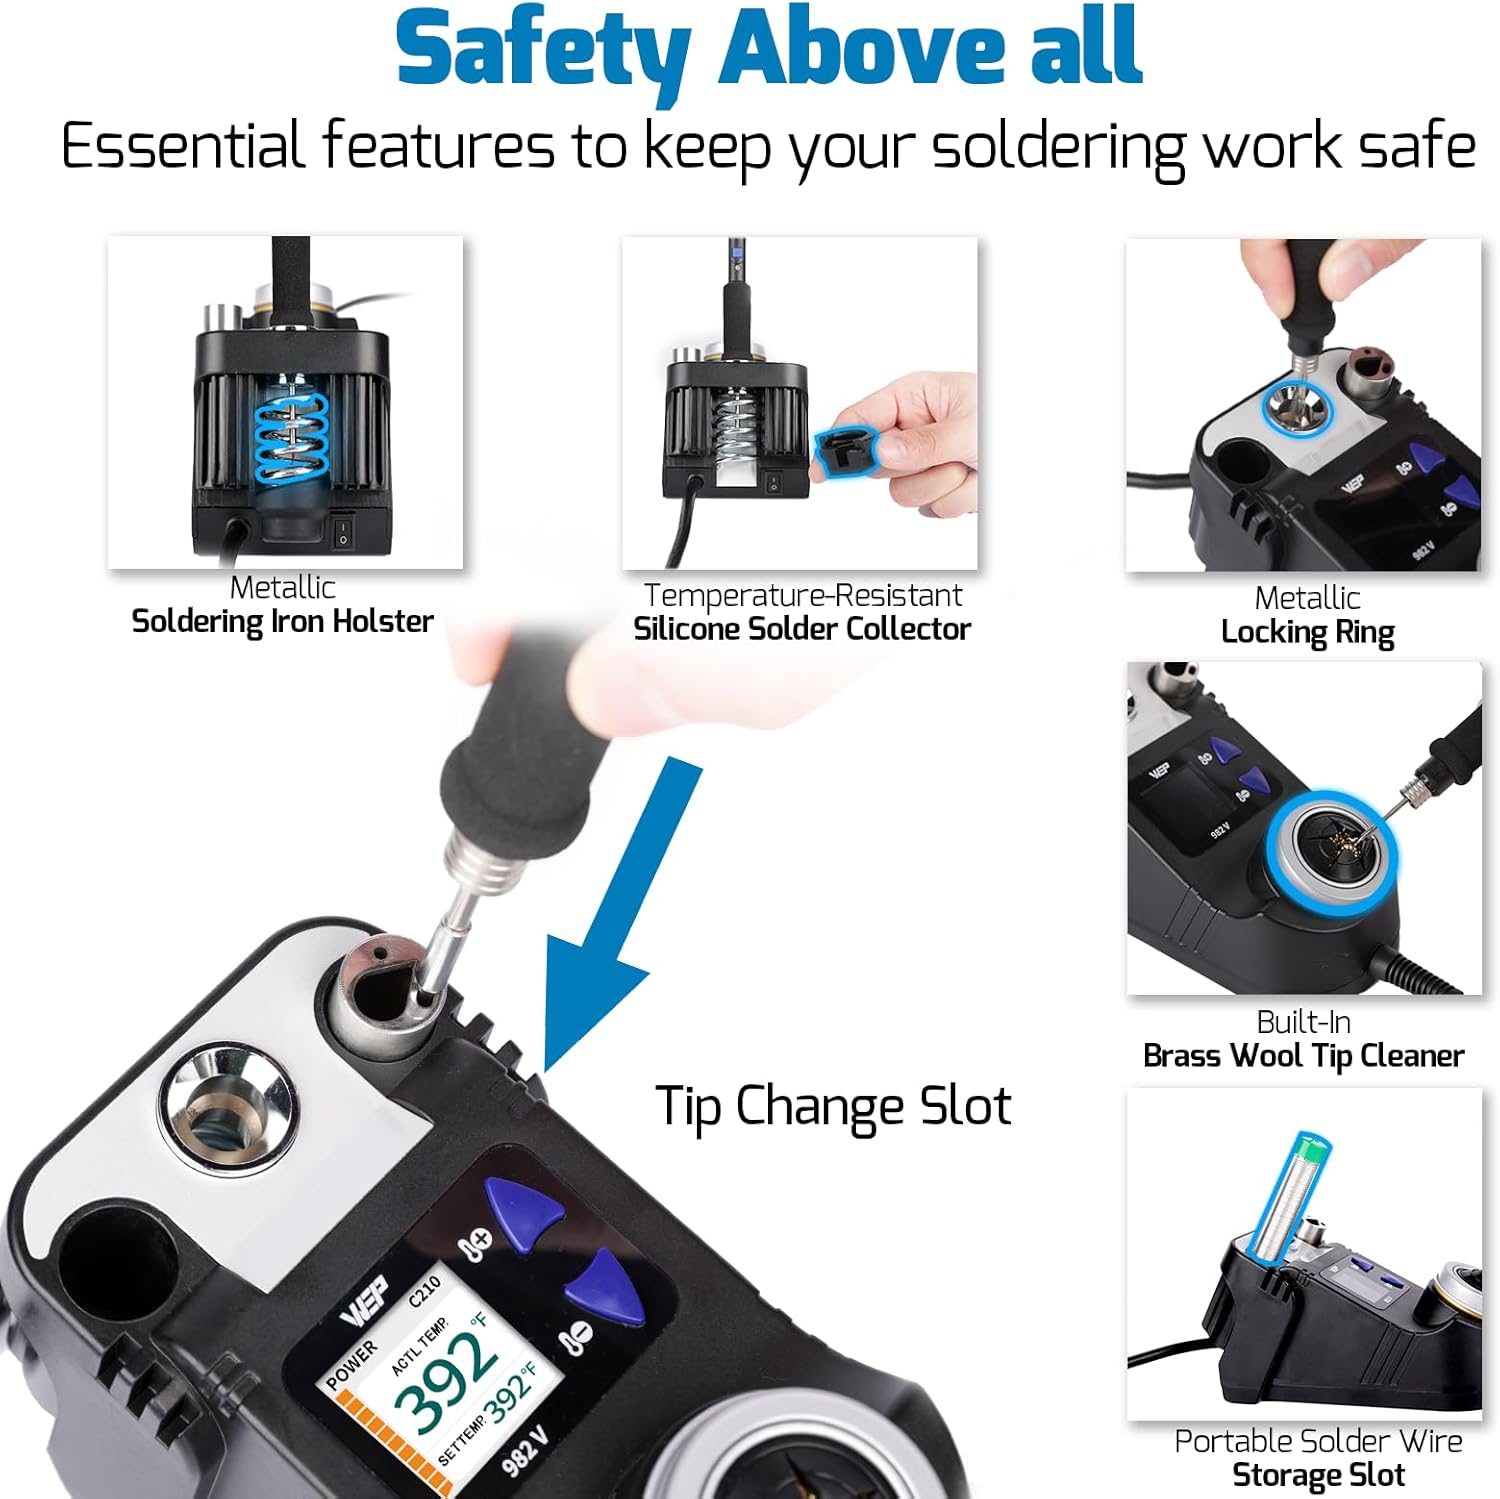
Figure 4.3: Integrated features for safety and convenience.
5. Maintenance
5.1. Soldering Tip Care
Proper care of soldering tips extends their lifespan and ensures optimal performance:
- Tip Cleaning: Use the built-in brass wool tip cleaner to remove excess solder and residue. Avoid abrasive materials that can damage the tip plating.
- Preventing Oxidation: To prevent oxidation, gently rub the tip at approximately 572°F (300°C) and always keep the tip coated with a thin layer of solder when not actively soldering or when placing it in the holder.

Figure 5.1: Steps to prevent tip oxidation.
5.2. Station Cleaning
Periodically clean the exterior of the soldering station with a soft, damp cloth. Ensure the unit is unplugged and cool before cleaning. Do not use harsh chemicals or solvents.
6. Troubleshooting
6.1. Iron Loses Contact/Shuts Down
If the soldering iron intermittently loses contact or shuts down, ensure the tip is fully and securely inserted into the handpiece. Sometimes, the tip may need to be gently pushed further into the handle to maintain proper electrical contact.
6.2. Tip Not Heating
- Verify the power cord is securely connected and the unit is powered on.
- Check if the tip is correctly installed as per Section 3.2.
- Ensure the unit is not in automatic shutdown mode. Remove the iron from the holder to reactivate.
6.3. Temperature Fluctuations
- Ensure the tip is clean and properly tinned.
- Verify the tip is fully inserted into the handpiece.
- Avoid working in drafty environments that can affect tip temperature.
7. Specifications
| Feature | Specification |
|---|---|
| Model Number | WEP 982-V C210-Compatible |
| Manufacturer | Guangzhou Yihua Electronic Equipement Co.,Ltd. |
| Item Weight | 1.34 pounds |
| Package Dimensions | 7.56 x 4.57 x 3.7 inches |
| Power Source | AC |
| Voltage | 110 Volts |
| Wattage | 40 watts |
| Upper Temperature Rating | 842 Degrees Fahrenheit (450 Degrees Celsius) |
| Included Components | WEP 982-V Precision Soldering Station; 5 replacement soldering iron tips (2*C210/I, C210/K, 2*C210/SI); 1*lead-free solder wire (0.8mm, 10g) |
8. Warranty and Technical Support
This WEP Micro Soldering Kit is covered by a 1-year USA technical support warranty. For assistance, please contact our dedicated support team. WEP also offers a range of compatible replacement parts.
For technical support or warranty inquiries, please refer to the contact information provided with your product packaging or visit the official WEP website.


