HTLNUZD 770D-C
HP-770D-C Digital Multimeter User Manual
Model: 770D-C | Brand: HTLNUZD
Introduction
This user manual provides comprehensive instructions for the safe and effective operation of the HTLNUZD HP-770D-C Digital Multimeter. This professional-grade electrical tester features 40,000 counts, True RMS, and auto-ranging capabilities, designed for precise measurements in home, industrial, and DIY applications. Please read this manual thoroughly before use and retain it for future reference.
Safety Information
Always adhere to safety precautions when using electrical testing equipment. Failure to do so may result in electric shock, injury, or damage to the meter or equipment under test.
- Do not exceed the maximum input limits for any function.
- Use caution when working with voltages above 30V AC RMS, 42V peak, or 60V DC. These voltages pose a shock hazard.
- Ensure test leads are in good condition and properly connected before making measurements.
- Do not operate the meter if it appears damaged or if the case is open.
- Always turn off power to the circuit and discharge all high-voltage capacitors before testing resistance, continuity, diodes, or capacitance.
- Replace batteries when the low battery indicator appears to ensure accurate readings.
Packing List
Verify that all items are present in the package upon unboxing:
- HP-770D-C Digital Multimeter x1
- English User Manual x1
- Test Leads x1 pair
- Temperature Test Probe x1
- Carrying Pouch x1

Image: Contents of the HP-770D-C Digital Multimeter package. This image displays the packing box, packing sleeve, the multimeter unit, test leads, temperature probe, and the user manual, illustrating all included components.
Product Overview
The HP-770D-C is a high-precision digital multimeter designed for a wide range of electrical measurements. It features a large LCD display with an analog bar chart for clear readings and a robust design for durability.

Image: The HP-770D-C Digital Multimeter shown with its included test leads, temperature probe, and a black carrying pouch. The multimeter features a blue protective casing and a large digital display.
Key Features

Image: An overview of the HP-770D-C Digital Multimeter's key features, highlighting its 40,000 count display, various testing modes (Diode, hFE, Continuity, NCV), data management functions (Hold, Relative, MAX/MIN), True RMS capability, and convenience features like Auto Power Off and Backlight.
Components and Controls

Image: Detailed diagram of the HP-770D-C Digital Multimeter highlighting its key components and controls with corresponding numbers.
- NCV Red Light: Indicates Non-Contact Voltage detection.
- CDS Sensor: Light sensor for automatic backlight adjustment.
- NCV Green Light: Indicates Non-Contact Voltage detection.
- NCV Detection Area: Area for non-contact voltage sensing.
- Display: Large LCD for readings, analog bar graph, and function indicators.
- SELECT Key: Toggles between functions within a rotary switch position (e.g., AC/DC, Diode/Continuity).
- HOLD Key: Freezes the current display reading.
- RANGE Key: Switches between auto-ranging and manual ranging.
- REL Key: Relative measurement mode.
- Hz/Duty Key: Toggles between frequency and duty cycle measurements.
- MAX/MIN Key: Displays maximum and minimum readings.
- Transistor hFE Test Input Jack: For testing transistor hFE.
- Crust of Meter: Protective outer casing.
- VΩHz Input Jack: Input for Voltage, Resistance, Frequency, and Capacitance measurements.
- COM Input Jack: Common (negative) input for all measurements.
- 20A Input Jack: Input for high current (up to 20A) measurements.
- µAmA T+ Input Jack: Input for microampere and milliampere current measurements.
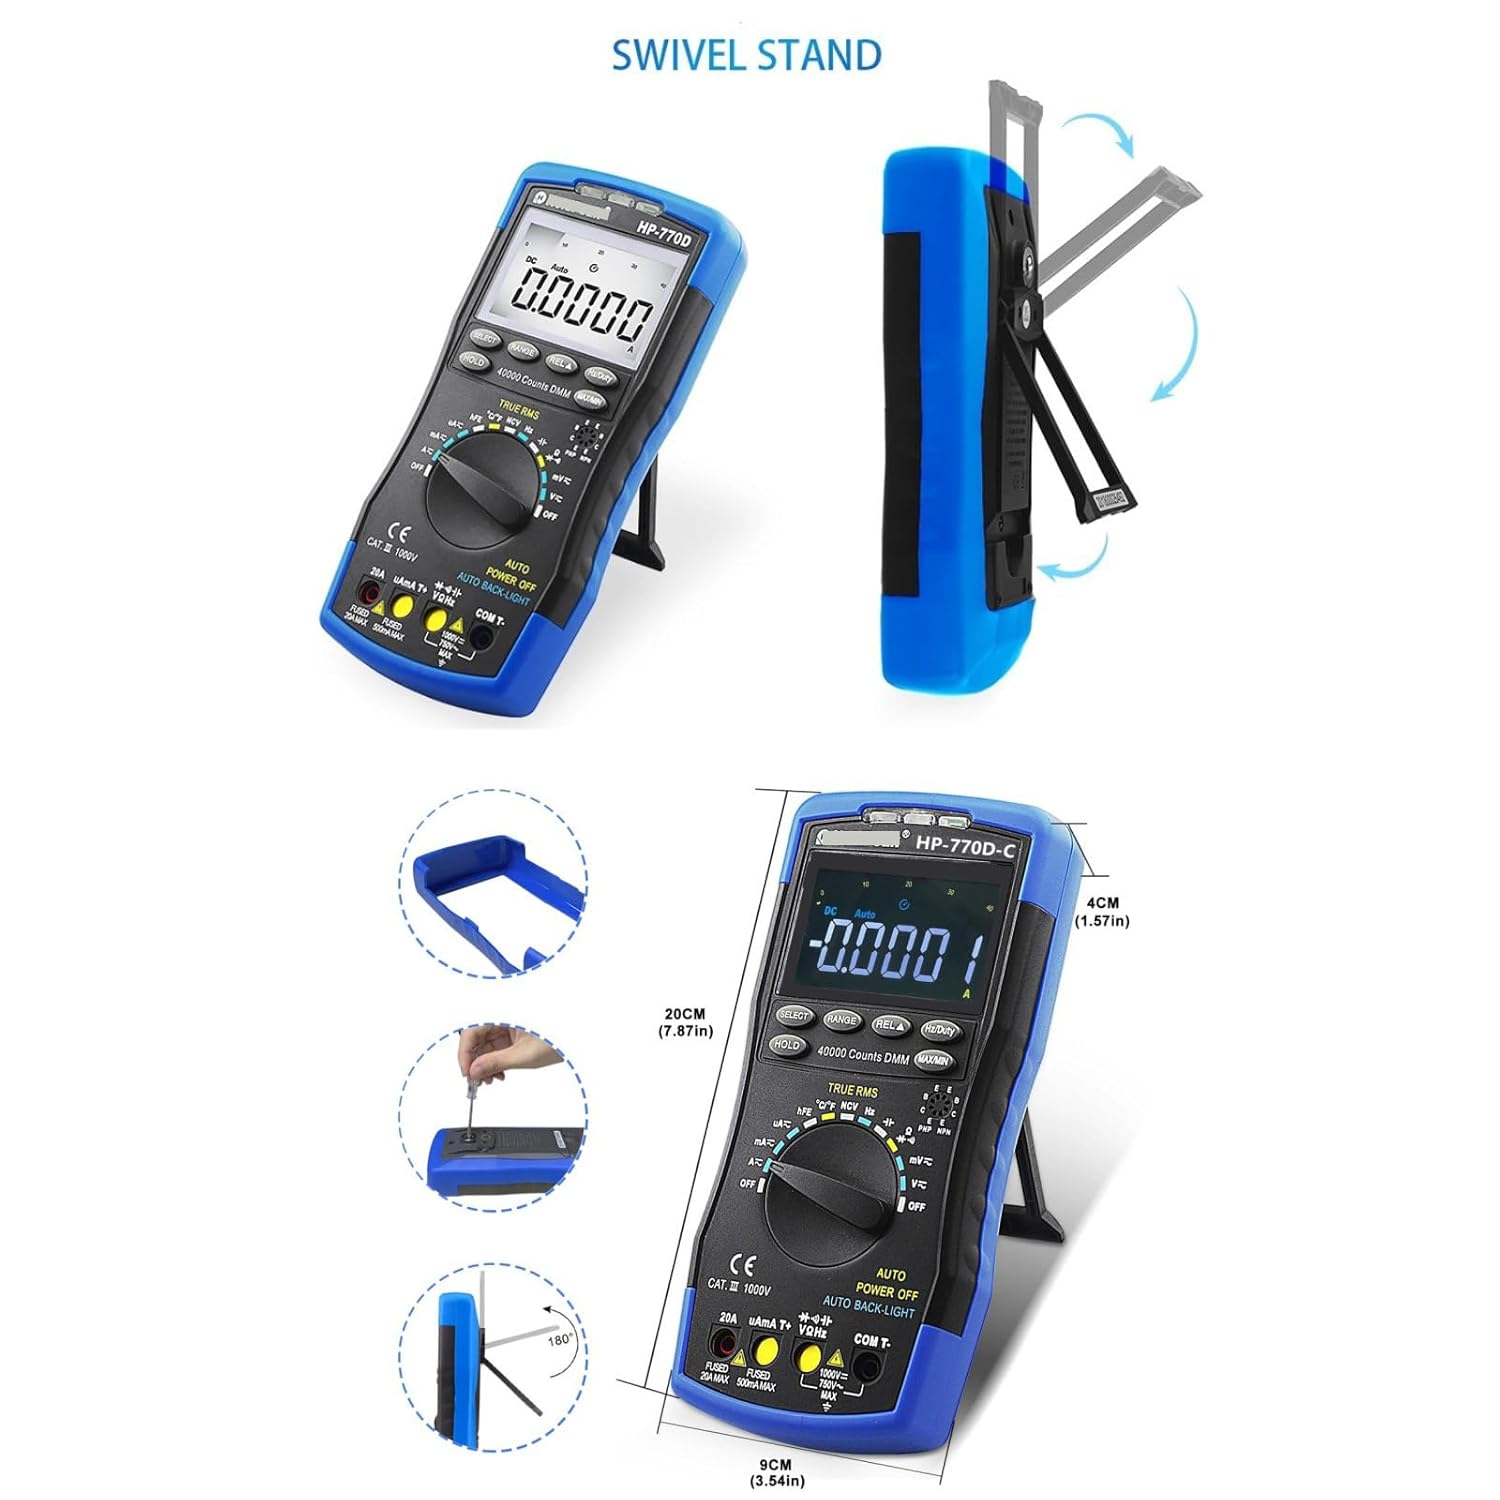
Image: The HP-770D-C Digital Multimeter demonstrating its integrated swivel stand for convenient viewing angles and illustrating its physical dimensions (height 20cm, width 9cm, depth 4cm).
Setup
Battery Installation
The HP-770D-C Multimeter requires batteries for operation. To install or replace batteries:
- Ensure the multimeter is turned off.
- Locate the battery compartment on the rear of the device.
- Use a screwdriver to open the battery cover.
- Insert new batteries, observing correct polarity (+ and -).
- Replace the battery cover and secure it with the screw.
Connecting Test Leads
For most measurements, connect the black test lead to the COM (Common) input jack and the red test lead to the VΩHz input jack. For current measurements, refer to the specific instructions in the Operating section.
Operating Instructions
This section details how to perform various measurements using your HP-770D-C Digital Multimeter.
General Measurement Procedure
- Turn the rotary switch to the desired function.
- Connect the test leads to the appropriate input jacks on the multimeter and to the circuit or component under test.
- Read the measurement value on the LCD display.
- Use the SELECT button to toggle between AC/DC or other sub-functions if applicable.
Measuring AC/DC Voltage
To measure voltage, set the rotary switch to the V~ (AC Voltage) or V- (DC Voltage) position. Connect the test leads in parallel with the circuit or component. The meter will automatically select the appropriate range.

Image: The HP-770D-C Digital Multimeter displaying measurements for AC Voltage, DC Voltage, AC/DC Current, and Resistance, demonstrating its multi-functional capabilities in a household setting.
Measuring AC/DC Current
To measure current, the multimeter must be connected in series with the circuit. Select the appropriate current range (µA, mA, or A) on the rotary switch. Connect the black lead to COM and the red lead to the µAmA T+ or 20A input jack, depending on the expected current magnitude. Always ensure the circuit is de-energized before connecting the meter in series.
Measuring Resistance
Set the rotary switch to the Ω (Resistance) position. Connect the test leads across the component. Ensure the component is isolated from the circuit and de-energized before measuring resistance.
Measuring Capacitance
Set the rotary switch to the capacitance symbol (F). Connect the test leads across the capacitor. Ensure the capacitor is fully discharged before measurement to prevent damage to the meter.
Measuring Frequency and Duty Cycle
Set the rotary switch to the Hz/% position. Connect the test leads to the VΩHz and COM jacks. Press the Hz/Duty button to toggle between frequency (Hz) and duty cycle (%).
Temperature Measurement
Connect the temperature test probe to the VΩHz and COM input jacks, observing polarity. Set the rotary switch to the °C/°F position. The display will show the temperature in Celsius or Fahrenheit, which can be toggled using the SELECT button.

Image: The HP-770D-C Digital Multimeter demonstrating its Non-Contact Voltage (NCV) detection function near an electrical outlet and its temperature measuring function using the included probe in a liquid.
Non-Contact Voltage (NCV) Detection
Set the rotary switch to the NCV position. Move the top front part of the multimeter (NCV detection area) close to the conductor. If AC voltage is detected, the NCV red/green light will illuminate, and an audible beep will sound, indicating the presence of live voltage without direct contact.
Diode Test and Continuity
Set the rotary switch to the Diode/Continuity position. Press the SELECT button to toggle between diode test and continuity test. For diode test, connect the red lead to the anode and black lead to the cathode. For continuity, connect the leads across the circuit; a beep indicates continuity.
Data Hold (HOLD)
Press the HOLD button to freeze the current reading on the display. Press it again to release.
MAX/MIN Measurement
Press the MAX/MIN button to enter MAX/MIN recording mode. The meter will display the maximum or minimum value recorded since entering the mode. Press again to cycle through MAX, MIN, and current readings.
Maintenance
Cleaning
Wipe the meter's case with a damp cloth and mild detergent. Do not use abrasives or solvents. Ensure the meter is completely dry before use.
Battery Replacement
When the battery indicator appears on the display, replace the batteries promptly to ensure accurate measurements. Refer to the "Battery Installation" section under Setup for detailed instructions.
Fuse Replacement
If the current measurement function fails, the fuse may need replacement. This meter uses two fuses: a 20A MAX fuse and a 500mA MAX fuse. Refer to the diagram on the meter for fuse specifications and replacement procedure. Always replace with fuses of the same type and rating.
Storage
When not in use for extended periods, remove the batteries to prevent leakage. Store the meter in a cool, dry place, away from direct sunlight and extreme temperatures.
Troubleshooting
| Problem | Possible Cause | Solution |
|---|---|---|
| No display or dim display | Low batteries; Meter off | Replace batteries; Turn on meter |
| Incorrect readings | Incorrect function selected; Poor test lead connection; Damaged test leads; Overload | Select correct function; Ensure secure connections; Replace leads; Check input limits |
| Current measurement not working | Blown fuse; Incorrect input jack used | Replace fuse; Use correct A or mA input jack |
| NCV not detecting voltage | Not close enough to source; Source not live | Move closer; Verify source is live |
Specifications
| Parameter | Value |
|---|---|
| Display | 40,000 Counts LCD with Analog Bar Graph |
| True RMS | Yes |
| Auto Ranging | Yes |
| DC Voltage Range | 40mV to 1000V |
| AC Voltage Range | 40mV to 750V |
| DC Current Range | 400µA to 20A |
| AC Current Range | 400µA to 20A |
| Resistance Range | 400Ω to 40MΩ |
| Capacitance Range | (Not explicitly listed in feature bullets, but mentioned in description. Will omit specific range if not found.) |
| Frequency/Duty Cycle | Yes |
| Temperature Measurement | Yes (with included probe) |
| NCV Detection | Yes |
| Diode Test | Yes |
| Continuity Test | Yes |
| Transistor hFE | Yes |
| Power Source | AC, DC (Implies internal battery, and ability to measure AC/DC) |
| Safety Rating | CAT III 1000V |
Note: Specifications are subject to change without notice. For detailed accuracy specifications, refer to the product's official data sheet.
Warranty and Support
HTLNUZD products are manufactured to high quality standards. For warranty information or technical support, please contact your point of purchase or refer to the official HTLNUZD website. Keep your purchase receipt as proof of purchase for warranty claims.
Manufacturer: HTLNUZD
Model Number: 770D-C