1. Introduction
Thank you for choosing the Commercial Electric 6-Pack 6-inch Flush Mount LED Lights. These integrated LED fixtures provide efficient, soft white (3000K) illumination designed for various indoor applications. This manual provides essential information for safe installation, operation, and maintenance of your new lighting fixtures.
2. Safety Information
WARNING: To reduce the risk of death, personal injury, or property damage from fire, electric shock, falling parts, cuts/abrasions, and other hazards, please read all warnings and instructions included with and on the fixture box and all fixture labels.
- Always turn off power at the circuit breaker before installation or servicing.
- Ensure all electrical connections comply with local codes and ordinances, as well as the National Electric Code (NEC).
- If you are unfamiliar with proper electrical wiring connections, consult a qualified electrician.
- Do not install in wet locations unless specifically rated for such use.
- Do not attempt to alter the fixture in any way.
- Handle with care. Avoid direct contact with the LED light source when powered on.
3. Package Contents
Verify that all components are present before beginning installation:
- 6 x Commercial Electric 6-inch Flush Mount LED Light Fixtures
- Installation Hardware (screws, wire nuts)
- Instruction Manual (this document)

Image: A view of the six flush mount LED light fixtures included in the package.
4. Setup and Installation
These flush mount LED lights are designed for quick and straightforward mounting, compatible with 3.5-inch and 4-inch pancake junction boxes.
Tools Required (Not Included):
- Screwdriver
- Wire Strippers
- Electrical Tape (optional)
Installation Steps:
- Turn Off Power: Locate the circuit breaker controlling the light fixture location and turn off the power. Verify power is off using a voltage tester.
- Prepare Wiring: If replacing an existing fixture, carefully remove it. Ensure the junction box is securely mounted.
- Connect Wires: Connect the fixture's wires to the corresponding house wires using wire nuts. Typically, black to black (live), white to white (neutral), and green/bare copper to green/bare copper (ground). Ensure connections are secure.
- Mount Fixture: Align the fixture with the junction box. Secure the fixture to the junction box using the provided screws. Ensure the fixture is flush against the ceiling.
- Restore Power: Once the fixture is securely mounted, turn the power back on at the circuit breaker.
- Test Light: Test the light to ensure proper operation.

Image: The rear of the LED fixture, illustrating the pre-wired connections and mounting points for installation into a junction box.
5. Operating Instructions
These LED flush mount lights are designed for simple operation.
- Power On/Off: Control the light using a standard wall switch connected to the fixture's circuit.
- Dimming Functionality: The fixture is dimmable. For optimal performance, use with compatible LED dimmer switches. Refer to your dimmer switch manufacturer's instructions for specific wiring and operation details.
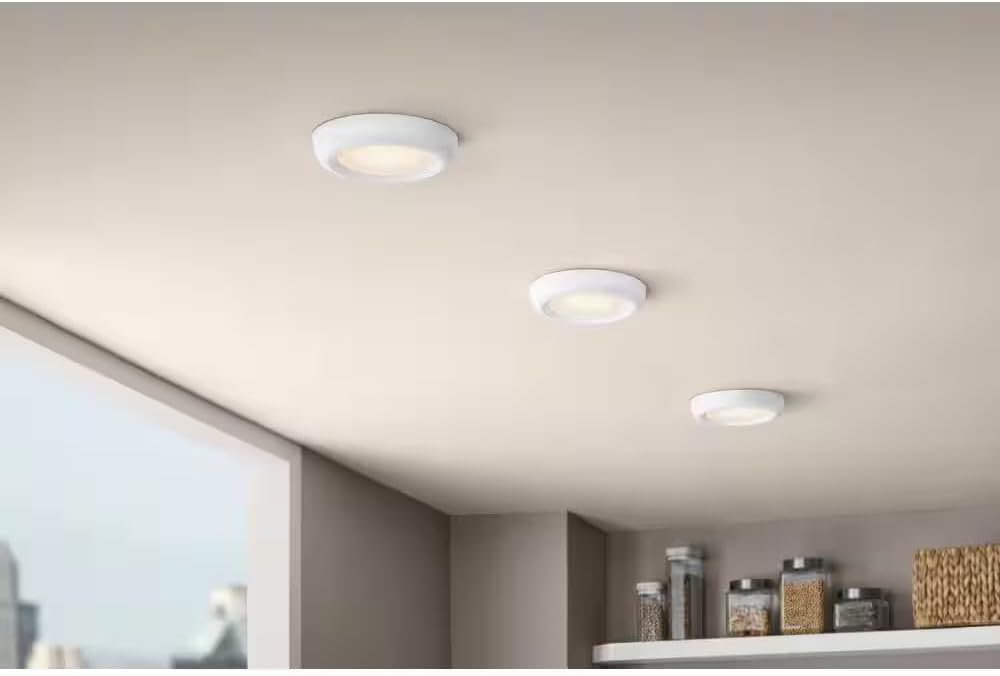
Image: Three flush mount LED lights installed on a ceiling, demonstrating their appearance when operational.
6. Maintenance
The Commercial Electric Flush Mount LED Lights feature integrated LED technology, eliminating the need for bulb replacement. This makes them largely maintenance-free.
- Cleaning: To clean the fixture, ensure power is off. Use a soft, dry, or slightly damp cloth. Do not use abrasive cleaners or solvents, as these may damage the finish or electrical components.
- No User-Serviceable Parts: There are no user-serviceable parts inside the fixture. Do not attempt to open or repair the unit.
7. Troubleshooting
If you experience issues with your LED flush mount light, refer to the following common troubleshooting steps:
| Problem | Possible Cause | Solution |
|---|---|---|
| Light does not turn on | No power to the fixture; Loose wiring; Faulty switch | Check circuit breaker; Verify wiring connections; Test or replace switch |
| Light flickers | Incompatible dimmer switch; Loose wiring; Voltage fluctuations | Ensure dimmer is LED compatible; Check wiring; Consult electrician for voltage issues |
| Light is dim or inconsistent | Dimmer setting too low; Incompatible dimmer | Adjust dimmer to higher setting; Replace with compatible LED dimmer |
If these steps do not resolve the issue, contact customer support.
8. Specifications
Key technical specifications for the Commercial Electric 6-inch Flush Mount LED Light:
- Model Name: Commercial Electric Flush Mount
- Part Number: 1012 156 066
- Light Source Type: Integrated LED
- Color Temperature: 3000K Soft White
- Brightness: 800 Lumens
- Wattage: 10 Watts
- Voltage: 120 Volts
- Lifespan: Rated for 35,000 hours
- Mounting Type: Flush Mount, J-Box Compatible (3.5-inch & 4-inch pancake)
- Dimmable: Yes
- Material: Aluminum
- Finish: White
- Certification: ETL Listed
Image: Product packaging highlighting key specifications such as size, lumen output, wattage, color temperature, and lifespan.
9. Warranty and Support
This Commercial Electric Flush Mount LED Light is backed by a 3-Year Warranty from the date of purchase, covering defects in materials and workmanship under normal use.
For warranty claims, technical assistance, or any questions regarding your product, please contact the manufacturer's customer support. Keep your proof of purchase for warranty validation.