Beelink Beelink ME mini
Beelink ME Mini PC User Manual
Model: ME mini 12G/2T/N150
1. Introduction
This manual provides comprehensive instructions for the setup, operation, maintenance, and troubleshooting of your Beelink ME Mini PC. Please read this manual thoroughly before using the device to ensure optimal performance and longevity.

Figure 1.1: The compact Beelink ME Mini PC, designed for versatile home and office use.
2. Product Overview
The Beelink ME Mini PC is a high-capacity desktop NAS solution featuring an Intel N150 CPU, 12G LPDDR5 RAM, and 64G eMMC storage, expandable with up to 6 M.2 SSD slots. It is designed for file serving, NAS storage, private cloud, and network storage applications, offering dual 2.5G LAN ports for efficient data transmission.

Figure 2.1: Overview of the Beelink ME Mini PC's core components and design.
2.1 Rich Interfaces
- USB 2.0 Ports: 1
- USB 3.0 Ports: 1
- Dual 2.5G LAN Ports (Intel i226v)
- HDMI (Max 4K 60Hz)
- Built-in WiFi 6 and Bluetooth 5.2

Figure 2.2: Detailed view of the Beelink ME Mini PC's input/output ports.
3. Setup
Follow these steps to set up your Beelink ME Mini PC for the first time.
3.1 Initial Connection
- Connect the power adapter to the AC Power Port on the device and plug it into a power outlet.
- Connect your display to the HDMI port using the provided HDMI cable.
- Connect a keyboard and mouse to the available USB ports.
- For wired network access, connect an Ethernet cable to one of the 2.5G LAN ports.
3.2 Operating System Installation (if applicable)
The Beelink ME Mini PC supports multiple operating systems, including Windows and Linux. It also supports NAS systems like FNOS, UNRAID, and TrueNAS, and media systems such as KODI, JellyFin, Plex, and Emby.

Figure 3.1: Supported operating systems and recommended installation practices.
For detailed instructions on installing Windows 10 from a USB drive, please refer to the video below:
Video 3.1: How to Install Windows 10 from USB. This video provides a step-by-step guide on preparing a USB installer and performing a clean installation of Windows 10 on your Beelink Mini PC.
4. Operating
Once set up, your Beelink ME Mini PC is ready for operation. It can function as a mini computer, a home media center, or a network-attached storage device.
4.1 Power On/Off
- To power on: Press the Power Button located on the front panel.
- To power off: Perform a graceful shutdown through the operating system. Alternatively, press and hold the Power Button for 5 seconds.
4.2 Network Configuration
The dual 2.5G LAN ports support soft routing functionality, network performance optimization, and advanced network management. Built-in WiFi 6 and Bluetooth 5.2 enable high-speed wireless connections.

Figure 4.1: Dual 2.5G LAN Ports and WiFi 6 for robust network connectivity.
5. Maintenance
Regular maintenance ensures the longevity and optimal performance of your Beelink ME Mini PC.
5.1 Storage Expansion and Replacement
The Beelink ME Mini NAS features 6 M.2 NVMe SSD slots (supporting 2230/2242/2280), each supporting up to 4TB capacity, for a total of up to 24TB. The pre-installed 2TB SSD is in the fourth slot (M.2 PCIe 3.0x2, compatible with SATA3), with the remaining five slots being M.2 PCIe 3.0 x1.

Figure 5.1: High capacity storage with 6 M.2 SSD slots.
For instructions on replacing or adding SSDs, please watch the following tutorial:
Video 5.1: SSD Replacement Tutorial. This video demonstrates the process of opening the Beelink Mini PC and replacing or installing an SSD.
5.2 Cooling and Noise
The device features a vertical airflow cooling design and a silent fan (average 1500 rpm) to maintain optimal temperatures and low noise levels (33-35 dB during operation).
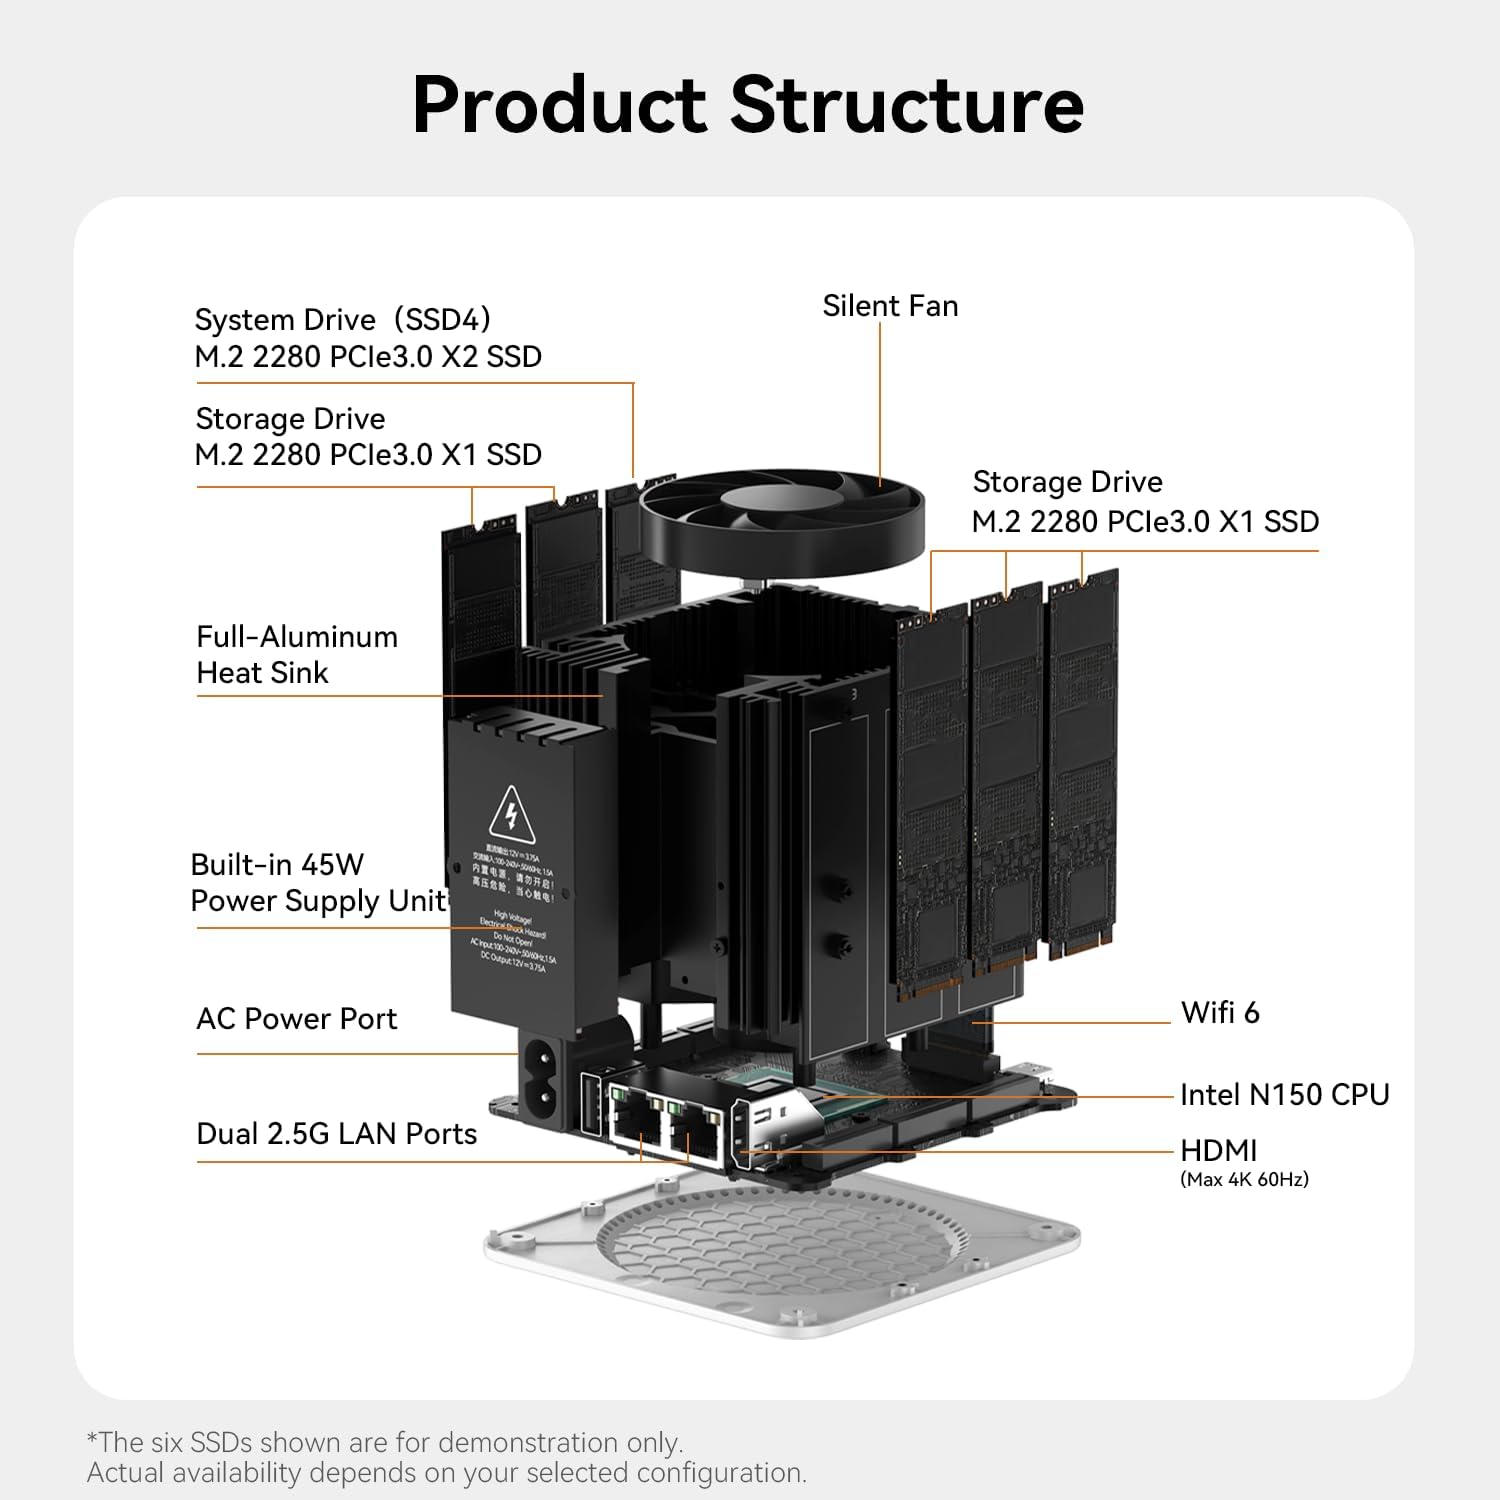
Figure 5.2: Internal product structure highlighting cooling components.
6. Troubleshooting
This section provides solutions to common issues you might encounter.
- No Power: Ensure the power adapter is securely connected to both the device and the power outlet. Check the power outlet with another device.
- No Display: Verify the HDMI cable is properly connected to both the Mini PC and the monitor. Ensure the monitor is powered on and set to the correct input source.
- Network Connectivity Issues: For wired connections, check Ethernet cable integrity and router status. For wireless, ensure WiFi is enabled on the device and you are connected to the correct network with the right password.
- Slow Performance: Check available storage space. Close unnecessary applications. Consider upgrading RAM or SSD if performance remains consistently low.
7. Specifications
Detailed technical specifications for the Beelink ME Mini PC.
| Component | Specification |
|---|---|
| CPU | Intel® Twin Lake N150 Processor |
| Internal Slot | 12GB LPDDR5 4800MHz |
| System Disk | EMMC 64GB/SSD4: M.2 2280 PCIe3.0 x2 (Max 4TB)*1 (Compatible with SATA III SSD) |
| Storage Disk | M.2 2280 PCIe3.0 x1 (Max 4TB)*5 |
| Interface | USB2.0 480Mbps*1 + USB3.2 10Gbps*1 + LAN2.5G (Intel i226-v) *2 + Type-C 10Gbps (Data) *1 + HDMI (Max 4K 60Hz) *1 |
| Network | WiFi 6 (Intel AX101); Bluetooth 5.2 |
| Power LED | 2 |
| Power Button | 1 |
| AC Cable | 100-240V~, 50/60Hz, 1.5A |
| Operating Environment | -10°C-45°C, 30%-90% Humidity |
| Storage Environment | -20°C-60°C, 10%-90% Humidity |
| Accessories | HDMI 100cm; User Manual; AC Cable |
| Dimension | 99x99x99mm (With Rubber Feet) |
| Color | Pearl White / Peacock Blue / Midnight Gray |
Table 7.1: Beelink ME Mini PC Product Specifications.
8. Warranty and Support
Beelink offers lifetime technical support, a 1-Year-free warranty, and 24/7 after-sales service for all its products. All Beelink NAS devices have passed strict inspections and obtained FCC, RoHS, and CE Certifications.
If you have any questions or require assistance, please do not hesitate to contact Beelink customer service. For information on how to contact us, please refer to the video below:
Video 8.1: How to Contact Us. This video guides you on the available methods to reach Beelink customer support for any inquiries or technical assistance.