
Introduction
The Klortecer SL-MINI is an innovative extension module designed to enhance your existing TIG/TIG welding machine. It enables precise pulse welding by utilizing a high-performance charging capacitor circuit to deliver ultra-short energy pulses. This results in a current surge of several thousand amps, ideal for spot connections with minimal heat input to the workpiece. The SL-MINI offers precise time pulse control, allowing separate programming of weld and pause durations, and can store up to 20 individual programs. Its compact design and plug-and-play installation make it a versatile tool for various precision welding applications.

Figure 1: The SL-MINI unit held in a hand, highlighting its compact and portable design.
Safety Instructions
Always prioritize safety when operating welding equipment. Read and understand all safety warnings and instructions before using the Klortecer SL-MINI. Failure to follow these instructions may result in electric shock, fire, serious injury, or property damage.
- Electrical Safety: Ensure the device is connected to a properly grounded power source. Do not operate in wet conditions. Disconnect power before making any connections or adjustments.
- Personal Protective Equipment (PPE): Always wear appropriate welding PPE, including welding helmet, gloves, protective clothing, and safety shoes.
- Ventilation: Ensure adequate ventilation to avoid inhaling welding fumes.
- Fire Hazards: Keep flammable materials away from the welding area. Have a fire extinguisher readily available.
- Compatibility: Only connect the SL-MINI to compatible TIG/TIG welding machines as specified in this manual.
- Children and Bystanders: Keep children and unauthorized persons away from the welding area.
- Maintenance: Do not attempt to open or repair the device yourself. Refer all servicing to qualified personnel.
Package Contents
Verify that all items listed below are included in your package:
- Main control unit (Klortecer SL-MINI)
- Power supply / Power cord
- Connection cable
- Indoor and outdoor corner porcelain nozzles (3 sets)
- Instruction manual
Note: A foot switch is not included with this specific model.

Figure 2: Contents of the package, including the SL-MINI unit, cables, and nozzles. Note that a foot switch is not included with this model.
Product Overview
The Klortecer SL-MINI features a user-friendly control panel and robust connections for integration with your TIG welding machine.

Figure 3: Front Control Panel of the SL-MINI.
Control Panel Features:
- Digital Displays: Two displays show current settings for TIME/FREQ and TIME/DUTY.
- Adjustment Buttons (+/-): Used to increase or decrease values for time, frequency, and duty cycle.
- Mode Buttons (POINT, LINE, TIG, STORAGE): Select different welding modes or access stored programs.
- MODE Button: Cycles through different parameter settings (e.g., Time, Freq).
- FUNC Button (2T, 4T): Selects between 2-stroke and 4-stroke trigger functions.
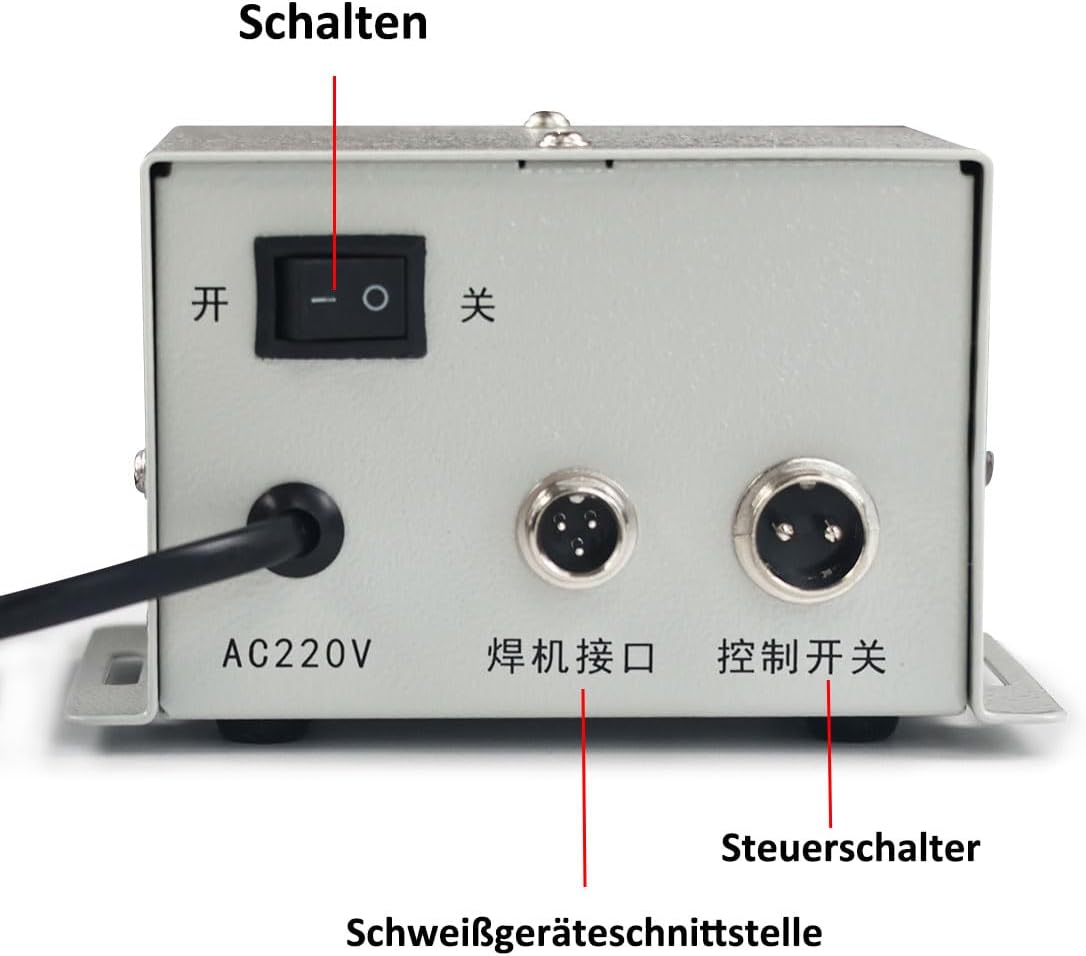
Figure 4: Rear Panel Connections of the SL-MINI. Labels indicate: "Schalten" (Switch), "AC220V", "Schweißgeräteschnittstelle" (Welding Machine Interface), and "Steuerschalter" (Control Switch).
Rear Panel Features:
- Power Switch: Turns the unit ON/OFF.
- AC220V Power Input: Connects the device to the main power supply.
- Welding Machine Interface: Connects to your TIG welding machine.
- Control Switch Interface: Connects to the control cable of your TIG machine for trigger signals.
Setup
The SL-MINI is designed for plug-and-play installation. Follow these steps to connect it to your TIG welding machine:
- Power Off: Ensure your TIG welding machine and the SL-MINI unit are both powered off and disconnected from the main power supply.
- Connect Power: Connect the provided power cord to the AC220V input on the rear of the SL-MINI unit and then to a suitable power outlet.
- Connect to TIG Machine (Control Line): Locate the control cable of your TIG welding machine. The SL-MINI module is designed to be looped into this control line. Connect the appropriate cable from the SL-MINI's "Control Switch Interface" to your TIG machine's control input.
- Connect to TIG Machine (Welding Interface): Connect the welding machine interface cable from the SL-MINI to the corresponding output on your TIG welding machine.
- Verify Connections: Double-check all connections to ensure they are secure.
- Power On: Power on your TIG welding machine first, then power on the Klortecer SL-MINI unit.
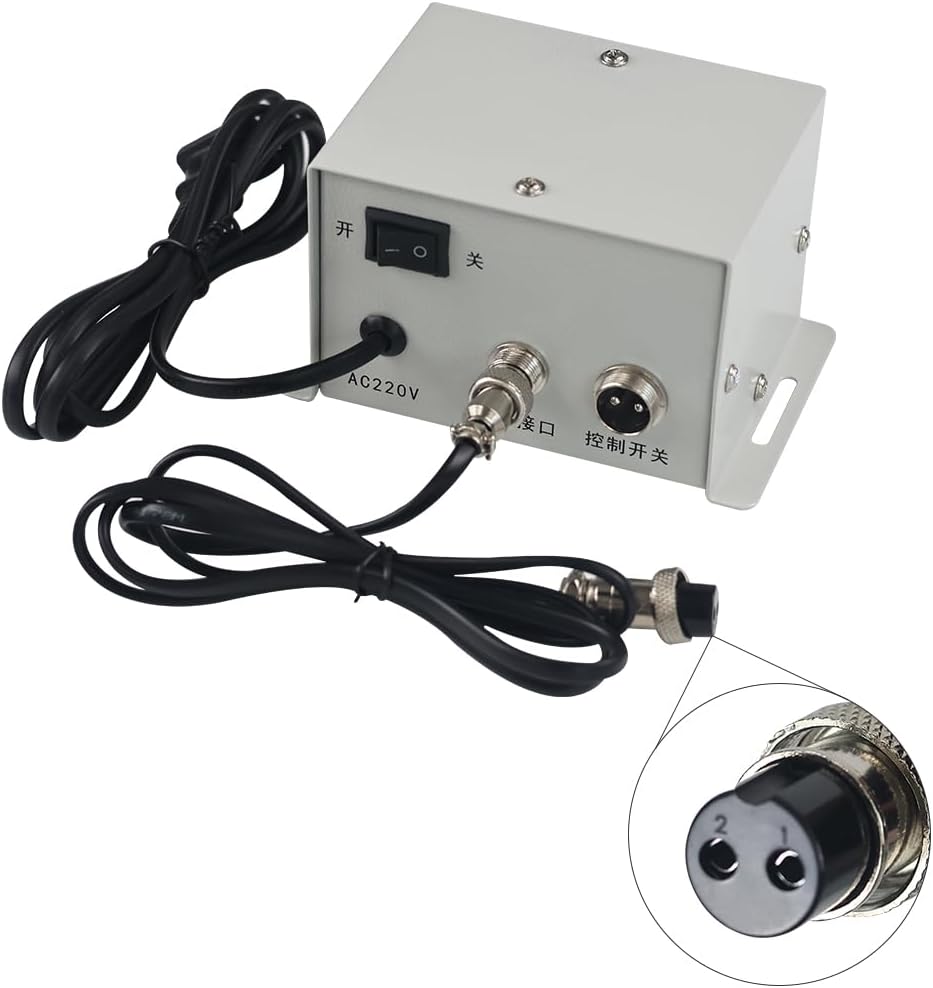
Figure 5: Rear connections for power and TIG machine integration.
The SL-MINI is compatible with 1 to 3 phase TIG/TIG devices (AC 220V 50Hz, Output 3-48V) and supports MOS and IGBT welding machines, covering over 90% of the market.
Operation
The SL-MINI allows precise control over welding parameters for various applications. Familiarize yourself with the control panel before beginning operation.
Basic Operation Steps:
- Power On: Ensure the SL-MINI and your TIG welder are powered on.
- Select Mode: Use the POINT, LINE, or TIG buttons to select the desired welding mode.
- POINT: For single, precise spot welds.
- LINE: For continuous pulse welding, creating a seam.
- TIG: Standard TIG welding mode (if applicable, consult your TIG welder manual).
- Adjust Parameters:
- Use the MODE button to cycle through adjustable parameters (e.g., Time, Frequency, Duty Cycle).
- Use the +/- buttons next to the digital displays to adjust the values.
- TIME/FREQ: Adjusts welding time (1-999 ms) and pulse frequency (1-20 Hz).
- TIME/DUTY: Adjusts interval time (1-999 ms) and duty cycle (1-99%).
- Select Trigger Function (2T/4T): Use the FUNC button to switch between 2T and 4T modes.
- 2T (2-Stroke): Press and hold the trigger to weld, release to stop.
- 4T (4-Stroke): Press and release the trigger to start welding, press and release again to stop. This allows for continuous operation without holding the trigger.
- Store Programs: The STORAGE button allows you to save up to 20 custom welding programs for quick recall. Refer to the detailed manual for specific steps on saving and recalling programs.
- Perform Welding: With parameters set, proceed with your welding task according to your TIG welder's instructions and standard welding practices.
Recommended Settings:
Optimal settings will vary depending on the material, thickness, and desired weld. Start with lower settings and gradually increase until the desired result is achieved. Experimentation on scrap material is recommended.
- For thin stainless steel sheets: Begin with short pulse times (e.g., 50-100 ms) and a moderate frequency.
- For battery cell welding: Very short, precise pulses are often required to minimize heat input.
Maintenance
Proper maintenance ensures the longevity and reliable performance of your Klortecer SL-MINI.
- Cleaning: Regularly wipe the exterior of the unit with a clean, dry cloth. Do not use abrasive cleaners or solvents. Ensure the unit is powered off and unplugged before cleaning.
- Ventilation: Keep the ventilation openings clear of dust and debris to prevent overheating.
- Storage: Store the unit in a dry, dust-free environment when not in use.
- Cable Inspection: Periodically inspect all cables for signs of wear, cuts, or damage. Replace damaged cables immediately.
- No Internal Servicing: The SL-MINI contains no user-serviceable parts. Do not open the casing. Refer all repairs to qualified service personnel.
Troubleshooting
If you encounter issues with your Klortecer SL-MINI, refer to the following common problems and solutions:
| Problem | Possible Cause | Solution |
|---|---|---|
| Unit does not power on. | No power supply; faulty power cord; unit switch off. | Check power outlet; ensure power cord is securely connected; turn on the power switch on the rear panel. |
| No pulse output from TIG welder. | Incorrect connection to TIG machine; TIG machine not in correct mode; SL-MINI settings incorrect. | Verify all connection cables are secure and correctly plugged into the TIG machine's control and welding interfaces. Ensure your TIG machine is set to a compatible mode. Check SL-MINI pulse settings (Time, Freq, Duty Cycle). |
| Inconsistent welding results. | Incorrect parameters; unstable power supply; workpiece contamination. | Adjust welding parameters (time, frequency, duty cycle) incrementally. Ensure stable power supply. Clean workpiece thoroughly before welding. |
| Unit overheats. | Blocked ventilation; prolonged use at high settings. | Ensure ventilation openings are clear. Allow the unit to cool down. Reduce duty cycle or operating time if continuously overheating. |
If the problem persists after attempting these solutions, contact Klortecer customer support or your seller for further assistance.
Specifications
Technical specifications for the Klortecer SL-MINI Mini Cold Welding Machine:
- Model: SL-MINI
- Dimensions: 125 x 80 x 70 mm (approx. 4.92 x 3.15 x 2.76 inches)
- Weight: Approx. 740g
- Power Source: AC 220V 50Hz
- Power Consumption (Standby): Less than 3.5 W
- Output Voltage Range (TIG Machine Compatibility): 3-48V
- Adjustable Welding Time: 1 - 999 ms
- Adjustable Interval Time: 1 - 999 ms
- Pulse Rate: 1 - 20 Hz
- Duty Cycle: 1 - 99%
- Program Storage: 20 slots
- Operating Modes: Single pulse, duration/TIG welding, 2T/4T function
- Compatibility: MOS and IGBT TIG welding machines
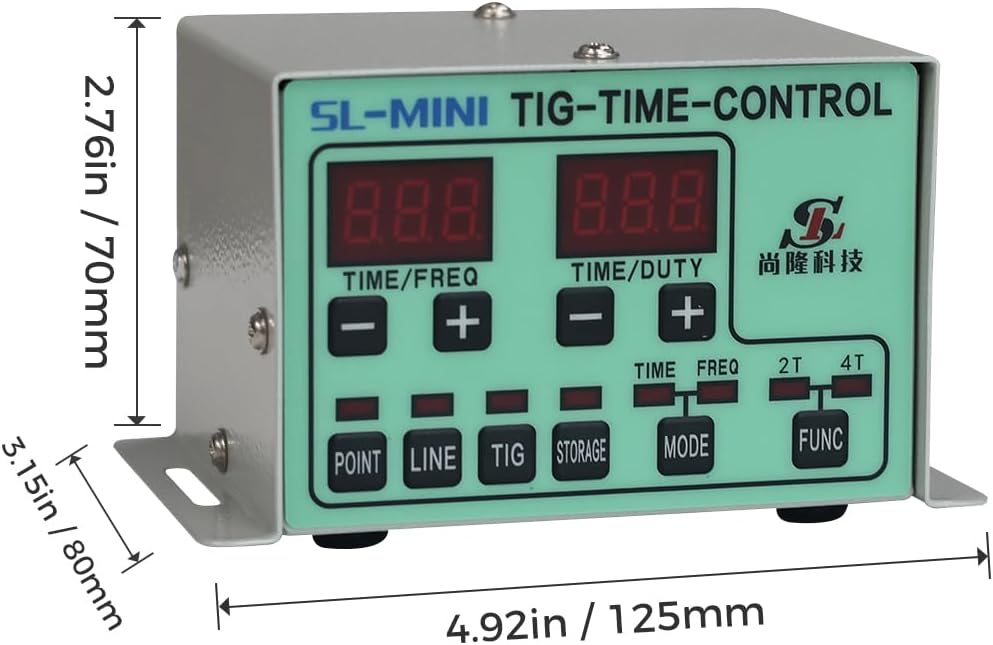
Figure 6: Dimensions of the SL-MINI unit.
Warranty and Support
For warranty information, please refer to the documentation provided at the time of purchase or contact your seller directly. Klortecer is committed to providing quality products and support.
If you require technical assistance or have questions not covered in this manual, please contact Klortecer customer service through the retailer where you purchased the product or visit the official Klortecer website for support contact details.