1. Important Safety Instructions
Please read all instructions carefully before using your LumosBari Drip Coffee Maker. Retain this manual for future reference.
- Do not immerse the appliance, power cord, or plug in water or other liquids.
- Ensure the appliance is placed on a stable, flat, heat-resistant surface.
- Unplug from the outlet when not in use and before cleaning. Allow to cool before putting on or taking off parts, and before cleaning the appliance.
- Do not operate any appliance with a damaged cord or plug, or after the appliance malfunctions or has been damaged in any manner.
- Close supervision is necessary when any appliance is used by or near children.
- Do not touch hot surfaces. Use handles or knobs.
- Do not use the appliance for other than intended household use.
2. Package Contents
Verify that all items are included in your package:
- LumosBari Drip Coffee Maker
- User Manual
- Coffee Scoop
- Cleaning Brush
- Reusable Filter
- Glass Carafe

This image displays all the components that come with your coffee maker: the main unit, a glass carafe, a reusable filter, a filter ring, a funnel, a coffee scoop, and a cleaning brush.
3. Product Overview
The LumosBari Drip Coffee Maker is designed for convenience and fresh brewing. Key features include a built-in conical burr grinder, a 1.5L removable water tank, a touch screen interface, and a warming plate.
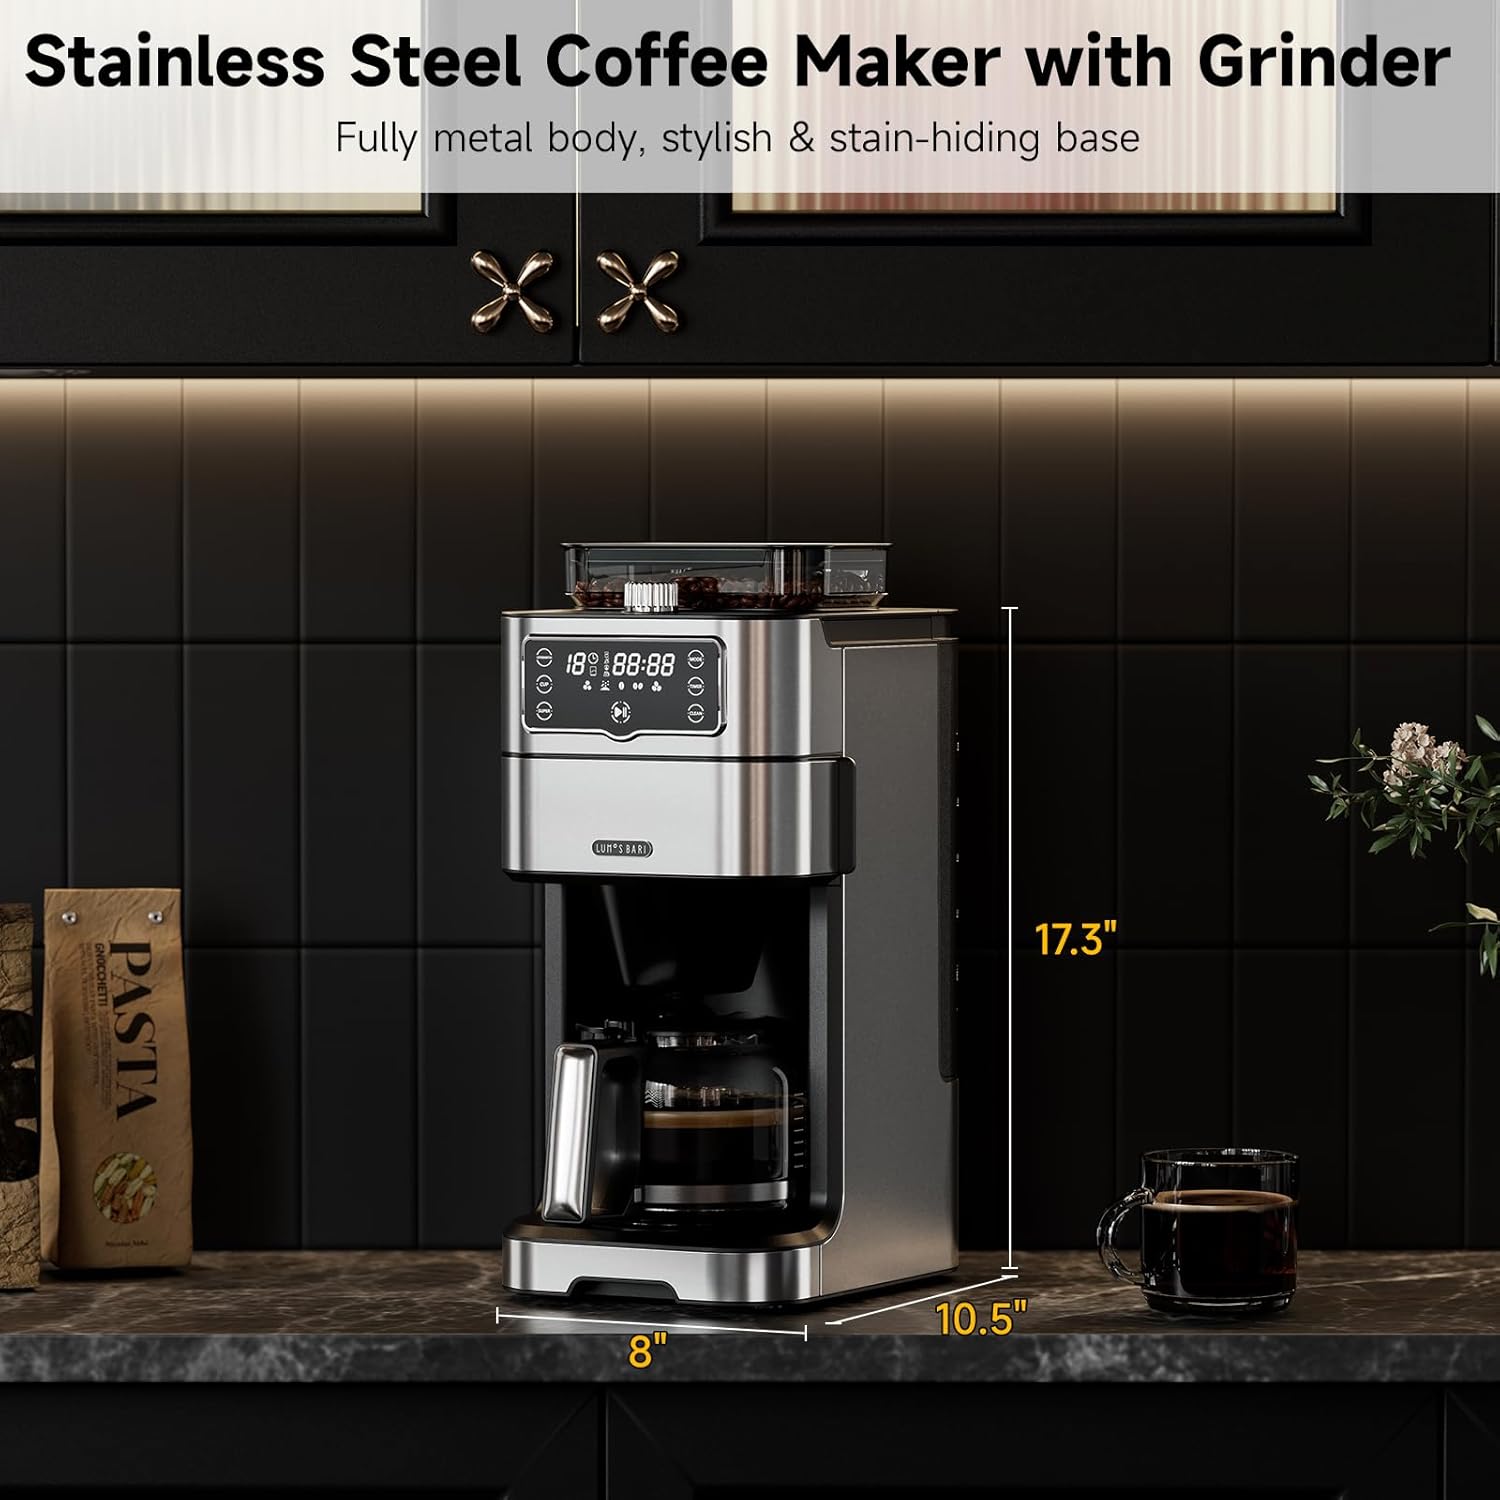
The coffee maker has a compact design, measuring 17.3 inches in height, 8 inches in width, and 10.5 inches in depth, making it suitable for various kitchen spaces.

The integrated conical burr grinder ensures uniform grinding with low heat generation, preserving coffee flavor. It offers three adjustable coarseness settings: Fine, Medium, and Coarse.
4. Setup
- Unpack: Carefully remove all packaging materials and ensure all components are present.
- Clean Components: Wash the glass carafe, reusable filter, filter ring, and funnel with warm, soapy water. Rinse thoroughly and dry.
- Position: Place the coffee maker on a dry, stable, and level surface.
- Fill Water Tank: Remove the 1.5L water tank from the side of the unit. Fill it with fresh, cold water up to the desired level (1 to 10 cups). Reinsert the water tank securely.
- Insert Filter: Place the reusable filter into the filter basket, then insert the filter basket into the designated slot.

This image illustrates the three primary steps for preparing your coffee maker: adding water to the removable tank, adding either whole beans to the grinder or pre-ground coffee to the filter, and then personalizing your brew settings.
5. Operating Instructions
5.1 Brewing with Whole Beans (Built-in Grinder)
- Add Water: Ensure the water tank is filled to your desired cup marking.
- Add Whole Beans: Open the bean hopper lid and pour fresh whole coffee beans into the hopper. Do not overfill.
- Select Grind Size: Adjust the grind size selector knob (Fine, Medium, Coarse) according to your preference.
- Select Brew Strength: Use the touch screen to select your desired brew strength (Mild, Medium, Strong).
- Select Cups: Choose the number of cups (1-10) you wish to brew on the touch screen.
- Start Brewing: Press the 'Start' button. The machine will automatically grind the beans and begin the brewing process.

This image highlights the versatility of the coffee maker, allowing users to brew quickly with pre-ground coffee or enjoy a fresh, flavorful brew by grinding whole beans.
5.2 Brewing with Pre-Ground Coffee
- Add Water: Ensure the water tank is filled to your desired cup marking.
- Add Pre-Ground Coffee: Open the filter basket and add your desired amount of pre-ground coffee into the reusable filter.
- Select Brew Strength: Use the touch screen to select your desired brew strength (Mild, Medium, Strong).
- Select Cups: Choose the number of cups (1-10) you wish to brew on the touch screen.
- Start Brewing: Press the 'Start' button. The machine will begin brewing.
5.3 24-Hour Delay Timer
Set your coffee maker to brew at a specific time:
- Prepare the coffee maker with water and coffee (beans or ground) as per sections 5.1 or 5.2.
- Press the 'TIMER' button on the touch screen.
- Adjust the desired brew time using the '+' and '-' buttons.
- Confirm the setting. The machine will start brewing automatically at the programmed time.
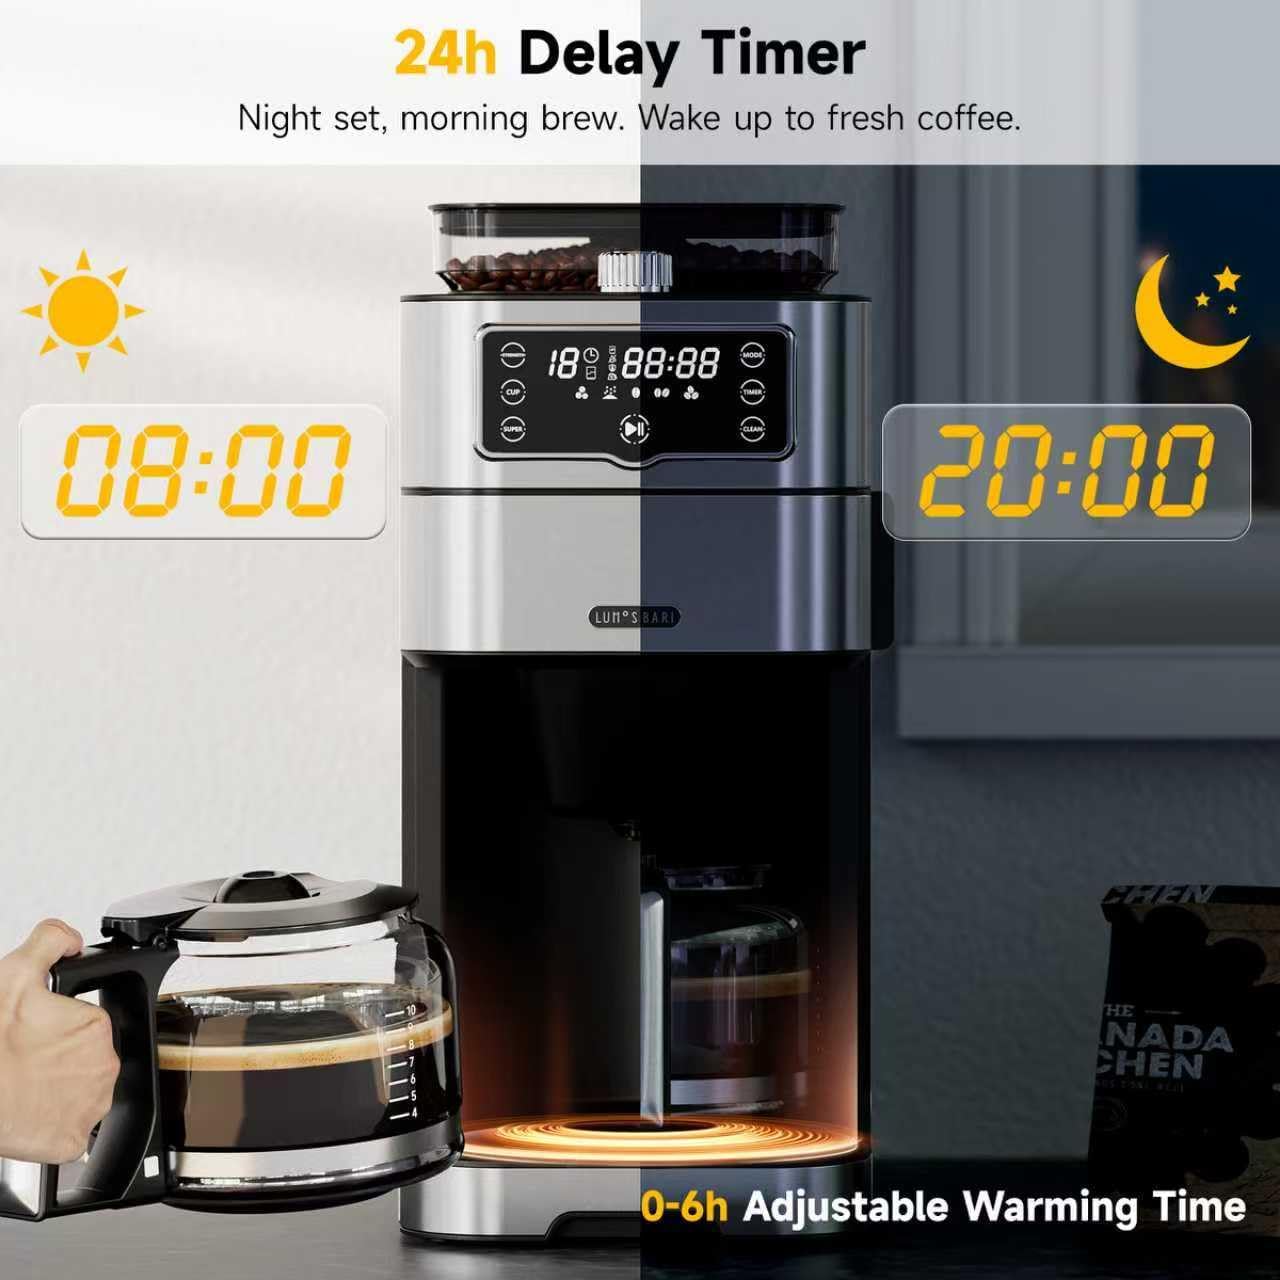
This image demonstrates how to use the 24-hour delay timer, allowing you to set the machine to brew coffee at a specific time, such as 8:00 AM for a morning brew or 8:00 PM for preparation.
5.4 Iced Americano Mode
For a rich, undiluted iced coffee:
- Prepare the coffee maker with water and coffee (beans or ground).
- Select the 'SUPER' mode on the touch screen. This mode brews a higher concentration of coffee.
- Add ice to your cup before pouring the brewed coffee.
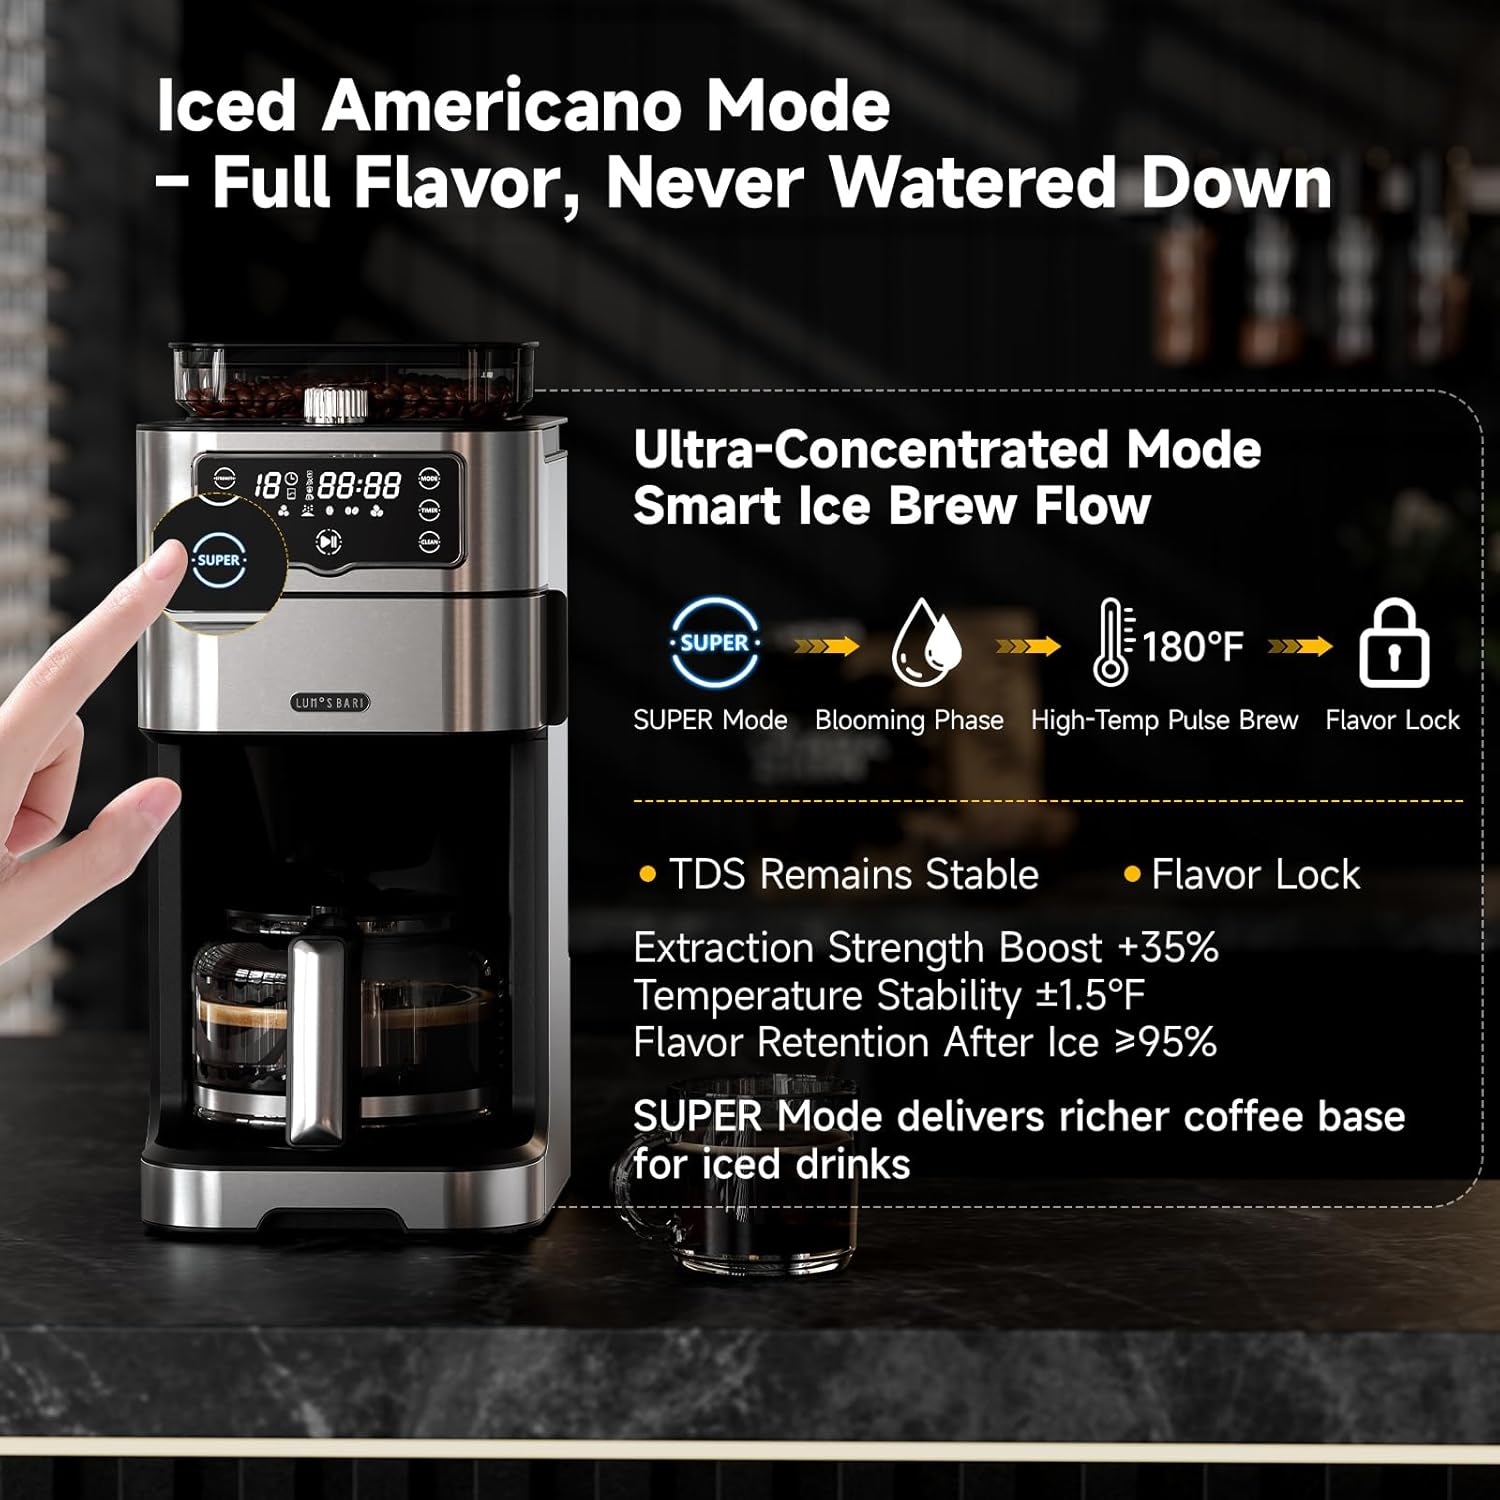
The Iced Americano Mode (SUPER Mode) ensures a concentrated brew that maintains its rich flavor even when poured over ice, preventing a watered-down taste.
5.5 Mid-Brew Pause
The anti-drip function allows you to temporarily remove the carafe during brewing:
- You can remove the carafe for up to 30 seconds to pour a cup before brewing is complete.
- Ensure the carafe is returned to its position within 30 seconds to prevent overflow from the funnel.

This feature allows you to briefly remove the carafe to pour a cup of coffee during the brewing cycle without drips, provided it is returned within 30 seconds.
6. Cleaning and Maintenance
Regular cleaning ensures optimal performance and extends the lifespan of your coffee maker.
6.1 Daily Cleaning
- Carafe and Filter: After each use, remove the glass carafe and reusable filter. Wash them with warm, soapy water and rinse thoroughly.
- Water Tank: The 1.5L water tank is removable for easy refilling and cleaning. Wash it periodically with warm, soapy water.
- Exterior: Wipe the exterior of the coffee maker with a soft, damp cloth.

The reusable coffee filter is designed for easy cleaning and can be rinsed under running water after each use.

The water reservoir is easily removed from the side of the coffee maker, simplifying the process of refilling and cleaning.
6.2 Self-Cleaning Function
The coffee maker features a one-touch self-cleaning function:
- Ensure the water tank is filled with water.
- Remove any coffee grounds from the filter.
- Press the 'CLEAN' button on the touch screen. The machine will run a cleaning cycle.
- For thorough cleaning of the powder pathway, press and hold the 'CLEAN' button.
7. Troubleshooting
| Problem | Possible Cause | Solution |
|---|---|---|
| Coffee tastes weak | Incorrect brew strength selected, insufficient coffee, or coarse grind size. | Select 'STRONG' brew option, increase coffee amount, or choose a finer grind setting. |
| Grinder not working | Bean hopper empty, lid not properly closed, or grinder clogged. | Ensure beans are in hopper, close lid securely, or clean grinder pathway. |
| Delay timer not starting | Timer not set correctly or power interruption. | Re-set the delay timer. Ensure power supply is stable. |
| Water not flowing | Water tank empty or not properly seated. | Fill water tank and ensure it is correctly inserted. |
8. Specifications
- Brand: LumosBari
- Model Name: Drip Coffee Machine
- Item Model Number: CMA300PRO-WH
- Color: Silver
- Product Dimensions: 10.5"D x 8"W x 17.3"H
- Capacity: 1.5 Liters (10-Cup)
- Coffee Maker Type: Drip Coffee Machine
- Special Feature: Auto Shut-Off, Keep Warm, Integrated Coffee Grinder, Permanent Filter, Programmable
- Operation Mode: Fully Automatic
- Voltage: 120 Volts
- Human Interface Input: Touchscreen
- Coffee Input Type: Ground, Whole Bean
- Is Dishwasher Safe: No
- Item Weight: 10.8 pounds
9. Warranty and Support
Your LumosBari Drip Coffee Maker is covered by a manufacturer's warranty. For detailed warranty information, please refer to the warranty card included in your product packaging or visit the official LumosBari website.
For technical support, troubleshooting assistance, or any questions regarding your product, please contact LumosBari customer service:
- Website: LumosBari Official Store
- Email: (Refer to product packaging for email address)
- Phone: (Refer to product packaging for phone number)