1. Introduction
This manual provides essential instructions for the proper setup, operation, and maintenance of your ostritec Sunflower Solar Lights Outdoor Decor. Please read this guide thoroughly before use to ensure optimal performance and longevity of your product.
2. Product Features
- Realistic & Bright Design: Each bouquet features 6 detailed sunflower heads with upgraded petals, buds, and leaves, equipped with 60 ultra-bright LEDs for vibrant golden illumination.
- Upgraded Solar Panels: Features 2025 monocrystalline panels for higher energy conversion rates, charging in 6–8 hours and providing 12+ hours of continuous glow.
- Weatherproof & Durable: Constructed with fade-resistant flower heads, sturdy metal stems, and reinforced ABS light poles. IP65 waterproof rating ensures resistance to rain, wind, snow, and sun.
- Automatic Operation: Built-in light sensors automatically turn the lights on at dusk and off at dawn.
- Easy Setup: No wiring or tools required; simply stake into the ground.
3. Package Contents
Your package should contain the following items:
- 4 x Sunflower Solar Light Units (each with 6 sunflower heads)
- 4 x Ground Stakes
- Integrated Solar Panels (one per unit)
4. Setup Instructions
- Unpack Components: Carefully remove all items from the packaging.
- Assemble Sunflowers: Gently arrange the petals of each sunflower head to achieve the desired natural look.
- Select Location: Choose an outdoor location that receives direct sunlight for 6-8 hours daily. Ensure the solar panel is not obstructed by shade from trees, buildings, or other objects.
- Insert Ground Stake: Attach the ground stake to the bottom of each solar light unit.
- Install Lights: Firmly push the assembled solar light units into the ground. Ensure the solar panel faces upwards towards the sun.
- Activate: Locate the power switch (usually on the underside or back of the solar panel) and switch it to the 'ON' position. The lights will automatically charge during the day and illuminate at night.
Video: Demonstrates how to gently arrange the petals of the solar sunflowers for optimal appearance.

Image: Illustrates the automatic charging during daylight hours and illumination after dark.
5. Operating Instructions
- Once installed and the switch is in the 'ON' position, the solar lights will operate automatically.
- During daylight hours, the integrated solar panel will convert sunlight into electricity and store it in the internal battery.
- At dusk, the built-in light sensor will detect the decrease in ambient light and automatically turn on the sunflower LEDs.
- The lights will remain illuminated for approximately 12+ hours on a full charge.
- At dawn, the light sensor will detect increasing ambient light and automatically turn off the LEDs, resuming the charging cycle.
Video: Shows the sunflower solar lights illuminating a garden at night.
Video: Provides a general overview of the solar garden lights in an outdoor setting.
6. Maintenance
- Cleaning: Periodically wipe the solar panel with a soft, damp cloth to remove dust, dirt, or debris. A clean panel ensures efficient charging.
- Positioning: Ensure the solar panel remains exposed to direct sunlight. Trim any overhanging branches or foliage that may block sunlight.
- Battery Life: The integrated rechargeable battery has a limited lifespan. If the lights become dim or stop working after prolonged use, the battery may need replacement. Refer to the manufacturer for compatible replacement batteries.

Image: The solar lights are designed to withstand heat, water, wind, and snow, ensuring year-round outdoor use.
7. Troubleshooting
| Problem | Possible Cause | Solution |
|---|---|---|
| Lights do not turn on at night. | 1. Power switch is OFF. 2. Insufficient sunlight for charging. 3. Solar panel is dirty. 4. Battery is depleted or faulty. | 1. Ensure the switch is in the 'ON' position. 2. Relocate the light to an area with direct sunlight for 6-8 hours. 3. Clean the solar panel with a soft, damp cloth. 4. Allow several days of full charge. If issue persists, consider battery replacement. |
| Lights are dim or only stay on for a short period. | 1. Insufficient charging. 2. Solar panel is partially obstructed. 3. Battery capacity reduced. | 1. Ensure full sun exposure for 6-8 hours. 2. Clear any obstructions from the solar panel. 3. The battery may be nearing the end of its lifespan and require replacement. |
| Lights flicker or are inconsistent. | 1. Loose connection. 2. Moisture ingress. 3. Battery issue. | 1. Check all connections. Ensure the light is securely assembled. 2. Ensure the unit is properly sealed and waterproof. If water has entered, allow it to dry completely. 3. Replace the battery if other solutions fail. |
8. Specifications
- Model Number: sunflower-6tou-4pack
- Item Weight: 1.48 pounds (0.67 Kilograms)
- Product Dimensions: 10 x 15 x 29 inches (L x W x H)
- Assembled Height: 29 inches
- Power Source: Solar Powered
- Light Color: Warm White
- Material: Plastic (Frame Material)
- Waterproof Rating: IP65
- Number of Items: 4 (units)
- Batteries: Yes, included and required.
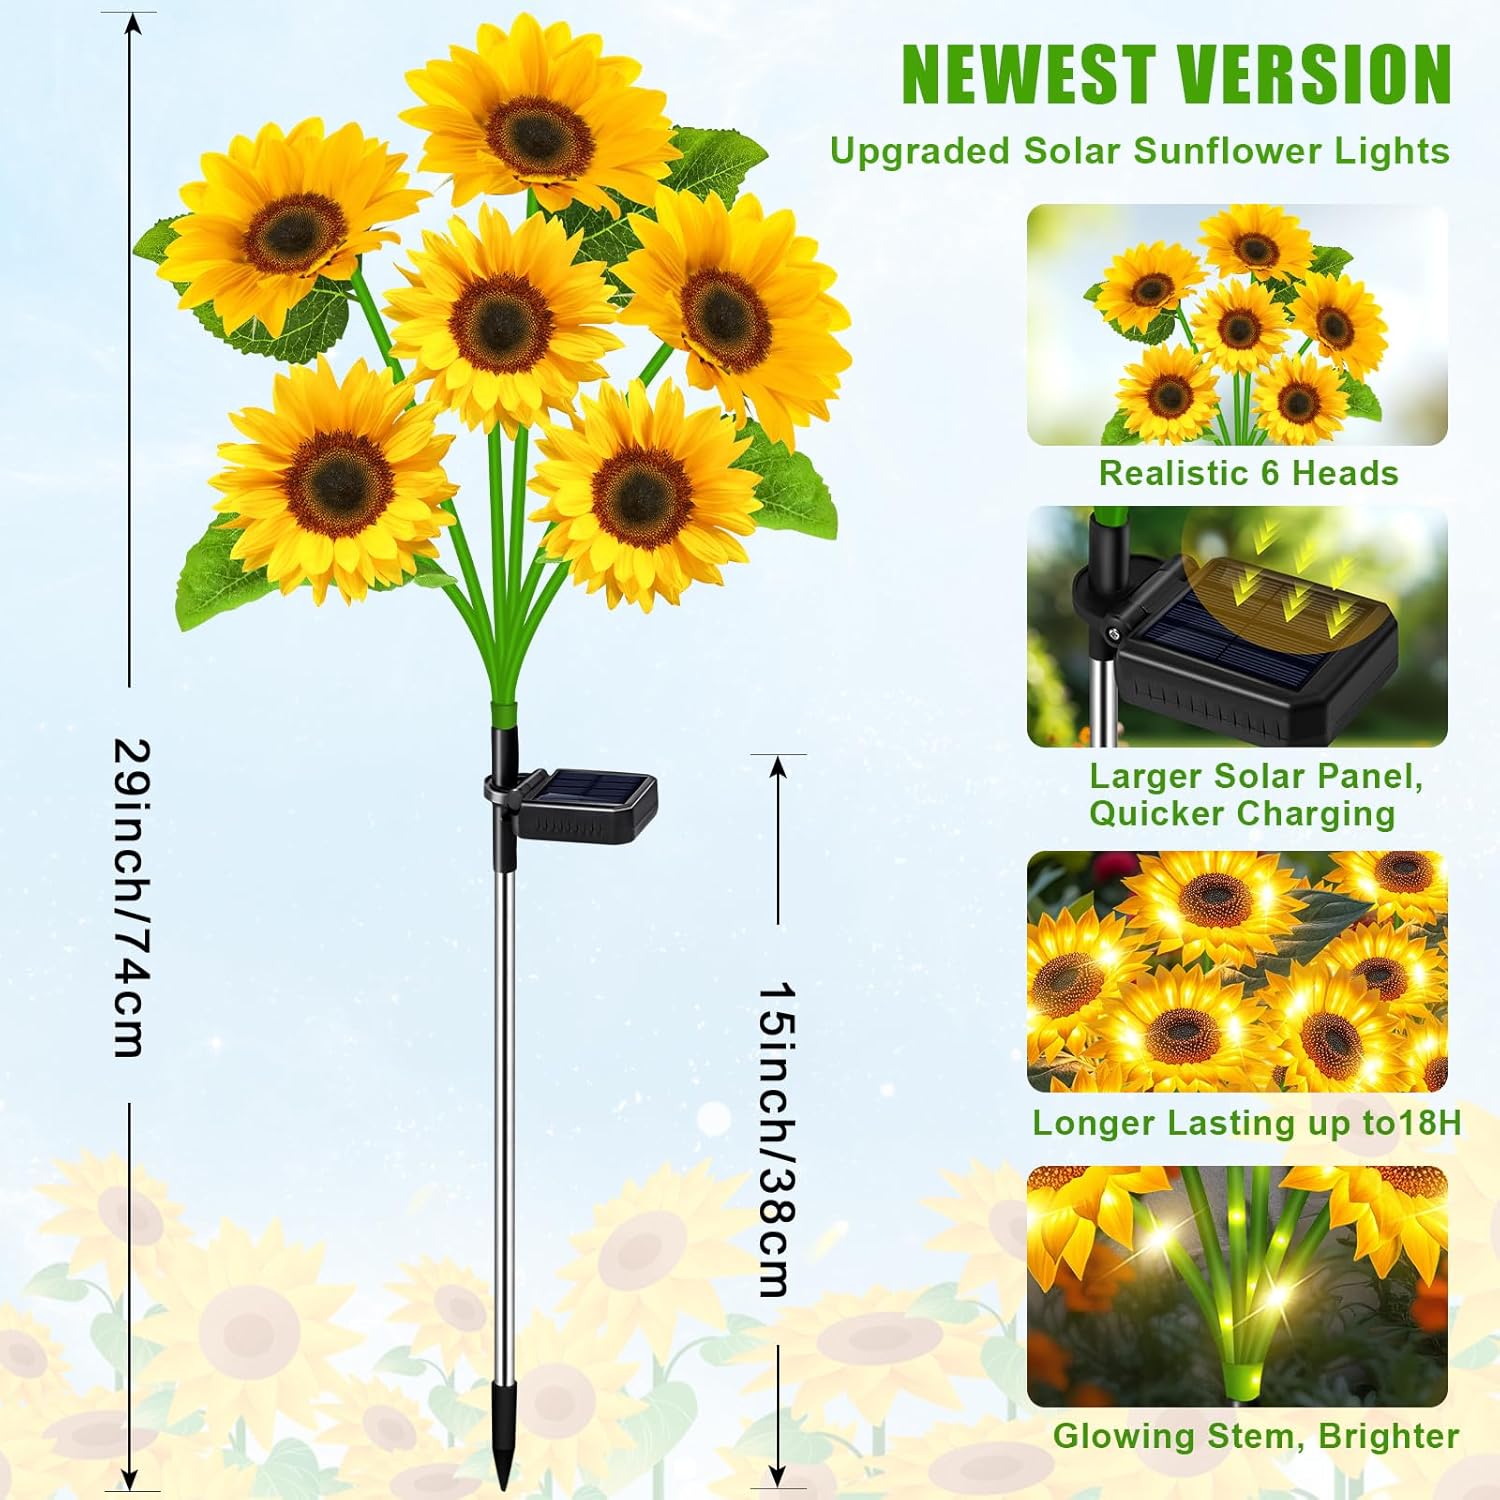
Image: Provides a visual guide to the product's size and highlights features like the larger solar panel and longer lasting illumination.
9. Safety Information
- Avoid exposure to extreme weather conditions beyond the product's IP65 rating.
- Keep away from flammable materials.
- Do not attempt to modify or disassemble the product, as this may void the warranty and pose a safety risk.
- Ensure proper installation to prevent tripping hazards.
10. Warranty and Support
For warranty information or technical support, please contact the manufacturer, ostritec, directly through their official channels or the retailer where the product was purchased. Keep your proof of purchase for any warranty claims.