1. Introduction
Thank you for choosing the RAINPOT Portable Cordless Pressure Washer. This device is designed for efficient and convenient cleaning tasks, offering high-pressure water flow without the need for a power outlet. Its versatile 6-in-1 adjustable nozzle and robust design make it suitable for a variety of applications, from vehicle washing to garden and home cleaning.
Please read this manual thoroughly before operating the pressure washer to ensure safe and optimal performance. Keep this manual for future reference.

Image 1.1: The RAINPOT Portable Cordless Pressure Washer with its included accessories, including the main unit, hose, and various nozzles.
2. Product Components
The RAINPOT Portable Cordless Pressure Washer package includes the following components:
- Portable Pressure Washer Unit
- 21V 10000mAh Lithium-ion Battery
- Battery Charger
- 6-in-1 Adjustable Nozzle
- Foam Cannon Bottle
- Water Inlet Hose with Filter
- Rotating Sprinkler (for this specific variant)

Image 2.1: Key components of the pressure washer, including the multi-angle adjustable nozzle, foam cannon accessory, pump for drawing water, and the portable cordless battery.

Image 2.2: Detailed view of the split battery, surging power mechanism, fan heat protection, and smart gun shutdown feature.
3. Setup
Follow these steps to assemble and prepare your pressure washer for use:
- Install the Outlet Pipe: Securely attach the metal outlet pipe to the front of the pressure washer unit.
- Connect Hoses: Connect the water inlet hose to the designated port on the pressure washer. Ensure all connections are tight to prevent leaks.
- Install Water Gun Inlet: Push down and firmly tighten the connector to the water gun inlet. Ensure the upward push installation is complete.
- Install Water Pump: Insert the water pump filter end into your water source (e.g., bucket, pool).
- Install Nozzle: Attach the desired nozzle (e.g., 6-in-1 adjustable nozzle or foam cannon) to the end of the outlet pipe.
- Insert Battery: Ensure the battery is fully charged before inserting it into the battery slot at the base of the pressure washer unit.

Image 3.1: Visual guide for the jet power washer installation steps, from attaching the outlet pipe to installing the nozzle.
Pre-Use Checks:
- Tighten Water Inlet: Always ensure the water inlet connection is securely tightened before use to prevent leaks and maintain pressure.
- Unblock Water Pipe: Verify that the water pipe is not kinked or blocked, which could impede water flow.
- Check Sealing Ring: Before each use, inspect the sealing ring for any damage or looseness. A proper seal is crucial for effective operation.

Image 3.2: Important checks to perform before use, including tightening the water inlet, unblocking the water pipe, and checking the sealing ring.
4. Operating Instructions
Once assembled and connected to a water source, you can begin operating your pressure washer:
- Power On: Press the power button on the unit to turn it on.
- Select Nozzle Mode: If using the 6-in-1 adjustable nozzle, rotate the nozzle head to select the desired spray pattern. Available modes include 0° (direct high-pressure stream), 15°, 25°, 40° (fan spray patterns), Straight Mode, and Shower Mode.
- Begin Cleaning: Aim the nozzle at the surface to be cleaned and press the trigger. Maintain a safe distance from the surface, especially with higher pressure settings.
- Foam Application: To use the foam cannon, fill the foam bottle with appropriate cleaning solution, attach it to the unit, and spray.
- Power Off: Release the trigger and press the power button to turn off the unit when finished.
Applications:
This pressure washer is versatile and can be used for:
- Domestic Car Washing
- Yard Washing
- Cleaning Air Conditioner External Units
- Green Spraying (e.g., watering plants with shower mode)
- Cleaning House Doors and Windows
- Washing Large Equipment
- Cleaning Bikes and Floors

Image 4.1: Illustration of the various spray modes available with the 6-in-1 adjustable nozzle, including 0°, 15°, 25°, 40°, high-flow direct injection, and showerhead mode.

Image 4.2: Examples of diverse cleaning needs met by the pressure washer, such as yard wash, air conditioner external unit cleaning, green spraying, domestic car wash, house doors & windows, and large equipment cleaning.

Image 4.3: Demonstrations of the pressure washer's use for cleaning a bike, spraying flowers, washing a yard, and cleaning a floor.
5. Maintenance
Proper maintenance ensures the longevity and optimal performance of your pressure washer:
- Cleaning the Unit: After each use, wipe down the exterior of the pressure washer with a damp cloth to remove dirt and debris.
- Nozzle Care: Regularly check the nozzle for blockages. If clogged, clear it carefully using a small pin or the included nozzle cleaning tool.
- Hose and Filter: Inspect the water inlet hose and filter for any damage or accumulation of debris. Clean the filter as needed to ensure unobstructed water flow.
- Battery Care: Store the battery in a cool, dry place. For long-term storage, ensure the battery is partially charged (around 50%) to prolong its lifespan. Avoid fully discharging or overcharging the battery.
- Sealing Rings: Periodically check all sealing rings and O-rings for wear or damage. Replace them if necessary to prevent leaks.
- Winter Storage: If storing in freezing temperatures, ensure all water is drained from the unit and hoses to prevent damage from ice expansion.
6. Troubleshooting
If you encounter issues with your pressure washer, refer to the following common problems and solutions:
| Problem | Possible Cause | Solution |
|---|---|---|
| No water flow or low pressure | Water inlet hose kinked or blocked; filter clogged; insufficient water supply; loose connections. | Unblock the water pipe/hose. Clean the water filter. Ensure water source is adequate. Tighten all connections, especially the water inlet. |
| Unit does not turn on | Battery not charged; battery not properly inserted; power button malfunction. | Charge the battery fully. Reinsert the battery securely. If problem persists, contact customer support. |
| Water leakage from connections | Loose connections; damaged sealing rings/O-rings. | Tighten all connections. Inspect and replace any damaged sealing rings or O-rings. |
| Nozzle not spraying correctly | Nozzle clogged; incorrect nozzle selection. | Clean the nozzle. Rotate the 6-in-1 nozzle to a different setting. |
If the issue persists after attempting these solutions, please contact RAINPOT customer support for further assistance.
7. Specifications
Key technical specifications for the RAINPOT Portable Cordless Pressure Washer:
- Model Number: CP91954
- Manufacturer: RAINPOT
- Product Dimensions: 8.66 x 4.72 x 11.02 inches (22 x 12 x 28 cm)
- Power Source: Battery Powered
- Battery Type: 21V Lithium-ion (10000mAh capacity)
- Max Water Pressure: 600 PSI (36 Bar)
- Jet Accessibility: 6-8 meters
- Endurance Time: Approximately 60 minutes (depending on usage)
- Color: Black
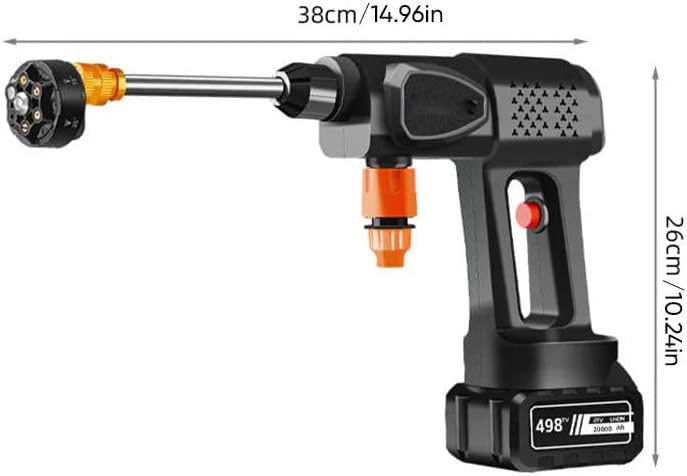
Image 7.1: Dimensions of the pressure washer unit, measuring 38cm (14.96in) in length and 26cm (10.24in) in height.

Image 7.2: Key performance metrics: 6-8m jet accessibility, 36 bar strong driving force, and 60 minutes endurance time.
8. Warranty and Support
For information regarding product warranty, please refer to the warranty card included with your purchase or contact the seller directly. RAINPOT is committed to providing quality products and customer satisfaction.
If you require technical support, have questions about product operation, or need to report a defect, please contact RAINPOT customer service through the retailer where you purchased the product or visit the official RAINPOT website for contact information.