Introduction
This manual provides detailed instructions for the installation, operation, and maintenance of your Locksworth 2.0 Cubic Feet Fire Safe Box. Please read this manual thoroughly before using the safe to ensure proper function and security.
The Locksworth safe is designed to protect your valuables with features including a digital keypad, multiple unlocking methods, a dual alarm system, and a robust steel construction. It also includes a fireproof and waterproof bag for added protection of sensitive documents.
Setup Instructions
1. Initial Unlocking and Battery Installation
Upon receiving your safe, it will be locked. Use the provided emergency keys to open it for the first time and install the batteries.
- Locate the emergency keyhole cover on the digital keypad.
- Insert one of the emergency keys into the keyhole and turn it counterclockwise.
- While the key is turned, rotate the knob clockwise to open the safe door.
- Inside the safe door, locate the battery compartment. Install four (4) AA batteries (not included) according to the polarity markings.
- Close the battery compartment.
Note: Ensure batteries are installed correctly for the digital keypad to function.
2. Setting Your Personal Password
After installing batteries, you can set your personal password.
- With the safe door open, press the green 'SET' button located on the inside of the safe door, near the hinge.
- The keypad will beep, and the indicator light will flash, signaling it is ready to accept a new password.
- Enter your desired 3-8 digit password on the keypad.
- Press the '#' button to confirm your new password. The safe will beep to confirm successful password setting.
Important: Test your new password several times with the door open before closing it to ensure it works correctly.
3. Mounting the Safe (Optional)
For enhanced security, the safe can be mounted to a wall or floor using the pre-drilled holes and expansion screws.

Image: Illustration of wall and floor mounting options for the safe, showing pre-drilled holes and screw installation steps.
- Choose a suitable location for mounting.
- Mark the drilling points through the pre-drilled holes on the back (4 holes for wall) or bottom (2 holes for floor) of the safe.
- Drill holes in the wall or floor at the marked positions.
- Align the safe with the drilled holes and secure it using the provided expansion screws.
Operating Instructions
1. Unlocking the Safe
Your Locksworth safe offers three methods for unlocking:
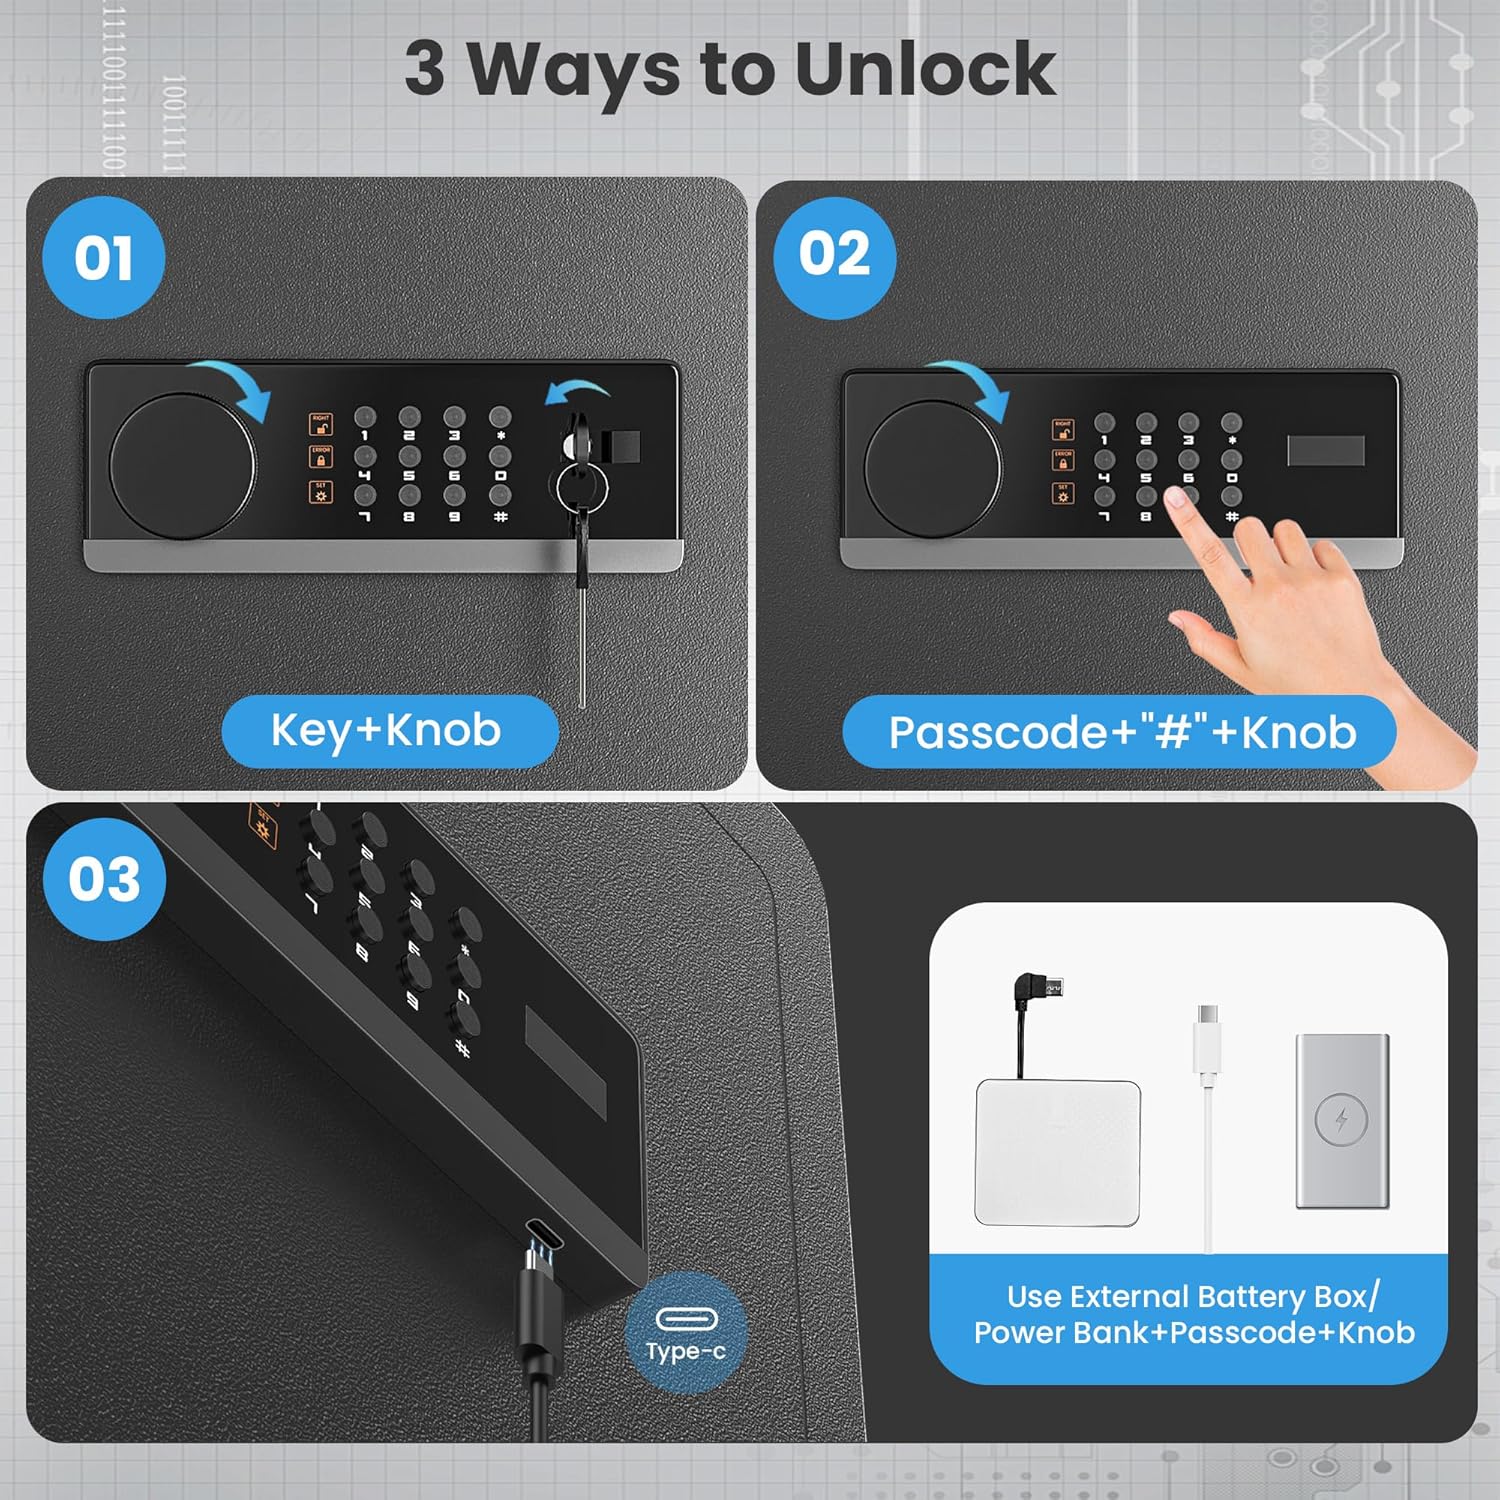
Image: Visual guide demonstrating the three unlocking methods for the safe: using a key and knob, using a digital passcode and knob, and using an external battery box with a passcode and knob.
- Using Personal Code + Knob: Enter your 3-8 digit personal password, then press '#'. The indicator light will turn green. Within 5 seconds, turn the knob clockwise to open the door.
- Using Emergency Keys + Knob: Insert the emergency key into the keyhole, turn it counterclockwise, then rotate the knob clockwise to open the door. This method bypasses the digital keypad.
- Using Emergency Charging + Knob (if batteries are dead): If the internal batteries are depleted, connect the external battery box (with 4 AA batteries installed) to the emergency power port on the keypad. Then, enter your personal password, press '#', and turn the knob clockwise to open the door.
2. Dual Alarm System
The safe is equipped with a dual alarm system to deter unauthorized access.

Image: Visual representation of the safe's alarm system, detailing that 3 wrong code entries lead to a 20-second keypad lockout and continuous alarm, while 6 wrong entries result in a 5-minute lockout and continuous alarm.
- 3 Wrong Codes: If 3 incorrect codes are entered consecutively, the keypad will lock for 20 seconds, and a continuous alarm will sound.
- 6 Wrong Codes: If 6 incorrect codes are entered consecutively, the keypad will lock for 5 minutes, and a continuous alarm will sound.
3. Internal LED Light
The safe features a built-in LED light that automatically illuminates for 30 seconds when the safe is unlocked using a passcode. This aids visibility in low-light environments.
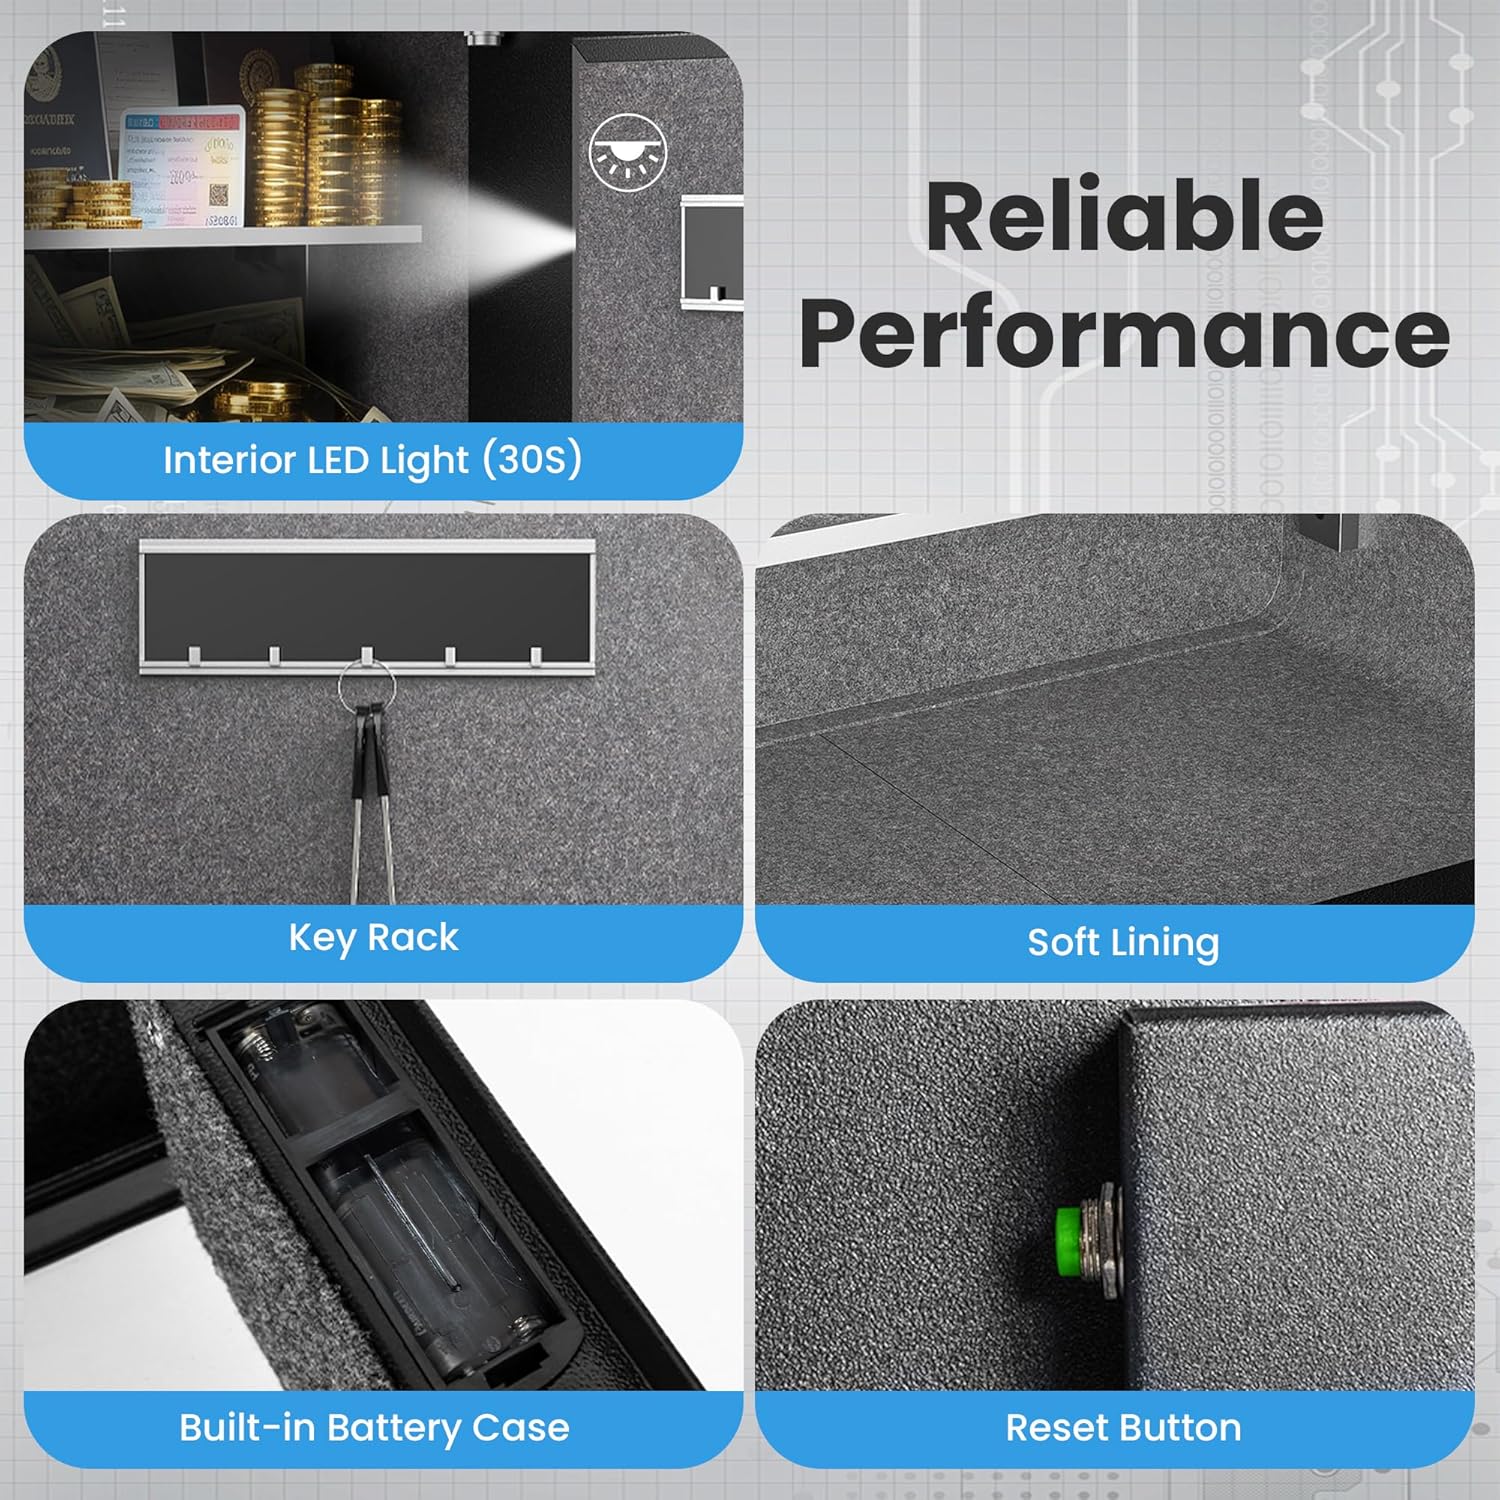
Image: Detailed view of the safe's interior features, including the LED light, a key rack for organization, soft lining to protect contents, and the internal reset button.
4. Removable & Adjustable Shelves
The safe includes removable and height-adjustable shelves, allowing you to customize the interior storage space to fit various items.

Image: Depiction of the safe's interior with shelves, highlighting their removability and adjustable height for flexible organization of valuables.
Maintenance
1. Battery Replacement
When the battery indicator light on the keypad starts to flash or the keypad becomes unresponsive, it's time to replace the batteries. Use four new AA alkaline batteries. Do not mix old and new batteries or different types of batteries.
2. Cleaning
Clean the exterior of the safe with a soft, damp cloth. Avoid using abrasive cleaners or solvents that could damage the finish or electronic components.
3. Key Storage
Always store your emergency keys in a secure location away from the safe. Do not store them inside the safe.
Troubleshooting
- Keypad Unresponsive / No Power: Check if the batteries are installed correctly and are not depleted. If necessary, use the external battery box for emergency power.
- Alarm Sounds Continuously: This indicates multiple incorrect password attempts. Wait for the lockout period (20 seconds or 5 minutes) to expire before attempting to enter the correct password again.
- Door Does Not Open After Correct Code: Ensure you are turning the knob clockwise immediately after entering the correct code and pressing '#'. If using the emergency key, ensure it is fully turned counterclockwise before rotating the knob.
- Knob Wobbles / Door Misaligned: Check the mounting screws if the safe is mounted. Ensure the safe is on a stable, level surface if not mounted. Contact customer support if the issue persists.
Specifications
| Feature | Detail |
|---|---|
| Brand | Locksworth |
| Model Number | AZ4315VC |
| Capacity | 2 Cubic Feet |
| Product Dimensions | 12.6"D x 15"W x 17.7"H |
| Item Weight | 32.2 Pounds |
| Material | Carbon Steel |
| Lock Type | Electronic Combination Lock, Key |
| Special Features | Alarm System, Anti-Theft, Combination Lock, Removable Shelf, Sensor Light |
| Mounting Type | Wall/Floor Mount |
| Included Components | Spare Key, Fireproof & Waterproof Bag, External Battery Box, Expansion Screws, User Manual |

Image: Detailed view of the safe's dimensions (12.6"D x 15"W x 17.7"H) and a list of included accessories: 2 keys, 6 expansion screws, 4 feet pads, 1 battery box, 1 fireproof bag, and 1 manual.
Warranty Information
Locksworth products are manufactured to high-quality standards. This product comes with a standard manufacturer's warranty against defects in materials and workmanship. Please retain your proof of purchase for warranty claims. For specific warranty terms and conditions, refer to the documentation included with your purchase or contact customer support.
Customer Support
If you have any questions, require assistance with setup, or encounter any issues with your Locksworth safe, please contact our customer support team. Details for contacting support can typically be found on the product packaging or on the official Locksworth website.
For visual guidance, please refer to the official product video below:
Video: Official product overview of the Locksworth Anti-theft Safe Box for Home Office, demonstrating its features and usage.