1. Introduction
Thank you for choosing the PhiloDeco Portable Air Conditioner. This manual provides important information regarding the safe operation, installation, maintenance, and troubleshooting of your new appliance. Please read this manual thoroughly before using the product and retain it for future reference.

Image 1.1: Front view of the PhiloDeco Portable Air Conditioner.
This portable air conditioner is designed to provide cooling, dehumidification, and fan functions for various indoor spaces. It features a 12000 BTU cooling capacity, a 24-hour timer, and a remote control for convenient operation.
2. Important Safety Instructions
To reduce the risk of fire, electrical shock, or injury when using your air conditioner, follow these basic precautions:
- Read all instructions before using the appliance.
- Connect to a properly grounded outlet only.
- Do not operate any appliance with a damaged cord or plug.
- Do not block air openings.
- Do not use in wet areas like bathrooms or laundry rooms.
- Always stand the unit upright for at least 5 hours before first use to allow refrigerant pressure to stabilize.
- Keep the appliance away from heat sources and direct sunlight.
- Ensure the air filter is clean and properly installed before operation.
- Unplug the unit before cleaning or servicing.
3. Package Contents
Verify that all items listed below are included in your package:
- Portable Air Conditioner Unit
- Remote Control
- Window Kit (adjustable panel)
- Exhaust Hose
- Hose Connector
- Window Kit Adapter
- Water Pipe (for continuous drainage)

Image 3.1: Contents of the product package, including the main unit, remote, and installation accessories.
4. Product Overview
Familiarize yourself with the main components and features of your portable air conditioner.
4.1 Unit Features
- Auto Air Louver: Automatically adjusts for optimal air distribution.
- LED Digital Display: Shows current settings and temperature.
- Easy To Carry Handles: Integrated handles for convenient relocation.
- Omni-directional Casters: 360° wheels for easy movement.

Image 4.1: Key features and dimensions of the portable air conditioner.
4.2 Rear View and Components
- Dust Filter: Detachable and washable for maintaining air quality.
- Continuous Drain Outlet: For connecting a water pipe for continuous drainage.
- Air Exhaust Outlet: Connects to the exhaust hose for expelling hot air.
- Bottom Tray Drain Outlet: For manual drainage of collected water.

Image 4.2: Rear components of the portable air conditioner.
5. Setup and Installation
Proper installation is crucial for the efficient operation of your portable air conditioner.
5.1 Initial Placement
- Place the unit on a flat, stable surface.
- Ensure there is at least 20 inches (50 cm) of space around the unit for proper airflow.
- Important: Before first use, stand the portable air conditioner upright for at least 5 hours. This allows the refrigerant pressure in the compressor to reach equilibrium, preventing potential damage.
5.2 Window Kit Installation
This unit is designed for installation in single/double-hung or sliding windows.
- Assemble the window kit by connecting the adjustable panels to fit your window opening.
- Insert the assembled window kit into the window opening and secure it.
- Attach the exhaust hose to the air exhaust outlet on the back of the unit.
- Connect the other end of the exhaust hose to the window kit adapter, then insert the adapter into the opening in the window kit.
- Ensure all connections are secure to prevent hot air from re-entering the room.
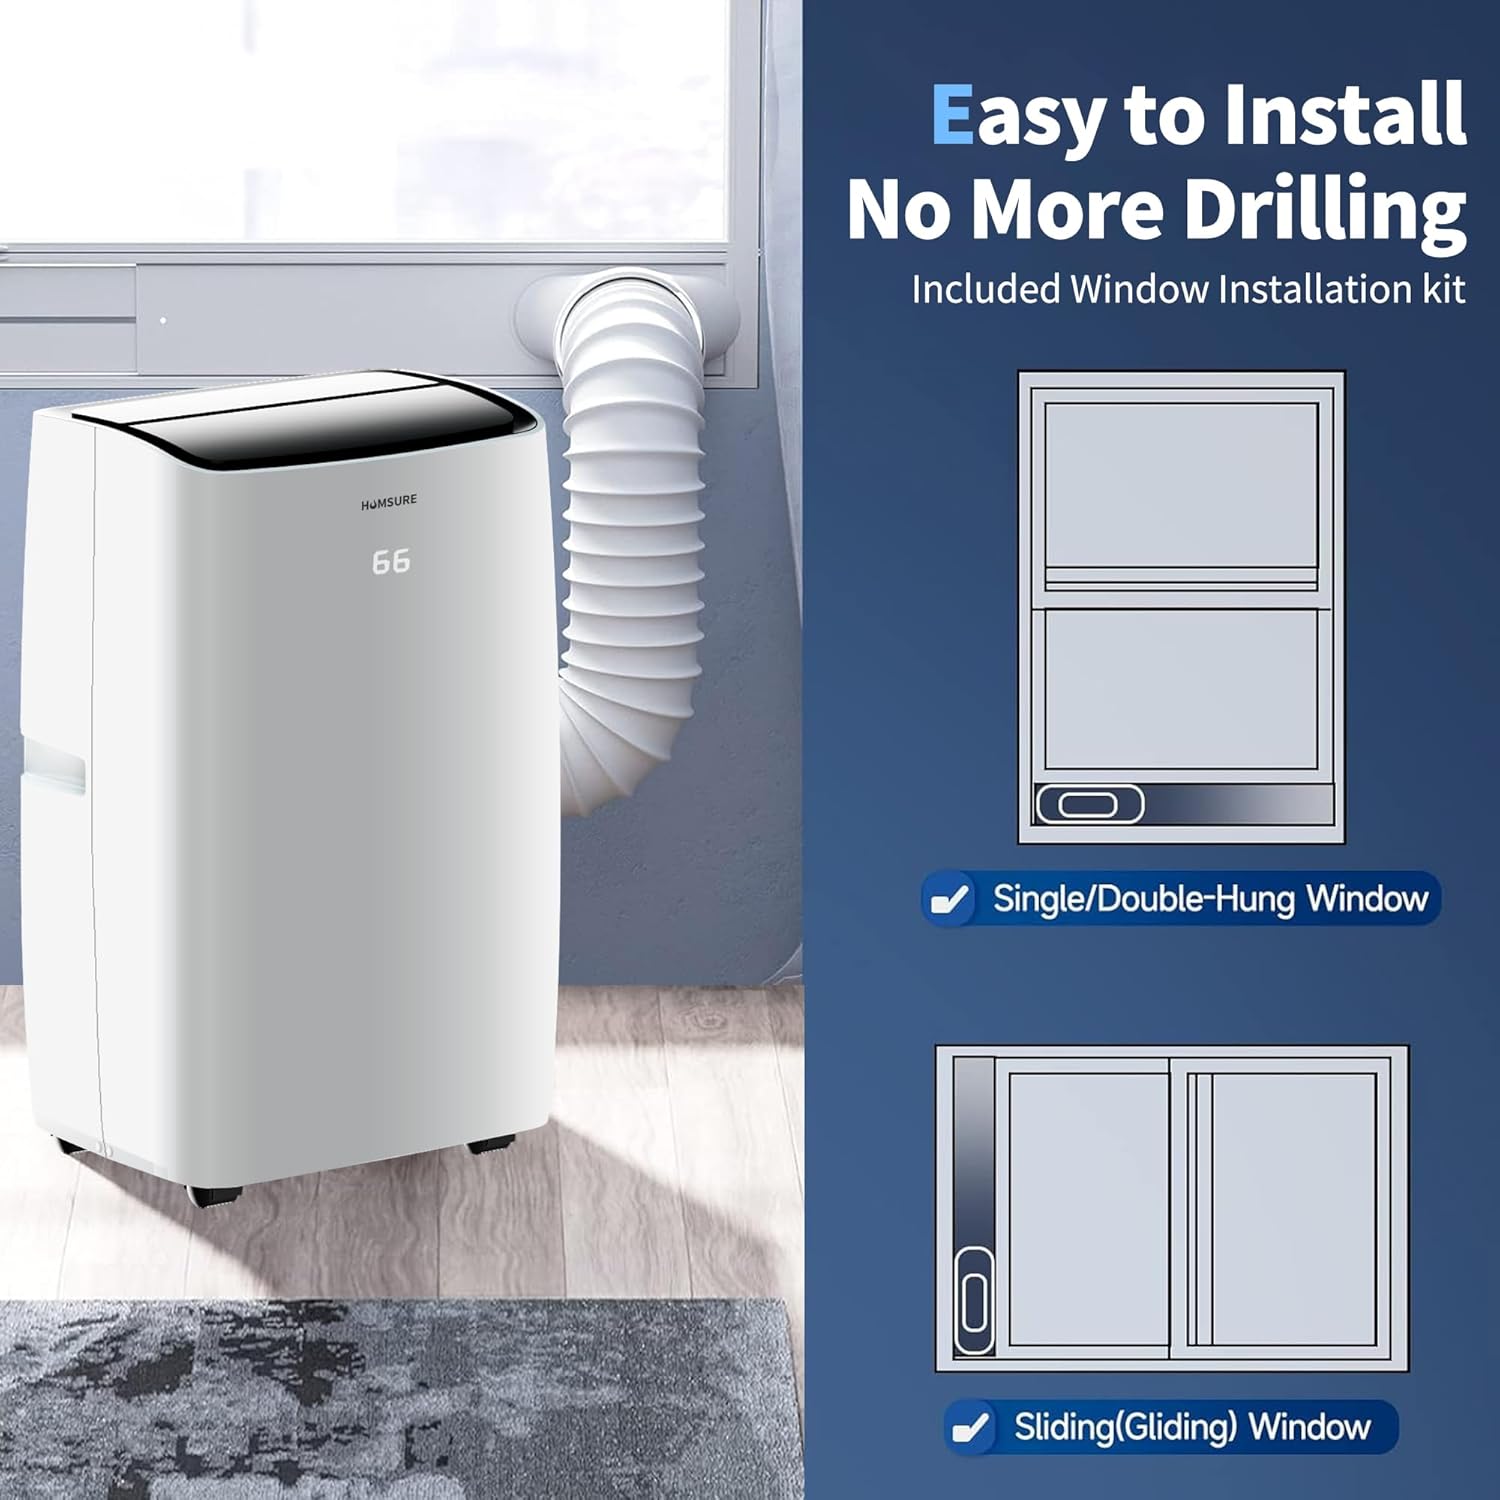
Image 5.1: Window installation kit setup for different window types.
6. Operating Instructions
Your portable air conditioner features a multifunctional control panel and a remote control for easy operation.
6.1 Control Panel and Remote Control

Image 6.1: Overview of the control panel and remote control functions.

Image 6.2: Detailed functions of the remote control buttons.
6.2 Operating Modes
The unit offers five operating modes:
- Cooling Mode: Provides powerful cooling. Adjust temperature and fan speed.
- Dehumidification Mode: Reduces humidity in the room. Fan speed is typically fixed in this mode.
- Fan Mode: Circulates air without cooling. Adjust fan speed.
- Automatic Mode: The unit automatically selects the operating mode (cooling, fan, or dehumidification) based on the ambient room temperature.
- Sleep Mode: Operates quietly with reduced fan speed and gradually increases the set temperature over time for comfortable sleep and energy saving.
6.3 Setting the Timer
The 24-hour timer allows you to set a specific time for the unit to turn ON or OFF.
- Press the 'Timer' button on the control panel or remote.
- Use the temperature adjustment buttons (Up/Down arrows) to set the desired ON/OFF time in hours.
- The timer will activate after a few seconds of inactivity.
7. Maintenance
Regular maintenance ensures optimal performance and extends the lifespan of your air conditioner.
7.1 Cleaning the Air Filter
The detachable air filter should be cleaned regularly (every two weeks or more often depending on usage) to maintain clean airflow.
- Unplug the air conditioner from the power outlet.
- Locate the dust filter on the rear of the unit (refer to Image 4.2).
- Open the filter cover and carefully remove the filter.
- Wash the filter with warm, soapy water. Rinse thoroughly and allow it to air dry completely before re-installing.
- Re-insert the dry filter and close the cover.
7.2 Drainage
The unit collects condensed water during operation. It offers two drainage methods:
- Continuous Drainage: For prolonged use, connect the included water pipe to the continuous drain outlet (refer to Image 4.2). Ensure the pipe is directed to a suitable drain or container and is sloped downwards for gravity drainage.
- Manual Drainage: When the internal water tank is full, the unit will stop operating and display an indicator. Unplug the unit, place a shallow pan under the bottom tray drain outlet (refer to Image 4.2), and remove the drain plug to empty the water. Re-insert the plug securely after drainage.
8. Troubleshooting
Before contacting customer support, please refer to the following troubleshooting guide for common issues.
| Problem | Possible Cause | Solution |
|---|---|---|
| Unit does not turn on | No power; Power cord not plugged in; Circuit breaker tripped; Water tank full. | Check power supply; Plug in securely; Reset breaker; Drain water tank. |
| No cooling or insufficient cooling | Windows/doors open; Air filter dirty; Exhaust hose blocked/disconnected; Room too large; Temperature setting too high. | Close windows/doors; Clean air filter; Check exhaust hose; Ensure unit matches room size; Lower temperature setting. |
| Unit is noisy | Unit not level; Air filter dirty; Obstruction in fan. | Place on a flat surface; Clean air filter; Check for obstructions. |
| Water leakage | Drain plug loose; Continuous drain hose not properly connected or blocked. | Secure drain plug; Check continuous drain hose for proper connection and clear any blockages. |
9. Specifications
Technical specifications for the PhiloDeco Portable Air Conditioner 12000 BTU model.

Image 9.1: Performance specifications of the portable air conditioner.
| Feature | Specification |
|---|---|
| Brand Name | PHILODECO |
| Model Info | YD8000BTU |
| Item Weight | 49.6 pounds |
| Product Dimensions | 13.11 x 15.07 x 34.64 inches |
| Capacity | 12000 Fluid Ounces |
| Annual Energy Consumption | 110 Watts |
| Noise Level | 45 dB |
| Installation Type | Packaged |
| Special Features | Inverter Compressor |
| Color | White |
| Voltage | 110 Volts (DC) |
| Wattage | 110 watts |
| Cooling Power | 12000 British Thermal Units |
10. Warranty and Customer Support
PhiloDeco is committed to providing quality products and worry-free after-sales service.
If you encounter any questions or issues with your portable air conditioner, please do not hesitate to contact our customer support team. We are dedicated to resolving all problems as quickly as possible.
For assistance, please reach out to us via our official after-sales email (details typically found on product packaging or official website).