PCCOOLER GT360 ARGB Display CPU AIO Liquid Cooler
PCCOOLER GT360 ARGB AIO CPU Cooler User Manual
Model: GT360 ARGB Display CPU AIO Liquid Cooler
1. Introduction
Thank you for choosing the PCCOOLER GT360 ARGB AIO CPU Cooler. This all-in-one liquid cooling system is designed to provide superior thermal performance and visual customization for your PC. Featuring a vibrant 3.5-inch IPS display, a 360mm ARGB radiator, and durable dual ball bearing fans, the GT360 ensures efficient cooling and a personalized aesthetic. This manual provides detailed instructions for installation, operation, maintenance, and troubleshooting to help you get the most out of your new cooler.

Figure 1: PCCOOLER GT360 ARGB AIO CPU Cooler
2. Key Features
- 3.5-inch IPS Display: Stunning 480x480 resolution for vibrant colors and wide viewing angles, customizable with system information, animations, or video playback.
- Real-Time Monitoring: Display real-time system parameters and performance metrics for an immersive and interactive cooling experience.
- Advanced Ceramic Pump Design: Low noise and high durability with an all-ceramic bearing pump solution for superior cooling and long-lasting performance.
- 14-Channel High-Density Radiator: 14 channels for enhanced heat dissipation, increasing thermal capacity over standard designs.
- Universal Compatibility: Supports AMD AM4/AM5, Intel LGA115X/1200/1700/1851 sockets for seamless integration with your system.
- Durable Dual Ball Bearing Fan: 28mm thick design with superior airflow and static pressure, featuring high-quality dual ball bearings for quiet, reliable operation.
- Easy Installation: Quick-latch waterblock bracket and simplified setup for hassle-free installation.

Figure 2: Overview of Key Features
3. Setup and Installation
Before beginning installation, ensure your system is powered off and unplugged. Refer to your motherboard manual for specific CPU socket and fan header locations.
3.1 Package Contents
The PCCOOLER GT360 ARGB AIO CPU Cooler package includes:
- PCCOOLER CPS GT360 ARGB Display CPU AIO Liquid Cooler (pre-assembled with fans and radiator)
- Mounting brackets for Intel (LGA115X/1200/1700/1851) and AMD (AM4/AM5) sockets
- Thermal paste
- Mounting screws and accessories
- User Manual

Figure 3: Installation Components for Intel and AMD
3.2 Pre-Installation Steps
- Prepare Motherboard: For AMD installations, ensure the motherboard's original backplate is in place. For Intel, use the provided Intel backplate.
- Remove Stock Brackets: Remove any pre-installed plastic retention brackets around the CPU socket on your motherboard.
- Install Standoffs: Screw the appropriate standoffs for your CPU socket (Intel or AMD) into the motherboard's mounting holes. Ensure the correct side of the standoff faces the motherboard.
- Apply Thermal Paste: Apply a small amount of thermal paste to the center of your CPU's integrated heat spreader (IHS). A pea-sized dot or a small 'X' pattern is generally sufficient.
3.3 Cooler Mounting
- Attach Mounting Brackets to Pump: The pump comes with a pre-installed Intel bracket. Slide this off and attach the appropriate AMD bracket by sliding it into place until it clicks securely.
- Mount Radiator and Fans: The fans are pre-installed on the radiator with hidden wiring for simplified setup. Secure the radiator to your PC case in the desired location (top, front, or side) using the provided radiator screws.
- Position Pump: Carefully place the pump onto the CPU, aligning the mounting holes on the pump bracket with the standoffs on the motherboard. Avoid sliding the pump once it makes contact with the thermal paste.
- Secure Pump: Use the provided thumb screws to secure the pump to the motherboard standoffs. Tighten them in a diagonal pattern until snug, ensuring even pressure. Do not overtighten.

Figure 4: Pre-installed Fans with Hidden Wiring
3.4 Cable Connections
Connect the following cables to your motherboard:
- Pump Power: Connect the pump's 3-pin or 4-pin connector to the dedicated AIO_PUMP or CPU_FAN header on your motherboard.
- Fan Power: Connect the fan cables (usually daisy-chained) to an available fan header on your motherboard.
- ARGB Lighting: Connect the ARGB cable to a 5V 3-pin ARGB header on your motherboard for synchronized lighting control.
- LCD Display: Connect the USB 2.0 header cable from the pump to an available USB 2.0 header on your motherboard. This enables software control and customization of the IPS display.
4. Operating the Cooler and Display
Once installed and powered on, the PCCOOLER GT360 will begin cooling your CPU. The integrated 3.5-inch IPS display provides real-time system information and customization options.
4.1 Display Functionality
The 3.5-inch IPS display offers:
- Real-Time Monitoring: View CPU temperature, GPU temperature, fan speeds, and other system metrics directly on the screen.
- Customizable Content: Upload images (JPG, PNG, GIF) or short videos for a personalized look.
- Screen Brightness and Angle Control: Adjust display settings via the dedicated software.
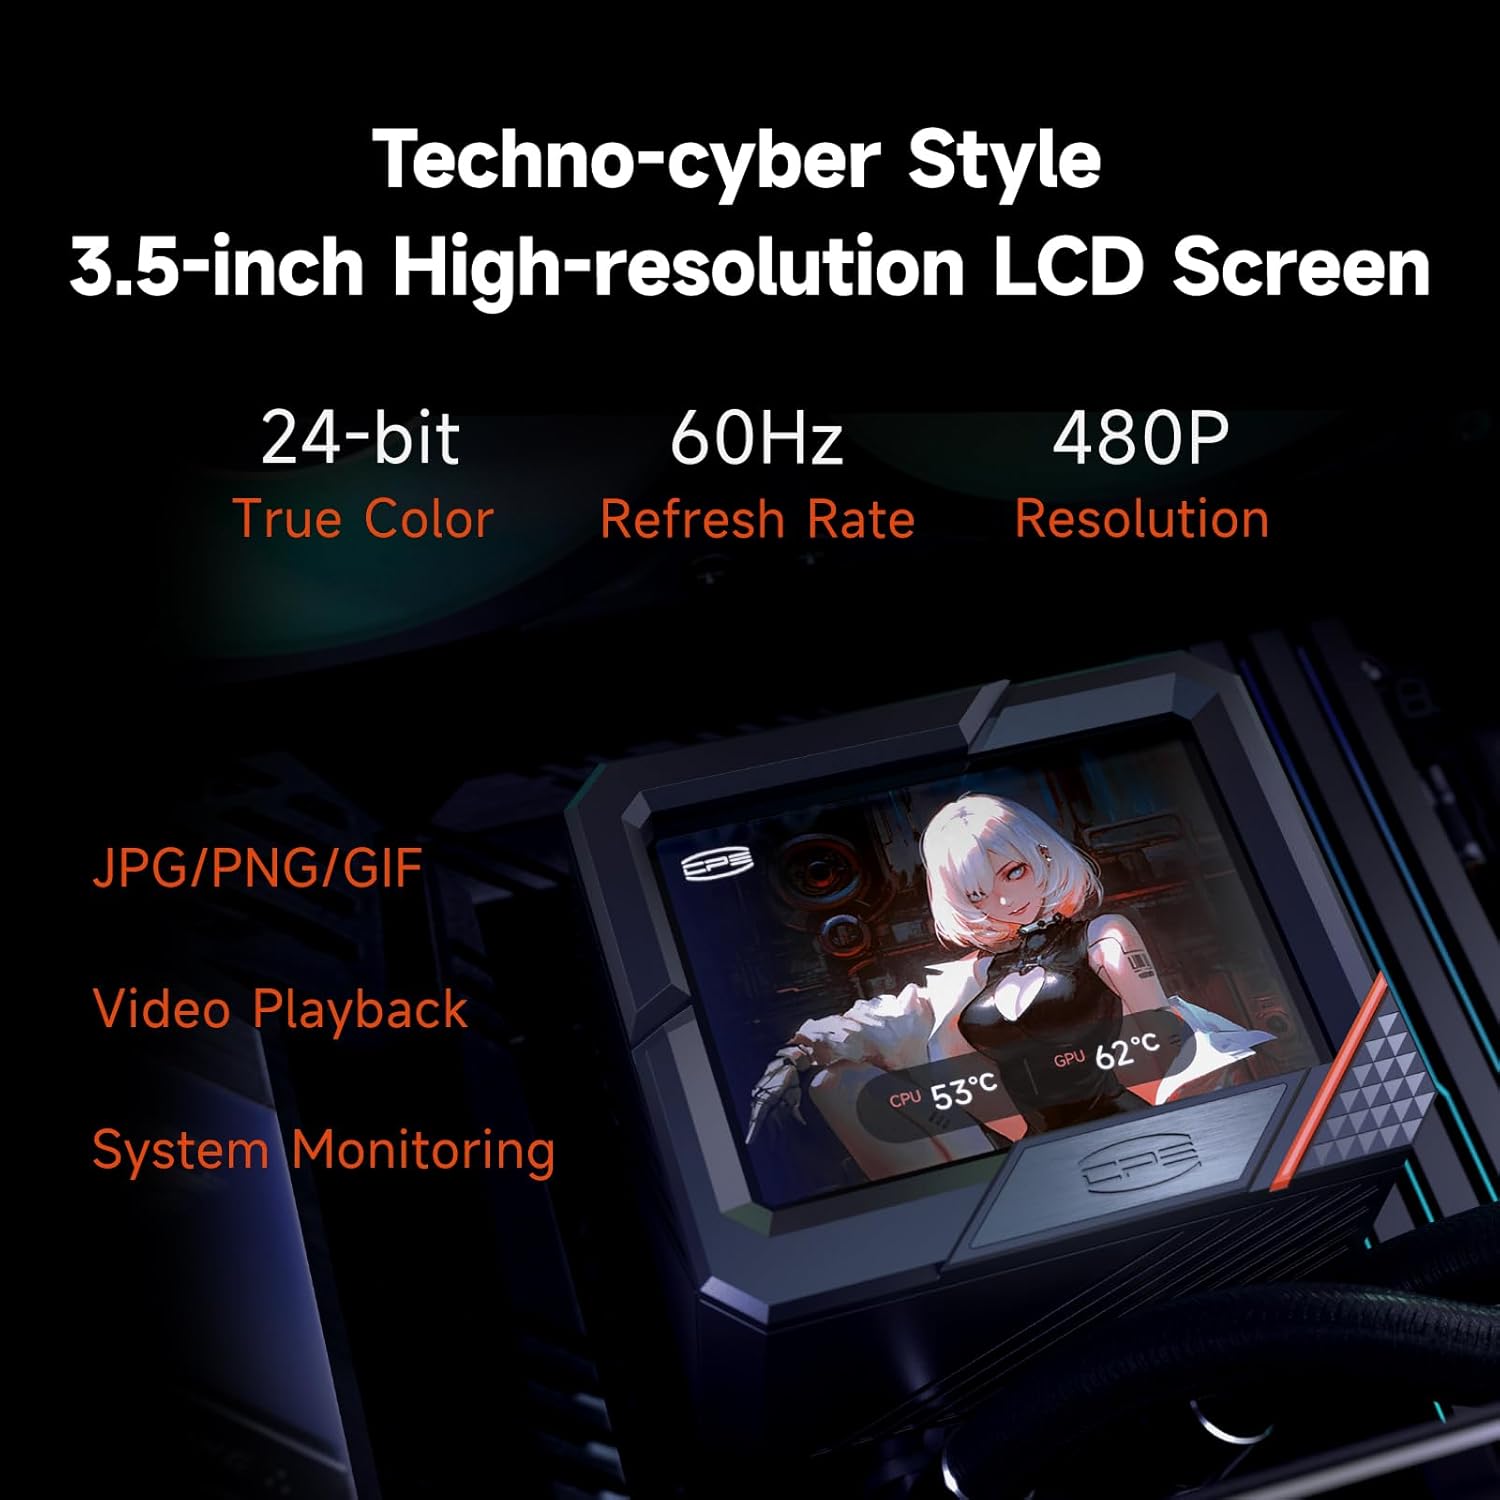
Figure 5: 3.5-inch IPS Display
4.2 Software Control (CPS-Display)
To fully utilize the display's customization features, download and install the CPS-Display software from the official PCCOOLER website (www.pccooler.com). The software allows you to:
- Change the displayed image or video.
- Adjust screen brightness and orientation.
- Select monitoring parameters.
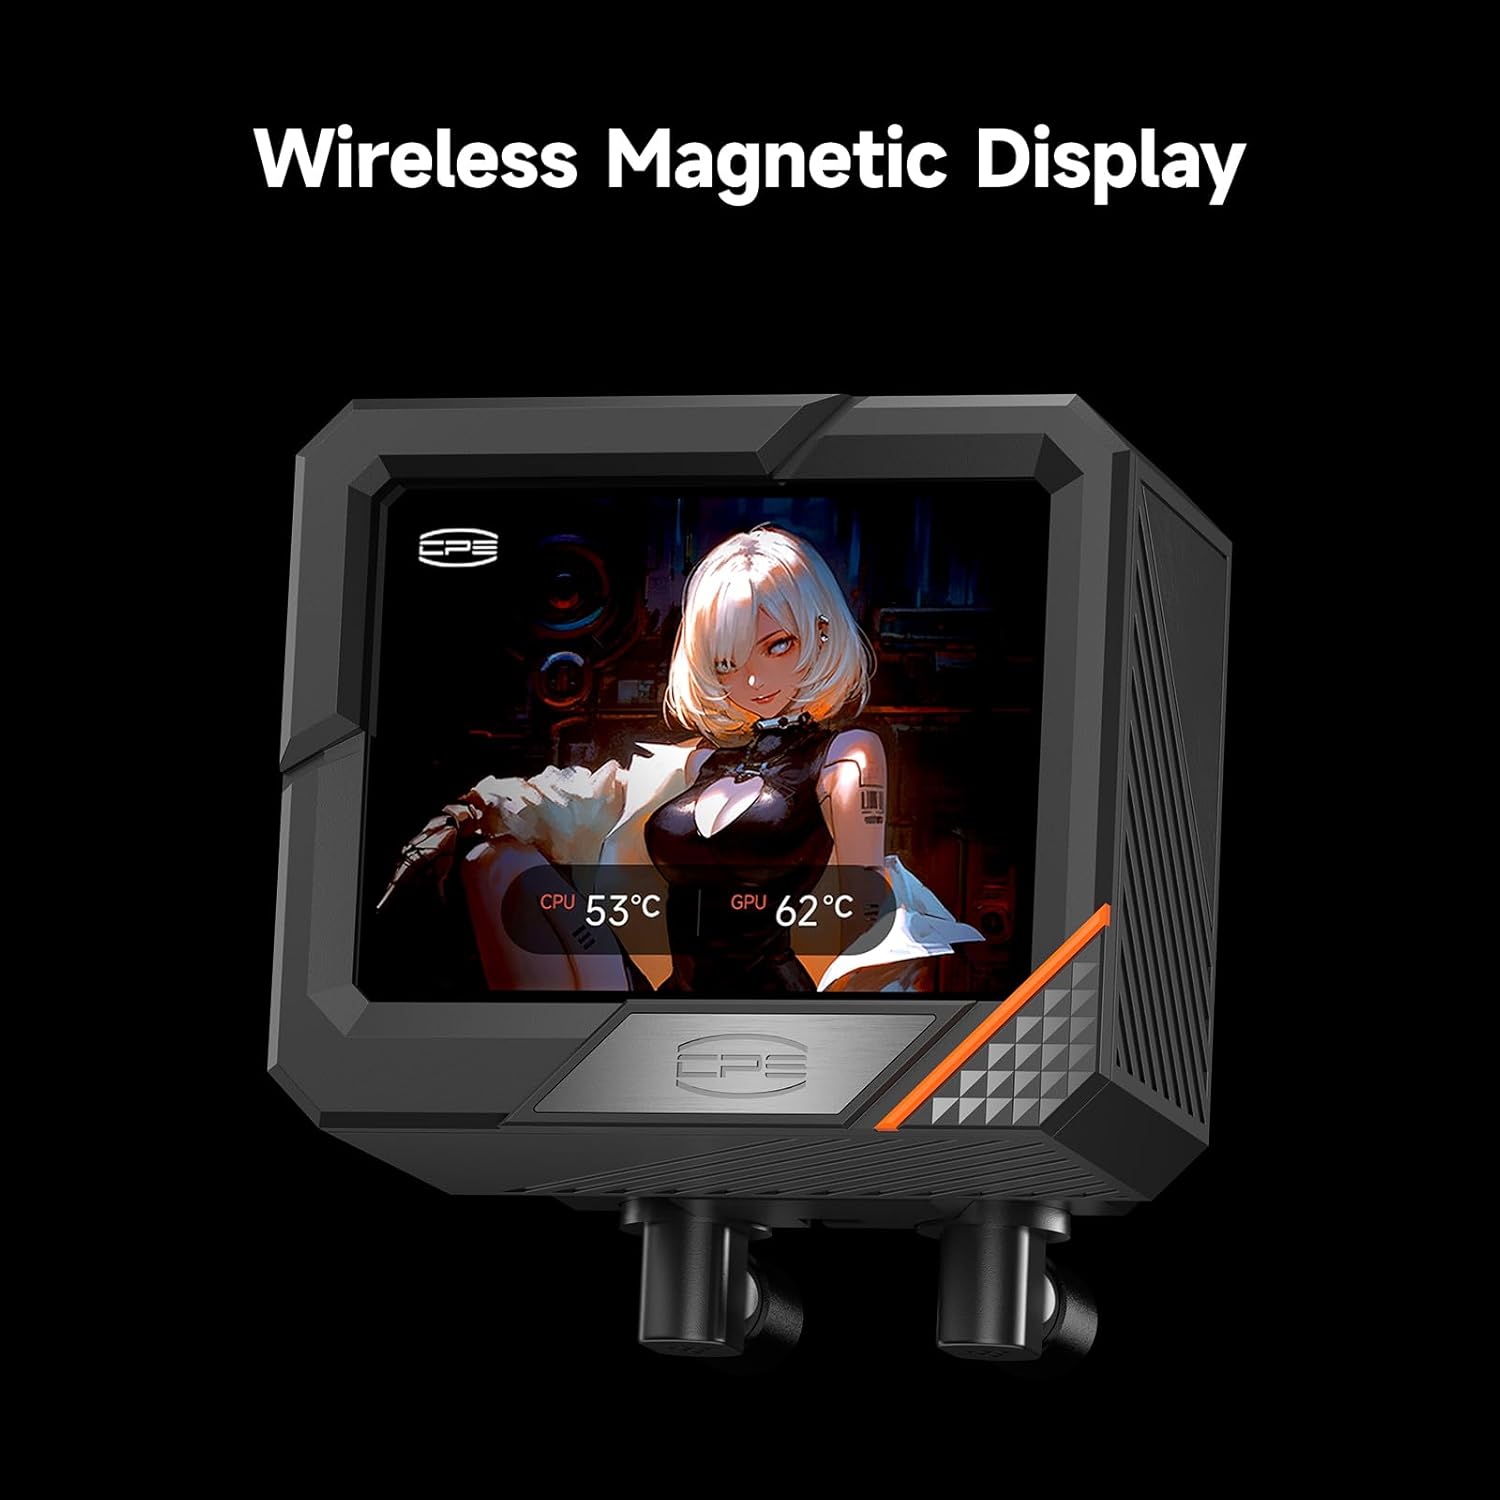
Figure 6: Wireless Magnetic Display for easy adjustment
5. Maintenance
The PCCOOLER GT360 AIO CPU Cooler is designed for low maintenance, thanks to its advanced ceramic pump and durable dual ball bearing fans. Regular checks can help ensure optimal performance and longevity.
- Dust Cleaning: Periodically clean the radiator fins and fan blades to prevent dust buildup, which can impede airflow and reduce cooling efficiency. Use compressed air or a soft brush.
- Tubing Inspection: Occasionally inspect the tubing for any signs of kinks, leaks, or damage. While rare, addressing these issues promptly can prevent system damage.
- Thermal Paste: The pre-applied thermal paste is designed for long-term use. Reapplication is generally not necessary unless the cooler is removed from the CPU.

Figure 7: Advanced Ceramic Bearing Pump Structure

Figure 8: High-speed Dual Ball Bearing Fan
6. Troubleshooting
If you encounter issues with your PCCOOLER GT360, refer to the following common problems and solutions:
- No Power/Fans Not Spinning:
- Check all power connections (pump, fans, ARGB) to ensure they are securely seated on the motherboard.
- Verify that the correct headers are used (e.g., AIO_PUMP for the pump).
- High CPU Temperatures:
- Ensure the pump is properly seated and making full contact with the CPU.
- Check if thermal paste was applied correctly and evenly.
- Verify fan orientation for proper airflow (intake or exhaust).
- Clean any dust buildup on the radiator fins.
- LCD Display Not Working/Customization Issues:
- Ensure the USB 2.0 header cable is correctly connected to the motherboard.
- Verify that the CPS-Display software is installed and running.
- Check for software updates or driver issues.
- ARGB Lighting Not Synchronized:
- Confirm the ARGB cable is connected to a 5V 3-pin ARGB header (not 12V 4-pin RGB).
- Use your motherboard's ARGB software or the CPS-Display software to control lighting effects.
7. Specifications
| Feature | Detail |
|---|---|
| Product Dimensions | 15.51"L x 3.35"W x 1.06"H |
| Brand | PCCOOLER |
| Power Connector Type | 3-Pin |
| Voltage | 12 Volts |
| Wattage | 310W |
| Cooling Method | Water |
| Compatible Devices | CPU (AMD AM4/AM5, Intel LGA115X/1200/1700/1851) |
| Noise Level | 15 Decibels (min) |
| Material | Copper (cold plate) |
| Maximum Rotational Speed | 3000 RPM (pump) |
| Air Flow Capacity | 99 Cubic Feet Per Minute (fans) |
| Model Number | GT360 ARGB Display CPU AIO Liquid Cooler |
8. Warranty
PCCOOLER offers a 2-year warranty on all products, ensuring long-lasting reliability and performance. For warranty claims or service, please contact PCCOOLER customer support through their official website or your retailer.
9. Support
For further assistance, product information, or to download the latest software and drivers, please visit the official PCCOOLER website:
You can also visit the PCCOOLER store on Amazon for product updates and related accessories: PCCOOLER Amazon Store
Ask a question about this manual
Ask about setup, troubleshooting, compatibility, parts, safety, or missing instructions. Manuals+ will review the question and use this page’s manual context to help answer it.