VEVOR SDC-30A
VEVOR 12V 30A DC to DC Battery Charger User Manual
Model: SDC-30A
Brand: VEVOR
1. Introduction
This manual provides detailed instructions for the safe and efficient operation of your VEVOR 12V 30A DC to DC Battery Charger. This charger is designed to provide a reliable charging solution for various 12V battery types, including lead-acid (AGM, Gel, Flooded) and lithium (LiFePO4) batteries, making it ideal for RVs, commercial vehicles, boats, and yachts.
Key Features:
- Versatile Battery Compatibility: Supports lead-acid (AGM, Gel, Flooded) and lithium batteries.
- Smart Multi-Stage Charging: Optimizes charging for battery health and longevity (2-stage for LiFePO4, 3-stage for lead-acid).
- Multiple Protections: Includes over/under voltage, high temperature, reverse polarity, and short circuit protection.
- Isolated Input/Output: Prevents interference with your vehicle's electrical system.
- Lithium Battery Activation: Capable of restoring deeply discharged lithium batteries.
- Compact Design: Easy to install in limited spaces.
2. Safety Precautions
WARNING: Failure to follow these safety instructions may result in electric shock, fire, or serious injury.
- Always wear appropriate personal protective equipment, including eye protection, when working with batteries.
- Ensure the charger is installed in a well-ventilated area, away from flammable materials.
- Do not expose the charger to rain, moisture, or excessive heat.
- Verify that all connections are secure and correctly polarized before applying power.
- Use appropriate gauge wiring for the current draw to prevent overheating.
- Do not attempt to disassemble or repair the charger. Refer all servicing to qualified personnel.
- Ensure the vehicle's engine is off and the ignition is disabled before installation or maintenance.
- Install appropriate fuses on both input and output lines as recommended.
3. Product Overview and Components
Familiarize yourself with the VEVOR DC to DC Battery Charger and its key components.

Figure 3.1: Front view of the VEVOR 12V 30A DC to DC Battery Charger, showcasing its compact design and included fuses.

Figure 3.2: Detailed view of the charger's input and output terminals, including the DIP switches for battery type selection, temperature sensor port, and D+ ignition terminal.
Component Identification:
- Positive DC Input: Connects to the starter battery positive terminal.
- Negative DC Input: Connects to the starter battery negative terminal (ground).
- Positive DC Output: Connects to the house/standby battery positive terminal.
- Negative DC Output: Connects to the house/standby battery negative terminal (ground).
- DIP Switches: Used to select the battery type and charging parameters.
- Temperature Sensor Port: For connecting an optional temperature sensor to optimize charging.
- D+ Ignition Terminal: Activates the charger when the vehicle's ignition is on.
- LC Terminal (Current Limiting): Used for current limiting functionality.
- Cooling Fans: Automatically activate to dissipate heat.
4. Setup and Installation
Proper installation is crucial for the safe and effective operation of the charger.
4.1 Mounting the Charger
Select a dry, well-ventilated location close to the house battery, ensuring sufficient space for airflow around the unit. The charger features pre-drilled mounting holes for easy installation.

Figure 4.1: Example installation diagram in a recreational vehicle, showing connections between starter battery, alternator, DC-DC charger, and house battery.
4.2 Wiring Connections
Refer to Figure 4.1 and 3.2 for wiring diagrams. Ensure all connections are tight and secure.
- Input Wiring: Connect the positive input terminal to the starter battery's positive terminal and the negative input terminal to the starter battery's negative terminal (or chassis ground). Install appropriate fuses (e.g., 30A for this model) on both positive input and output lines, as close to the batteries as possible.
- Output Wiring: Connect the positive output terminal to the house/standby battery's positive terminal and the negative output terminal to the house/standby battery's negative terminal (or chassis ground).
- D+ Ignition Wire: Connect the D+ terminal to a switched ignition source (e.g., alternator D+ terminal or an ignition-controlled relay) to ensure the charger only operates when the vehicle is running.
- Temperature Sensor (Optional): If using an external temperature sensor, connect it to the designated port and attach the sensor to the house battery for accurate temperature compensation during charging.
4.3 DIP Switch Settings
The DIP switches on the charger allow you to select the appropriate charging profile for your battery type. Refer to the table below for common settings. Always consult your battery manufacturer's specifications for optimal charging voltages.

Figure 4.2: The charger is compatible with Lithium (LI), Sealed Lead-Acid (SLA), AGM, GEL, and Flooded (FLD) battery types.
| Battery Type | DIP Switch 1 | DIP Switch 2 | Charging Voltage Range |
|---|---|---|---|
| Lithium (LiFePO4) | ON | OFF | 12.6V - 14.6V |
| Lead-Acid (AGM/Gel/Flooded) | OFF | ON | 13.2V - 14.7V |
Note: Specific DIP switch positions for each battery type may vary. Always refer to the detailed diagram provided with your product for precise settings.
5. Operating Instructions
Once properly installed and configured, the VEVOR DC to DC Battery Charger operates automatically.
5.1 Automatic Operation
The charger will begin charging the house battery when the vehicle's engine is running and the D+ ignition signal is received. It will automatically stop charging when the engine is turned off.
5.2 Multi-Stage Charging Process
The charger employs an intelligent multi-stage charging algorithm to ensure optimal battery health and full charge.
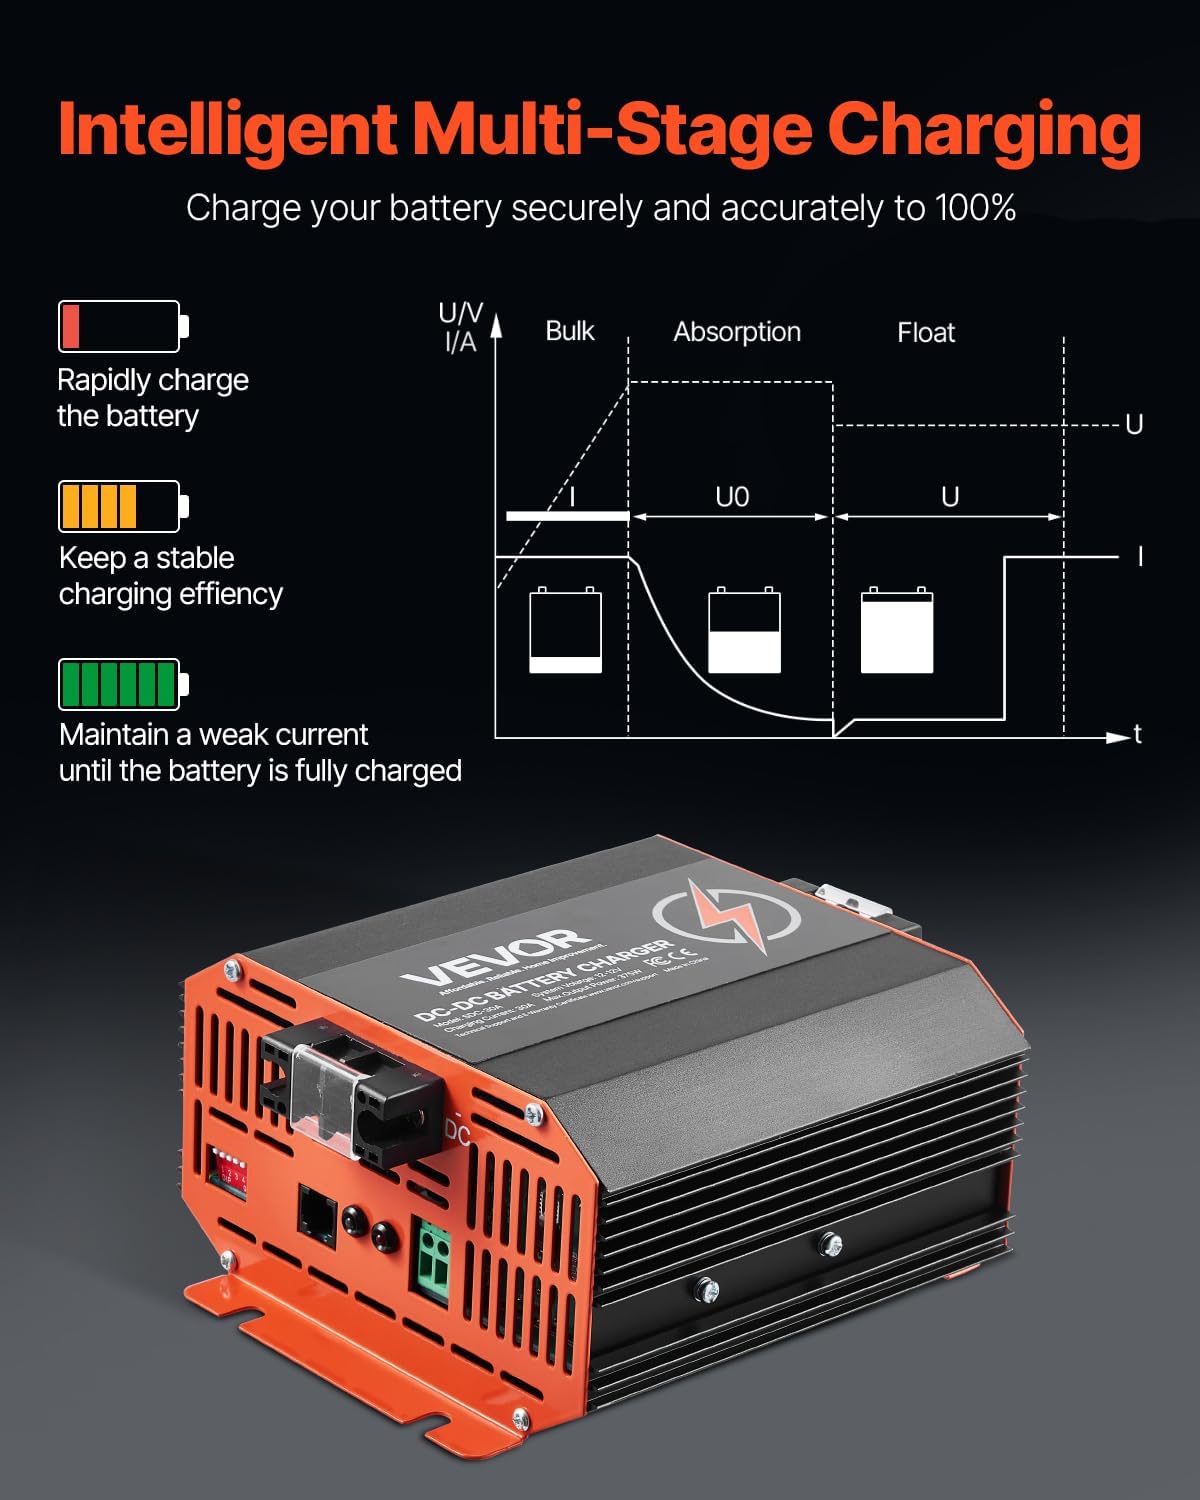
Figure 5.1: The multi-stage charging process ensures rapid charging, stable efficiency, and full charge maintenance.
- Bulk Stage: Rapidly charges the battery with maximum current until it reaches approximately 80% of its capacity.
- Absorption Stage: Charges the battery at a constant voltage, gradually reducing current, to bring the battery to 100% charge.
- Float Stage (for Lead-Acid): Maintains a weak current to keep the battery fully charged without overcharging.
- Lithium Activation: If a lithium battery is deeply discharged, the charger can initiate a low-current charge to bring it back to a recoverable voltage before entering the bulk stage.
6. Maintenance
The VEVOR DC to DC Battery Charger requires minimal maintenance to ensure long-term performance.
- Regular Inspection: Periodically check all wiring connections for tightness and signs of corrosion. Clean terminals if necessary.
- Cleanliness: Keep the charger clean and free from dust and debris. Use a dry cloth to wipe down the exterior. Do not use harsh chemicals or solvents.
- Ventilation: Ensure the cooling fans and vents are not obstructed to allow for proper heat dissipation. The built-in smart cooling fans will automatically turn on and off based on temperature changes.
- Fuse Check: If the charger is not operating, check the inline fuses on both the input and output lines. Replace with fuses of the correct rating if blown.
7. Troubleshooting
This section addresses common issues you might encounter with your VEVOR DC to DC Battery Charger.
| Problem | Possible Cause | Solution |
|---|---|---|
| Charger not operating / No output | No ignition signal (D+) Blown fuse(s) Loose wiring connections Input voltage too low/high | Ensure engine is running and D+ wire is connected to a live ignition source. Check and replace any blown fuses. Verify all input and output connections are secure. Check starter battery voltage; ensure it is within the operating range (8V-16V). |
| Low charging current (e.g., 13A instead of 30A) | Battery already near full charge Incorrect DIP switch setting High resistance in wiring Internal fault | Charging current naturally decreases as battery approaches full charge. Verify DIP switches are set correctly for your battery type. Inspect wiring for proper gauge and secure connections. Ensure terminals are clean. If issue persists with a discharged battery and correct settings, contact support. |
| Charger fans are noisy | Normal operation under load Dust/debris in fans | Fans will operate to cool the unit, especially during high current charging. This is normal. Clean fan vents to ensure unobstructed airflow. |
| Unit gets excessively hot | Poor ventilation Overload condition | Ensure adequate airflow around the charger. Do not block vents. Verify the load on the charger is within its specified limits. |
| Small terminal connections | Design limitation | Ensure proper crimping and use of appropriate wire lugs to maximize contact area. Consider using high-quality, flexible wire. |
If you encounter a problem not listed here or if the suggested solutions do not resolve the issue, please contact VEVOR customer support.
8. Specifications
Detailed technical specifications for the VEVOR 12V 30A DC to DC Battery Charger.

Figure 8.1: Dimensions and key specifications of the VEVOR SDC-30A charger.
| Specification | Value |
|---|---|
| Model Number | SDC-30A |
| Input Voltage | 12V |
| Input Battery Voltage Range | DC 8V - 16V |
| Charging Current | 30A |
| Maximum Output Power | 375W |
| Compatible Battery Types | Lead-acid (AGM, Gel, Flooded) & Lithium (LiFePO4) |
| Casing Material | Aluminum Alloy |
| Operational Temperature | 4°F to 122°F / -20°C to 50°C |
| Net Weight | 3.28 pounds (1.2 kg) |
| Product Dimensions (L x W x H) | 6.5 x 5.7 x 3.3 inches (165 x 145 x 83 mm) |
| Charging Voltage Range (Lead-acid) | 13.2V - 14.7V |
| Charging Voltage Range (Lithium) | 12.6V - 14.6V |
| Certifications | FCC, UL |
9. Warranty and Support
VEVOR products are designed for durability and performance. For information regarding product warranty, returns, or technical support, please refer to the official VEVOR website or contact their customer service directly.
Extended protection plans may be available for purchase to provide additional coverage beyond the standard warranty period. Please check with your retailer for details on available protection plans.
Ask a question about this manual
Ask about setup, troubleshooting, compatibility, parts, safety, or missing instructions. Manuals+ will review the question and use this page’s manual context to help answer it.