Introduction
This manual provides detailed instructions for the setup, operation, and maintenance of your Dumborc DDF-350 10-channel 2.4G FHSS RC Radio Transmitter and Receiver system. Designed for RC cars, boats, and tanks, this system offers advanced features including a digital screen with telemetry, gyro function, and customizable settings. Please read this manual thoroughly before using the product to ensure proper function and safety.
What's in the Box
Upon opening the package, verify that all components are present:
- Dumborc DDF-350 RC Transmitter
- P10F(G) RC Receiver
- Sling (Neck Strap)
- Battery (for transmitter, color may vary)

Image: The Dumborc DDF-350 transmitter shown alongside the P10F(G) receiver, highlighting their compact dimensions and overall design.
Key Features
- 10-Channel 2.4G FHSS System: Provides reliable and interference-free communication with a communication range of 350-400 meters.
- Integrated Gyro Function: Enhances stability and control for RC vehicles.
- Digital LCD Screen: High-resolution display for real-time telemetry data, settings, and control parameters.
- Fast Response Time: 10ms response time for precise control inputs.
- Wide Voltage Range: Supports DC 4V-10V, compatible with Ni-MH and lithium batteries.
- Customizable Settings: Supports tank mixing control, program custom mixing, independent channel forward/reverse, and travel adjustments. Direction and throttle curves are adjustable.
- Firmware Upgradeable: USB firmware upgrade capability.
- Ergonomic Design: Comfortable grip for extended use, with a carbon fiber handwheel featuring a 30-degree bevel angle.
- Telemetry Support: Capable of monitoring receiver battery voltage (with optional cable).
Setup
1. Battery Installation
The DDF-350 transmitter can be powered by either AA batteries or the included 2-cell LiPo battery pack.
- AA Batteries: Insert the required number of AA batteries into the battery compartment, ensuring correct polarity.
- LiPo Battery Pack: To use the included LiPo battery, carefully remove the AA battery tray. This tray is secured by small tabs around its edges; use a small flat-bladed screwdriver to gently release them. Once the tray is removed, disconnect the connector from the bottom of the transmitter (if present) and then connect the LiPo battery pack, paying close attention to the polarity markings inside the compartment.
Note: The transmitter does not have built-in charging circuitry for the LiPo battery. An external LiPo charger is required to charge the battery pack.
2. Binding the Receiver
To establish communication between the transmitter and receiver, a binding process is required.
- Ensure both the transmitter and receiver are powered off.
- Connect a bind plug (not included, typically comes with the receiver or ESC) to the BIND/VCC port on the P10F(G) receiver.
- Apply power to the receiver (e.g., via an ESC or separate battery). The receiver's LED should flash rapidly, indicating it's in binding mode.
- While holding down the BIND button on the DDF-350 transmitter (refer to the transmitter diagram for exact location), power on the transmitter.
- Release the BIND button on the transmitter once its screen indicates binding is in progress or successful.
- The receiver's LED should turn solid, indicating a successful bind.
- Power off both the receiver and transmitter. Remove the bind plug from the receiver.
- Power on the transmitter first, then the receiver. Verify that the controls respond correctly.
3. Initial Configuration
After binding, it is recommended to perform initial configuration steps:
- Channel Assignment: Ensure your servos and ESC are connected to the correct channels on the receiver.
- Servo Reversing: Adjust servo direction as needed through the transmitter's menu to ensure correct steering and throttle response.
- End Point Adjustment (EPA)/Travel: Set the maximum travel for each channel to prevent over-stressing servos or mechanical components.
- Trim Adjustments: Fine-tune neutral positions for steering and throttle.
Operating Instructions
1. Basic Controls
The DDF-350 transmitter features standard pistol-grip controls:
- Steering Wheel: Controls the steering of your vehicle (Channel 1).
- Throttle Trigger: Controls forward/reverse and braking (Channel 2). Pull for forward, push for reverse/brake.
- Auxiliary Channels (CH3-CH10): These channels can be assigned to various functions such as lights, winches, gear shifts, or other accessories, depending on your vehicle's setup.

Image: Side view of the DDF-350 transmitter, showing the ergonomic grip and trigger mechanism.
2. Digital Screen and Menu Navigation
The DDF-350 features a TFT-LCD (IPS) screen for accessing settings and monitoring telemetry. Navigation is typically done using the dial and buttons located near the screen.

Image: Close-up of the DDF-350 transmitter's digital screen, displaying battery voltage, channel states, and other telemetry data.
- Main Display: Shows real-time information such as transmitter battery voltage, receiver voltage (if telemetry cable is used), RSSI (Received Signal Strength Indicator), channel output percentages, and a timer.
- Menu Access: Use the navigation dial and buttons to enter the main menu.
- Parameter Adjustment: Rotate the dial to scroll through options and press to select. Adjust parameters like servo reverse, EPA, sub-trim, dual rates, and exponential.
- Model Selection: The transmitter supports 10 groups of model selection, allowing you to save settings for different vehicles.

Image: The DDF-350 transmitter in an operational context, demonstrating its color screen display and real-time telemetry data while controlling an RC car.
3. Advanced Functions
- Tank Mixing Control: Configure mixing for tank-style steering (e.g., controlling two motors independently for track vehicles).
- Program Custom Mixing: Create custom mixes between channels for complex control setups.
- PPM Output and Input: Supports PPM for compatibility with various flight controllers or simulators.
- Head Tracking Function: For FPV applications, allows head movements to control camera pan/tilt.
- Wireless Training: Enables connection to another compatible transmitter for training purposes.
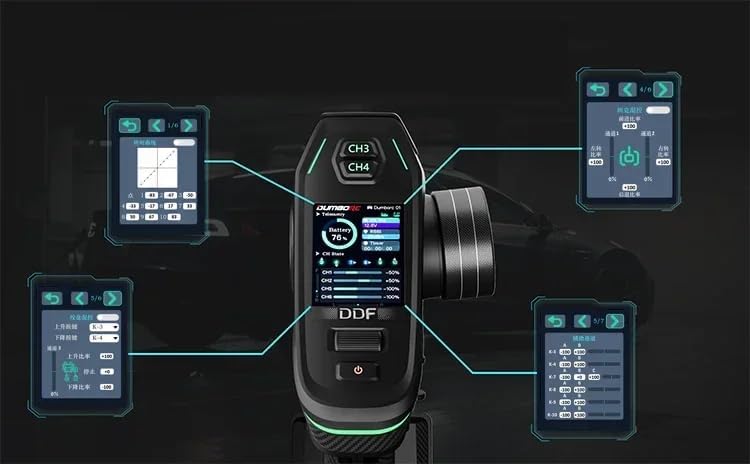
Image: A visual representation of the DDF-350 transmitter's various menu screens, illustrating the depth of customizable settings available to the user.
Firmware Upgrade
The DDF-350 transmitter supports firmware upgrades via USB. This allows for improvements, bug fixes, and new features to be added.
- Connect the remote control to a computer using a USB cable. It should be recognized as a USB flash drive.
- Download the latest firmware file from the manufacturer's official website.
- Drag and drop the firmware file into the root directory of the USB flash drive (the transmitter's internal storage).
- Safely eject the USB device from your computer.
- Disconnect the USB cable. The transmitter will automatically initiate the upgrade process. Do not power off the transmitter during this time.
- Once the upgrade is complete, the transmitter will restart.
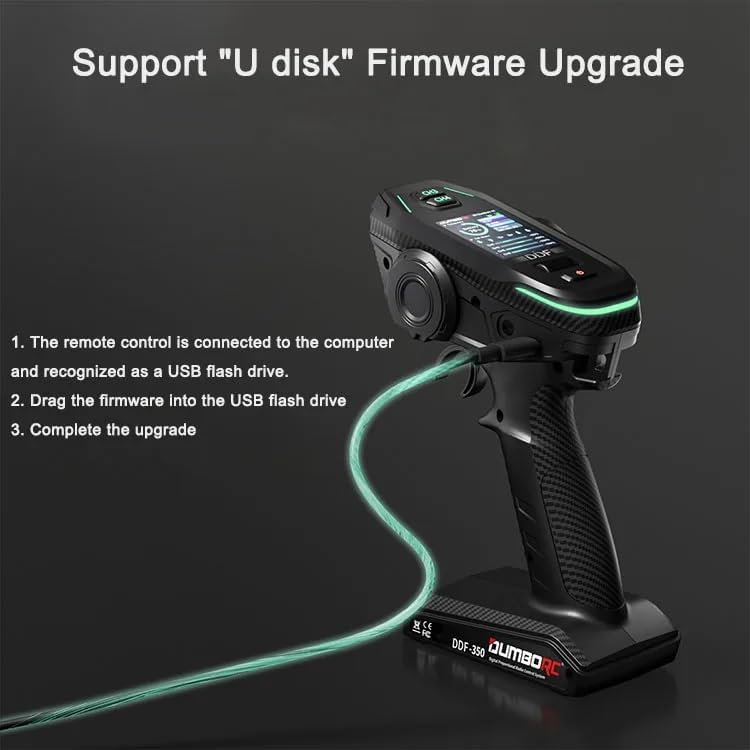
Image: Illustration demonstrating the process of upgrading the DDF-350 transmitter's firmware by connecting it to a computer via USB and transferring the firmware file.
Maintenance
- Cleaning: Use a soft, dry cloth to clean the transmitter and receiver. Avoid using solvents or harsh chemicals.
- Storage: Store the system in a cool, dry place away from direct sunlight and extreme temperatures. Remove batteries if storing for extended periods.
- Battery Care: If using a LiPo battery, follow proper charging and storage guidelines to prolong its lifespan and ensure safety.
- Inspection: Periodically check all connections and cables for wear or damage.
Troubleshooting
- No Power:
- Check battery installation and charge level.
- Ensure the power button is pressed correctly.
- No Control/Loss of Signal:
- Re-bind the transmitter and receiver.
- Check the distance between the transmitter and receiver; ensure it's within the operational range (350-400m).
- Verify all connections between the receiver, ESC, and servos.
- Check for potential interference sources in the operating environment.
- Incorrect Servo Movement:
- Check servo reversing settings in the transmitter menu.
- Verify channel assignments.
- Inspect servos for damage or mechanical binding.
- Screen Not Responding:
- Restart the transmitter.
- If issues persist, consider a firmware re-flash.
For further assistance, refer to the manufacturer's support resources.
Specifications
| Feature | Specification |
|---|---|
| Model | DDF-350 |
| Channels | 10CH |
| RF Range | 2.4GHz |
| Mode Type | RC Car, Boat, Tank |
| RF Power | <20dbm |
| Reaction Speed (PWM) | 10ms |
| Receive Sensitivity | -110dB |
| Remote Control Distance | Approx. 350-400m |
| Signal Return Distance | Approx. 40m |
| Modulation | GFSK |
| Spread Spectrum | FHSS |
| Voltage | DC 4V-10V |
| Display | TFT-LCD (IPS) screen |
| Input Battery | Included (color may vary) |
| Net Weight | 303g |
| Size | 205x120x65mm |
| Receiver Model | P10F(G) |
| Receiver Channels | 10CH |
| Receiver Voltage | DC 4.8-10V |
| Product Dimensions | 4.7 x 2.6 x 8 inches |
| Item Weight | 6.1 ounces |
| Manufacturer | DUMBORC |
Warranty and Support
For warranty information, technical support, or service inquiries, please contact the manufacturer, DUMBORC, or your retailer directly. Keep your purchase receipt as proof of purchase.