1. Introduction
Congratulations on your purchase of the My Mini Premium 7-Egg Cooker! This versatile appliance is designed to simplify your meal preparation, allowing you to cook perfect eggs to your desired doneness with ease. Whether you prefer soft, medium, or hard-boiled eggs, or wish to prepare poached eggs, scrambled eggs, omelets, steamed vegetables, or dumplings, this cooker delivers consistent results every time. Its one-touch operation and detachable parts make cooking and cleaning effortless.
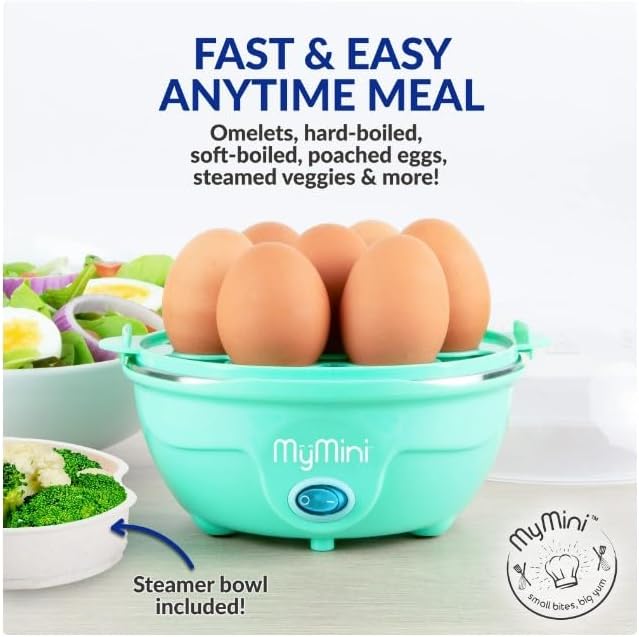
Image: The My Mini Premium 7-Egg Cooker showcasing its versatility with various egg dishes and steamed vegetables.
2. Important Safety Instructions
- Read all instructions before using the appliance.
- Do not touch hot surfaces. Use handles or knobs.
- To protect against electrical shock, do not immerse cord, plugs, or the main unit (heating plate base) in water or other liquid.
- Close supervision is necessary when any appliance is used by or near children.
- Unplug from outlet when not in use and before cleaning. Allow to cool before putting on or taking off parts, and before cleaning the appliance.
- Do not operate any appliance with a damaged cord or plug, or after the appliance malfunctions or has been damaged in any manner.
- The use of accessory attachments not recommended by the appliance manufacturer may cause injuries.
- Do not use outdoors.
- Do not let cord hang over edge of table or counter, or touch hot surfaces.
- Do not place on or near a hot gas or electric burner, or in a heated oven.
- Extreme caution must be used when moving an appliance containing hot oil or other hot liquids.
- Always attach plug to appliance first, then plug cord into the wall outlet. To disconnect, turn any control to “off”, then remove plug from wall outlet.
- Do not use appliance for other than intended use.
- Keep hands safe with the cool-touch handles when opening and closing the lid.
3. Package Contents
- My Mini Premium 7-Egg Cooker Base Unit
- Lid with steam holes
- Measuring cup with egg piercing tip
- 7-Egg tray
- Egg poacher/scrambled egg bowl
- Egg white separator
4. Product Components
Familiarize yourself with the different parts of your My Mini Premium 7-Egg Cooker:
- Lid with Steam Holes: Transparent lid to cover eggs during cooking, allowing steam to escape.
- Egg Bowl: Used for preparing omelets, poached eggs, or steaming small vegetables/dumplings.
- Egg Tray: Holds up to 7 eggs for boiling or supports the egg bowl for other preparations.
- Heating Plate: The base unit where water is added and heated to create steam.
- Power Switch/Indicator Light: Activates the cooking process and indicates operation status.
- Measuring Cup with Piercing Pin: Used to measure the correct amount of water and to pierce eggs.
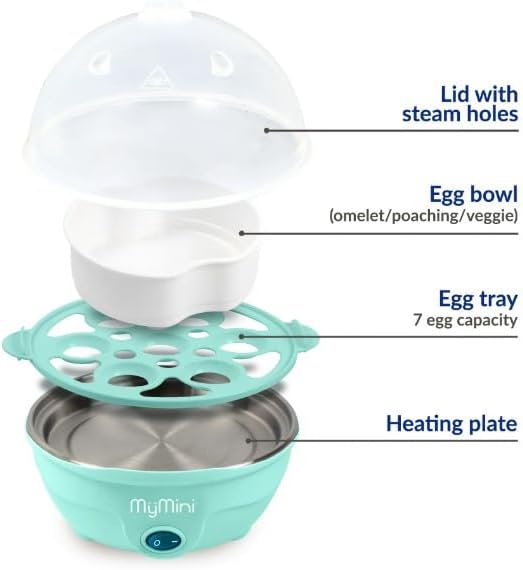
Image: Exploded view of the My Mini Premium 7-Egg Cooker showing the lid, egg bowl, egg tray, and heating plate.
5. Setup
Before first use, follow these steps:
- Unpack all components from the packaging.
- Wash the lid, egg tray, egg bowl, and measuring cup in warm, soapy water. Rinse thoroughly and dry. These parts are top-rack dishwasher safe.
- Wipe the heating plate with a damp cloth. Ensure it is completely dry before plugging in.
6. Operating Instructions
6.1. Hard-Boiled Eggs
- Fill the heating plate with water using the provided measuring cup. Refer to the markings on the cup for your desired doneness (Soft, Medium, Hard).
- Place the 7-egg tray onto the heating plate.
- Carefully pierce the large end of each egg using the piercing pin located at the bottom of the measuring cup. This helps prevent eggs from cracking during cooking.
- Place the pierced eggs onto the egg tray.
- Cover the unit with the lid.
- Plug in the unit and press the power button. The indicator light will illuminate.
- The unit will automatically shut off and an audible alarm will sound when the water has evaporated and the eggs are cooked to your selected doneness.
- Immediately transfer cooked eggs to a bowl of cold water or an ice bath to stop the cooking process and aid in easier peeling.
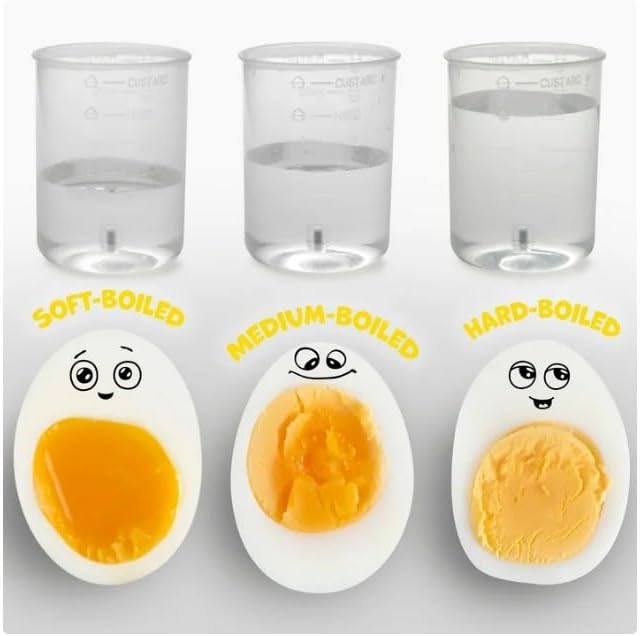
Image: Measuring cup indicating water levels for soft, medium, and hard-boiled eggs.
6.2. Poached Eggs / Omelets
- Fill the heating plate with water according to the "Omelet/Poach" line on the measuring cup.
- Place the egg tray onto the heating plate.
- For poached eggs, crack eggs directly into the poaching inserts of the egg bowl.
- For omelets, crack eggs into the omelet bowl, add desired ingredients, and whisk gently.
- Place the egg bowl onto the egg tray.
- Cover the unit with the lid.
- Plug in the unit and press the power button. The indicator light will illuminate.
- The unit will automatically shut off and an audible alarm will sound when cooking is complete.
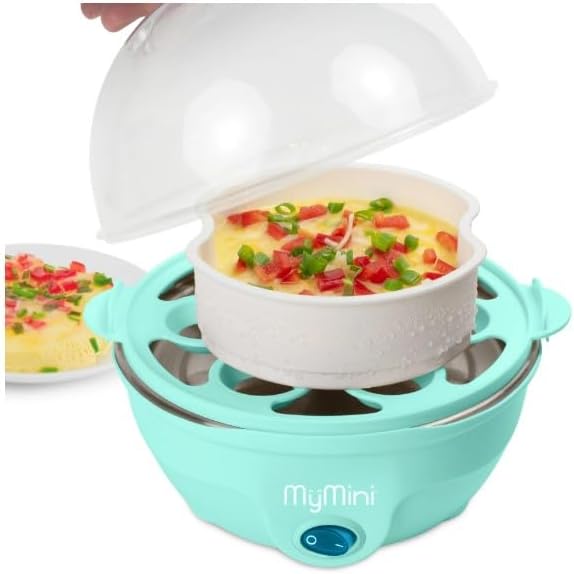
Image: The My Mini Premium 7-Egg Cooker with the omelet bowl inserted, ready for cooking.
6.3. Steaming Vegetables / Dumplings
- Fill the heating plate with water (refer to the cooking guide or experiment for specific amounts based on food type).
- Place the egg tray onto the heating plate.
- Place vegetables or dumplings into the egg bowl.
- Place the egg bowl onto the egg tray.
- Cover the unit with the lid.
- Plug in the unit and press the power button. The indicator light will illuminate.
- The unit will automatically shut off and an audible alarm will sound when cooking is complete.

Image: The My Mini Premium 7-Egg Cooker steaming dumplings, demonstrating its steaming capability.
6.4. Official Product Videos
MyMini Egg Maker, Fast Cooking, Zero Hassle
Video: A seller demonstrates the MyMini Egg Maker, highlighting its fast cooking and ease of use for various egg preparations.
If you can not boil an egg to save your life
Video: A seller provides a demonstration of the egg cooker, focusing on its simplicity for achieving perfectly boiled eggs.
Very useful! My go to in the kitchen
Video: A seller demonstrates the egg cooker's utility in a kitchen setting, showcasing its ease of use for daily cooking.
7. Cooking Guide
The cooking times listed below are guidelines. The thermal sensor in the Egg Cooker will automatically shut off when the water has completely evaporated and the eggs are done. Adjust water levels slightly for desired firmness. Higher altitudes may require additional water.
| Doneness | Number of Eggs | Cook Time (approx.) |
|---|---|---|
| Soft-Boiled | 1-3 | 7 minutes |
| Soft-Boiled | 4-7 | 11 minutes |
| Medium-Boiled | 1-3 | 9 minutes |
| Medium-Boiled | 4-7 | 13 minutes |
| Hard-Boiled | 1-3 | 12 minutes |
| Hard-Boiled | 4-7 | 17 minutes |
8. Cleaning and Maintenance
- Always unplug the appliance and allow it to cool completely before cleaning.
- Wash the lid, egg tray, egg bowl, and measuring cup in warm, soapy water. Rinse thoroughly and dry. These parts are top-rack dishwasher safe.
- Wipe the heating plate with a damp cloth. For mineral residue, use a small amount of white vinegar on a damp cloth, then wipe with clean water and dry.
- Do NOT immerse the main unit (heating plate base) in water or any other liquid.
- Store the cooker in a dry place.
9. Troubleshooting
- Eggs cracking during cooking: Ensure eggs are pierced before cooking. Using room temperature eggs can also help.
- Eggs not cooked to desired doneness: Adjust the water level in the measuring cup. More water generally results in harder eggs, less water for softer eggs.
- Mineral residue on heating plate: This is normal due to water minerals. Clean with white vinegar as described in the Cleaning and Maintenance section.
- Unit does not turn on: Ensure the appliance is properly plugged into a working electrical outlet.
10. Specifications
- Model: MEC-7TL
- Color: Teal
- Material: Plastic, Stainless Steel
- Product Dimensions: 6.34"L x 6.34"W x 7.17"H
- Item Weight: 1 pound
- Egg Capacity: Up to 7 eggs
11. Warranty and Support
For warranty information or product support, please contact Generic customer service. Refer to your product packaging or the manufacturer's website for the most up-to-date contact details and warranty terms.