1. Product Overview
This instruction manual provides important information for the installation, operation, and maintenance of your new dryer motor. This motor is designed to replace faulty or worn-out motors in compatible Whirlpool dryer models, restoring proper drum rotation and drying function.
A functional dryer motor is essential for the efficient operation of your clothes dryer, ensuring the drum spins correctly to dry clothes effectively and quietly.
2. Safety Information
WARNING: Before attempting any installation or repair, always disconnect the dryer from its power source to prevent electric shock or injury. Appliance repair should only be performed by qualified individuals.
- Always wear appropriate personal protective equipment (PPE), such as gloves and safety glasses.
- Ensure the work area is well-lit and clear of obstructions.
- Refer to your specific dryer model's service manual for detailed disassembly and reassembly instructions.
- Keep children and pets away from the work area.
- Do not operate the dryer with the motor exposed or improperly installed.
3. Compatibility
This dryer motor is compatible with a wide range of Whirlpool dryer models. Please verify your dryer's model number against the list below to ensure proper fitment.
Compatible Whirlpool Models include:
- LG5701XKW0
- LG5701XMW0
- LG5701XMW1
- LG5701XMW2
- LG5701XPW0
- LG5701XSW0
- LG5706XPW0
- LG5721XPW0
- LG5721XSW0
- LG5721XSW1
- LG5726XPW0
- LG5751XFW0
- LG5751XKW0
- LG5751XKW1
- LG5751XMW0
- LG5761XSW0
- LG5761XSW1
- LG5771XWN0
- LG5771XWW0
- LG5781XKW0
- LG5781XKW2
- LG5781XMW1
- LG5781XMW2
- LG5791XMW0
- LG5801XSW2
- LG5801XSW3
- LG5806XPW0
- LG5811XPW0
- LG5901XSW0
- LG5921XKW0
- LG5921XKW1
- LG5921XMW0
- LG5921XMW1
- LG5921XMW2
- LG5951XSW0
- LG6056XSW0
- LG6056XSW1
- LG6091XSW0
- LG6091XSW1
- LG6099XSW0
- LG6099XSW1
- LG6099XTF0
- LG6099XTG0
- LG6099XTN0
- LG6099XTW0
- LG6099XTW1
- LG6101XSW0
- LG6151XSW0
- LG6151XSW1
- LG6401XKW0
- LG6601XKW0
- LG6601XPW0
- LG6601XSW0
- LG6606XPW0
- LG6606XPW1
- LG6801XPW0
- LG6801XSW0
- LG6806XPW0
- LG6811XPW0
- LG6811XSW0
- LG6881XSW0
- LG6881XSW1
- LG6881XTF0
- LG6881XTG0
- LG6881XTM0
- LG6881XTN0
- LG6881XTW0
- LG6881XTW1
- LG6901XKW0
- LG7001XMW0
- LG7001XMW1
- LG7001XMW2
- LG7001XPW0
- LG7001XSW0
- LG7006XPW0
- LG7011XPW0
- LG7011XSW0
- LG7801XPW0
- LG7801XSW0
- LG7801XSW1
- LG7801XSW2
- LG7806XPW0
- LG7811XPW0
- LG8601XWN0
- LG8601XWW0
- LG8651XWN0
- LG8651XWW0
- LG8861XWQ0
- LG9101XTN0
- LG9101XTW0
- LG9201XWN0
- LG9201XWN1
- LG9201XWW0
- LG9201XWW1
- LG9381XTN0
- LG9381XTW0
- LG9481XWN0
- LG9481XWW0
- LG9481XWW1
- LG9501XTW0
- LG9501XTW1
- LG9521XTW0
- LG9521XTW1
- LG9681XWN0
- LG9681XWW0
- LG9681XWW1
- LG9801XKW1
- LG9801XMW0
- LG9801XMW1
- LG9801XMW2
- LG9801XPW0
- LG9801XPW1
- LG9801XSW0
- LG9806XPW0
- LGN2000KQ2
- LGN2000KT0
- LGQ8000HQ0
- LGQ8000JQ3
- LGQ8000JQ4
- LGQ8100KQ0
- LGQ8100KT0
- LGQ8800JQ1
- LGQ8800JT1
Note: This list is extensive. Always cross-reference with your dryer's specific model number.
4. Package Contents
Upon opening the package, ensure all components are present and undamaged.
- 1 x Clothes Dryer Motor (as pictured)

Image 1: The complete dryer motor, showing its internal windings and fan assembly.
5. Installation and Setup
Installation of a dryer motor requires technical knowledge and should be performed with caution. If you are unsure, consult a professional appliance technician.
- Disconnect Power: Unplug the dryer from the electrical outlet or turn off the circuit breaker supplying power to the dryer.
- Access the Motor: Depending on your dryer model, you may need to remove the front panel, top panel, or rear panel to access the motor compartment. Refer to your dryer's service manual for specific instructions.
- Document Connections: Before disconnecting any wires or components, take clear photos or make diagrams of all electrical connections and belt routing. This will aid in reassembly.
- Remove Old Motor: Disconnect the drive belt, blower wheel, and any mounting hardware securing the old motor. Carefully remove the old motor.
- Install New Motor: Position the new motor in the dryer. Secure it with the appropriate mounting hardware.
- Connect Wiring: Reconnect all electrical wires to the new motor according to your documented connections. Ensure all connections are secure.
- Attach Belt and Blower Wheel: Reattach the drive belt around the motor pulley and the drum. Reinstall the blower wheel if it was removed.
- Reassemble Dryer: Reattach all panels and covers that were removed.
- Test Operation: Plug the dryer back into the electrical outlet or restore power. Run a short cycle to ensure the drum rotates smoothly and there are no unusual noises.
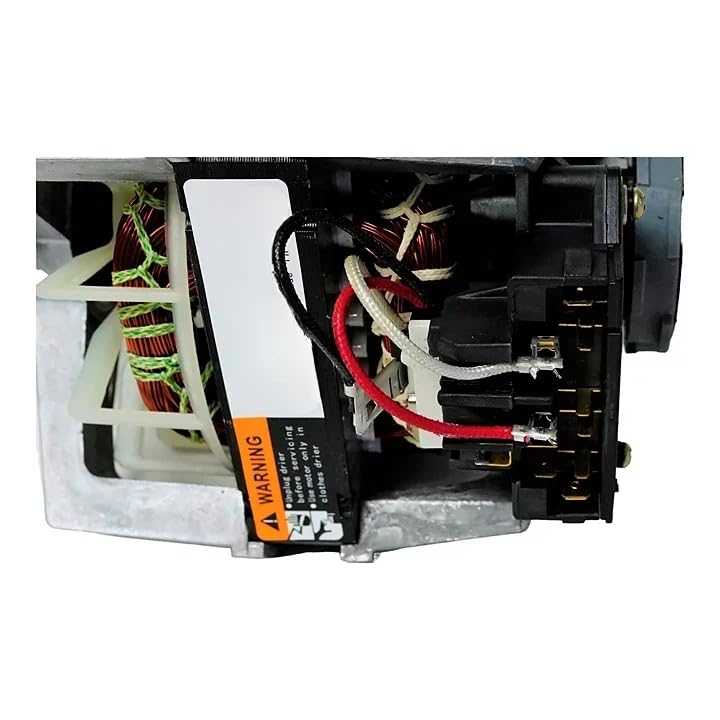
Image 2: Detailed view of the motor's electrical connection points. Ensure correct wiring during installation.
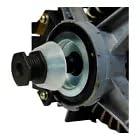
Image 3: View of the motor shaft and pulley mechanism, where the drive belt connects.
6. Operation
Once correctly installed, the dryer motor operates automatically as part of the dryer's cycle. It powers the drum's rotation and often the blower fan, which circulates hot air through the drum.
- The motor engages when a drying cycle is selected and the start button is pressed.
- It continues to run throughout the drying cycle, ensuring even drying of clothes.
- Proper motor function is indicated by smooth, consistent drum rotation and normal airflow.
7. Maintenance
The dryer motor itself typically requires minimal maintenance. However, regular maintenance of the dryer can prolong the life of all its components, including the motor.
- Clean Lint Filter: Clean the lint filter before or after every load to ensure proper airflow and prevent motor strain.
- Inspect Venting: Periodically check and clean the dryer's exhaust vent to prevent blockages, which can cause the motor to overheat.
- Check Drive Belt: Inspect the drive belt for signs of wear, cracks, or fraying. A worn belt can put extra strain on the motor.
- Listen for Unusual Noises: Pay attention to any new or unusual noises coming from the dryer, which could indicate a developing issue with the motor or other components.
8. Troubleshooting
If your dryer is experiencing issues after motor replacement, consider the following common problems and solutions:
| Problem | Possible Cause | Solution |
|---|---|---|
| Dryer does not start or drum does not turn. | No power, faulty door switch, broken drive belt, incorrect wiring. | Check power supply. Ensure door is fully closed. Inspect drive belt. Verify all electrical connections. |
| Dryer makes loud humming noise but drum doesn't turn. | Motor attempting to start but is overloaded or seized, faulty start switch. | Ensure drum is not overloaded. Check for obstructions. If motor is new, re-check installation. |
| Dryer runs but clothes are not drying. | Blocked vent, faulty heating element, faulty thermistor. | Clean lint filter and exhaust vent. This issue is typically not motor-related. |
| Unusual grinding or squealing noises. | Worn idler pulley, worn drum rollers, foreign object in blower wheel, motor bearing issue. | Inspect and replace worn components. Check blower wheel for obstructions. If noise persists from motor, it may indicate a defect. |
If troubleshooting steps do not resolve the issue, it is recommended to contact a qualified appliance technician.
9. Specifications
- Brand: Generic
- Model Name: Dryer Motor
- Speed: 1725 RPM
- Voltage: 120 Volts
- Horsepower: 0.33 Horsepower
- Product Dimensions: Approximately 1 x 1 x 1 inches (Note: This is likely a package dimension; actual motor dimensions may vary slightly)
- Item Weight: Approximately 1 pound
10. Warranty and Support
Your satisfaction is important. This product is designed for reliable performance. If you encounter any issues or require assistance, please contact the seller or manufacturer directly for support.
For specific warranty details, refer to the purchase documentation or contact the retailer where the product was acquired.