Introduction
This manual provides comprehensive instructions for the assembly, operation, and maintenance of your Baborokic Metal Storage Cabinet, Model XR-MZ02-White. Designed for versatile use in various rooms, this cabinet offers ample storage with adjustable shelves and a durable metal construction. Please read all instructions carefully before beginning assembly and retain this manual for future reference.
Safety Information
To ensure safe use and prevent injury or damage, please observe the following safety guidelines:
- Always assemble the cabinet on a soft, clean surface to prevent scratches.
- It is recommended that two people perform the assembly to ensure stability and safety.
- Do not overload shelves. Distribute weight evenly to prevent tipping.
- Secure the cabinet to a wall using appropriate anti-tip hardware (not included) to prevent accidental tipping, especially in households with children or pets.
- Keep small parts and packaging materials away from children.
- Use only the provided hardware or suitable replacements.
Parts List
Before starting assembly, carefully unpack all components and verify that all parts are present and undamaged. Refer to the diagram below for identification of each part.

Image: All components of the cabinet, including panels, hardware, and tools, laid out for inspection prior to assembly.
The package includes various metal panels, screws (R*40), nuts (M*4), shelf holders (L*12), and handles (G*2, U*2). A screwdriver and gloves are also provided for convenience.
Assembly Instructions
Follow these steps carefully for proper assembly. An assembly video is provided below for visual guidance. It is recommended to have two people for assembly.
Video: Official assembly guide for the Baborokic Metal Storage Cabinet, demonstrating each step from unboxing to final setup.
Step 1: Assemble the Base Frame
Connect the two long base frame pieces using the provided screws. Ensure the holes for the side panels are facing outwards as indicated in the diagram.
Image: A person wearing gloves is shown attaching the corner pieces to the long base frame, ensuring correct orientation of the holes.
Step 2: Attach Side Panels
Carefully align and attach the side panels to the base frame using the designated screws. Secure all connections firmly.
Image: A person is screwing the side panels into the base frame, forming the initial structure of the cabinet.
Step 3: Install Top Panel
Place the top panel onto the assembled frame. Ensure the front edge is correctly aligned and secure it with screws.
Image: Two people are carefully placing the top panel onto the cabinet frame, preparing to secure it.
Step 4: Install Back Panels
Slide the back panels into the grooves from the top. Ensure the panel with the cable management hole is positioned correctly if desired. Secure the panels with screws.
Image: A person is shown installing the back panels, ensuring they fit snugly and are secured with screws.
Step 5: Install Middle Divider
Insert the middle divider panel into its designated slots within the cabinet frame. This creates separate compartments for storage.
Image: A person is inserting the middle divider panel into the cabinet, creating distinct storage sections.
Step 6: Secure Internal Brackets
Attach the internal brackets to the top and bottom of the middle sections using screws. These brackets provide additional stability and support for the shelves.
Image: A person is using a drill to secure the internal support brackets inside the cabinet compartments.
Step 7: Insert Shelf Holders
Choose your desired shelf height. Insert the L*12 shelf holders into the corresponding holes on the side panels and middle divider. Ensure all four holders for each shelf are at the same height.
Image: A person is inserting the small metal shelf holders into the pre-drilled holes on the cabinet's interior side panels.
Step 8: Place Adjustable Shelves
Carefully place the adjustable shelves onto the installed shelf holders. Ensure they are level and securely seated.
Image: A person is carefully placing the adjustable shelves onto the installed shelf holders inside the cabinet.
Step 9: Assemble and Attach Doors
Assemble the door panels by securing the decorative elements and hinges. Then, attach the doors to the cabinet frame, ensuring they open and close smoothly. Install the gold metal handles (G*2) using the provided screws (U*2).
Image: A person is shown assembling the individual door panels, securing the components before attaching them to the main cabinet body.
Image: A person is attaching the finished doors to the cabinet frame and then installing the gold metal handles.
Assembly Complete
Your Baborokic Metal Storage Cabinet is now fully assembled and ready for use.
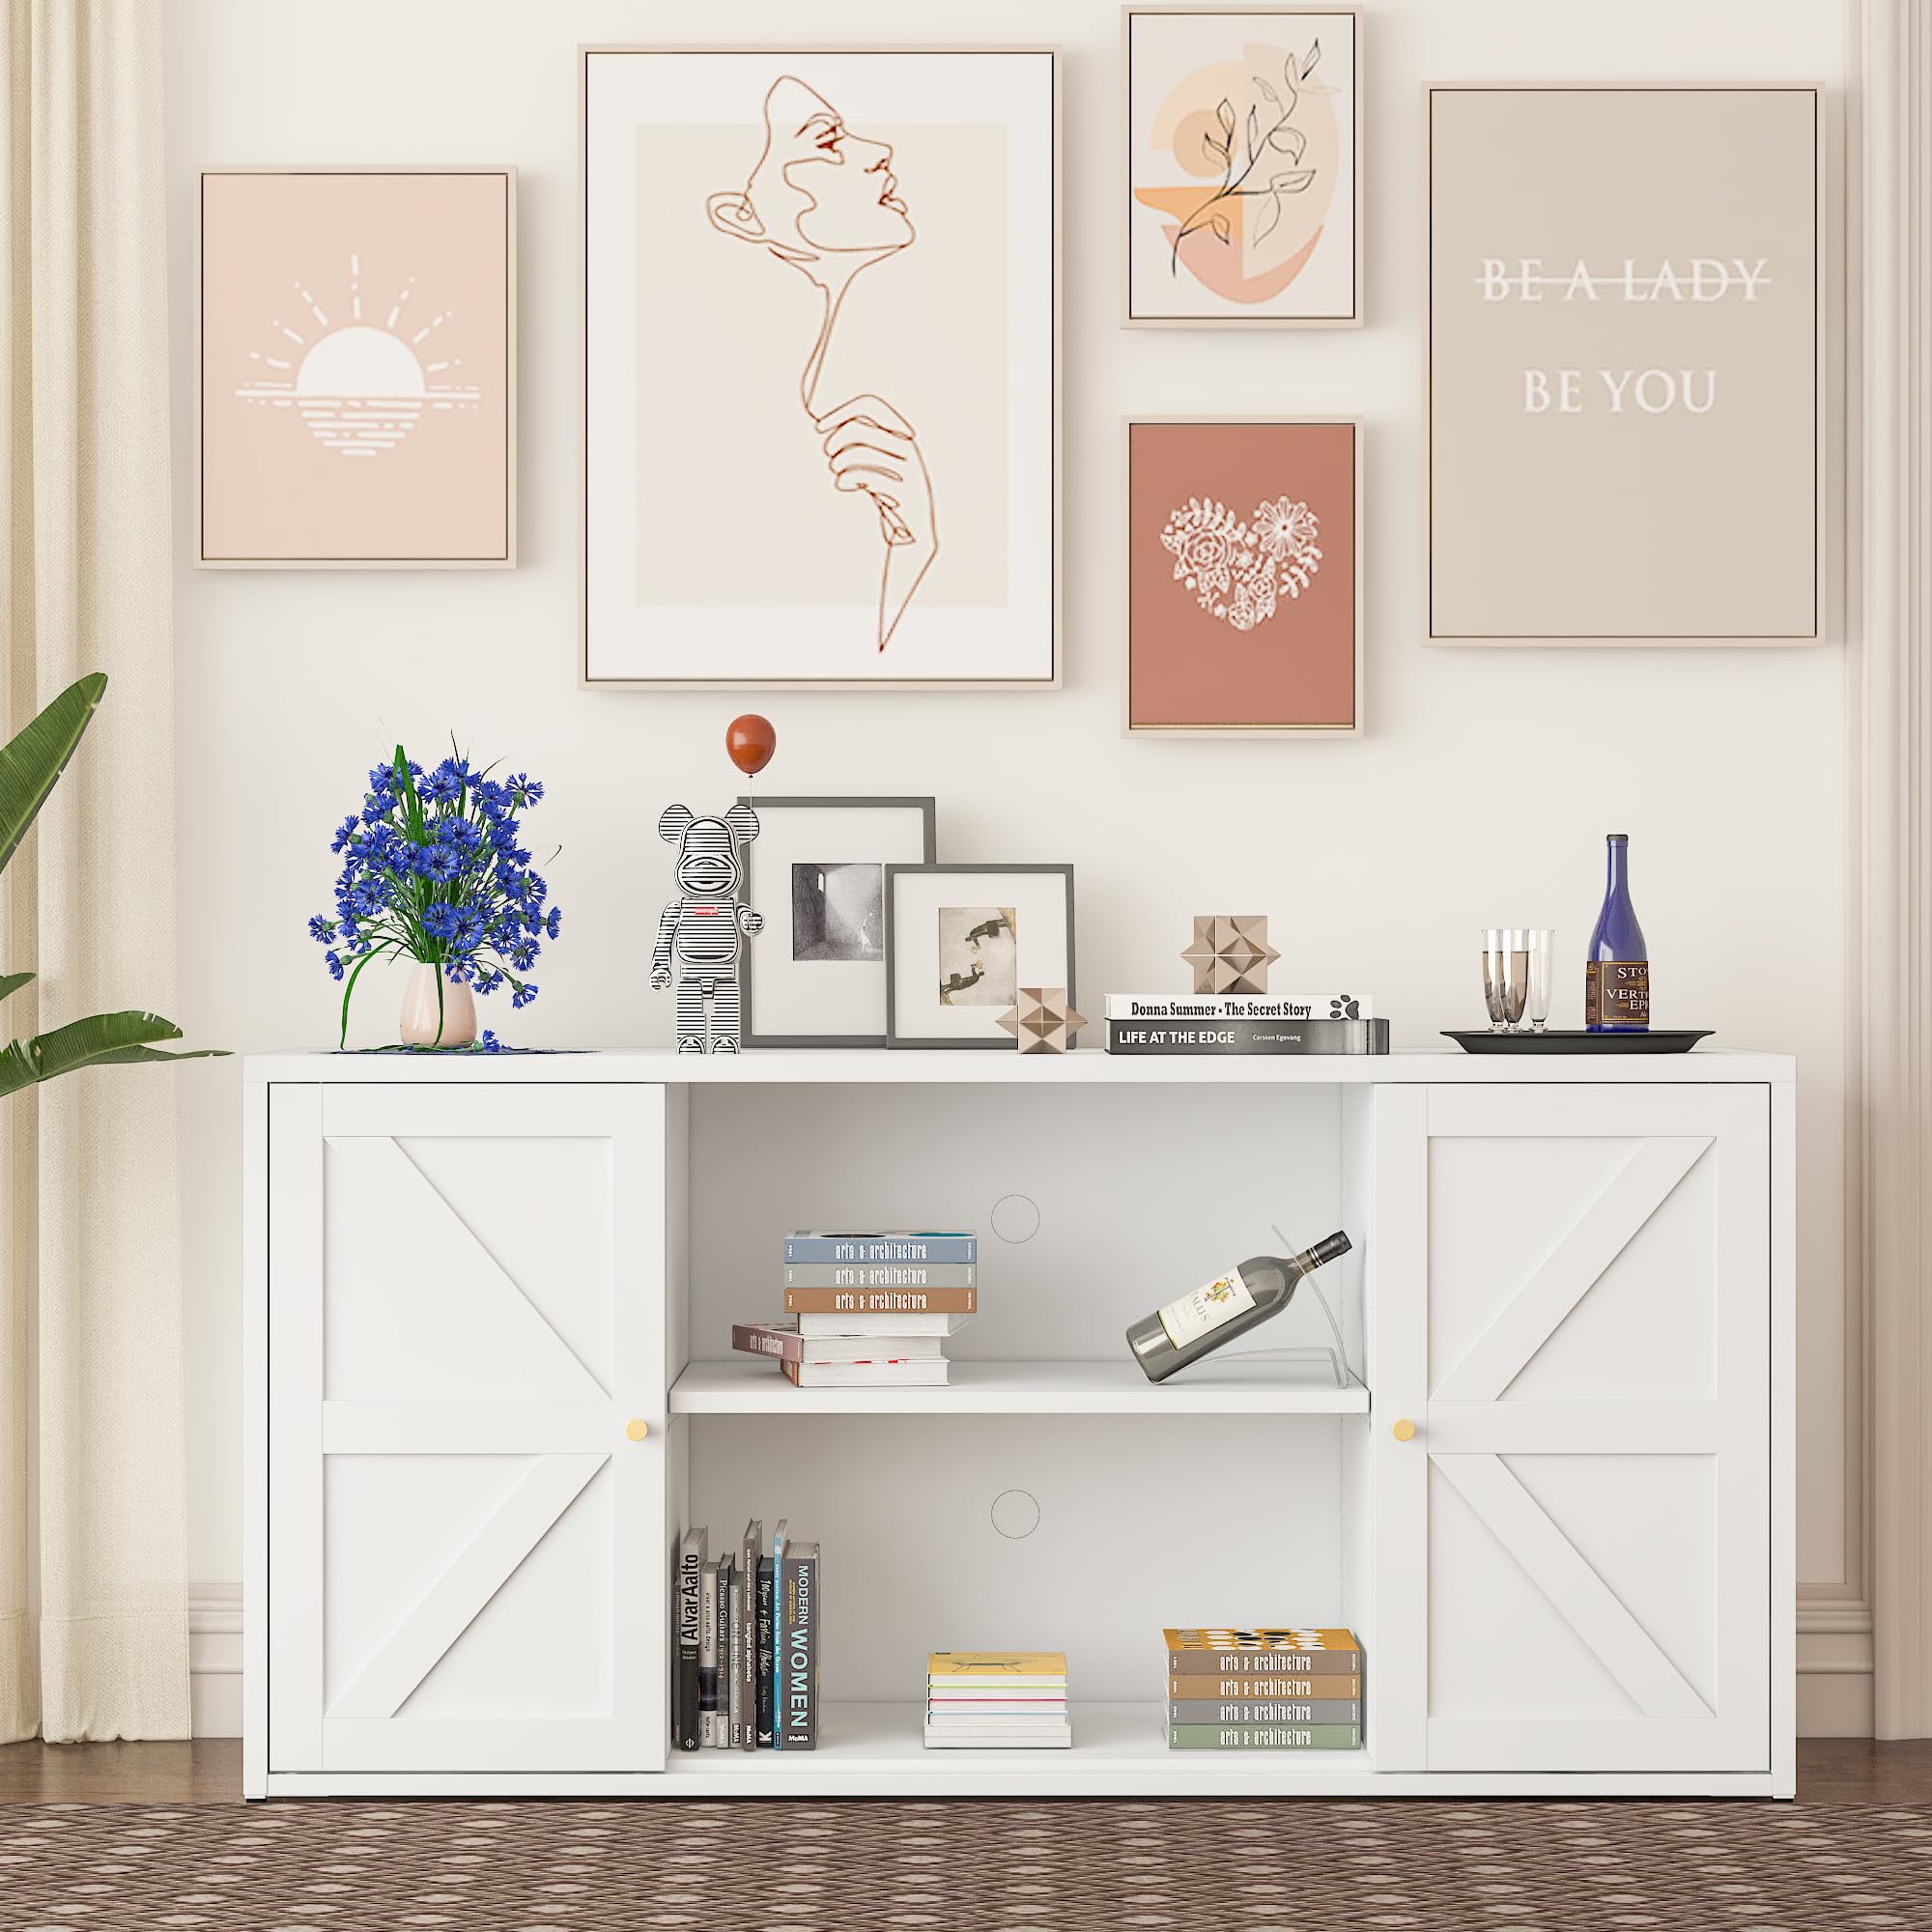
Image: The fully assembled Baborokic Metal Storage Cabinet, showcasing its design and functionality.
Operating Instructions
The Baborokic Metal Storage Cabinet is designed for versatile storage in various settings.
- Adjustable Shelves: The cabinet features adjustable shelves, allowing you to customize the storage space to fit items of different heights. Simply remove the shelf, reposition the shelf holders to the desired height, and reinsert the shelf.
- Cable Management: A reserved hole in the back panel simplifies cable management, making it ideal for storing electronic devices like microwaves, toasters, or media players while keeping cords organized and out of sight.
- Versatile Placement: This cabinet can be used as a pantry storage cabinet, credenza buffet cabinet, bathroom cabinet, or for storage in a living room, entryway, or home office.

Image: Detailed view showing the adjustable shelf mechanism and the circular cable management hole on the back panel.
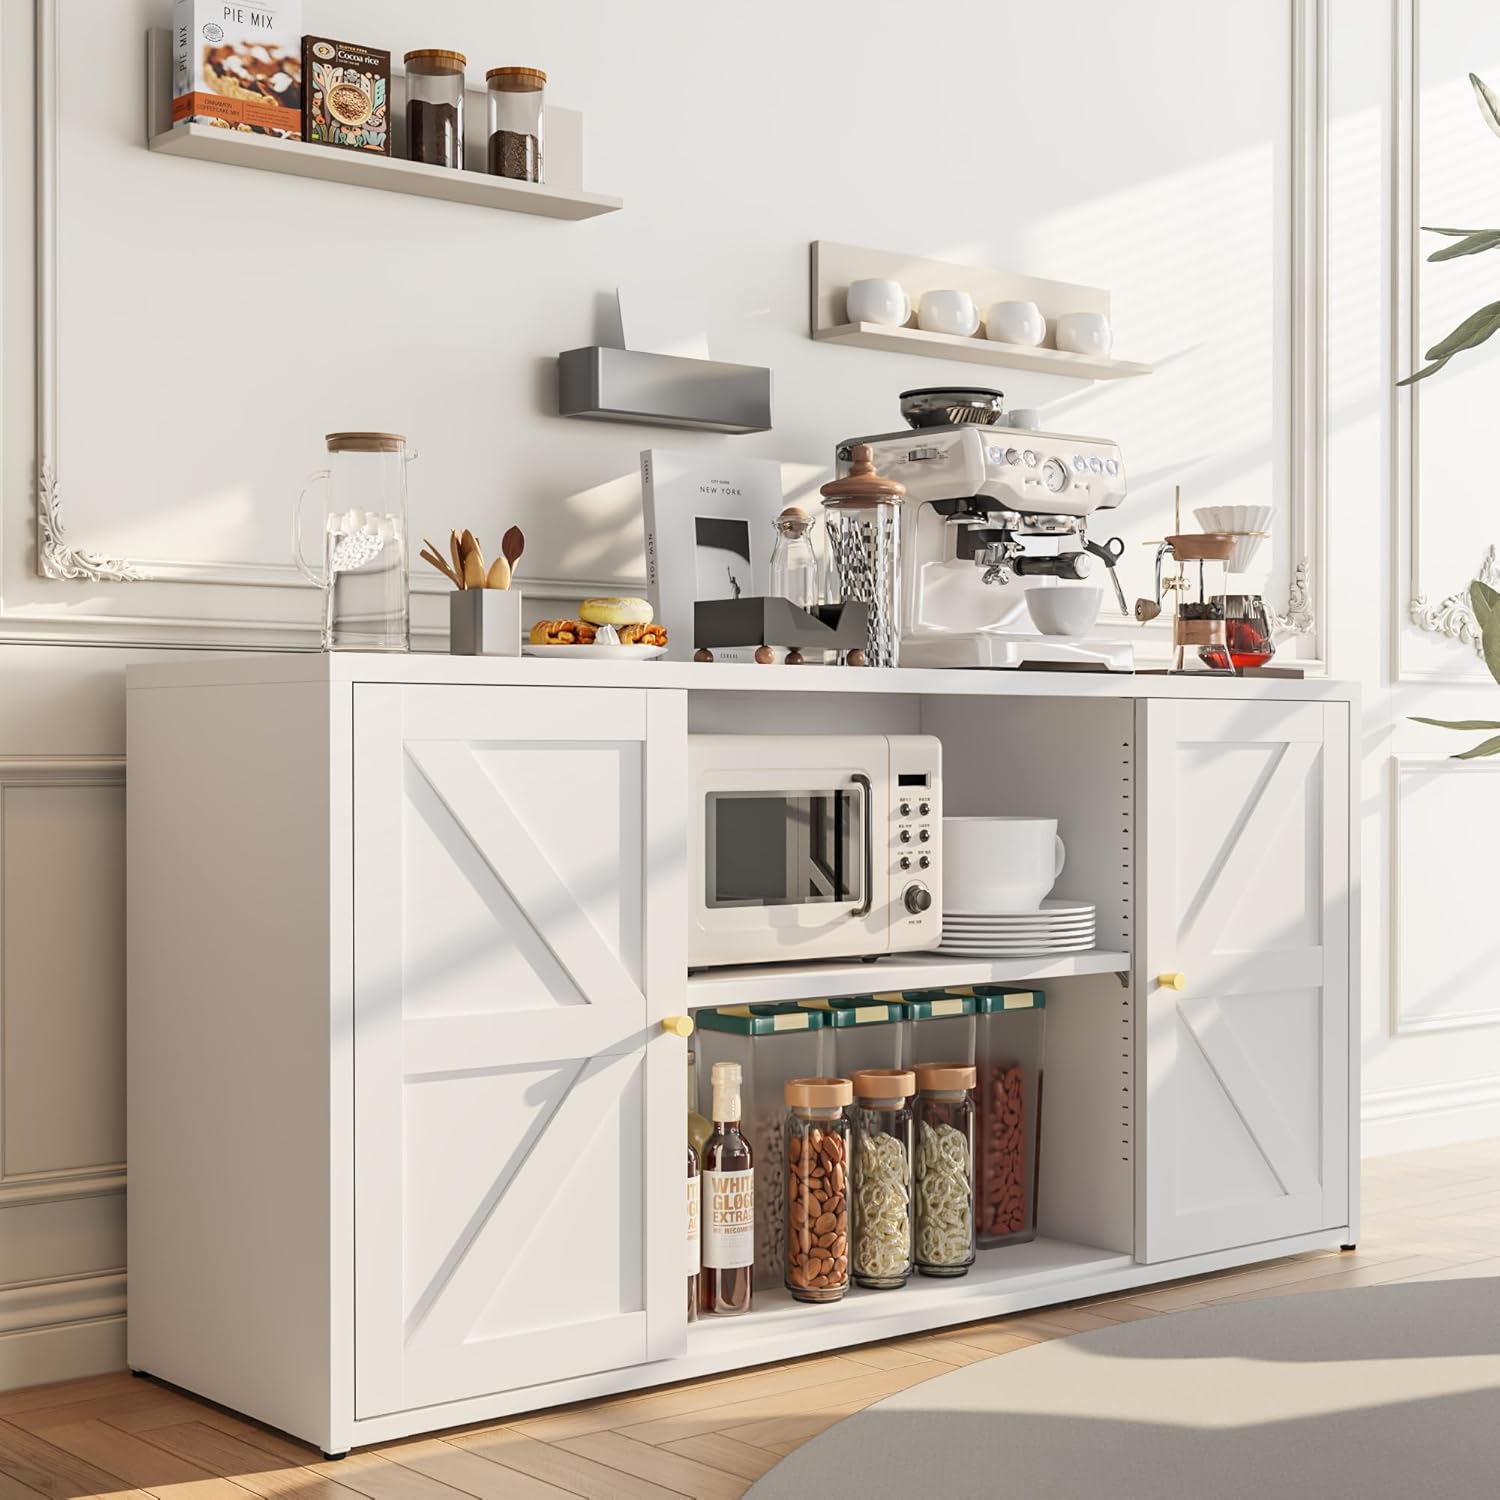
Image: The cabinet functioning as a kitchen pantry, holding various kitchen items and appliances, demonstrating its storage capacity.
Maintenance
Proper care will ensure the longevity and appearance of your metal storage cabinet.
- Cleaning: The cabinet is made of electrostatic powder-coated, cold-rolled steel, making it waterproof and easy to clean. Wipe surfaces with a soft, damp cloth and mild detergent. Avoid abrasive cleaners or harsh chemicals.
- Rust Prevention: The material includes a rust-resistant treatment layer and an anti-corrosion layer. However, avoid prolonged exposure to excessive moisture to maintain its condition.
- Scratch Resistance: While durable, the paint finish is not entirely scratch-proof. Exercise care during assembly and use to prevent scratches.

Image: A diagram illustrating the multi-layer construction of the metal, highlighting its electrostatic powder coating, rust-resistant, and anti-corrosion layers. Also shows a hand wiping the cabinet surface, indicating ease of cleaning.
Troubleshooting
If you encounter any issues during assembly or use, please refer to the following common solutions:
- Missing Accessories: If any parts or accessories are missing from your package, please contact customer support for a free reshipment.
- Installation Difficulties: If you have trouble installing the cabinet, take a picture of the specific issue and contact customer support for analysis and guidance.
- General Dissatisfaction: If you are not satisfied with the product, please message customer support for a satisfactory resolution within 24 hours.
Specifications
| Feature | Detail |
|---|---|
| Brand | Baborokic |
| Model Number | XR-MZ02-White |
| Color | White |
| Material | Metal (Electrostatic Powder Coated Cold-Rolled Steel) |
| Product Dimensions (D x W x H) | 15.75"D x 58"W x 27.6"H |
| Item Weight | 65.3 Pounds |
| Number of Doors | 2 |
| Number of Shelves | 2 (Adjustable) |
| Additional Features | Adjustable Feet, Adjustable Shelf, Cable Management Hole |
| Installation Type | Freestanding |
| Required Assembly | Yes |
Warranty and Support
Baborokic is committed to your satisfaction. Our dedicated after-sale service team is available to assist you with any questions or concerns.
- Professional Technical Assistance: For any technical queries or installation support, our team can provide guidance.
- Missing Parts: If you find any accessories missing upon delivery, we will resend them to you free of charge.
- Satisfaction Guarantee: If you are not satisfied with your product, please contact us. We aim to provide a satisfactory answer within 24 hours.
For support, please visit the Baborokic Store on Amazon or contact our customer service directly.

Image: The Baborokic brand logo, representing quality and customer commitment.