1. Introduction
This manual provides essential information for the installation, operation, and maintenance of your OiLiehu Android 15 Car Stereo. Please read this manual thoroughly before using the product to ensure proper function and to prevent damage.

Image 1.1: Overview of the OiLiehu Android 15 Car Stereo and included accessories.
2. Safety Information
- Ensure professional installation to avoid damage to the vehicle's electrical system or the stereo unit.
- Do not operate the device in a manner that distracts you from driving. Always prioritize road safety.
- Avoid exposing the unit to extreme temperatures, direct sunlight for prolonged periods, or moisture.
- Use only approved accessories and cables.
- Disconnect the vehicle's battery before installation to prevent electrical shorts.
3. Package Contents
Verify that all items listed below are present in your package:

Image 3.1: Package contents and product dimensions.
- OiLiehu Android 15 Car Stereo Unit (10.1-inch)
- Power Cable
- GPS Antenna
- Rear Camera Input Cable
- RCA Cable
- AHD Backup Camera
- Mounting Brackets
- USB Cables (x2)
- User Manual
- External Microphone
4. Specifications
| Feature | Specification |
|---|---|
| Operating System | Android 15 |
| RAM | 2GB |
| ROM | 64GB |
| Processor | 8-Core |
| Display Size | 10.1 Inches |
| Display Resolution | 1024x600P |
| Connectivity | Bluetooth 5.0, WiFi |
| Radio | FM/RDS (18 preset stations) |
| Navigation | Built-in GPS (Online/Offline maps) |
| Special Features | Wireless Carplay, Android Auto, Mirror Link, Split Screen, Steering Wheel Control (SWC), AHD Rear Camera Support, EQ |
| Item Weight | 1.32 pounds (600 Grams) |
| Package Dimensions | 7.09 x 4.72 x 3.94 inches |
5. Setup and Installation
Professional installation is recommended. Refer to your vehicle's specific wiring diagram and the included wiring harness for correct connections.
5.1 Wiring Connections
- Power Cable: Connect the yellow wire to the constant 12V power supply, the red wire to the accessory (ACC) 12V power supply, and the black wire to ground.
- Speaker Wires: Connect the speaker output wires to your vehicle's corresponding speaker wires. Ensure correct polarity.
- GPS Antenna: Connect the GPS antenna to the dedicated port on the back of the stereo and mount it in a location with a clear view of the sky.
- Rear Camera Input: Connect the AHD backup camera to the 'CAM IN' port and the reverse trigger wire to the vehicle's reverse light circuit.
- USB Cables: Connect the USB cables for external devices or data transfer.
- External Microphone: Plug the external microphone into its designated port for improved call quality.
- Steering Wheel Control (SWC): Connect the SWC wires to your vehicle's steering wheel control interface. Configuration may be required in the stereo settings.
5.2 Mounting the Unit
Use the provided mounting brackets to secure the stereo unit into your vehicle's double-DIN slot. Ensure the unit is firmly in place before reassembling the dashboard.
6. Operating Instructions
6.1 Basic Operation
- Power On/Off: Press and hold the power button on the front panel or use the vehicle's ignition.
- Volume Control: Adjust using the physical buttons or the touchscreen interface.
- Home Screen: Navigate to the main menu to access applications and settings.
6.2 Wireless Carplay / Android Auto
This feature allows seamless integration of your smartphone for navigation, music, calls, and messages.

Image 6.1: Wireless Carplay and Android Auto interface.
- Ensure Bluetooth and Wi-Fi are enabled on your smartphone.
- On the car stereo, open the 'Carplay' or 'Android Auto' application.
- Follow the on-screen prompts to pair your phone via Bluetooth. Once paired, the system will automatically connect via Wi-Fi for wireless functionality.
- Alternatively, connect your phone via a USB cable for wired Carplay/Android Auto.
6.3 Mirror Link Function
Mirror Link allows you to display your smartphone's screen directly onto the car stereo's display.

Image 6.2: Mirror Link functionality for iOS and Android devices.
- For iOS devices (up to iOS 15): Connect via Wi-Fi. Open the 'Mirror Link' app on the stereo and follow the instructions to connect your iPhone.
- For Android devices (up to Android 13): Connect via Wi-Fi or USB cable. Open the 'Mirror Link' app on the stereo and follow the instructions to connect your Android phone.
6.4 GPS Navigation
The stereo features a built-in GPS module for accurate navigation.

Image 6.3: GPS Navigation and WiFi connectivity.
- Access navigation applications like Google Maps, Here We Go, or Waze from the main menu.
- For online maps, ensure the stereo is connected to Wi-Fi or has a SIM card inserted (if supported by your specific model).
- Download offline maps for navigation without an internet connection.
6.5 Wi-Fi Connectivity
Connect to a Wi-Fi network to access online features, download apps, and stream content.
- Go to 'Settings' > 'Network & Internet' > 'Wi-Fi'.
- Select your desired Wi-Fi network and enter the password if required.
6.6 Bluetooth 5.0 & FM/RDS Radio
Enjoy hands-free calling, audio streaming, and radio broadcasts.

Image 6.4: FM/RDS Radio and Bluetooth Hands-Free interface.
- Bluetooth: Go to 'Settings' > 'Connected devices' > 'Bluetooth'. Pair your phone to enable hands-free calls and music streaming.
- FM/RDS Radio: Open the 'Radio' app. Use the scan function to find stations or manually tune. RDS provides station information and traffic updates where available.
6.7 AHD Backup Camera
The included AHD camera provides a clear view when reversing.

Image 6.5: AHD Backup Camera view and features.
- When the vehicle is shifted into reverse gear, the camera feed will automatically display on the screen.
- The camera offers a wide-angle view and night vision capabilities.
6.8 Steering Wheel Control (SWC)
Control basic stereo functions directly from your steering wheel.

Image 6.6: Steering Wheel Control learning interface.
- Navigate to 'Settings' > 'Steering Learn' or 'SWC'.
- Follow the on-screen instructions to program your vehicle's steering wheel buttons to control functions like volume, track skipping, and mode switching.
6.9 Split Screen Function
Use two applications simultaneously on the 10.1-inch display.
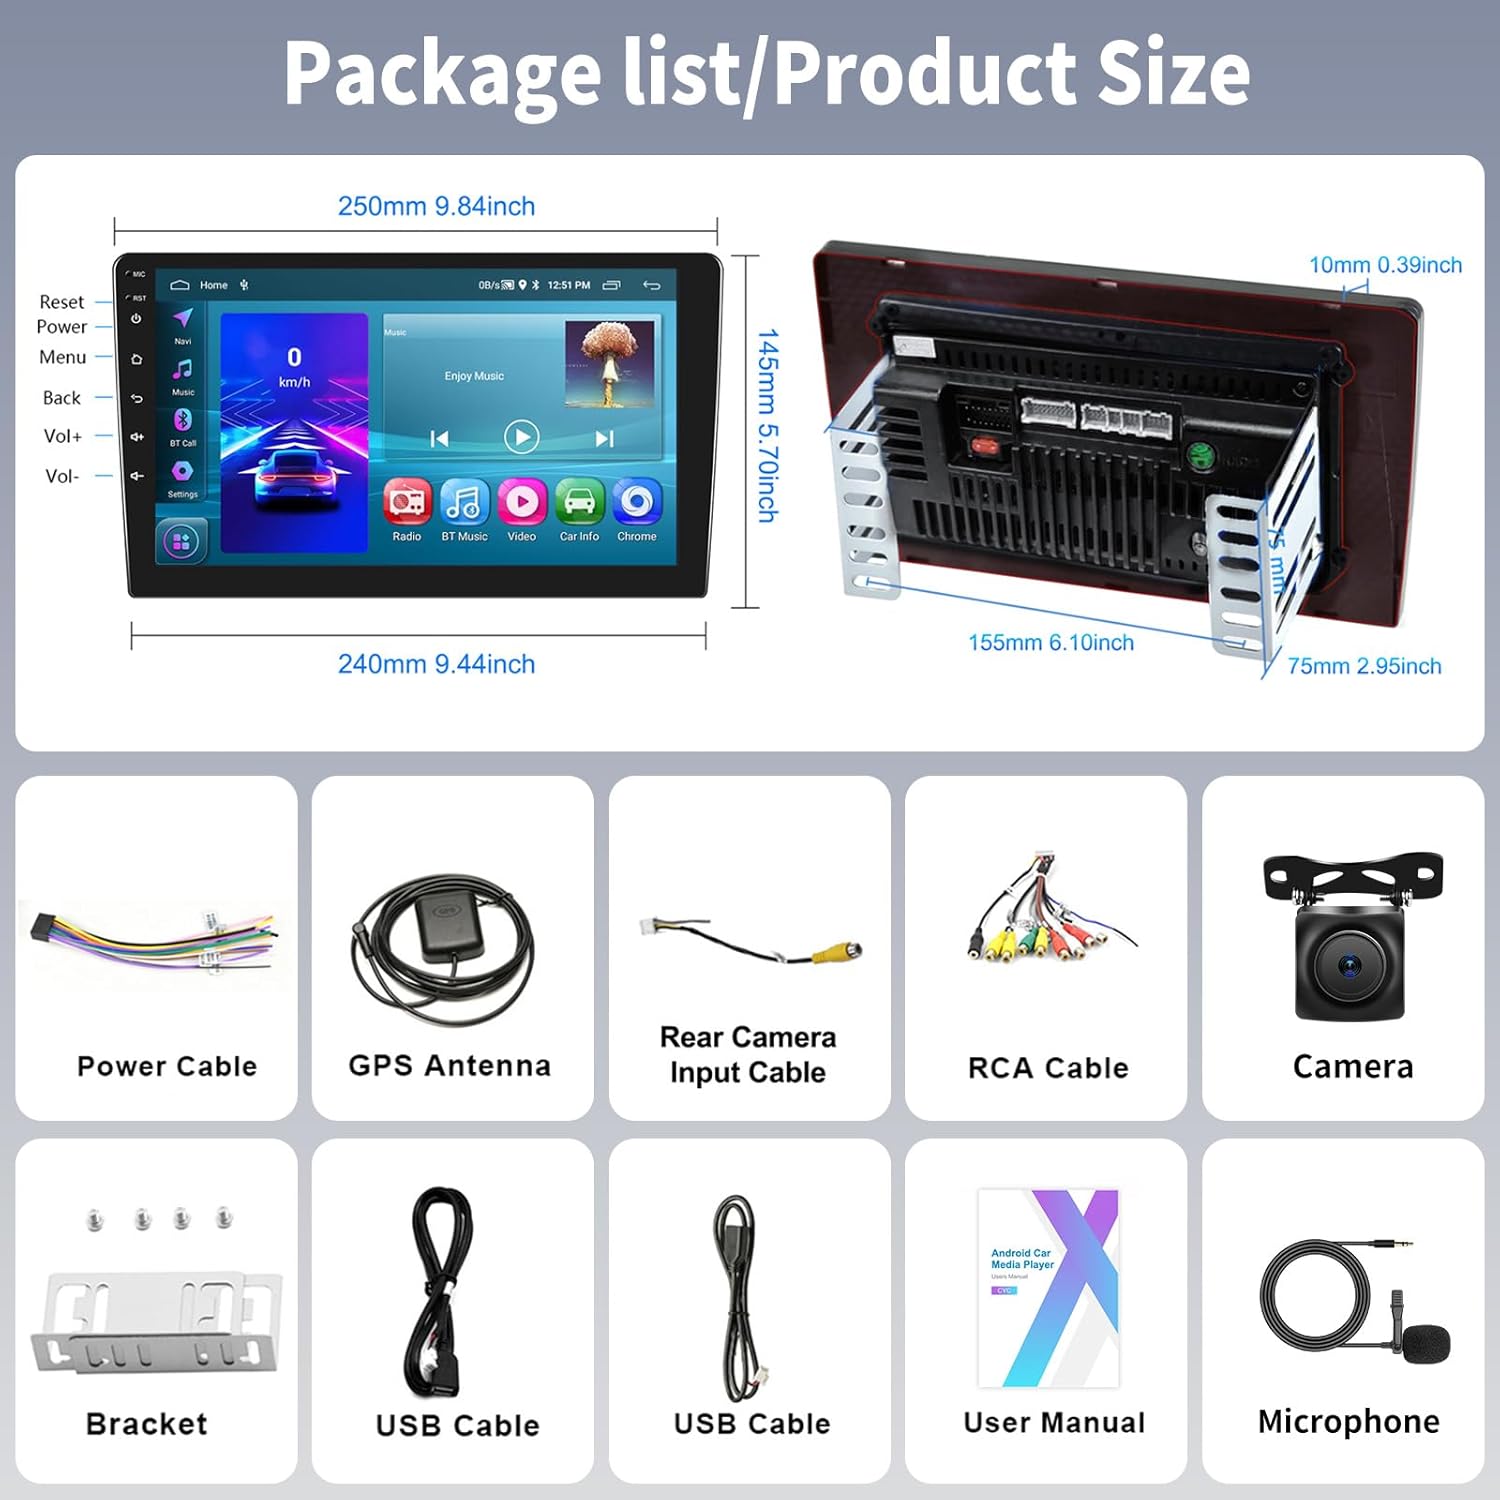
Image 6.7: Split Screen and HiFi Sound Effect (EQ) settings.
- From an open application, swipe up from the bottom or long-press the recent apps button (depending on the Android interface) to enter split-screen mode.
- Select a second application to display alongside the first.
6.10 Equalizer (EQ)
Adjust audio output to your preference.
- Access the 'EQ' or 'Sound Settings' app from the main menu.
- Choose from preset sound modes (e.g., Pop, Rock, Jazz) or customize the equalizer bands manually.
7. Maintenance
- Cleaning: Use a soft, dry cloth to clean the screen and unit. Avoid abrasive cleaners or solvents.
- Software Updates: Periodically check for software updates via Wi-Fi in the system settings to ensure optimal performance and access to new features.
- Temperature: Do not leave the unit in direct sunlight or extreme cold for extended periods when the vehicle is not in use.
8. Troubleshooting
| Problem | Possible Cause | Solution |
|---|---|---|
| Unit does not power on | Incorrect wiring, blown fuse, insufficient power supply | Check power connections (yellow, red, black wires). Verify vehicle fuses. Ensure stable 12V power. |
| No sound | Speaker wires disconnected, volume too low, incorrect audio output settings | Check speaker wiring. Increase volume. Verify audio settings in the stereo menu. |
| GPS not working or inaccurate | GPS antenna not connected, antenna obstructed, no internet for online maps | Ensure GPS antenna is securely connected and mounted with a clear view of the sky. Connect to Wi-Fi for online maps. |
| Bluetooth connection issues | Bluetooth off on phone/stereo, pairing failed, interference | Ensure Bluetooth is enabled on both devices. Delete previous pairings and re-pair. Move closer to the stereo. |
| Backup camera not displaying | Camera input cable loose, reverse trigger wire not connected, faulty camera | Check camera input cable connection. Verify reverse trigger wire is correctly connected to the reverse light. |
| Touchscreen unresponsive | System frozen, temporary software glitch | Perform a soft reset (locate the small reset button, usually requires a pin). If issue persists, contact support. |
9. Warranty and Support
9.1 Warranty Information
This OiLiehu car stereo comes with a 1-year warranty from the date of purchase, covering manufacturing defects. Please retain your proof of purchase for warranty claims. The warranty does not cover damage caused by improper installation, misuse, accidents, or unauthorized modifications.
9.2 Customer Support
For technical assistance, troubleshooting not covered in this manual, or warranty inquiries, please contact OiLiehu customer support:
- Email: cyservice@126.com
- Online Support: Visit the OiLiehu Store on Amazon and click 'Ask a question' to contact the seller.


Image 9.1: Customer support and warranty information.


