IGLIDE EG2
I-Glide 2 Wheel Trike Estate Glider User Manual
Model: EG2
Introduction
Thank you for choosing the I-Glide 2 Wheel Trike Estate Glider. This manual provides essential information for the safe operation, maintenance, and troubleshooting of your new glider. Please read this manual thoroughly before operating the device to ensure proper use and to maximize its lifespan.
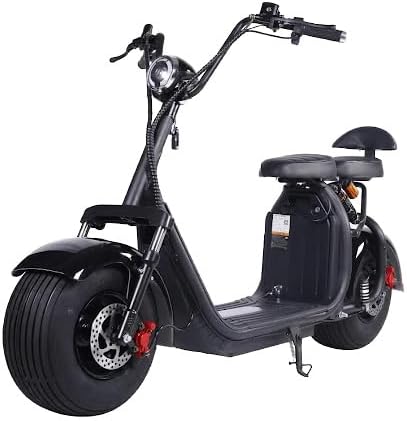
Figure 1: The I-Glide 2 Wheel Trike Estate Glider. This image displays the full black electric scooter, highlighting its robust wheels, handlebars, seat, and the integrated golf bag holder at the rear.
Safety Information
Your safety is paramount. Always adhere to the following guidelines:
- Always wear a helmet and appropriate safety gear when operating the glider.
- Observe all local traffic laws and regulations.
- Do not exceed the maximum load capacity of 200 kg (including rider and any passenger/cargo).
- Ensure the battery is fully charged before long rides.
- Avoid operating in adverse weather conditions (heavy rain, snow, ice).
- Perform pre-ride checks: brakes, tires, and battery level.
- Keep hands and feet clear of moving parts.
Setup
Unpacking and Initial Inspection
- Carefully remove all components from the packaging.
- Inspect the glider for any signs of damage during transit. Contact your dealer immediately if damage is found.
- Verify all included components are present: Glider unit, Charger, Golf Bag Holder.
Assembly (if required)
The I-Glide Estate Glider comes largely pre-assembled. Minor assembly may include:
- Handlebar Attachment: Secure the handlebars to the steering column using the provided bolts and tools. Ensure they are firmly tightened.
- Golf Bag Holder Installation: Attach the golf bag holder to the designated mounting points at the rear of the glider. Refer to the diagram for correct orientation.
Initial Charging
Before first use, fully charge the Lithium Ion Battery.
- Locate the charging port on the glider.
- Connect the charger to the glider's charging port, then plug the charger into a standard electrical outlet.
- The charger indicator light will typically show red during charging and turn green when fully charged.
- Charging time may vary, but allow for a full charge (typically 6-8 hours) before the first ride.
Operating Instructions
Starting the Glider
- Ensure the kickstand is retracted.
- Turn the key in the ignition to the "ON" position. The digital display will illuminate.
- Check the battery level indicator on the digital display.
Acceleration and Speed Control
- The glider is equipped with a Hand Throttle. Gently twist the throttle grip on the right handlebar towards you to accelerate.
- Twist the throttle away from you to decelerate.
- Maintain a comfortable and safe speed, especially in crowded areas or on uneven terrain.
Braking
- The glider features Front Braking. The brake lever is located on the left handlebar.
- To slow down or stop, gently squeeze the brake lever. Apply pressure smoothly to avoid sudden stops.
- Always use both brakes (if applicable, though specifications only mention front) for optimal stopping power and control.
Digital Display
The Digital Display provides real-time information:
- Speed: Current operating speed.
- Battery Level: Indicates remaining battery charge.
- Odometer/Trip Meter: Displays total distance traveled or trip distance.
Using the Golf Bag Holder
The integrated Golf Bag Holder allows for easy transport of your golf bag.
- Securely place your golf bag into the holder.
- Ensure the bag is stable and does not obstruct your view or interfere with the glider's operation.
- Distribute weight evenly to maintain balance.
Maintenance
Battery Care
- Charge the Lithium Ion Battery regularly, even if not in frequent use, to maintain battery health.
- Avoid completely draining the battery before recharging.
- Store the glider and battery in a cool, dry place away from direct sunlight and extreme temperatures.
- Use only the original charger provided with the glider.
Tire Maintenance
- Regularly check the pressure of the Rubber Tires. Maintain recommended pressure for optimal performance and safety.
- Inspect tires for wear, punctures, or damage before each ride.
Brake System Check
- Periodically check the responsiveness of the Front Braking system.
- Ensure brake levers operate smoothly and return to their original position.
- If brakes feel spongy or ineffective, have them inspected by a qualified technician.
Cleaning
Clean the glider with a damp cloth. Avoid using high-pressure washers or harsh chemicals that could damage electrical components or paint.
Troubleshooting
| Problem | Possible Cause | Solution |
|---|---|---|
| Glider does not power on. | Battery is low or depleted. Ignition key is not in "ON" position. Loose battery connection. | Charge the battery fully. Turn the key to "ON". Check battery connections. |
| Loss of power during operation. | Battery charge is low. Overload (exceeding 200kg). Motor overheating. | Recharge battery. Reduce load. Allow motor to cool down. |
| Brakes feel weak or unresponsive. | Brake pads worn. Brake cable loose. | Have brake pads replaced. Adjust or tighten brake cable. Consult a technician if unsure. |
| Digital display not working. | Loose wiring connection. Display unit fault. | Check connections. If problem persists, contact customer support. |
Specifications
| Feature | Detail |
|---|---|
| Model Name | EG2 |
| Maximum Load Capacity | 200 Kilograms |
| Passengers | Up to 2 |
| Battery Type | Lithium Ion Battery |
| Throttle Type | Hand Throttle |
| Wheel Type | Rubber Tires |
| Wheel Size | 8 Inches |
| Brake Type | Front Braking |
| Special Features | Digital Display, Golf Bag Bracket |
| Material | Aluminum |
| Color | Black |
| Item Weight | 40 Kilograms |
| Package Dimensions | 200 x 117 x 85 cm |
Warranty Information
The I-Glide 2 Wheel Trike Estate Glider comes with a 1 Year Limited Carry In Manufacturing Warranty. This warranty covers defects in materials and workmanship under normal use. Please retain your proof of purchase for warranty claims. For full terms and conditions, refer to the warranty card included with your product or contact the manufacturer.
Customer Support
If you encounter any issues not covered in this manual or require further assistance, please contact your retailer or the manufacturer, Exclusive Brands Online.
- For service inquiries, please have your model number (EG2) and purchase date ready.
- Regularly check the manufacturer's website for updated manuals or FAQs.
Ask a question about this manual
Ask about setup, troubleshooting, compatibility, parts, safety, or missing instructions. Manuals+ will review the question and use this page’s manual context to help answer it.