1. Introduction
This manual provides detailed instructions for the proper setup, operation, and maintenance of your Studiomaster C2-4 2-Channel Compact Mixer. Please read this manual thoroughly before using the device to ensure safe and efficient operation.
The Studiomaster C2-4 is a versatile and reliable audio solution designed for small-scale mixing needs, suitable for home studios, small performances, and podcasting. Its compact design and straightforward interface allow for effective blending of multiple sound sources.
2. Important Safety Instructions
- Power Source: Only use the power adapter supplied with the unit. Ensure the voltage matches your local power supply (220 Volts AC).
- Water and Moisture: Do not expose this appliance to rain or moisture. Do not use near water or in damp environments.
- Ventilation: Ensure proper ventilation. Do not block any ventilation openings.
- Heat: Do not place near heat sources such as radiators, heat registers, stoves, or other apparatus (including amplifiers) that produce heat.
- Cleaning: Clean only with a dry cloth.
- Servicing: Do not attempt to service this product yourself. Refer all servicing to qualified service personnel.
- Cables: Protect the power cord from being walked on or pinched, particularly at plugs, convenience receptacles, and the point where they exit from the apparatus.
3. Key Features
- Compact Design: Professional 2-channel audio mixing console suitable for small setups, home studios, and live performances.
- Versatile Input Options: Features balanced XLR microphone inputs and 1/4-inch line inputs for diverse connectivity.
- Precise Sound Control: Equipped with 2-band EQ (High and Low frequencies) per channel for accurate audio adjustment.
- Integrated Monitoring: Built-in headphone output with dedicated level control for accurate audio monitoring and mix preview.
- Durable Construction: Robust metal chassis ensures long-term durability and reliability.
4. Package Contents
Please check the package contents upon unpacking. If any items are missing or damaged, contact your dealer immediately.
- Studiomaster C2-4 2-Channel Compact Mixer
- Power Adapter (AC 220V)
- User Manual (this document)
5. Product Overview
5.1 Front Panel Controls and Connections
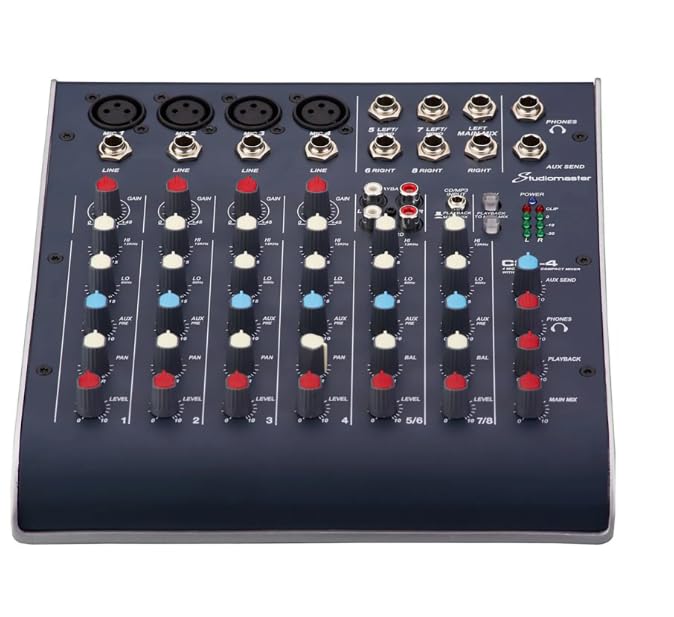
Figure 1: Front view of the Studiomaster C2-4 mixer, showing input jacks, control knobs, and output sections.
The front panel of the C2-4 mixer provides access to all primary controls and input/output connections for audio signals.
- XLR Microphone Inputs: Balanced inputs for connecting microphones.
- 1/4-inch Line Inputs: Inputs for connecting line-level instruments or audio devices.
- GAIN Control: Adjusts the input sensitivity for each channel.
- HIGH EQ: Adjusts the high-frequency range for each channel.
- LOW EQ: Adjusts the low-frequency range for each channel.
- LEVEL Control: Adjusts the output level for each channel.
- MAIN MIX Output: 1/4-inch TRS outputs for connecting to main speakers or recording devices.
- PHONES Output: 1/4-inch TRS stereo output for headphones with dedicated level control.
- POWER Indicator: Illuminates when the unit is powered on.
5.2 Rear Panel Connections
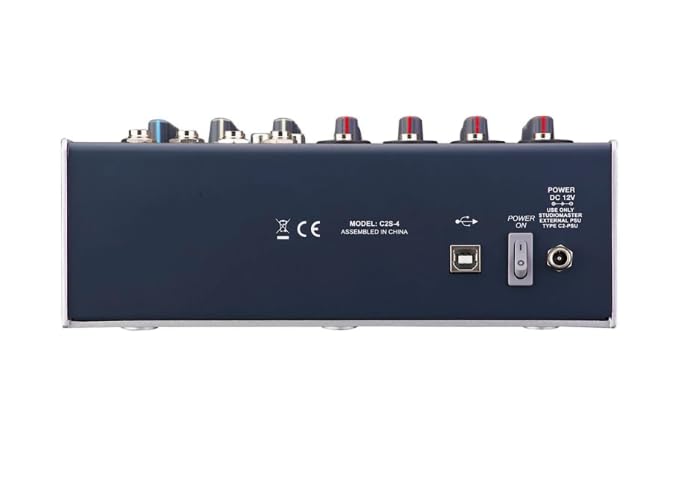
Figure 2: Rear view of the Studiomaster C2-4 mixer, showing power input, USB port, and power switch.
The rear panel houses essential connections for power and data.
- DC 12V Power Input: Connect the supplied power adapter here.
- POWER ON/OFF Switch: Toggles the mixer's power.
- USB Port: For potential future firmware updates or specific connectivity (refer to Studiomaster support for details).
6. Setup Guide
Follow these steps to set up your Studiomaster C2-4 mixer. Ensure all connections are made before powering on the unit.
6.1 Connecting Power
- Ensure the mixer's POWER switch (on the rear panel) is in the OFF position.
- Connect the supplied DC 12V power adapter to the "DC 12V" input on the rear panel of the mixer.
- Plug the power adapter into a suitable AC power outlet (220 Volts).
6.2 Connecting Input Devices
The C2-4 offers two input channels.
- Microphones: Connect microphones using XLR cables to the balanced XLR inputs on the front panel.
- Line-Level Devices: Connect instruments (e.g., keyboards, guitars with preamps) or other audio devices (e.g., media players) using 1/4-inch TRS or TS cables to the 1/4-inch LINE inputs.
6.3 Connecting Output Devices
- Main Speakers/Recording: Connect your main speakers, power amplifier, or recording interface to the MAIN MIX 1/4-inch TRS outputs using appropriate cables.
- Headphones: Connect your headphones to the PHONES 1/4-inch TRS output.
7. Operating Instructions
7.1 Powering On and Initial Setup
- Ensure all input and output devices are connected and their volume levels are set to minimum.
- Turn on the mixer by flipping the POWER switch on the rear panel to the ON position. The POWER indicator on the front panel will illuminate.
- Slowly increase the MAIN MIX level control to a low setting.
- Slowly increase the volume of your connected speakers or recording device.
7.2 Adjusting Channel Levels and EQ
- GAIN Control: For each active input channel, speak into the microphone or play your instrument. Slowly increase the GAIN control until the signal is strong but does not clip (distort). Aim for a healthy signal level without the peak indicator lighting up constantly.
- EQ Adjustment: Use the HIGH and LOW EQ controls to shape the tone of each channel.
- HIGH: Boost or cut high frequencies to add clarity or reduce harshness.
- LOW: Boost or cut low frequencies to add warmth or reduce muddiness.
- LEVEL Control: Adjust the LEVEL control for each channel to balance its volume within the overall mix.
7.3 Monitoring with Headphones
Connect your headphones to the PHONES output. Use the dedicated PHONES level control to adjust the headphone volume independently without affecting the main mix output. This allows for precise monitoring of your audio.
8. Maintenance
- Cleaning: Disconnect the power before cleaning. Use a soft, dry cloth to wipe the surface of the mixer. Do not use liquid cleaners, aerosols, or solvents.
- Storage: When not in use for extended periods, store the mixer in a cool, dry place, away from direct sunlight and extreme temperatures.
- Cable Management: Avoid bending or pinching cables excessively. Store cables neatly to prevent damage.
9. Troubleshooting
| Problem | Possible Cause | Solution |
|---|---|---|
| No power | Power cable not connected; Power switch off; Faulty power adapter/outlet. | Check power cable connection; Ensure power switch is ON; Test power adapter/outlet. |
| No sound output | Output cables disconnected; Main Mix level too low; Speaker/amplifier off or volume low. | Check all output cable connections; Increase MAIN MIX level; Ensure speakers/amplifier are on and volume is adequate. |
| No sound from a specific channel | Input cable disconnected; GAIN/LEVEL control too low; Microphone/instrument off or faulty. | Check input cable connection; Increase GAIN and LEVEL for that channel; Test microphone/instrument. |
| Distorted sound | GAIN/LEVEL set too high; Input signal too strong. | Reduce GAIN and LEVEL controls; Check input signal strength from source. |
| Hum or noise | Ground loop; Faulty cables; Interference from other electronics. | Ensure proper grounding; Replace suspect cables; Move mixer away from other electronic devices. |
10. Specifications
| Feature | Detail |
|---|---|
| Model | C2-4 |
| Number of Channels | 2 |
| Product Dimensions (D x W x H) | 15D x 20W x 8H Centimeters |
| Item Weight | 1500 Grams |
| Connectivity Technology | TRS, XLR |
| Power Source Type | AC |
| Frequency Response | 20 Hz (Lower limit, typical range is 20Hz-20kHz) |
| Output Connector Type | 6.35 Millimeter TRS, XLR |
| Audio Input | 2-channel |
| Voltage | 220 Volts |
| Manufacturer | Studiomaster |
11. Warranty Information
The Studiomaster C2-4 Compact Mixer comes with a 6 Months warranty from the date of purchase. This warranty covers manufacturing defects under normal use. It does not cover damage caused by misuse, accidents, unauthorized modifications, or improper installation. Please retain your proof of purchase for warranty claims.
12. Customer Support
For technical support, service, or warranty inquiries, please contact the importer or packer:
Nippon Enterprises South
24&25 Sivaganga road, Nugambakkam Chennai
Please have your product model (C2-4) and proof of purchase ready when contacting support.