1. Important Safety Information
Please read and understand all instructions before assembly and use. Retain this manual for future reference.
- Weight Capacity: Do not exceed the maximum weight limits. The top shelf supports up to 33 lb (15 kg), the bottom shelf supports up to 88 lb (40 kg), and the mesh rack supports up to 44 lb (20 kg).
- Anti-Tip Device: For safety, it is highly recommended to secure the blanket ladder to the wall using the provided anti-tip straps, especially in households with children or pets.
- Stable Placement: Ensure the product is placed on a flat, stable surface. Use the adjustable feet to compensate for uneven floors.
- Assembly: Assemble the product strictly according to the instructions. Do not overtighten screws.
- Children: Keep small parts and packaging materials away from children. Do not allow children to climb on or play with the product.
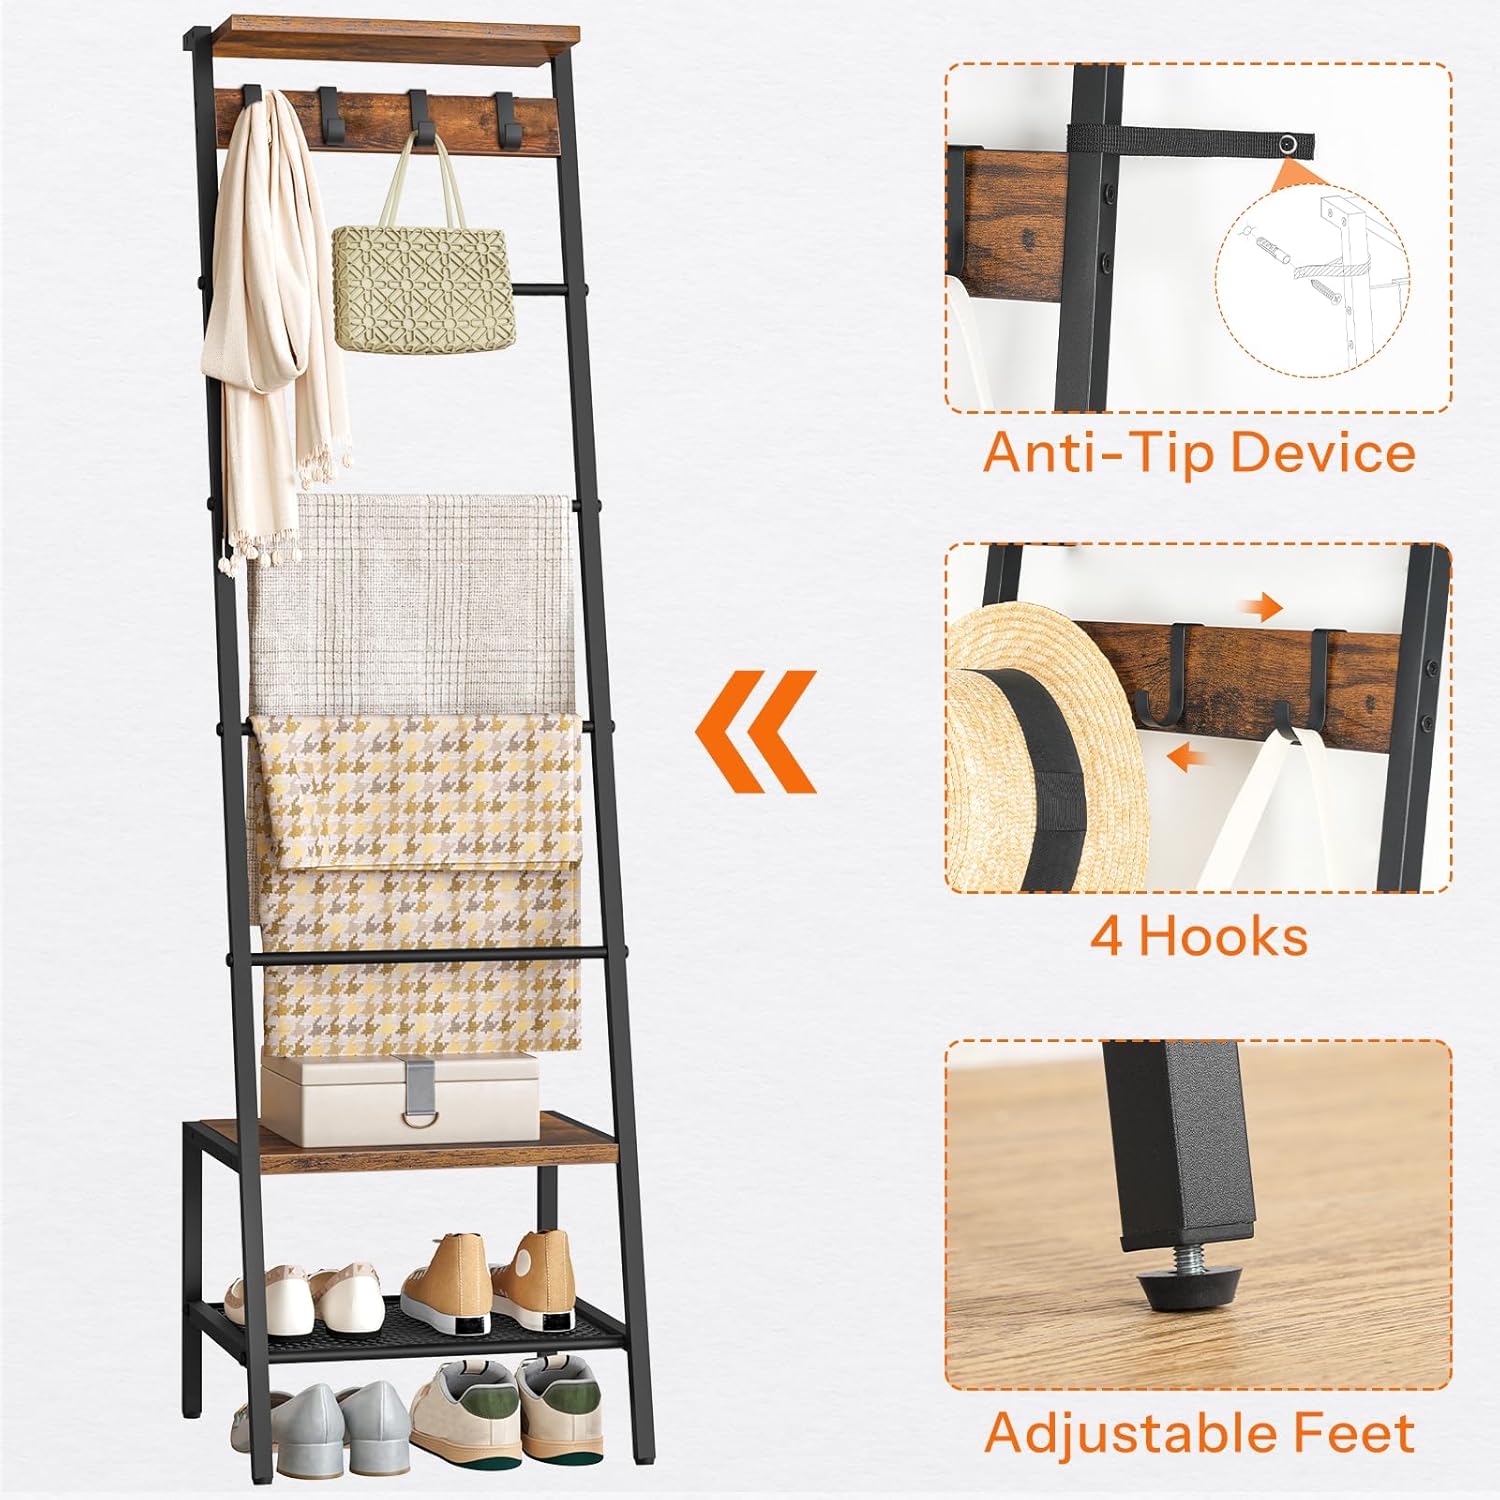
This image illustrates the anti-tip device for wall attachment, the four movable hooks for hanging items, and the adjustable feet for stability on uneven surfaces.
2. Package Contents
Verify that all components are present before beginning assembly. If any parts are missing or damaged, contact customer support.
| Component | Quantity |
|---|---|
| Metal Frame Sections | Various |
| Particleboard Shelves/Rods | Various |
| Movable Hooks | 4 |
| Adjustable Feet | 4 |
| Anti-Tip Straps and Hardware | 1 set |
| Assembly Hardware (Screws, Allen Wrench) | 1 set |
| Instruction Manual | 1 |
3. Assembly Instructions (Setup)
Follow these steps carefully for proper assembly. It is recommended to assemble the unit on a soft, clean surface to prevent scratches.
- Unpack and Identify: Unpack all components and lay them out. Refer to the parts list in the manual to identify each piece. All parts are clearly numbered.
- Assemble the Frame: Begin by connecting the main metal frame sections using the provided screws and Allen wrench. Do not fully tighten screws until all parts are loosely assembled.
- Attach Shelves and Rods: Secure the particleboard shelves and hanging rods to the metal frame as indicated in the diagram.
- Install Hooks: Place the movable hooks onto the designated hanging bar.
- Attach Adjustable Feet: Screw the adjustable feet into the bottom of the frame.
- Final Tightening: Once all components are in place, gradually tighten all screws securely.
- Install Anti-Tip Device: Attach the anti-tip straps to the top of the ladder and secure them to a wall stud using appropriate hardware. This step is crucial for stability.

This diagram provides detailed dimensions and indicates the maximum weight capacities for the top shelf, bottom shelf, and mesh rack.

A view of the assembled blanket ladder, showcasing its various storage features including hanging rods, hooks, and shelves.
4. Operating Instructions (Usage)
The HOOBRO Blanket Ladder is designed for versatile storage and display in various rooms.
- Hanging Rods: Utilize the multiple rods to hang blankets, quilts, towels, scarves, or clothing items. The giraffe-inspired design provides ample vertical space.
- Movable Hooks: The four movable hooks can be positioned as needed to hang handbags, hats, keys, or other accessories.
- Top Platform: The top shelf provides a stable surface for displaying small decorative items, plants, or books.
- Storage Shelves: The two lower shelves, including a mesh rack, offer additional space for folded items, storage baskets, or shoes.
- Placement: Ideal for living rooms, bedrooms, or bathrooms to organize and display items while saving floor space.
This video demonstrates the HOOBRO 7-Tier Blanket Ladder in various home settings, highlighting its space-saving design and multiple storage functions for blankets, towels, and other household items.

The blanket ladder shown in a bathroom, effectively holding long towels without touching the floor, demonstrating its utility for bath linens.

This image displays the blanket ladder in a bedroom, illustrating its space-saving vertical storage capability for blankets, hats, and other items.

The blanket ladder in a living room setting, highlighting its unique giraffe-inspired shape and its function as a decorative shelf for magazines and small ornaments.
5. Care and Maintenance
- Cleaning: Wipe surfaces with a soft, damp cloth. Avoid harsh chemicals or abrasive cleaners that may damage the finish.
- Dusting: Regularly dust the metal frame and wooden shelves to maintain appearance.
- Inspection: Periodically check all screws and connections to ensure they remain tight. Retighten if necessary.
- Avoid Moisture: While suitable for bathrooms, avoid prolonged exposure to excessive moisture to prevent damage to the engineered wood.
- Sunlight: Avoid placing the unit in direct sunlight for extended periods to prevent fading or warping of the wood components.
6. Troubleshooting
| Problem | Possible Cause | Solution |
|---|---|---|
| Unit is wobbly or unstable. | Screws are not fully tightened; uneven floor; anti-tip device not installed. | Ensure all screws are securely tightened. Adjust the leveling feet. Install the anti-tip device to the wall. |
| Parts do not fit together. | Incorrect orientation of parts; manufacturing defect. | Review the assembly diagrams carefully to ensure parts are oriented correctly. If parts are defective, contact customer support. |
| Missing hardware or components. | Packaging error. | Check all packaging thoroughly. If still missing, contact customer support with the specific part numbers. |
7. Specifications
- Model: BF13CJ01
- Brand: HOOBRO
- Color: Rustic Brown, Black
- Material: Engineered Wood, Metal
- Product Dimensions (L x W x H): 15.7" x 14.6" x 63.4" (40cm x 37cm x 161cm)
- Item Weight: 10.12 pounds (4.6 kg)
- Installation Type: Freestanding (with optional wall anchor)
- Finish Type: Matte, Powder Coated
- Max. Load Capacity (Top Shelf): 33 lb (15 kg)
- Max. Load Capacity (Bottom Shelf): 88 lb (40 kg)
- Max. Load Capacity (Mesh Rack): 44 lb (20 kg)
8. Warranty and Support
HOOBRO products are designed for quality and durability. For any questions, missing parts, or issues with your product, please contact HOOBRO customer support directly. Refer to your purchase documentation or the HOOBRO official website for specific warranty details and contact information.
Note: Warranty terms may vary by region and retailer.