1. Introduction
This manual provides detailed instructions for the installation, operation, and maintenance of your CAMECHO 8 Core 4+64G Car Radio. Please read this manual thoroughly before using the product to ensure proper function and safety. Keep this manual for future reference.
2. Compatible Vehicle Models
This car radio is designed for the following vehicle models:
- Chevrolet Chevy Cruze (2010-2015)
Ensure your vehicle's dashboard matches the installation rendering for proper fitment.
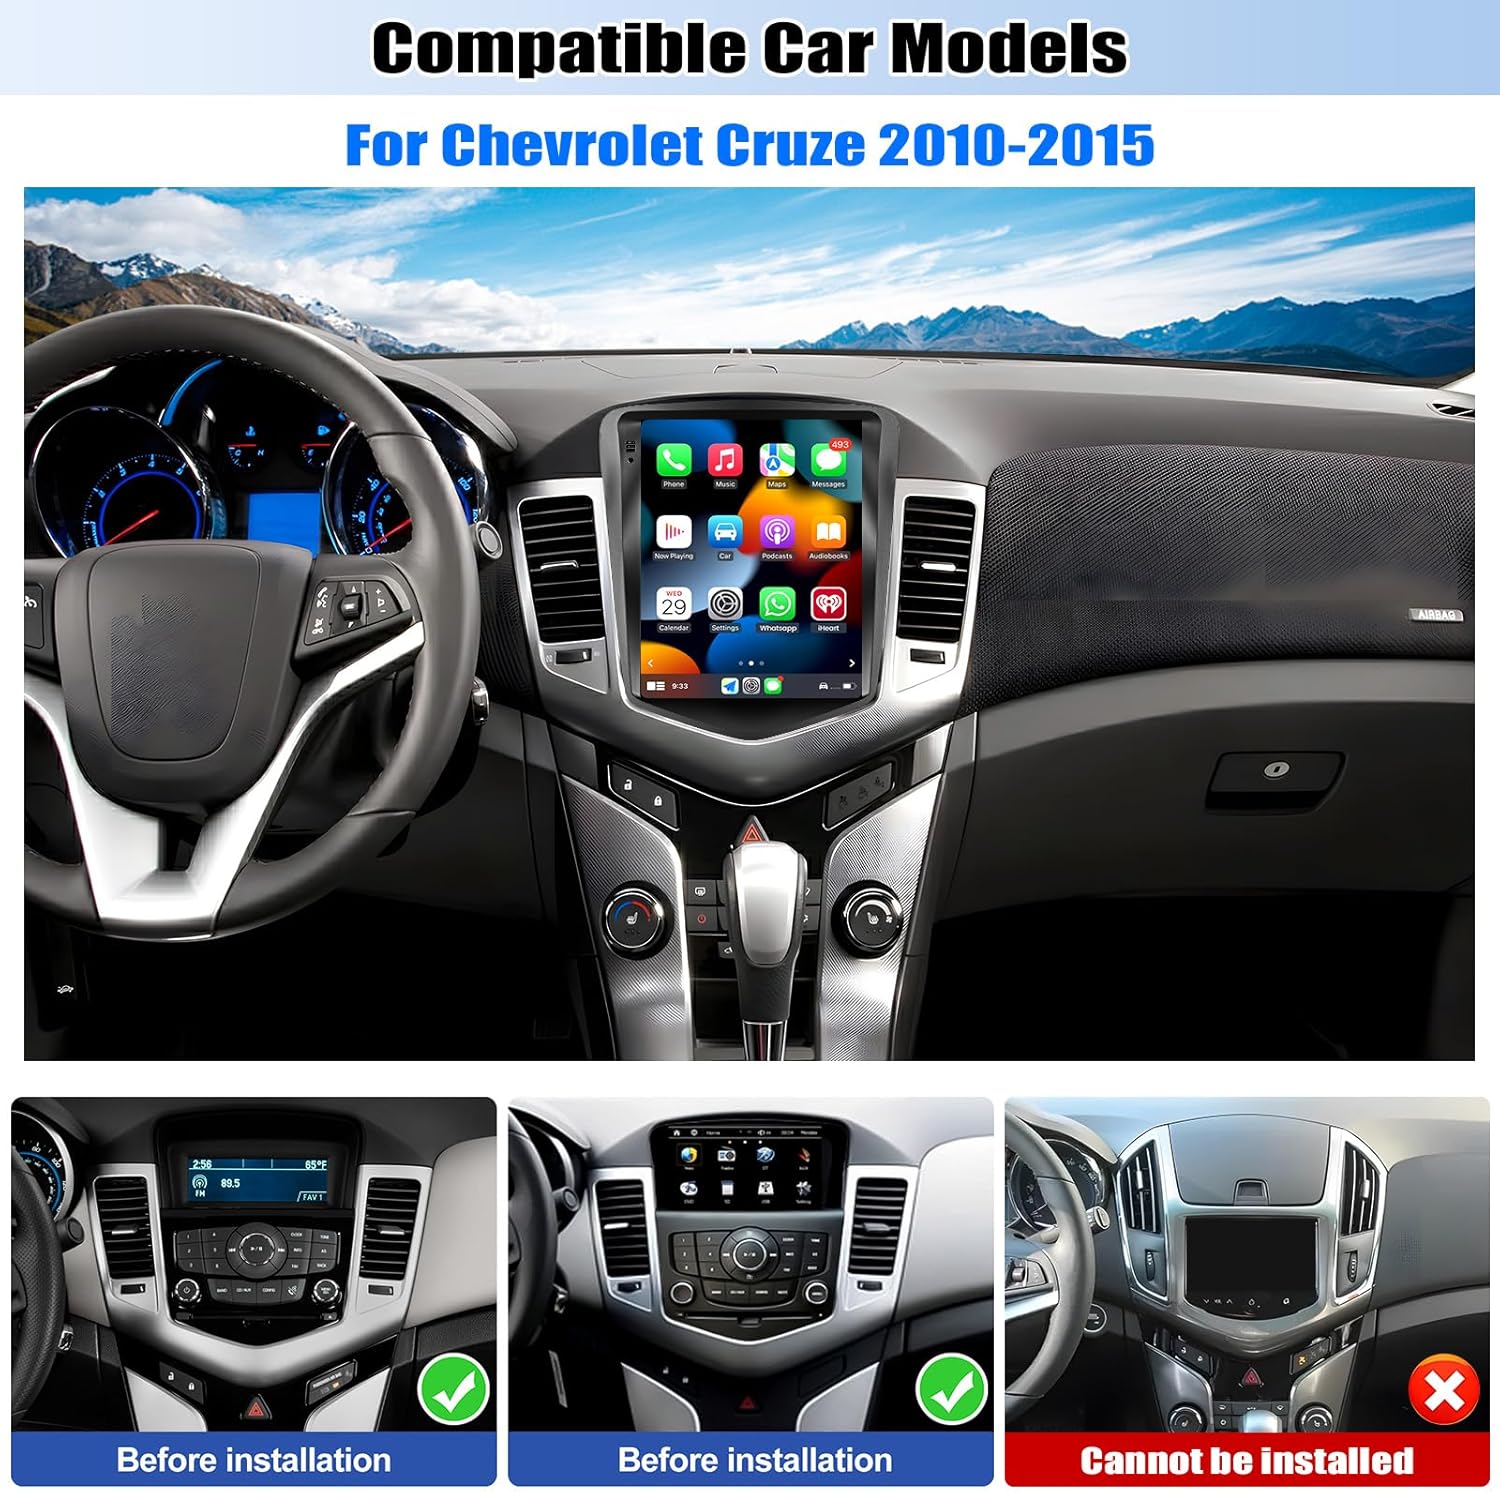
Image: CAMECHO Car Radio seamlessly integrated into a Chevrolet Cruze dashboard, illustrating the compatible vehicle models and successful installation.
3. Package Contents
The following components are included in your package:
- 1 x Android Car Stereo
- 1 x Small Horn
- 1 x CANBUS Decoder
- 1 x GPS Antenna
- 1 x Radio Antenna
- 1 x Power Cable
- 1 x RCA Cable
- 2 x USB Cables
- 1 x USB Adapter
- 1 x Rear Camera Input Cable
- 1 x User Manual

Image: A visual representation of the car radio unit, its dimensions, and a complete list of accessories provided in the package, including various cables and antennas.
4. Key Features
- Operating System: Android 15
- Memory: 4GB RAM + 64GB ROM
- Display: 9.7-inch HD Vertical Touch Screen (Resolution 1280*720)
- Connectivity: Wireless Apple CarPlay & Android Auto, Bluetooth 5.0, WiFi
- Navigation: Built-in GPS module for online/offline navigation
- Audio: 32-band Equalizer (32EQ), FM/RDS Radio with 18 presets
- Additional Functions: Steering Wheel Control support, 1080P video playback, Dual USB ports, Phone Mirror Link, Split Screen, Full RCA output, External backup camera support (camera not included)

Image: A comprehensive overview highlighting the main features of the CAMECHO Car Radio, such as GPS navigation, memory capacity, smartphone integration, audio equalization, and Bluetooth connectivity.
5. Installation Guide
5.1. Wiring Overview
Refer to the provided wiring diagrams for correct connections. Ensure all cables are securely connected before powering on the unit.

Image: A detailed diagram illustrating the various wiring connections for the car radio, including power, RCA, USB, camera input, radio antenna, and GPS antenna.
5.2. CANBUS Connection and Settings
The CANBUS decoder is essential for retaining factory steering wheel controls and other vehicle-specific functions. Connect the CANBUS box as shown in the diagram.
Video: This video demonstrates the process of connecting the CANBUS system to the car radio, which is crucial for integrating with your vehicle's existing controls.
After connecting the CANBUS, you need to set the protocol correctly:
- Go to Settings > Factory Setup.
- Enter the password: 1234.
- Navigate to CAN Settings.
- Choose Hiworld - GM - 08-14 Cruze for your car model.

Image: Instructions for connecting the CANBUS and configuring its settings within the car radio's interface to enable steering wheel controls.
5.3. Troubleshooting No Sound
If you experience no sound after installation, follow these steps:
- Connect the Small Horn to the power harness.
- Connect the AUX IN R/L (or AUDIO OUT R/L) from the RCA cable to AUX IN R/L from the Power harness.
- Open the "Car Amplifier" on the drag-down page of the top bar.
- For power amplifier, connect the ACC cable of the amplifier to the ACC cable of the Power harness.

Image: A guide to resolving common 'no sound' issues after installation, detailing connections for the small horn and RCA cables, and amplifier settings.
5.4. Reversing Camera Installation
The reversing input must be plugged in even if a reversing camera is not used. For camera wiring:
- Connect the positive pole of the power supply of the car's reversing light.
- Connect to the negative pole of the power supply of the car's reversing light.
- The reversing trigger is controlled by the stereo, so it does not require a separate connection.
If the camera still does not work, adjust the backup camera resolution via: Settings > Factory Settings (Password: 1234) > Video Source.

Image: A diagram illustrating the correct wiring for a reversing camera, including connections to the vehicle's reverse lights and the car radio unit.
5.5. Back Cover Adjustment
Some models may require adjusting the position of the back cover for proper fitment. The back cover can be moved up and down easily.
- Remove 4 screws.
- Take out the connecting wire and extend it.
- Move the back cover to the top or bottom, and fix it with 4 screws.

Image: Step-by-step instructions on how to adjust the back cover of the car radio unit, which may be necessary for certain vehicle installations.
6. Operating Instructions
6.1. Wireless Apple CarPlay Connection
To connect your iPhone wirelessly to CarPlay:
- Connect the car radio Bluetooth (Bluetooth name: "Car BT0", Bluetooth PIN: 1234). Ensure "phone audio, music audio" is connected.
- Click "SpeedPlay" on the car radio interface.
- Allow "Contacts and Favorites Sync" and "Use CarPlay with SpeedPlay".
- Wait for the connection to establish. The first connection may take longer.
Video: This video demonstrates the wireless CarPlay connection process, showing how to pair your iPhone with the car radio and activate CarPlay features.

Image: The car radio display showing active Wireless Apple CarPlay and Android Auto, providing access to phone functions, navigation, and media.
6.2. Wireless Android Auto Connection
To connect your Android phone wirelessly to Android Auto:
- Click "SpeedPlay" on the car radio interface.
- Connect your phone to the rear 4-pin USB port with the original data cable.
- Allow USB debugging on your phone.
- Wait for the connection to establish. The first connection may take longer.

Image: The car radio screen displaying the Wireless Android Auto interface, providing access to navigation, communication, and entertainment apps.
6.3. Bluetooth Hands-Free & Music Streaming
The unit features Bluetooth 5.0 for stable hands-free calls and wireless audio streaming.
- Pair your phone with the car radio via Bluetooth settings.
- Access phone contacts, make calls, and stream music directly from your device.
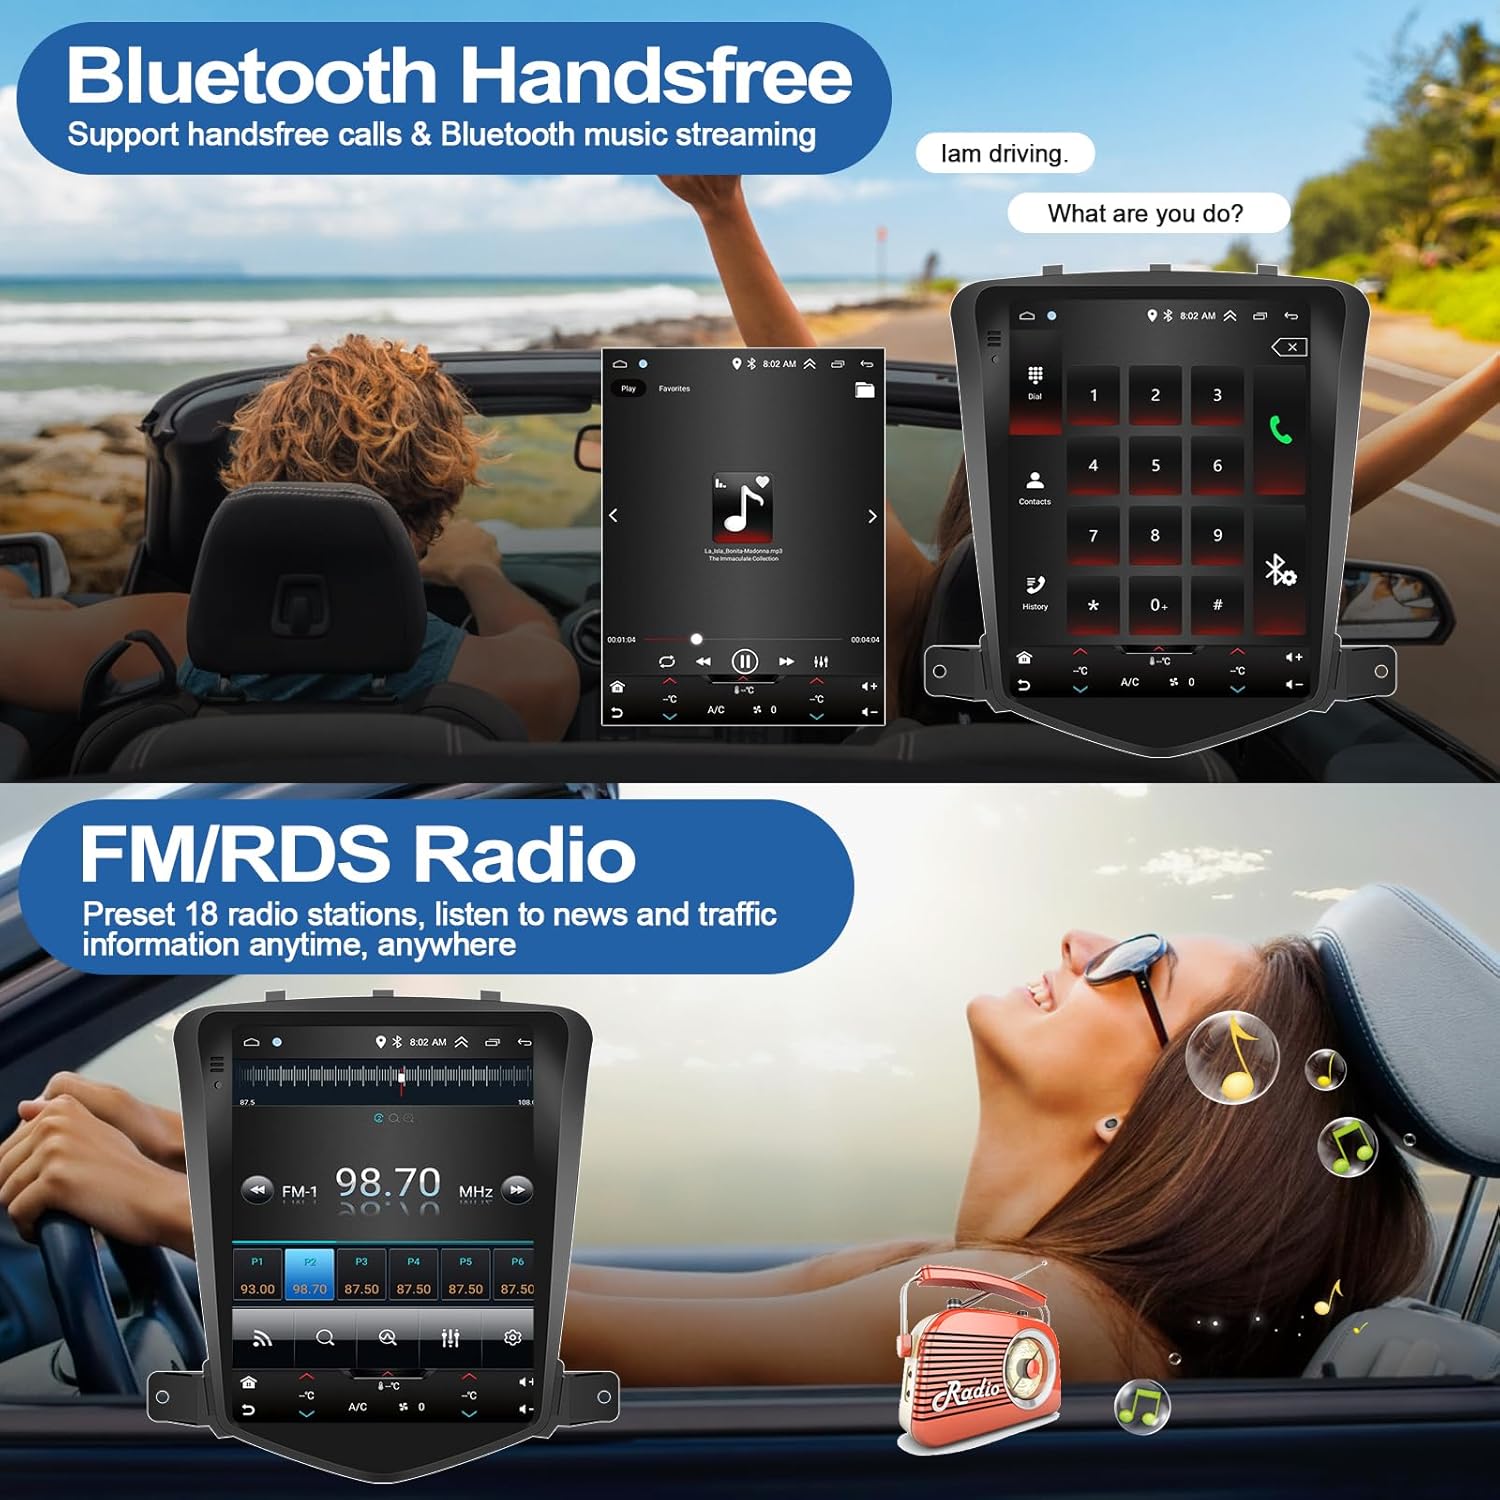
Image: The car radio screen showing the Bluetooth hands-free calling interface, allowing users to dial numbers and manage calls directly from the unit.
6.4. FM/RDS Radio Operation
Tune into your favorite radio stations with the built-in FM/RDS tuner. The unit supports 18-station presets.
- Navigate to the Radio application on the main screen.
- Use the frequency tuner to find stations or select from presets.
- RDS (Radio Data System) provides additional information like station name and traffic updates.
Image: The car radio's FM/RDS interface, demonstrating how to tune into radio stations and utilize the preset functions for quick access.
6.5. GPS Navigation
The unit includes a built-in GPS module for reliable navigation. You can use both online and offline maps.
- Access the Navigation application from the main screen.
- Download offline maps for areas without internet access.
- Use online maps by connecting to WiFi.

Image: The car radio displaying GPS navigation, showing map details and indicating the availability of WiFi connectivity for online services.
6.6. WiFi Connection
Connect to a mobile hotspot or local WiFi network to access online features and download applications.
- Go to Settings > WiFi.
- Select your desired network and enter the password.
- Once connected, you can browse the internet, stream media, and download apps from the Google Play Store.
Video: This video illustrates how to connect the car radio to a WiFi network, enabling access to online features and app downloads.

Image: The car radio screen showcasing a variety of applications accessible through a WiFi connection, including social media, streaming services, and web browsing.
6.7. Split Screen Function
The split-screen feature allows you to run two applications simultaneously, such as navigation and music playback.
- Open the first application.
- Press and hold the recent apps button or swipe from the bottom to access split-screen mode.
- Select the second application to display alongside the first.

Image: The car radio demonstrating its split-screen capability, allowing users to view and interact with two different applications, such as radio and navigation, concurrently.
6.8. Steering Wheel Control Setup
After connecting the CANBUS, you can configure your steering wheel controls to manage various functions of the car radio.
- Access the Steering Wheel Control settings in the unit's menu.
- Follow the on-screen prompts to map your vehicle's steering wheel buttons to desired functions (e.g., volume, track skip, call answer).

Image: The car radio interface displaying options for DSP sound adjustments and the setup menu for integrating and customizing steering wheel controls.
6.9. Mirror Link Usage
The Mirror Link function allows you to cast your smartphone's screen to the car radio display.
- Open the Phone Link application on the car radio.
- Follow the instructions to connect your smartphone (via USB or WiFi hotspot) and initiate screen mirroring.

Image: The car radio screen demonstrating the Mirror Link feature, which duplicates the content of a connected smartphone onto the larger display.
6.10. DSP & 32-Band EQ Adjustment
Enhance your audio experience with the built-in Digital Sound Processor (DSP) and 32-band Equalizer.
- Access the Equalizer application from the main screen.
- Adjust frequency bands, sound field, and other audio settings to customize your sound profile.

Image: The car radio's audio settings interface, showcasing the 32-band equalizer for precise sound customization and optimization.
7. Maintenance
To ensure the longevity and optimal performance of your car radio:
- Regularly clean the screen with a soft, lint-free cloth. Avoid abrasive cleaners.
- Keep the unit free from dust and moisture.
- Avoid exposing the unit to extreme temperatures.
- Ensure proper ventilation around the unit.
8. Troubleshooting
If you encounter issues, refer to the following common solutions:
- No Power: Check all power connections and fuses. Ensure the ignition is on.
- No Sound: Refer to Section 5.3 for detailed troubleshooting steps.
- CarPlay/Android Auto Disconnection: Ensure Bluetooth and WiFi connections are stable. Re-pair your device if necessary. Check for software updates for both the head unit and your smartphone.
- GPS Signal Loss: Ensure the GPS antenna is properly installed and has a clear view of the sky.
- Steering Wheel Controls Not Working: Verify CANBUS connection and settings (Section 5.2).
- Touch Screen Unresponsive: Try restarting the unit. If the issue persists, contact support.
9. Specifications
| Feature | Specification |
|---|---|
| Brand | CAMECHO |
| Operating System | Android |
| Memory Storage Capacity | 64 GB |
| Screen Size | 9.7 Inches |
| Display Type | LCD |
| Touch Screen Type | Capacitive |
| Connectivity Technology | Bluetooth |
| Bluetooth Version | 5.0 |
| Supported Navigation System | GPS |
| Product Dimensions (L x W x H) | 9.5" x 2.6" x 9.8" |
| Compatible Devices | For Chevrolet Chevy Cruze 2010-2015 |
10. Warranty and Support
This CAMECHO Car Radio comes with a 1-Year Warranty from the date of purchase.
For technical assistance, troubleshooting, or warranty claims, please contact our customer support team:
- Email: CAMECHOVIP@126.com
Please provide your product model and purchase details when contacting support for faster service.

Image: Customer support contact information, including an email address for assistance and user manual inquiries.