1. Introduction
Thank you for purchasing the ONEED Haute42 C16 Leverless Arcade Controller. This manual provides detailed instructions for setting up, operating, maintaining, and troubleshooting your device. Please read this manual carefully to ensure optimal performance and longevity of your controller.
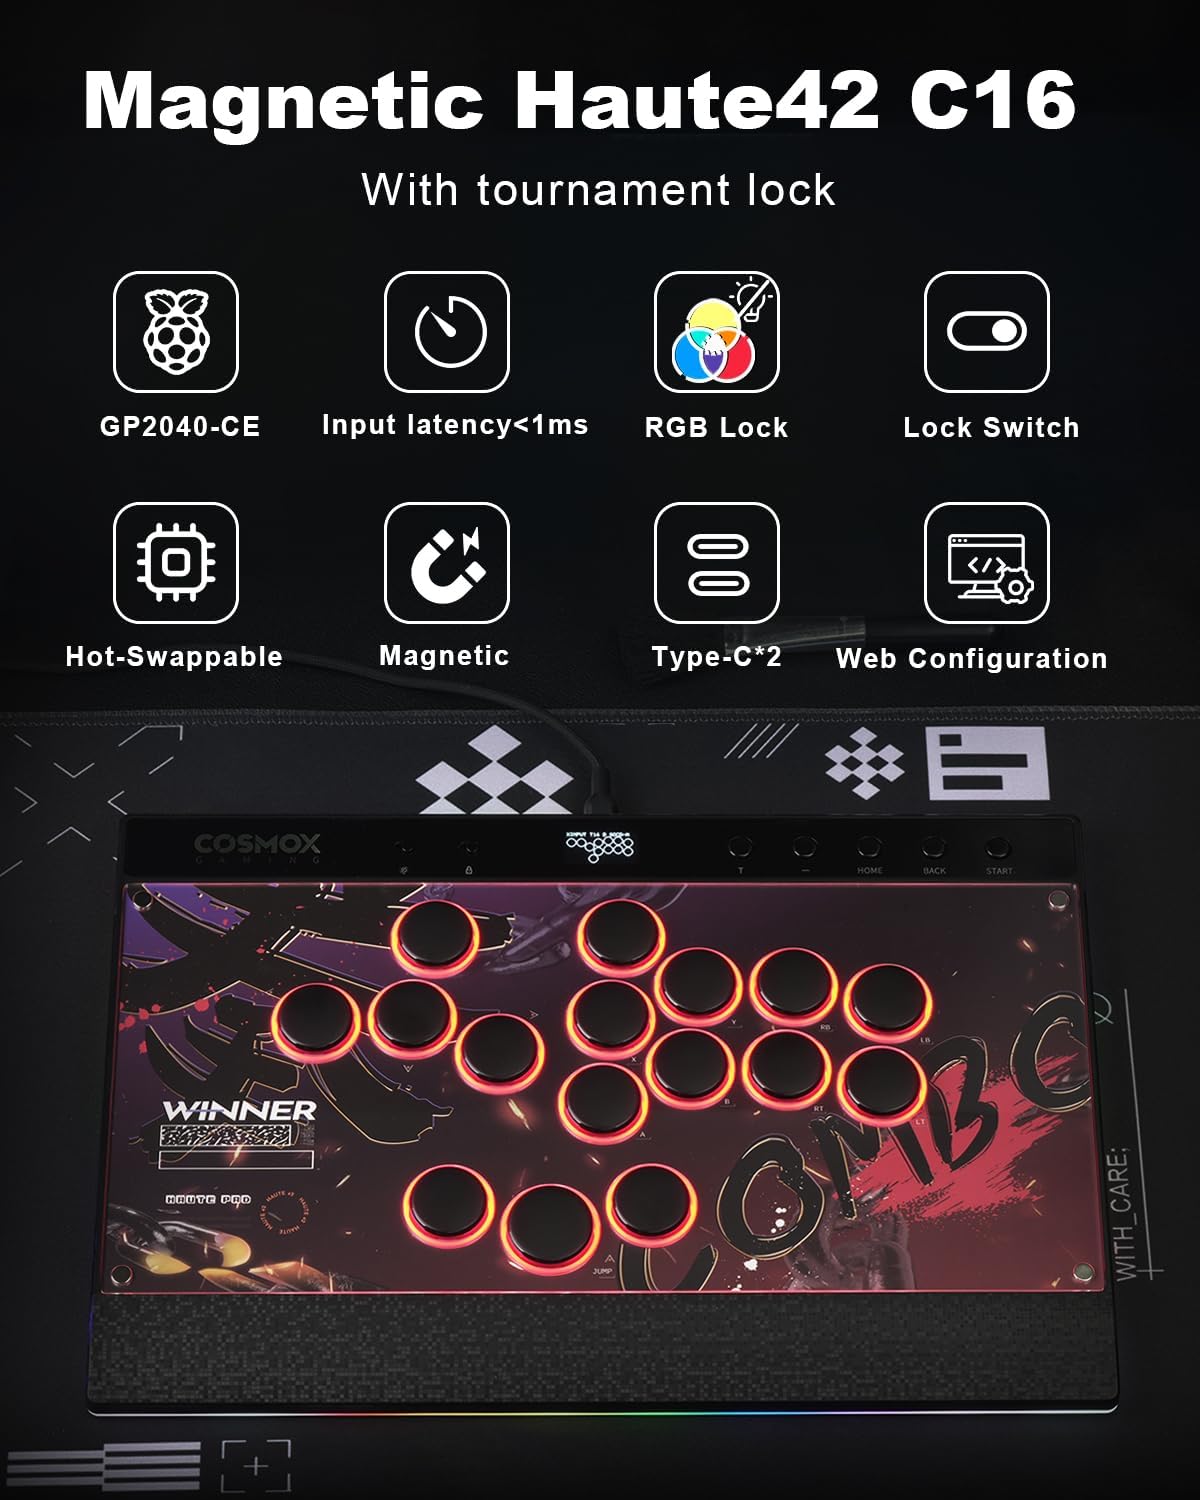
Image 1: The Haute42 C16 Leverless Arcade Controller, showcasing its sleek design and button layout.
Video 1: An overview of the Haute42 Leverless Controller C16, highlighting its features and design.
2. Product Features
- Magnetic Design: Easily customize artwork without screws. Features RGB rings around buttons and an ergonomic wrist rest.
- Tournament Lock Switch & RGB: Deactivates extra buttons to prevent accidental presses during competition.
- Ultra Low Latency: Equipped with Raspberry Pi RP2024 controller chip and GP2040-CE firmware, offering less than 1ms latency.
- System Compatibility: Compatible with Windows 10+, Steam Deck, PS3, PS4 (with adapter), Switch, and Windows (Keyboard mode only).
- Firmware Updates: Supports firmware updates via web browser configuration (access 192.168.7.1).
- Hot-Swappable Switches: Allows for easy replacement of Kailh Wind Engine low-profile switches.
3. What's in the Box

Image 2: Contents of the Haute42 C16 package, including the controller, cables, and customization tools.
The package contains the following items:
- Haute42 C16 Controller
- Art Templates (x4)
- White Art Templates (x2)
- Wind Engine Switches (x2)
- 3M Data Cable
- Switch Puller
- Introduction Manual
4. Setup
4.1 Initial Connection
Connect the Haute42 C16 controller to your gaming device using the provided 3M data cable. The controller will automatically attempt to detect the correct input mode.
4.2 Customizing the Magnetic Panel
The Haute42 C16 features a magnetic panel for easy customization. To change the artwork:
- Press the back push button to release the magnetic panel.
- Remove the existing artwork.
- Place your desired custom artwork or one of the provided templates.
- Align the panel and allow the magnets to secure it back in place.

Image 3: Illustration of how to remove the magnetic panel by pressing the release button.

Image 4: Examples of custom sticker skins applied to the controller's magnetic panel.

Image 5: The controller's display supporting custom splash screens.
4.3 Replacing Switches
The Haute42 C16 uses hot-swappable Kailh Wind Engine low-profile switches. To replace a switch:
- Carefully remove the keycap from the switch.
- Use the provided switch puller tool to gently extract the switch from the PCB.
- Align the pins of the new switch with the holes on the PCB.
- Press the new switch firmly into place until it clicks.
- Reattach the keycap.
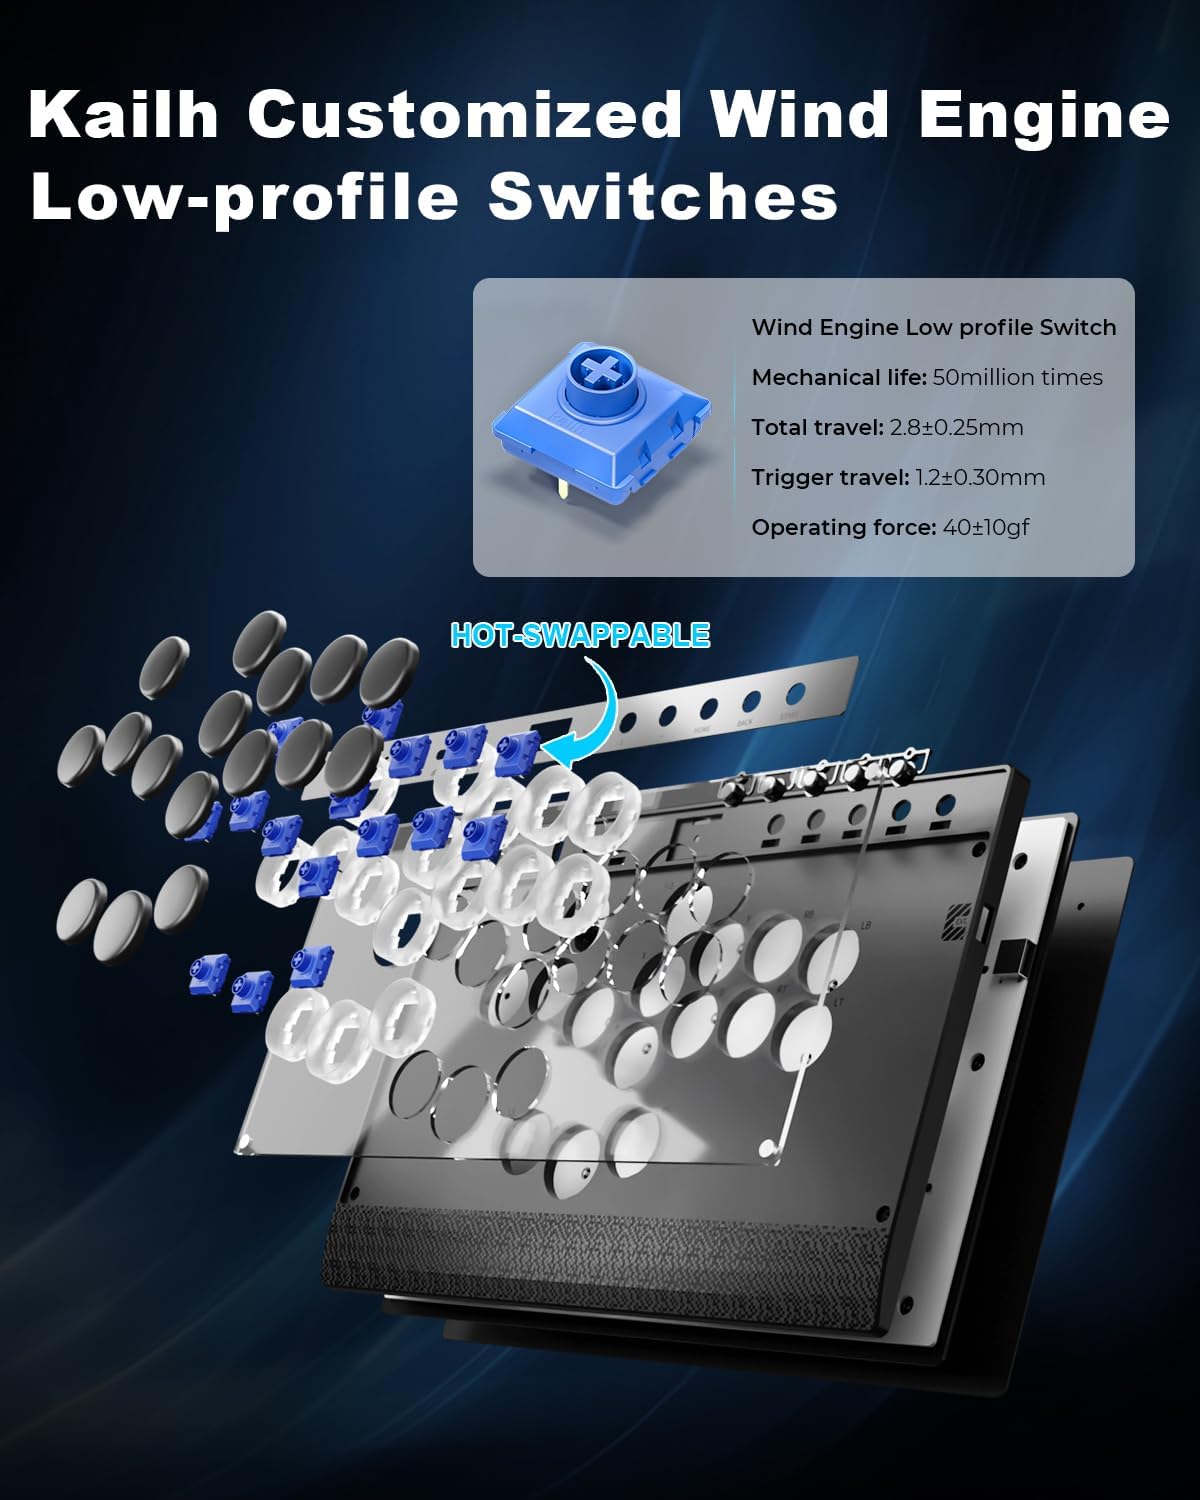
Image 6: Diagram illustrating the hot-swappable Kailh Wind Engine low-profile switches and their components.
4.4 RGB Lighting
The controller features customizable RGB lighting around the buttons and along the rims. Refer to the 'Customizing Key Values and LEDs' section for detailed instructions on adjusting RGB settings.

Image 7: The Haute42 C16 controller displaying various RGB lighting effects around its buttons.
5. Operating Instructions
5.1 System Compatibility
The Haute42 C16 is compatible with a range of platforms:
- PC: Windows 10 or above, Steam Deck (XInput mode).
- PlayStation: PS3, PS4 (requires an adapter for PS4/PS5).
- Nintendo: Switch.
- Other: Windows (Keyboard mode only).
5.2 Input Mode Settings
The controller supports various input modes. You can configure these modes via web configuration or by holding specific buttons during connection.
Video 8: A guide on how to adjust the input mode settings for the controller using the web configurator.
5.3 Connecting to PS4/PS5
For PS4 and PS5 consoles, an adapter may be required. Follow these steps:
- Ensure your arcade controller has the latest firmware.
- Plug the P5BOOTS adapter into the EXT port of the controller.
- Connect the controller to your PS4/PS5 console.
- Set the controller input mode to PS4 or PS5 mode as required.
- Press the HOME button on the controller to connect.
Video 9: Instructions on how to use the P5BOOTS adapter to connect the leverless controller to PS4/PS5 consoles.
5.4 Connecting to Switch2
To connect to Switch2:
- Press and hold the 'A' button while plugging in the cable to switch to SWITCH mode.
- Then, press and hold BACK + START + Left Directional Button to switch to Left Stick mode.
- The controller should now function correctly on Switch2.
5.5 Tournament Lock Switch
The tournament lock switch prevents accidental button presses during competitive play. Locate the lock switch on the controller and toggle it to the 'locked' position to deactivate non-essential buttons.

Image 10: The Haute42 C16 controller highlighting the tournament lock switch and RGB lighting.
5.6 Web Configuration
For advanced settings and firmware updates, connect your controller to a PC and access the web configurator:
- Plug your controller into a PC.
- Open a web browser and navigate to 192.168.7.1.
- From here, you can configure input modes, button mappings, and update firmware.
5.7 Key Value Table
The following table outlines the default key mappings for various input modes:

Image 11: A detailed key value table showing button mappings for different controller modes.
5.8 Customizing Key Values and LEDs
You can customize button mappings and LED lighting effects through the web configurator. This allows for personalized control and visual feedback.
Video 12: A tutorial on how to customize the RGB lighting effects on your controller.
6. Maintenance
To ensure the longevity and optimal performance of your Haute42 C16 controller, follow these maintenance guidelines:
- Cleaning: Use a soft, dry cloth to wipe down the controller's surface. For stubborn dirt, a slightly damp cloth with mild soap can be used, ensuring no liquid enters the internal components.
- Storage: Store the controller in a cool, dry place away from direct sunlight and extreme temperatures.
- Cable Care: Avoid sharp bends or kinks in the USB-C cable to prevent damage.
- Switch Longevity: While switches are hot-swappable, avoid unnecessary removal and reinsertion to prevent wear on the sockets.
7. Troubleshooting
If you encounter issues with your Haute42 C16 controller, try the following steps:
- Controller Not Responding: Ensure the USB-C cable is securely connected to both the controller and the device. Try a different USB port or cable.
- Incorrect Input Mode: Verify the input mode setting via the web configurator or by holding the correct button combination during connection.
- PS4/PS5 Connection Issues: Confirm that the P5BOOTS adapter is correctly inserted and the input mode is set to PS4 or PS5. Ensure the console's USB settings allow for external devices.
- Buttons Not Working: Check if the tournament lock switch is engaged. If individual buttons are unresponsive, consider replacing the switch using the provided switch puller.
- RGB Lighting Problems: Access the web configurator to check LED settings. Ensure the LED order has not been disrupted.
- Firmware Update Failure: Ensure a stable internet connection and follow the web configurator instructions carefully. If issues persist, contact customer support.
8. Specifications
| Feature | Detail |
|---|---|
| Hardware Interface | USB Type C |
| Display Type | Digital |
| Material | Acrylic, Aluminum, Plastic |
| Product Dimensions | 11.8 x 7.87 x 0.53 inches |
| Item Weight | 2.4 pounds |
| Item Model Number | ON-Haute C16 |
| Release Date | April 23, 2025 |
| Manufacturer | ONEED |
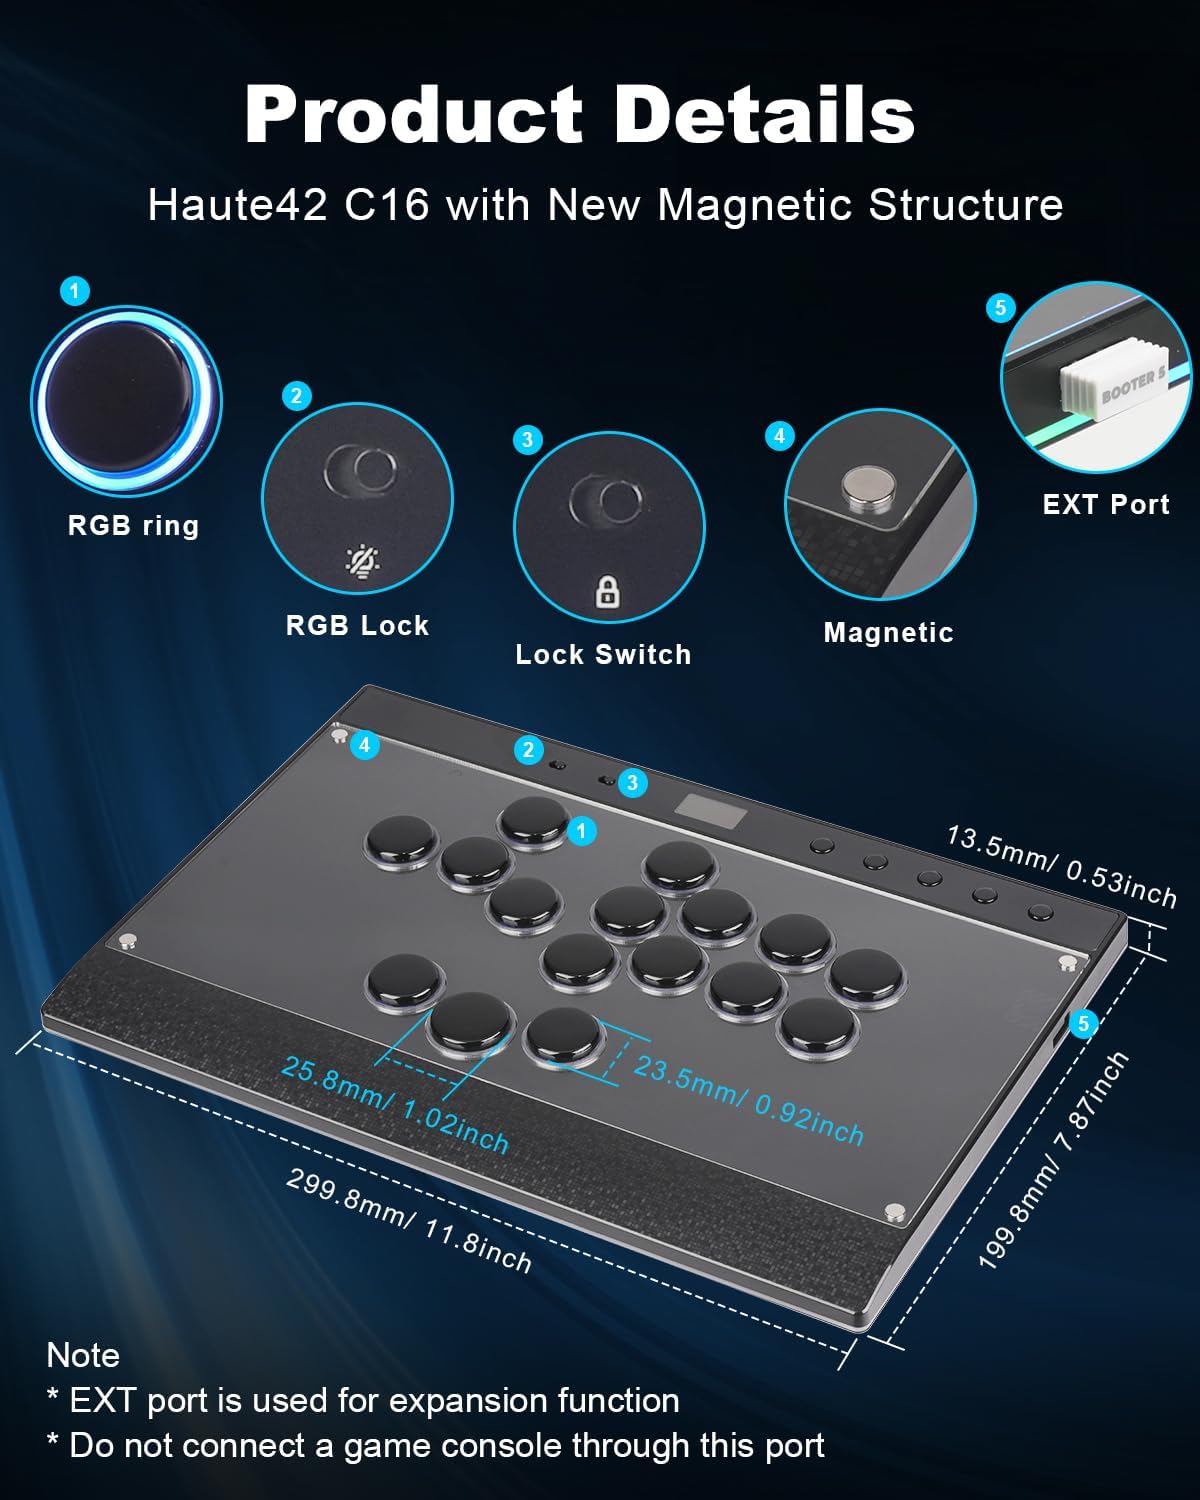
Image 13: Detailed view of the Haute42 C16, including its dimensions and key components.
9. Warranty and Support
ONEED provides technical support for the Haute42 C16 controller. For any questions, issues, or warranty claims, please visit our official website or contact our customer service team. Keep your purchase receipt as proof of purchase for warranty services.


