1. Introduction
Thank you for purchasing the YOUTHINK TSWP10 Bathroom Clock Thermometer Hygrometer. This device is designed to provide time, temperature, and humidity readings, along with a convenient countdown function, all within an IP65 waterproof design suitable for shower environments. Please read this manual thoroughly before use to ensure proper operation and maintenance.
2. Safety Information
- Do not immerse the device in water, despite its IP65 rating, which protects against splashes and jets.
- Keep the device away from extreme temperatures and direct sunlight to prevent damage to internal components.
- Use only the specified power supply (DC5V) or batteries (3 x AAA, not included).
- Do not attempt to disassemble or repair the device yourself. Contact customer support for assistance.
- Keep batteries out of reach of children. Dispose of used batteries responsibly according to local regulations.
3. Product Overview
The YOUTHINK TSWP10 features a clear digital display showing time, temperature, humidity, and countdown status. Its sealed design ensures durability in humid environments.

Figure 3.1: Front view of the YOUTHINK TSWP10 Bathroom Clock, displaying current time, temperature, and humidity readings on its digital screen.
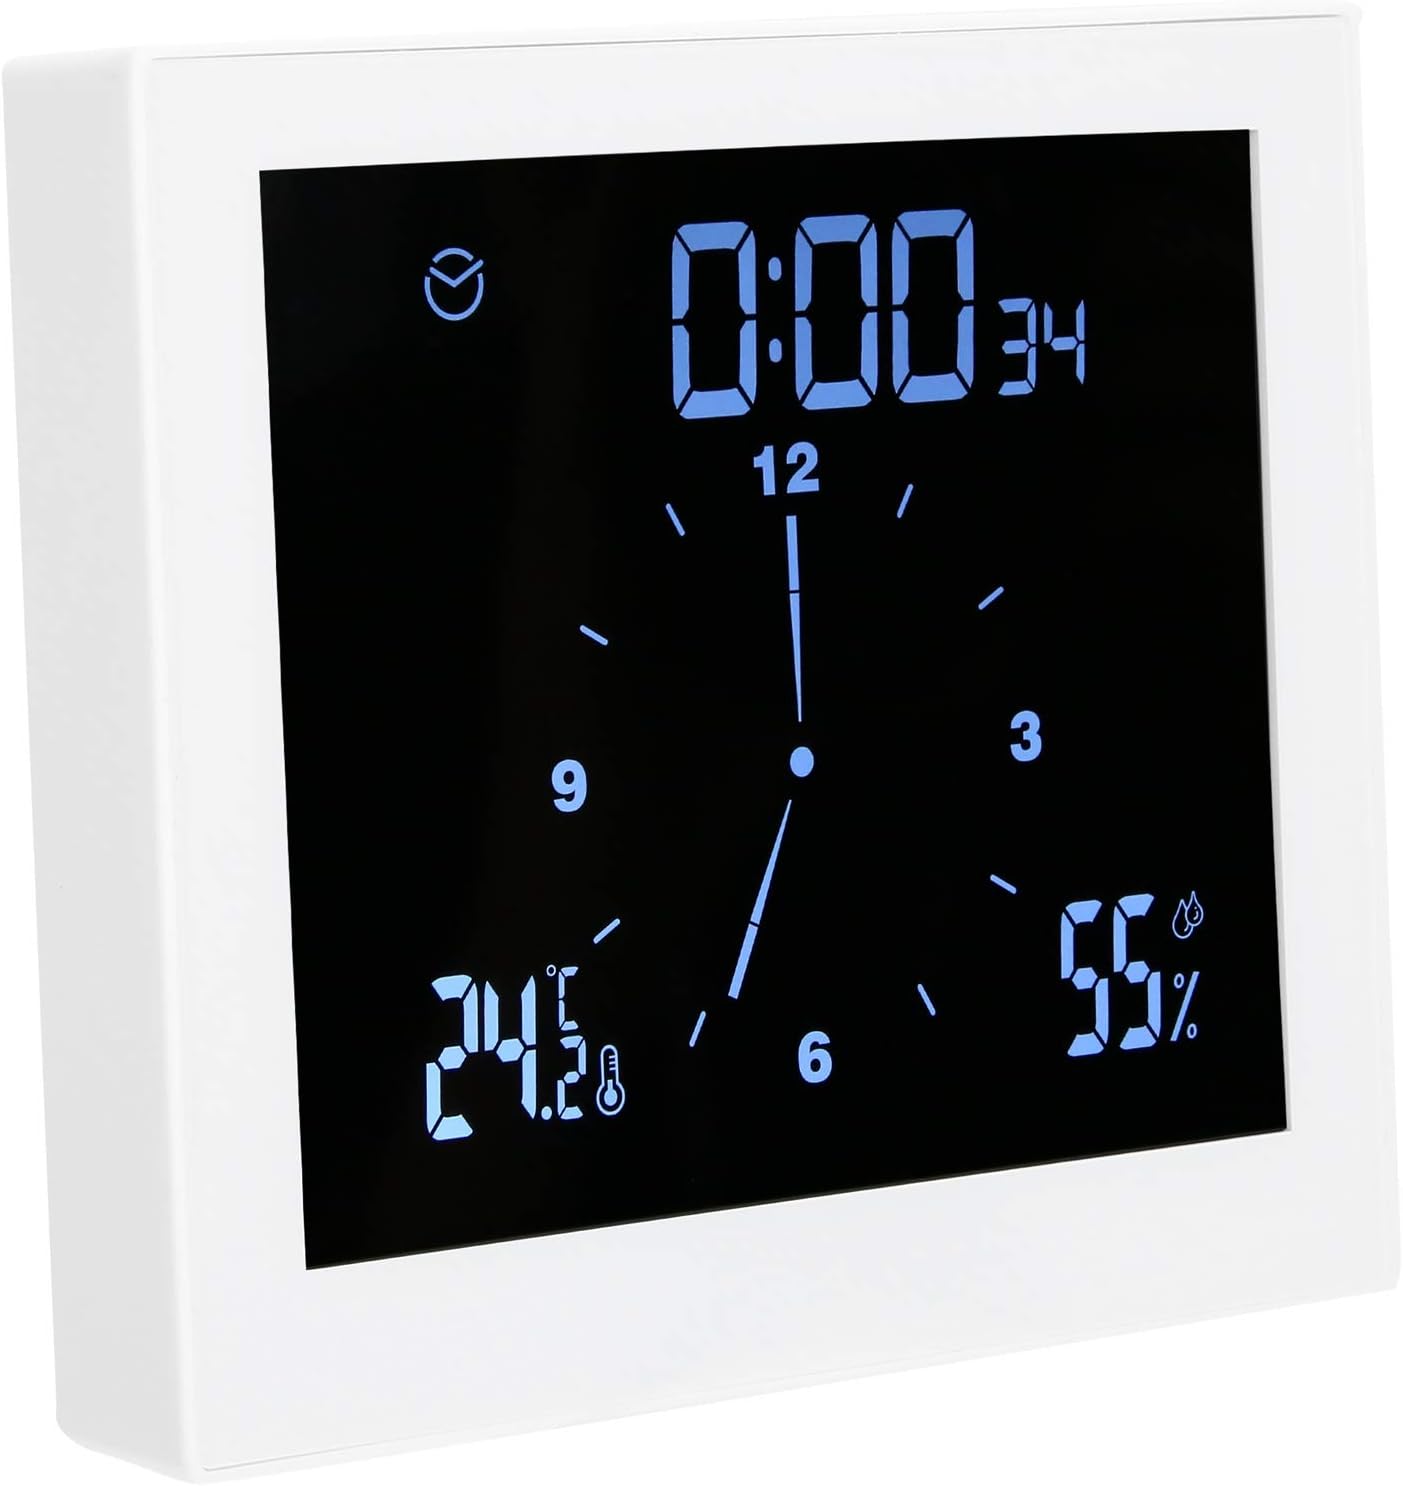
Figure 3.2: Angled view of the YOUTHINK TSWP10 Bathroom Clock, highlighting its compact design and clear display.
3.1 Key Features
- IP65 Sealed Design: Protects against water splashes and dust.
- Digital Display: Shows time, temperature, humidity, and countdown.
- Countdown Function: Adjustable timer for shower duration.
- Temperature & Humidity Monitoring: Displays current environmental conditions.
- Alarm Function: Customizable alarms for time and environmental limits.
- Suction Cup Mounting: Easy installation on smooth surfaces.
3.2 Package Contents
- 1 x YOUTHINK TSWP10 Bathroom Clock
- 1 x Power Line (USB cable)
- 1 x Suction Cup
- 1 x User Manual (this document)
4. Setup
4.1 Powering the Device
The TSWP10 can be powered either via the included DC5V USB cable or by 3 x AAA batteries (not included).
- Using DC Cable: Connect the provided USB power cable to the device's port and to a DC5V power adapter (not included).
- Using Batteries: Open the battery compartment on the back of the device and insert 3 x AAA batteries, ensuring correct polarity.

Figure 4.1: The USB power cable used to power the YOUTHINK TSWP10 Bathroom Clock.
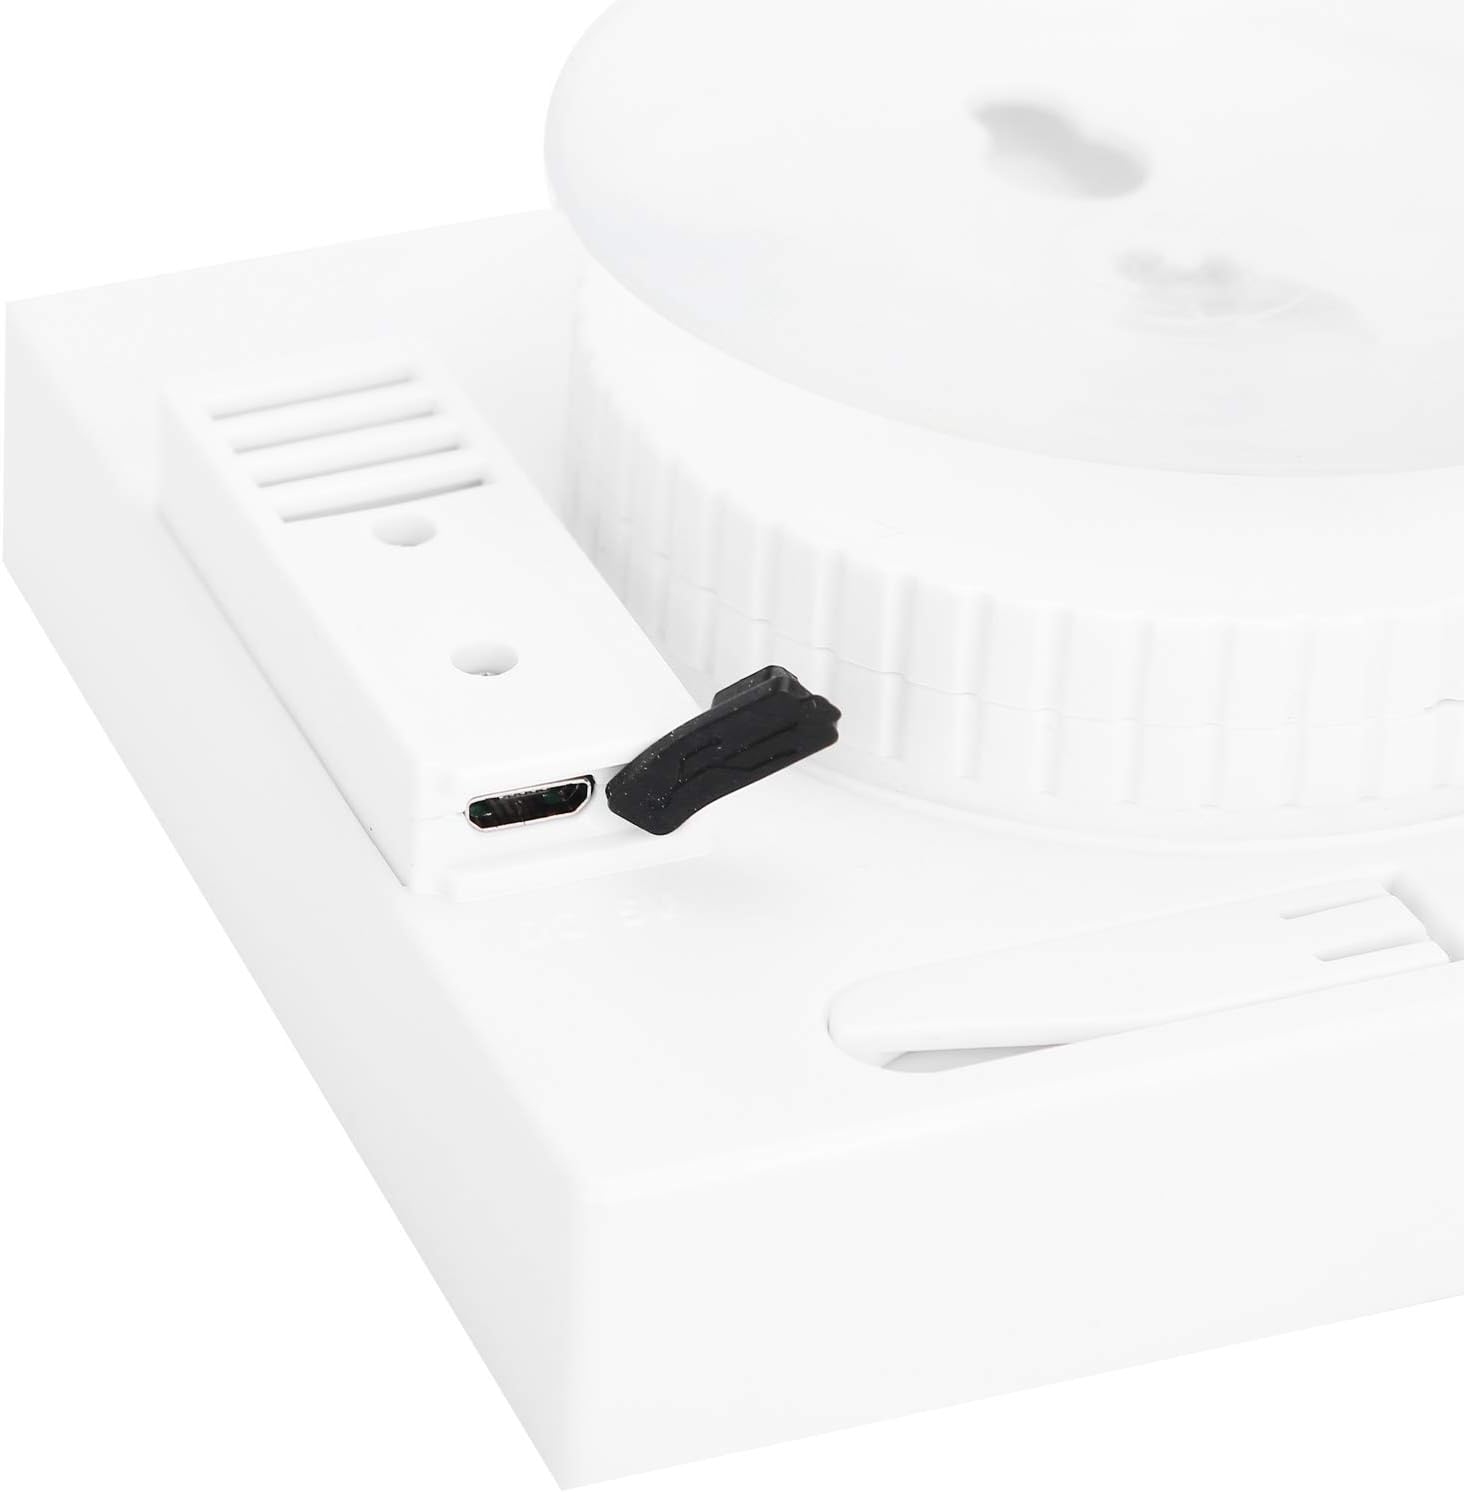
Figure 4.2: Close-up view of the USB charging port, protected by a silicone plug, on the side of the device.
Upon initial power-on, the LED display will show a full segment for 3 seconds, cycling through red, orange, and white backlight colors, followed by a "Bi" sound, indicating the system is ready.
4.2 Installation
The device comes with a solid suction cup for easy mounting.
- Ensure the desired surface (glass, smooth tile) is clean and dry.
- Press the suction cup firmly against the surface until it adheres securely.
- Attach the clock to the suction cup mount.

Figure 4.3: Rear view of the YOUTHINK TSWP10 Bathroom Clock, illustrating the integrated suction cup for wall mounting.
5. Operating Instructions
Familiarize yourself with the device's buttons for optimal use.
5.1 Time Setting
- In time display mode, press and hold the "Mode" button to enter time setting status.
- Use the "+" and "-" buttons (or similar increment/decrement buttons) to adjust the hours and minutes.
- Press the "Mode" button again to confirm and move to the next setting, or to exit setting mode.
5.2 Alarm Setting
- In time display mode, press the "Mode" button repeatedly to switch to the alarm display mode.
- Press and hold the "Mode" button to enter alarm setting status.
- Use the "+" and "-" buttons to adjust the alarm time.
- Press the "Mode" button again to confirm and exit alarm setting mode.
5.3 Snooze Mode
When the alarm sounds:
- Press the "Snooze/Clear" button (referred to as "Delete" in the original description) to enter a 5-minute snooze mode.
- Press any other button to end the alarm mode completely.
5.4 Countdown Function
To set the countdown timer:
- In time display mode, press the "10" button (likely a dedicated button for 10-minute increments) to add 10 minutes to the countdown time. Each press within 3 seconds adds 10 minutes, up to 99 minutes.
- Alternatively, press the "1" button (likely a dedicated button for 1-minute increments) to add 1 minute to the countdown time. Each press within 3 seconds adds 1 minute, up to 99 minutes.
- The countdown will begin automatically after setting. An alarm will sound when the countdown reaches zero.
5.5 Temperature and Humidity Limit Alarm Setting
This function allows you to set upper and lower limits for temperature and humidity.
- In time display mode, press the "Alarm" button (likely a dedicated button for this function) to toggle the temperature and humidity limit alarm function ON or OFF.
- When the upper limit is exceeded, the backlight will turn red and sound 5 times.
- When the lower limit is exceeded, the backlight will turn orange and sound 5 times.
- Refer to the full manual for detailed instructions on setting the specific upper and lower limits.
5.6 Temperature and Humidity Calibration
To calibrate temperature and humidity values:
- In time display mode, press the "Mode" button and the "+" button simultaneously to enter the temperature value calibration state.
- Use the "+" and "-" buttons to adjust the temperature value.
- Press "Mode" again to switch to humidity calibration, and adjust using "+" and "-".
- Press "Mode" to save and exit.
6. Maintenance
6.1 Cleaning
- Wipe the device with a soft, damp cloth. Do not use abrasive cleaners or solvents.
- Ensure the silicone plug for the USB port is securely closed to maintain IP65 rating.
6.2 Battery Replacement
- When the battery indicator shows low power, replace the 3 x AAA batteries.
- Open the battery compartment, remove old batteries, and insert new ones with correct polarity.
- Dispose of old batteries according to local environmental regulations.
7. Troubleshooting
| Problem | Possible Cause | Solution |
|---|---|---|
| Device does not power on. | No power, dead batteries, or loose cable. | Check USB cable connection, replace batteries, or ensure power adapter is working. |
| Display is dim or flickering. | Low battery power. | Replace batteries or connect to DC power. |
| Suction cup does not hold. | Surface is not clean, smooth, or dry. | Clean the surface thoroughly. Ensure it is smooth and dry before applying the suction cup. |
| Incorrect temperature/humidity readings. | Needs calibration or environmental interference. | Perform temperature and humidity calibration as per Section 5.6. Ensure device is not near heat sources or vents. |
| Alarm not sounding. | Alarm function is off or volume is too low. | Check alarm settings (Section 5.2). Ensure the alarm is enabled. |
8. Specifications
- Model: TSWP10
- Material: Plastic
- Dimensions: Approximately 15 x 3.81 x 7 cm (5.9 x 1.5 x 2.75 inches)
- Weight: Approximately 310g (10.9 oz)
- Waterproof Rating: IP65
- Power Supply: DC5V or 3 x AAA Batteries (not included)
- Display: Digital LED with backlight
- Functions: Time, Temperature, Humidity, Countdown, Alarm, Snooze, Limit Alarms
9. Warranty and Support
YOUTHINK products are designed and manufactured to the highest quality standards. For warranty information, technical support, or customer service inquiries, please refer to the contact information provided with your purchase or visit the official YOUTHINK website.
Please retain your proof of purchase for any warranty claims.