
Perfiware HS1000
Perfiware HS1000 Electronic Cash Register User Manual
Model: HS1000
Brand: Perfiware
1. Introduction
This manual provides detailed instructions for the setup, operation, maintenance, and troubleshooting of your Perfiware HS1000 Electronic Cash Register. This all-in-one solution is designed for small businesses, restaurants, and stores, featuring a built-in scanner, receipt printer, dual display, and a secure cash drawer. Please read this manual thoroughly to ensure proper use and to maximize the functionality of your device.
2. What's in the Box
Upon unpacking, please verify that all the following components are included:
- Cash Register with Cash Drawer (x1)
- Scanner (HS1000 model) (x1)
- USB Cord (x1)
- Power Cable (x1)
- 58mm Thermal Print Paper Rolls (x3)
- Cash Drawer Keys (x2)

Image: The Perfiware HS1000 Electronic Cash Register with its integrated scanner, cash drawer, and various accessories including paper rolls, USB cable, power cable, and cash drawer keys.
3. Setup Guide
3.1 Initial Connections
Before operating your cash register, ensure all necessary connections are made securely.
- Power Connection: Connect the power cable to the cash register and a suitable power outlet.
- Scanner Connection: Plug the HS1000 scanner into the designated RS232 port on the back of the cash register.
- USB Connection (Optional): For software integration and data management, connect the USB cable from the cash register to your computer.
- External Printer/Keyboard (Optional): If using external peripherals, connect them to the respective RX232 or PS2 ports.

Image: Rear view of the cash register highlighting the power input, switch, external receipt printer port, barcode scanner port, keyboard port, and USB port for computer connection.
3.2 Loading Thermal Paper
The cash register uses 58mm thermal paper rolls for receipt printing.
- Open the printer cover located at the top of the cash register.
- Insert the thermal paper roll with the paper feeding from the bottom, ensuring the thermal side (usually smoother) faces the print head.
- Pull a small amount of paper out and close the cover firmly until it clicks into place.
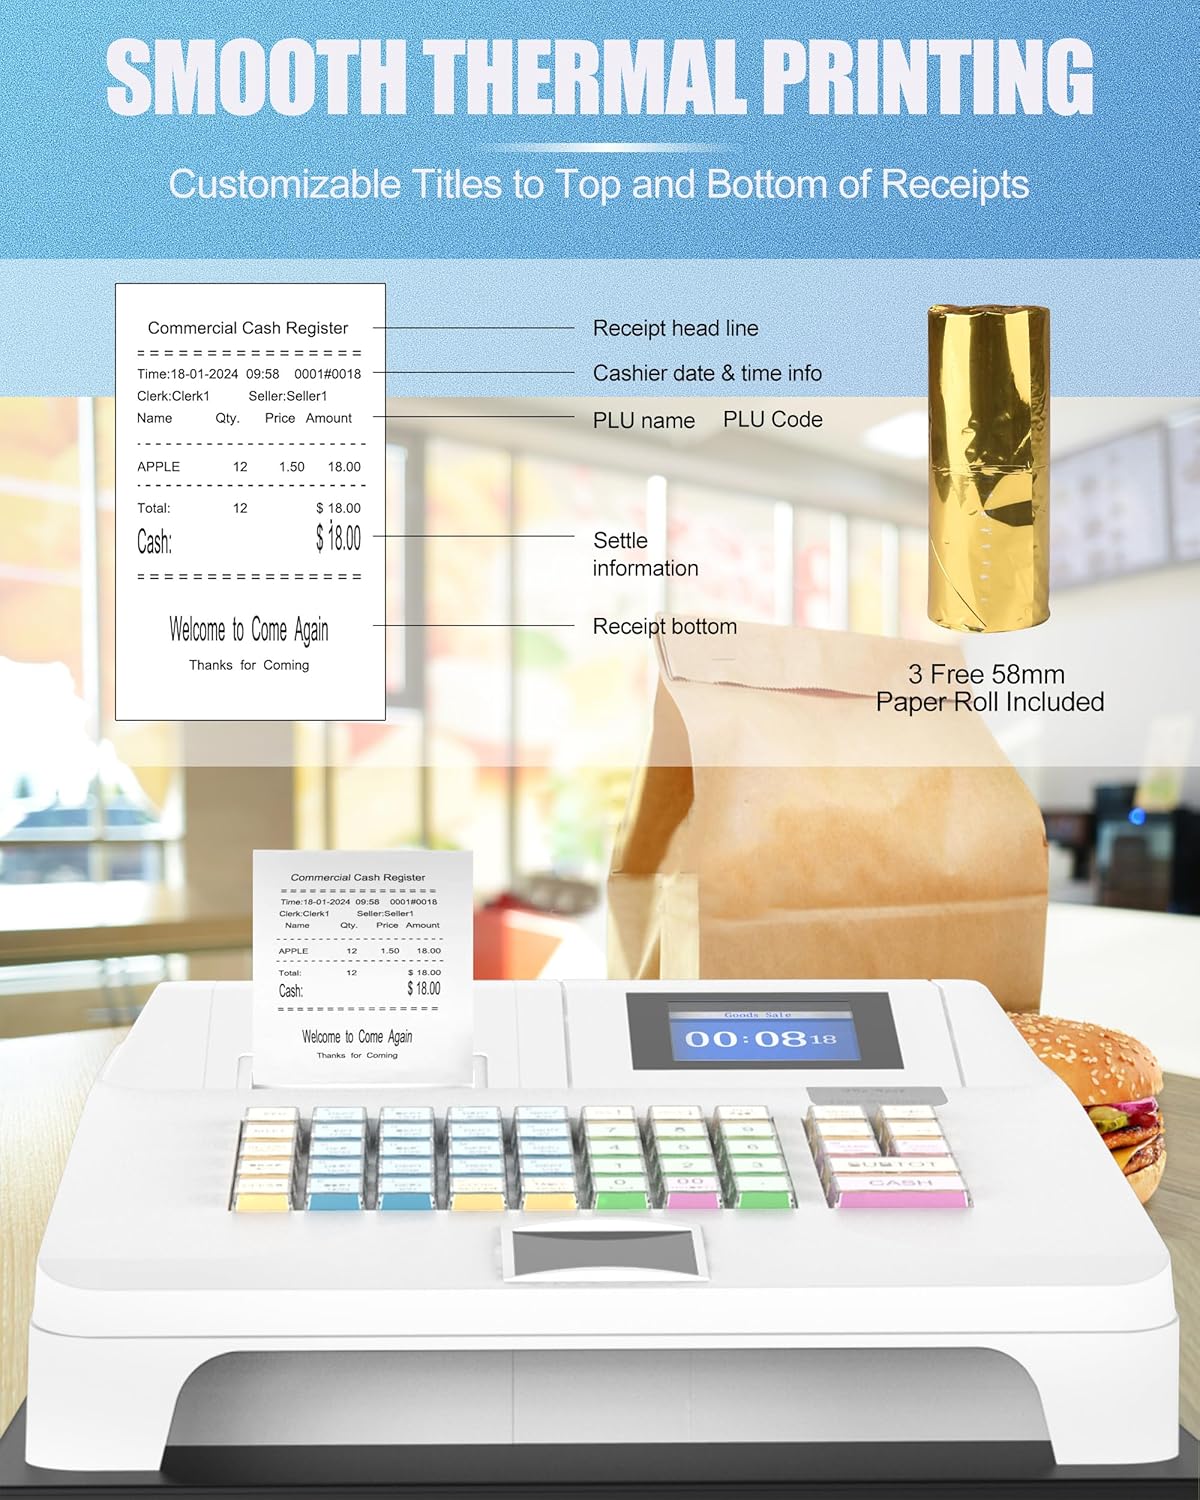
Image: The cash register's thermal printer in action, demonstrating a printed receipt with customizable header and footer.
3.3 Understanding the Keyboard Layout
The keyboard is color-coded for ease of use:
- Blue buttons: Represent departments, which can be used for separate products or as categories.
- Green buttons: Represent product codes, scannable via the integrated scanner.
- Red and Yellow buttons: Function keys for various operations.

Image: A detailed view of the cash register keyboard, illustrating the color-coded keys for departments (blue), product codes (green), and function keys (red and yellow).
4. Operating Instructions
The Perfiware HS1000 cash register offers various programming and operational modes. Use the 'MENU/ZERO' key to access the main menu.
4.1 Programming Departments (DEPT Program)
This process allows you to define and name your product departments.
- Press the 'MENU/ZERO' key.
- Choose 'DEPT' from the menu and press 'SUBTOT'.
- Select 'DEPT Program' and press 'SUBTOT'.
- Enter the desired DEPT number.
- Enter the DEPT Name and Tax Item Number.
- Press 'SUBTOT' to confirm and proceed, then 'CASH' to exit.
Video: A step-by-step demonstration of how to program departments on the Perfiware cash register (0:00-0:14).
4.2 Product Entry (PLU Program)
This section details how to add individual products (PLUs) to your system.
- Press the 'MENU/ZERO' key.
- Choose 'DEPT' from the menu and press 'SUBTOT'.
- Select 'PLU Program' and press 'SUBTOT'.
- Enter or scan the product code and press 'SUBTOT'.
- Enter the product name, DEPT number, price, and inventory information.
- Press 'SUBTOT' to confirm and proceed, then 'CASH' to exit.
Video: A step-by-step demonstration of how to enter product information (PLU Program) on the Perfiware cash register (0:14-0:36).
4.3 Tax Program
Configure tax rates applicable to your sales.
- Press the 'MENU/ZERO' key.
- Choose 'Setting' from the menu and press 'SUBTOT'.
- Select 'Tax Program' and press 'SUBTOT'.
- Enter the number of taxes you wish to configure.
- For each tax, enter its name, rate, and choose whether it is included in the price.
- Press 'SUBTOT' to confirm and proceed, then 'CASH' to exit.
Video: A step-by-step demonstration of how to set up tax programs on the Perfiware cash register (0:36-0:52).
4.4 Binding Tax to Department
Associate specific tax rates with your defined departments.
- Press the 'MENU/ZERO' key.
- Choose 'DEPT' from the menu and press 'SUBTOT'.
- Enter the DEPT number you wish to bind the tax to.
- Enter the tax number you previously set for that department.
- Press 'SUBTOT' to confirm and proceed, then 'CASH' to exit.
Video: A step-by-step demonstration of how to bind tax rates to specific departments on the Perfiware cash register (0:52-1:07).
4.5 Dual Display and Software Integration
The cash register features a 2.8-inch TFT LCD display for the cashier and an 8-digit LED display for customers, ensuring clear transaction visibility.

Image: A close-up of the cash register's dual display system, showing the operator's LCD screen and the customer-facing LED display.
The included inventory management software (provided on CD-ROM) allows for efficient data management, report generation, and machine configuration when connected to a computer via USB.

Image: A user interacting with the Perfiware cash register and its accompanying software interface on a computer, demonstrating data management and reporting capabilities.
5. Maintenance
To ensure the longevity and optimal performance of your Perfiware HS1000 cash register, follow these maintenance guidelines:
- Cleaning: Regularly wipe down the exterior surfaces with a soft, damp cloth. The cash register features a waterproof and oil-proof design, allowing for easy cleaning. Avoid abrasive cleaners or solvents.
- Printer Maintenance: Keep the thermal printer area free of dust and paper debris. Clean the print head gently with a lint-free cloth and isopropyl alcohol if print quality degrades.
- Cash Drawer: Periodically check the cash drawer for smooth operation. Ensure no foreign objects obstruct the drawer mechanism.
- Software Updates: Check the manufacturer's website for any available software updates to ensure your system is running the latest version.

Image: The Perfiware HS1000 cash register highlighting its waterproof and oil-proof design, indicating ease of cleaning.
6. Troubleshooting
This section addresses common issues you might encounter with your cash register.
| Problem | Possible Cause | Solution |
|---|---|---|
| Cash register does not power on. | Power cable not connected; Power outlet issue; Power switch off. | Ensure power cable is securely connected. Test the power outlet with another device. Turn the power switch to the 'ON' position. |
| Receipts are not printing. | Paper roll empty or incorrectly loaded; Printer cover not closed; Print head dirty. | Replace or re-load paper roll correctly. Ensure printer cover is fully closed. Clean the print head as per maintenance instructions. |
| Scanner is not reading barcodes. | Scanner cable loose; Barcode damaged or unreadable; Scanner settings incorrect. | Check scanner cable connection. Try scanning a different, known good barcode. Refer to the software manual for scanner configuration. |
| Cash drawer does not open. | Drawer lock engaged; Obstruction in drawer; Electronic release malfunction. | Ensure the cash drawer is unlocked with the key. Check for any objects blocking the drawer. If the issue persists, contact support. |
7. Specifications
| Feature | Detail |
|---|---|
| Model | HS1000 |
| Brand | Perfiware |
| Package Dimensions | 16.45 x 15.16 x 10.63 inches |
| Item Weight | 13.82 pounds |
| Cash Drawer | 4 Bill Trays, 5 Coin Trays (removable) |
| Operator Display | 2.8-inch Color Display |
| Customer Display | 8-digit LED Display |
| Printer Type | 57mm Thermal Printing |
| External Interfaces | 2x RS232 (for external printer & barcode scanner), 1x USB (for PC software), 1x PS2 (for keyboard) |
| Inventory Management | Free included software |
8. Warranty and Support
Perfiware products are designed for reliability and performance. For warranty information, technical support, or service inquiries, please refer to the contact details provided with your purchase documentation or visit the official Perfiware website. Keep your purchase receipt as proof of purchase for warranty claims.
Ask a question about this manual
Ask about setup, troubleshooting, compatibility, parts, safety, or missing instructions. Manuals+ will review the question and use this page’s manual context to help answer it.