ngnsky Matter Smart Thermostat
ngnsky Matter Smart Thermostat for Electric Heating User Manual
Model: Matter Smart Thermostat
1. Introduction
This manual provides detailed instructions for the installation, operation, and maintenance of your ngnsky Matter Smart Thermostat for Electric Heating. Please read this manual thoroughly before installation and use to ensure proper function and safety.
Key Features:
- Matter Compatibility: Seamless integration with certified smart home platforms like Apple HomeKit and Amazon Alexa.
- LAN Control: Reliable operation even without internet connectivity for Matter-certified devices.
- Energy Saving: Programmable 7-day schedule with 6 phases per day to optimize energy consumption.
- High Accuracy: Precise temperature control with ±1°C (±1°F) accuracy.
- Modern Design: White LED display with capacitive touch buttons, integrated into the wall for a sleek appearance.
- Easy Installation: Designed for straightforward DIY installation.
- Multi-Functional: Includes child lock, Wi-Fi auto-reconnection, clock display, backlight adjustment, and app/voice control.
2. Safety Information
WARNING: Electrical shock hazard. Installation must be performed by a qualified electrician or trained service personnel in accordance with all local and national electrical codes.
- Always disconnect power at the circuit breaker before installing or servicing the thermostat.
- Ensure wiring connections are secure and comply with local electrical codes.
- Do not operate the thermostat with wet hands.
- This thermostat is designed for electric heating systems only. Do not use with other heating types.
- Keep the device away from water and high humidity environments.
3. Package Contents
- ngnsky Matter Smart Thermostat
- User Manual (this document)
- Mounting Screws
4. Product Overview
The ngnsky Matter Smart Thermostat features a minimalist design with a clear LED display and intuitive touch controls.

Figure 4.1: Front view of the ngnsky Matter Smart Thermostat. The display shows the current temperature (26.5°C), time (09:38 AM), and various status icons for heating, home mode, sun (day), lock, Wi-Fi, and schedule.
Display and Controls:
- LED Display: Shows current temperature, set temperature, time, and operational status.
- Capacitive Touch Buttons: For navigation and setting adjustments.
- Icons:
- 🔥 Heating Indicator
- 🏠 Home Mode
- ☀ Day Mode
- 🔒 Child Lock
- ⏱ Clock/Timer
- 📶 Wi-Fi Connectivity
- 📅 Weekly Program
- ⏸ Play/Pause
- ↑ Up Arrow (Increase Value)
- ↓ Down Arrow (Decrease Value)
- ⌛ Settings/Mode
5. Installation and Setup
This section guides you through the physical installation and initial setup of your thermostat.
5.1 Wiring Diagram
The thermostat is designed for 16A electric heating systems. Ensure correct wiring to prevent damage or hazards.
(Note: A detailed wiring diagram is typically provided in the physical manual. Consult a qualified electrician if unsure.)
5.2 Mounting
- Turn off power to the heating system at the circuit breaker.
- Remove the front panel of the thermostat to access the mounting holes.
- Mount the backplate to a standard 86x86mm square electrical box using the provided screws.
- Connect the electrical wires according to the wiring diagram.
- Attach the front panel back onto the mounted backplate.
- Restore power at the circuit breaker.
5.3 Initial Power-On and Wi-Fi Connection
Upon first power-on, the thermostat will enter pairing mode. Follow the instructions in the companion mobile application to connect the thermostat to your Wi-Fi network and integrate it with Matter-compatible smart home platforms.

Figure 5.1: Illustration of APP Remote Control. The image shows a smartphone with the MOES app, demonstrating how to remotely control the thermostat and set temperatures from anywhere.
The thermostat supports Wi-Fi automatic reconnection, ensuring it re-establishes connection after power outages or network interruptions.
6. Operation
6.1 Manual Temperature Control
Use the ↑ (Up) and ↓ (Down) arrow buttons on the thermostat to adjust the desired temperature. The new setting will be displayed and applied immediately.
6.2 Weekly Programmable Function
The thermostat supports a 7-day programmable schedule with 6 distinct time periods per day. This allows for automated temperature adjustments to suit your daily routine and save energy.
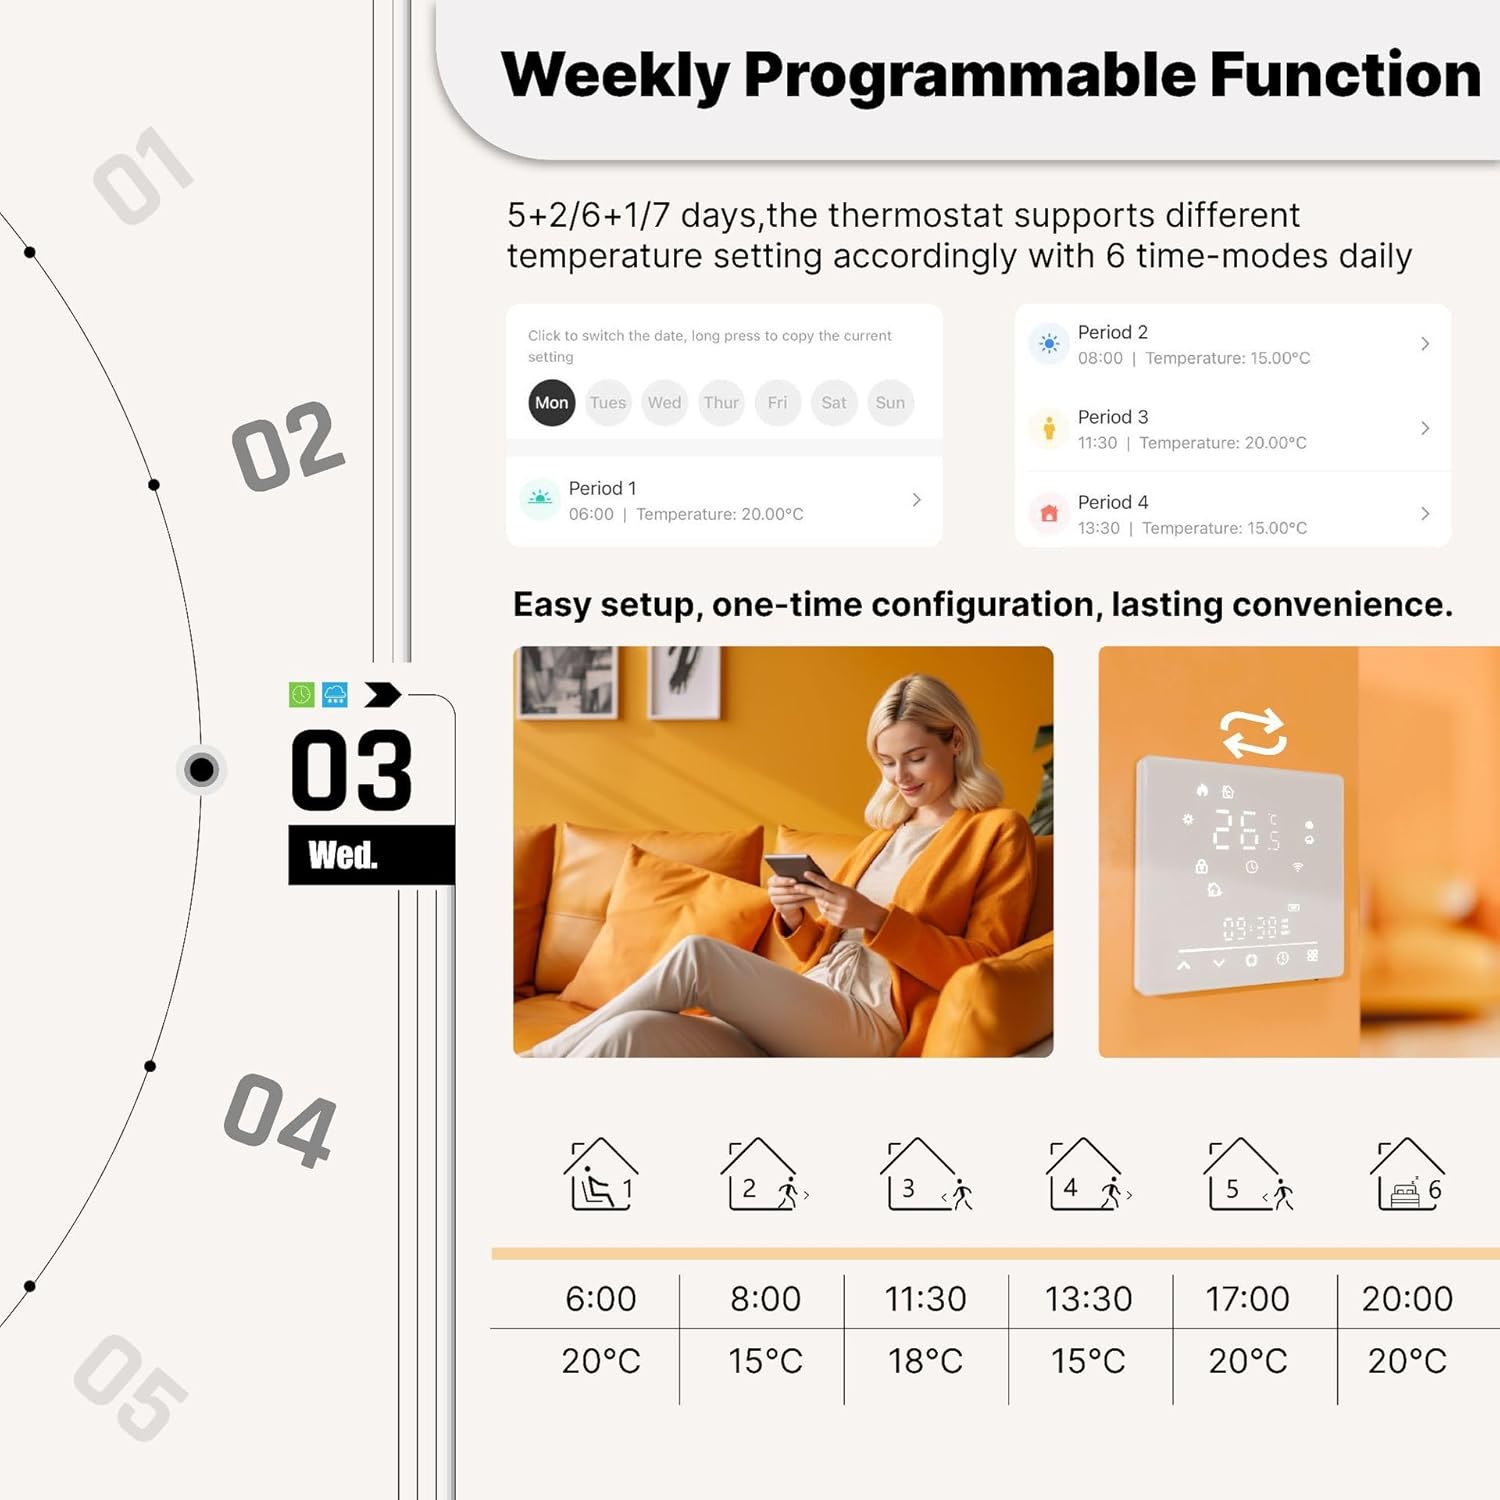
Figure 6.1: Weekly Programmable Function. This image illustrates how to set a 5+1+1 day weekly schedule with 6 time modes daily, showing different temperatures for various periods like morning, day, and evening.
To set the weekly program, access the programming menu via the thermostat's interface or the companion mobile application. You can customize settings for weekdays (5 days), Saturday (1 day), and Sunday (1 day) or a uniform 7-day schedule.
6.3 App Control
Control your thermostat remotely using the dedicated mobile application. This allows you to adjust settings, view current temperature, and manage schedules from anywhere.
Figure 6.2: App Remote Control. The image shows a smartphone with the MOES app, demonstrating how to remotely control the thermostat and set temperatures from anywhere.
6.4 Voice Control
Integrate your thermostat with Amazon Alexa or Apple HomeKit for convenient voice control. Use simple commands to adjust the temperature or check the current status.

Figure 6.3: Voice Control in action. A user is shown controlling the thermostat using voice commands through a smart speaker, illustrating integration with Alexa, Google Assistant, and Siri.
7. Advanced Features
7.1 Child Lock Function
Activate the child lock to prevent accidental changes to settings by children. This feature can be enabled or disabled via the thermostat's settings menu or the mobile application.

Figure 7.1: Child Lock Function. This image shows a child attempting to interact with the thermostat, while a digital shield icon and app screenshot highlight the child lock feature, preventing unintended adjustments.
7.2 Temperature Calibration
If there is a discrepancy between the thermostat's reported temperature and the actual room temperature, you can calibrate the sensor via the mobile application. This ensures the thermostat operates according to your desired comfort level.

Figure 7.2: Temperature Calibration. The image shows the app interface for temperature compensation, allowing users to adjust the thermostat's reading within a range of -9°C to 9°C to match actual room temperature.
7.3 Adjustable Backlight Brightness
The thermostat's backlight brightness can be adjusted from 0% to 100% to suit your preference and environment, ensuring comfortable viewing day or night.

Figure 7.3: Adjustable Backlight Brightness. This image demonstrates the thermostat's backlight adjustment feature, showing the display at 80% brightness for daytime and 10% for nighttime, optimizing for visibility and comfort.
8. Maintenance
- Clean the thermostat's screen and body with a soft, dry cloth. Do not use abrasive cleaners or solvents.
- Ensure the thermostat is free from dust and debris to maintain optimal performance.
- No user-serviceable parts inside. Do not attempt to open or repair the device yourself.
9. Troubleshooting
| Problem | Possible Cause | Solution |
|---|---|---|
| Thermostat not powering on. | No power from circuit breaker; incorrect wiring. | Check circuit breaker. Verify wiring connections. Consult an electrician. |
| No heating. | Thermostat set too low; heating system issue; wiring problem. | Increase set temperature. Check heating system. Verify wiring. |
| Wi-Fi disconnected. | Router off; network issues; incorrect Wi-Fi password. | Check router and internet connection. Re-enter Wi-Fi credentials in the app. |
| Inaccurate temperature reading. | Sensor calibration needed; thermostat location. | Use the temperature calibration feature in the app. Ensure thermostat is not near heat sources or drafts. |
| Cannot control via app/voice. | No Wi-Fi connection; app not linked; incorrect voice commands. | Ensure Wi-Fi is connected. Verify app is linked to thermostat. Use correct voice commands. |
10. Specifications
Technical details for the ngnsky Matter Smart Thermostat.

Figure 10.1: Product Features and Specifications Overview. This image provides a summary of the thermostat's capabilities and technical data.
| Feature | Detail |
|---|---|
| Model Name | Matter Smart Thermostat |
| Brand | ngnsky |
| Power Rating | 95-240VAC, 3600W |
| Current Load | 16A (Electric Heating) |
| Temperature Range (Set) | 5~70°C (41~158°F) |
| Room Temperature Range | 5~35°C (41~95°F) |
| Display Temperature Range | 5~70°C (41~158°F) |
| Accuracy | ±1°C (±1°F) |
| Sensor | NTC3950, 10K |
| Material | PC + ABS (Fireproof), Toughened Glass Surface |
| Screen | LED, Touch Screen |
| Buttons | Capacitive Touch Buttons |
| Storage Humidity | 5 ~ 95%RH (Non-condensation) |
| Install Size | 86x86x35mm Square |
| Control Mode | APP / Manual / Voice |
| Connectivity Technology | Wi-Fi, Matter |
| Certifications | CE, RoHS |
11. Warranty and Support
For warranty information and technical support, please refer to the documentation provided with your purchase or contact ngnsky customer service through their official website or the retailer where the product was purchased.
Please have your product model number (Matter Smart Thermostat) and purchase date available when contacting support.
Ask a question about this manual
Ask about setup, troubleshooting, compatibility, parts, safety, or missing instructions. Manuals+ will review the question and use this page’s manual context to help answer it.