1. Introduction
Thank you for choosing the HanRongDa HRD-757 Multi-Band Radio. This portable radio is designed to provide a comprehensive listening experience with its wide range of supported bands, including FM, AM, MW, SW, V.UHF, AIR, and WB. It also features Bluetooth connectivity, TF card music playback, APP control, an SOS alarm, a flashlight, and an alarm clock function. This manual will guide you through the setup, operation, and maintenance of your new device.
Please read this manual thoroughly before using the radio to ensure proper operation and to maximize its features.
2. Product Overview
Familiarize yourself with the components and controls of your HRD-757 radio.
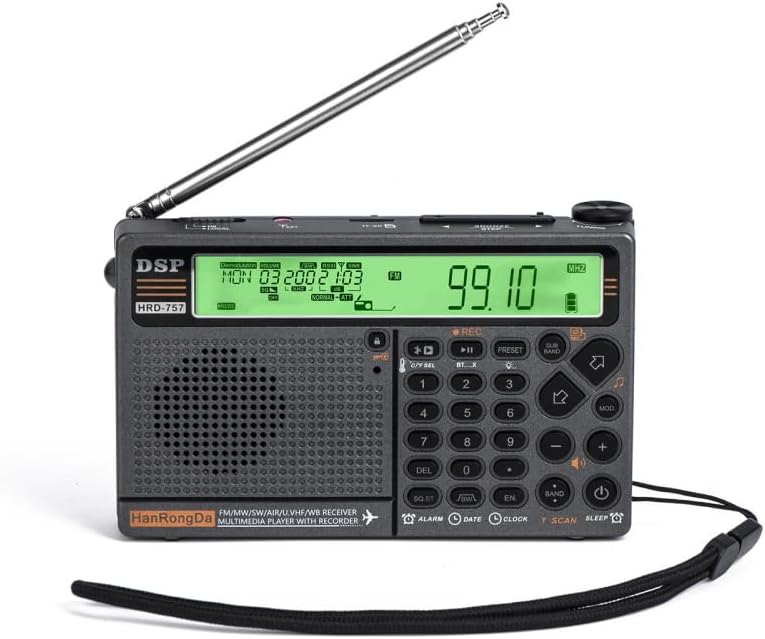
Figure 2.1: Front view of the HRD-757 radio with the telescopic antenna extended, showing the main display and control buttons. The display is illuminated, showing a frequency of 99.10 MHz.

Figure 2.2: Angled view of the HRD-757 radio, providing a perspective of the top panel, front display, and the right side where some ports or controls might be located.

Figure 2.3: Another angled view of the HRD-757 radio, highlighting the top controls and the left side of the device, with the display showing a time and date.

Figure 2.4: Front view of the HRD-757 radio with the antenna extended, showing the full layout of buttons and the speaker grille. The display is not illuminated in this image.

Figure 2.5: Rear view of the HRD-757 radio, displaying the battery compartment cover, product specifications, and QR codes for downloading the companion mobile application.
Package Contents:
- 1 x HanRongDa HRD-757 Multi-Band Radio
- 1 x USB Charging Cable
- 1 x APP Operational Manual (separate guide for app usage)
- 1 x User Manual (this document)
3. Setup
3.1. Charging the Battery
The HRD-757 radio is powered by a built-in 3.7V 2500mAh rechargeable battery. Before first use, fully charge the battery.
- Locate the charging port on the side of the radio.
- Connect the provided USB charging cable to the radio's charging port.
- Connect the other end of the USB cable to a standard USB power adapter (DC 5V, not included) or a computer's USB port.
- The battery indicator on the display will show charging status. Once fully charged, the indicator will typically show a full battery icon.
Note: Ensure the external input voltage is DC 5V to prevent damage to the device.
3.2. Inserting TF Card (Optional)
To use the TF card music playback feature, insert a TF (MicroSD) card (up to 256GB) into the designated slot.
- Locate the TF card slot, usually on the side or bottom of the radio.
- Gently insert the TF card with the metal contacts facing down (or as indicated by a small icon next to the slot) until it clicks into place.
- To remove, gently push the card in again until it springs out.
3.3. Initial Power On
Press and hold the Power button (usually marked with a power symbol) to turn on the radio. The backlit display will illuminate, showing the current time, date, and other information.
4. Operating Instructions
4.1. Radio Operation (FM/AM/MW/SW/V.UHF/AIR/WB)
The HRD-757 supports a wide range of frequency bands. It can store up to 1,000 channels (200 for each band: FM/VHF/AM/SW/AIR).
- Band Switching: Press the BAND button repeatedly to cycle through available bands (FM, AM, MW, SW, V.UHF, AIR, WB).
- Tuning:
- Manual Tuning: Use the tuning knob or the +/- buttons to adjust the frequency incrementally.
- Automatic Scan: Press the SCAN button to automatically scan and store available stations.
- Direct Frequency Input: Use the numeric keypad to directly enter a desired frequency, then press ENTER (or a similar confirmation button).
- Storing Channels:
- Tune to the desired station.
- Press the MEM (Memory) or PRESET button.
- Use the numeric keypad or tuning knob to select a memory location.
- Press MEM/PRESET again to confirm.
- Recalling Stored Channels: Use the numeric keypad to enter the memory location number or use the PRESET +/- buttons to cycle through stored stations.
4.2. Bluetooth (BT) Audio Playback
The radio supports Bluetooth 5.0 for wireless music streaming with a receiving distance of up to 20 meters.
- Press the MODE button until "BT" or "Bluetooth" is displayed on the screen. The radio will enter pairing mode, indicated by a flashing Bluetooth icon.
- On your mobile device (smartphone, tablet, etc.), enable Bluetooth and search for available devices.
- Select "HRD-757" or a similar name from the list of found devices.
- Once paired, the Bluetooth icon on the radio's display will become solid. You can now play audio from your device through the radio.
- Use the radio's Play/Pause, Next/Previous buttons to control playback, or control directly from your paired device.
4.3. TF Card Music Playback
Play music files directly from a TF card (up to 256GB) supporting MP3, WMA, WAV, APE, and FLAC formats.
- Ensure a TF card with music files is inserted (refer to Section 3.2).
- Press the MODE button until "TF" or "Card" is displayed. The radio will automatically begin playing music from the card.
- Use the Play/Pause, Next/Previous buttons to navigate through your music.
4.4. APP Control
Control your HRD-757 radio remotely using a dedicated mobile application (supports Android and Harmony OS) within 20 meters.
- Download the official "Radio-c" app (for Android) or "Radio-ct" app (for iOS/Harmony) by scanning the QR codes on the back of the radio or referring to the separate APP Operational Manual.
- Ensure Bluetooth is enabled on your mobile device and the radio is powered on.
- Open the app and follow the on-screen instructions to connect to your HRD-757 radio via Bluetooth.
- Once connected, you can use the app to switch bands, change modes, tune frequencies, and access other radio functions remotely.
4.5. Alarm Clock and Sleep Timer
The radio features a customizable alarm clock and a sleep power-off timer.
- Setting Alarm Clock:
- Press the ALARM button.
- Use the numeric keypad or +/- buttons to set the desired alarm time.
- Press ALARM again to confirm.
- Choose from two available ringtones.
- Two modes of scheduled power-on and scheduled alarm clock can be set.
- Setting Sleep Timer:
- Press the SLEEP button.
- Repeatedly press SLEEP to cycle through preset sleep times: 120, 110, 100, 90, 80, 70, 60, 50, 40, 30, 20, and 10 minutes.
- The radio will automatically power off after the selected duration.
4.6. SOS Alarm and Flashlight
The HRD-757 includes emergency features for safety.
- SOS Alarm: Press and hold the SOS button (if available, or a combination of buttons as per the device markings) to activate a loud emergency alarm sound.
- Flashlight: Locate the flashlight button or switch (often on the side of the unit) to turn the integrated flashlight on or off.
5. Specifications
| Feature | Specification |
|---|---|
| Receiving Range | FM: 64.0-108.0 MHz MW: 520-1710 KHz SW: 3.20-30.0 MHz V.UHF: 25.0-999.0 MHz AIR: 118.0-138.0 MHz WB: 162.400-162.550 MHz |
| Quiescent Current | <70uA |
| Max Current | <750mA |
| Speaker | D40mm/4Ω/3W |
| Number of Channels Stored | 1,000 in total (200 per band for FM/VHF/AM/SW/AIR) |
| Bluetooth Version | 5.0 |
| Bluetooth Receiving Distance | 20m |
| Operating Voltage | 3.4V |
| External Input Voltage | DC 5V |
| Battery Capacity | 3.7V 2500mAh |
| TF Card Play Format | MP3, WMA, WAV, APE, FLAC |
| Max Memory of TF Card | 256GB |
| Product Material | ABS |
| Product Size | Approx. 138.3 x 86.5 x 30.7 mm (5.44 x 3.40 x 1.21 in) |
| Product Weight | Approx. 250g (8.81 oz) |
6. Maintenance
- Cleaning: Use a soft, dry cloth to clean the radio's surface. Do not use abrasive cleaners, solvents, or strong chemicals, as they may damage the finish.
- Storage: When not in use for extended periods, store the radio in a cool, dry place away from direct sunlight and extreme temperatures.
- Battery Care: To prolong battery life, avoid fully discharging the battery frequently. Recharge the battery regularly, even if the radio is not in active use.
- Antenna: Handle the telescopic antenna with care to prevent bending or breaking. Extend it fully for optimal reception.
- Water Exposure: This radio is not waterproof. Avoid exposing it to water, rain, or high humidity.
7. Troubleshooting
| Problem | Possible Cause | Solution |
|---|---|---|
| Radio does not power on. | Battery is depleted. | Charge the radio using the provided USB cable. |
| Poor radio reception. | Antenna not extended; weak signal; interference. | Fully extend the telescopic antenna. Try repositioning the radio. Move away from electronic devices that may cause interference. |
| Bluetooth not connecting. | Radio not in pairing mode; device Bluetooth off; out of range. | Ensure radio is in BT pairing mode. Turn on Bluetooth on your device. Move device closer to the radio (within 20m). |
| TF card music not playing. | TF card not inserted correctly; unsupported file format; corrupted files. | Reinsert the TF card. Ensure music files are in MP3, WMA, WAV, APE, or FLAC format. Try another TF card or reformat the current one. |
| APP control not working. | App not connected; Bluetooth issue; incorrect app version. | Ensure the app is connected via Bluetooth. Restart the app and radio. Verify you have the correct app version for your OS. |
8. Warranty and Support
This product comes with a standard manufacturer's warranty. For specific warranty terms and conditions, please refer to the documentation provided at the time of purchase or contact your retailer.
For technical support, troubleshooting assistance beyond this manual, or inquiries regarding replacement parts, please contact the seller or manufacturer directly. Contact information can typically be found on the product packaging or the retailer's website.
Please retain your purchase receipt as proof of purchase for warranty claims.