1. Introduction
This manual provides essential information for the safe and correct installation, maintenance, and troubleshooting of the Generic Replacement Bake Element, part number WPW10207398. This element is designed as a compatible replacement for specific KitchenAid Wall Oven models, including KOSC504ESS00. Please read all instructions carefully before proceeding with any installation or maintenance.
Note: Appliance repair should only be performed by qualified individuals. Always disconnect power before servicing.
2. Safety Information
- Electrical Hazard: Always disconnect power to the oven at the circuit breaker or fuse box before attempting any repair or installation. Failure to do so can result in serious injury or death.
- Burn Hazard: Oven elements can retain heat for a significant period after use. Ensure the oven is completely cool before handling any internal components.
- Personal Protective Equipment: Wear appropriate safety gear, such as gloves and eye protection, during installation.
- Professional Installation: If you are unsure about any step, consult a qualified appliance technician.
- Part Verification: Double-check that the replacement part matches the original element and is compatible with your oven model before installation.
3. Compatibility
This replacement bake element (Part Number: WPW10207398) is compatible with KitchenAid Wall Oven Model KOSC504ESS00. It is crucial to verify your oven's model number and the original part number to ensure correct fitment and function. Refer to your oven's owner's manual or the manufacturer's specifications for exact part requirements.
4. Installation Instructions
The following steps outline a general procedure for replacing a bake element. Specific oven models may vary. Always refer to your oven's service manual for detailed instructions.
- Disconnect Power: Turn off the power to the oven at the main circuit breaker or fuse box. Confirm power is off by attempting to turn on the oven light or controls.
- Access Oven Interior: Open the oven door and locate the bake element at the bottom of the oven cavity.
- Remove Mounting Screws: Using a screwdriver, carefully remove the screws that secure the bake element to the back wall of the oven.
- Gently Pull Element Forward: Carefully pull the element forward a few inches into the oven cavity. This will expose the electrical terminals at the back.
- Disconnect Wires: Note the position of the wires connected to the element terminals. Disconnect the wires from the old element. It is recommended to take a photo for reference. Ensure the wires do not retract into the back wall.
- Remove Old Element: Once wires are disconnected, remove the old bake element from the oven.
- Install New Element: Connect the wires to the terminals of the new WPW10207398 bake element. Ensure connections are secure.
- Secure New Element: Carefully push the new element into place, aligning the mounting brackets with the screw holes. Reinstall the mounting screws.
- Restore Power: Close the oven door. Restore power to the oven at the circuit breaker.
- Test Functionality: Turn on the oven to a bake setting and observe if the new element heats up properly.

Figure 1: Overview of the Generic Replacement Bake Element WPW10207398. This image shows the full element, illustrating its characteristic 'M' shape and mounting brackets.
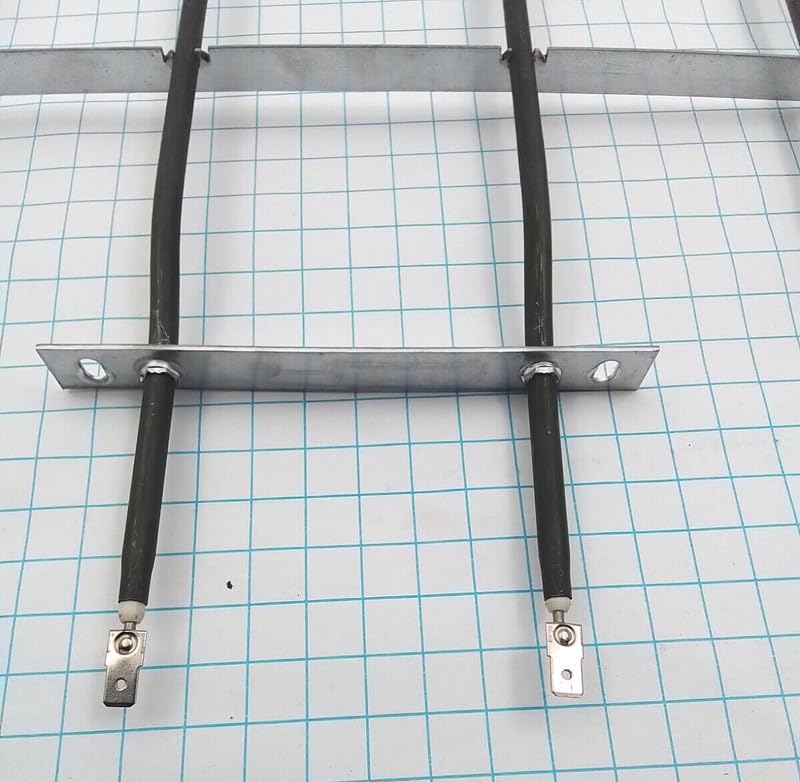
Figure 2: Close-up view of the electrical terminals on the bake element. These terminals are where the oven's wiring connects to supply power to the element.

Figure 3: Detailed view of a bend in the bake element tubing and one of its support brackets. These brackets help secure the element within the oven cavity.
5. Operating Instructions
This replacement bake element is a component of your oven and does not have separate operating instructions. Its function is to heat the oven cavity when the oven is set to a bake cycle. Refer to your KitchenAid Wall Oven's owner's manual for specific operating instructions for your appliance.
6. Maintenance
The bake element itself requires minimal maintenance. However, regular inspection can help prolong its lifespan and ensure optimal oven performance.
- Visual Inspection: Periodically inspect the element for any signs of damage, such as cracks, blisters, or visible breaks. If damage is observed, the element should be replaced.
- Cleaning: Avoid direct contact with cleaning agents. If food spills occur on the element, allow the oven to cool completely, then gently wipe away any residue. Do not use abrasive cleaners or sharp objects, as these can damage the element's surface.
- Secure Connections: During other oven maintenance, ensure the electrical connections to the element remain secure.
7. Troubleshooting
If your oven is not heating correctly after replacing the bake element, consider the following troubleshooting steps:
- No Heat: If the oven does not heat at all, first check the circuit breaker to ensure power is supplied to the oven. Verify that the element is properly connected to the electrical terminals.
- Uneven Heating: If the oven heats unevenly, ensure the element is fully seated and secured in its mounting brackets. A faulty temperature sensor or control board could also be a cause, which is beyond the scope of this element replacement.
- Element Not Glowing: A properly functioning bake element should glow red when heated. If it does not glow, or only partially glows, it may indicate a faulty element or an issue with the electrical supply.
- Sparking/Burning Smell: Immediately disconnect power if you observe sparking or a burning smell. This could indicate a short circuit or improper installation.
For persistent issues, it is recommended to consult a qualified appliance technician.
8. Specifications
- Part Number: WPW10207398
- Compatible Oven Model: KitchenAid KOSC504ESS00
- Manufacturer: Generic
- Item Package Quantity: 1 Set
- ASIN: B0F635CJH4
9. Warranty and Support
Warranty information for this Generic replacement part is not provided in the product details. For any warranty claims or technical support, please contact the seller or retailer from whom the part was purchased. Keep your purchase receipt as proof of purchase.
